Inspection Form
Creating the Inspection Form
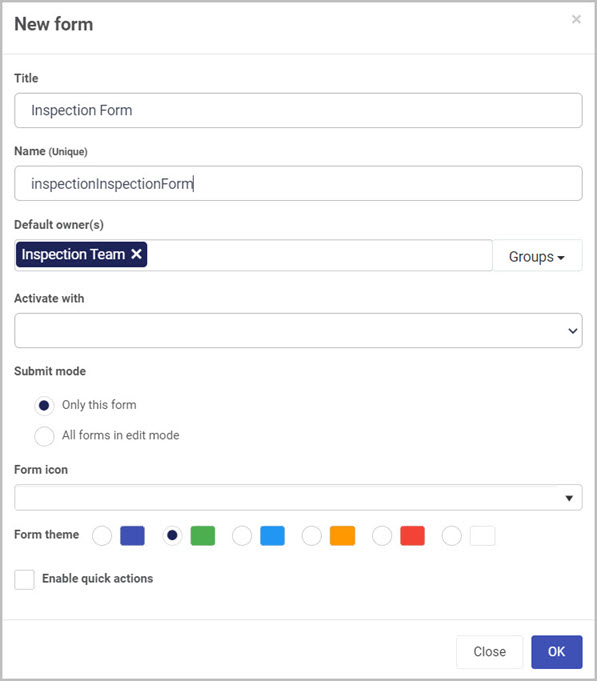
To begin this example of creating an Inspection Form, we need to add a new form to our process.
-
From the process creation page, click on Add form. This can be found at the top of your screen.

-
Title - Name to represent this form. In our case we will call it Inspection Form.
-
Name (unique) - A unique identifier for our form. You can give this any name you would like as long as it’s unique.
-
Default owner(s) - This field identifies which users can fill out our form when it’s complete. In our case we will choose from Groups and choose our Management Team. To learn more about how to create groups in Kianda go to creating groups.
-
Activate with - Means that the form can be activated with other forms within the process, so they can be edited at the same time. This means several forms become the current form in a form group. In our case we will leave this blank.
-
Submit mode - This option means that when a process instance is running you can choose only this form to be submitted, or you can choose all forms in edit mode meaning that several forms could have their details submitted or saved. Choose Only this form radio list.
-
Form icon - Dropdown field to select an icon for the form.
-
Form theme - This option is used to change the colour of the form tile, for example Green.
-
Enable quick actions - if you tick the checkbox, you can select from the options a) Enable re-assign b) Enable edit and c) Enable custom action. We will leave this box unchecked.
-
-
Click on the OK button when you are finished editing to save your changes or click on Close to exit the dialog box without saving.
-
To save your changes to the form, click on the Save button

Creating Form Fields
Taking a look back at our requirements, on the Inspection Form there is five different fields which will be used to complete an inspection along with five inner fields for our table:
- Date - Representing the day of the inspection.
- Inspection checklist - Checklist that will be filled out by an Engineer.
- Question - Question asking the engineer to make a check on the inspection.
- Pass or fail - Radio list with a yes or no indicating whether a check is passed or failed.
- Comment - Text box used by the engineer for any comments on a check.
- Upload file - Upload file button used to upload an image.
- Image - Image container that contains the uploaded image.
- Utility panel - An invisible to the user panel used to hold our word template and generated PDF file.
- Upload template - Word template used to create a PDF file.
- Generated PDF - File field to hold our generated PDF.
Creating a Date field - Date
The Date field represents the day, month and year of our inspection. To learn more about Date fields, go to Date Control.
-
To add a Data field, first select the Inspection Form so that the edit or pen icon
 appears.
 -
Click on Controls in the left-hand pane to expand the Controls menu.
-
Select Input to view the range of Input controls.
-
Click on Date.
-
Select the Date field so that the edit or pen icon
appears. -
Click on the edit or pen icon
to open the Edit field dialog box.
-
Change the Title to Date.
-
Chane the Name (unique) to a unique identifier.
-
Click on OK on the Edit field dialog box.
Creating a Table field - Inspection Checklist
The Inspection Checklist will be used by an engineer to fill out. Inside of the table we need to have five different columns. First column will be a text box representing a check that our engineer must complete. Second column will be our passed radio list of Yes and No options. Third column is another text box for any comments that the engineer might have. Forth column is a File upload field to upload any images. Our last, fifth column is the Image container to hold the uploaded image. To learn more about Table input, go to Table control.
-
To add a Table field, first select the Inspection Form so that the edit or pen icon
appears. -
Click on Controls in the left-hand pane to expand the Controls menu.
-
Select Input to view the range of Input controls.
-
Click on Table.
-
Select the Table field so that the edit or pen icon
appears. -
Click on the edit or pen icon
to open the Edit field dialog box.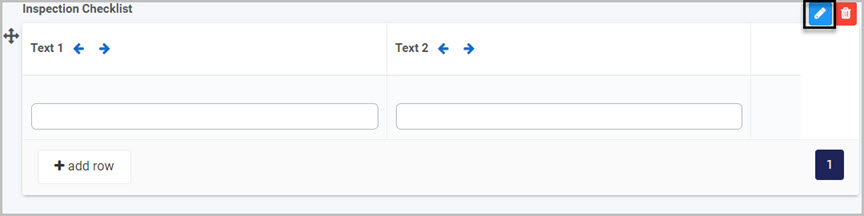
-
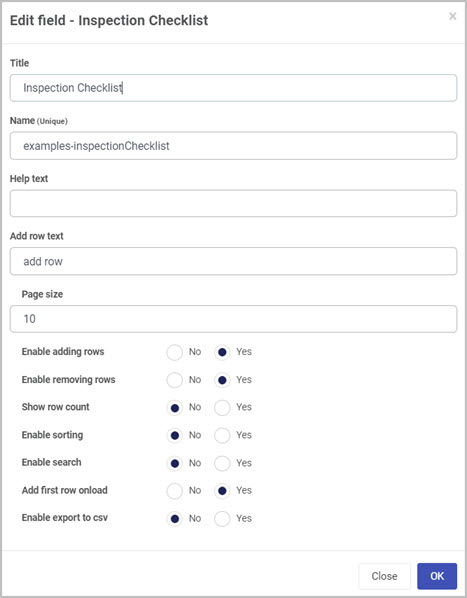
Change the Title to Inspection Checklist.
-
Chane the Name (unique) to a unique identifier.
-
Click on OK on the Edit field dialog box.
Changing the Table layout
When adding a table in Kianda, the table has two text boxes inside by default. We will leave them in as we’ll be using them for our Question and Comment fields.
Changing Text box field - Question
The Question field represents what kind of check the engineer must complete. This field will be disabled so that the users of this form will not be able to change the contents of the question.
-
Click on the left text box inside of the table so that the edit or pen icon
appears.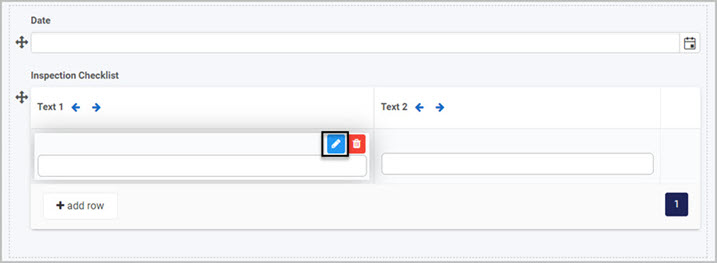
-
Click on the edit or pen icon
to open the Edit field dialog box. -
Change the Title to Question.
-
Chane the Name (unique) to a unique identifier.
-
Click on OK on the Edit field dialog box.
-
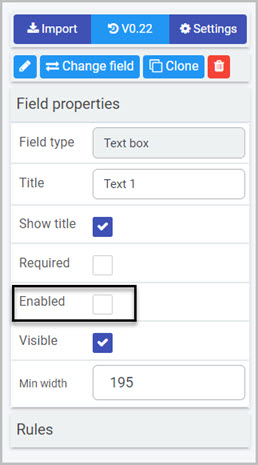
Click on Field properties in the right-hand pane.
-
Click on the Enabled checkbox to uncheck it.
Adding Radio List to a table - Passed field
The Radio list is a List type from the Input set of fields. We will enter the options manually and set the field to be of type radio. To find out more about radio lists, go to List Control.

-
To add a Radio list, first select the Question field in the checklist table so that the edit or pen icon
appears. -
Click on Controls in the left-hand pane to expand the Controls menu.
-
Select Input to view the range of Input controls.
-
Click on List.
-
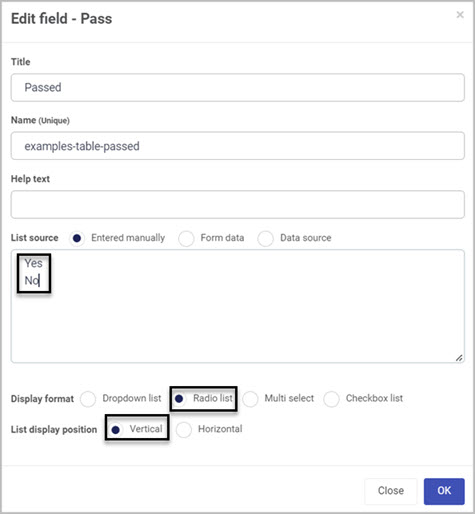
In the New field - List dialog box, change the Title to Passed.
-
Select Entered manually in the List source options.
-
Type in Yes and No in the text box as shown in the image below.
-
Select Radio list from the Display format options.
-
Select Vertical in the List display position.
-
Click on OK on the Edit field dialog box.
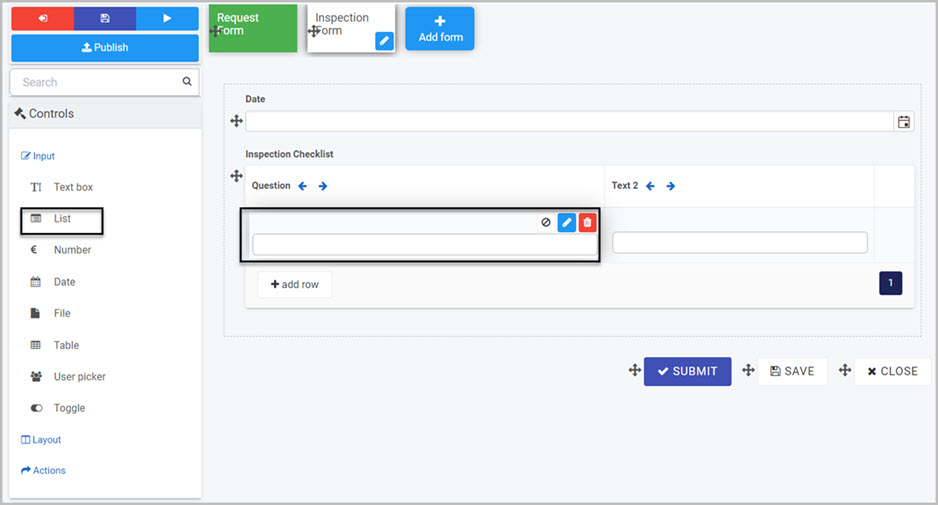
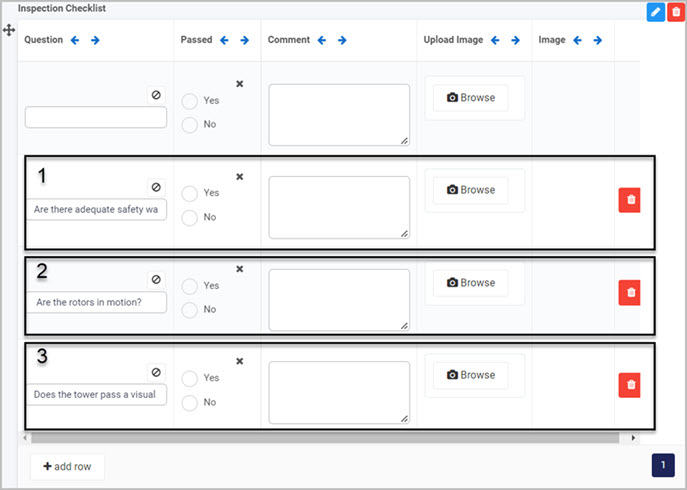
The image below shows how the Inspection Checklist should look so far. You can move the table fields with the left and right arrows above each field. Note the crossed circle above the question text box, this indicated that this field is disabled and will not be editable by an user of the form.

Changing Text box field - Comment
The Comment field gives the ability to type in a comment on any of the checks performed by the engineer. We will use the Text 2 field which is automatically created in when adding the Table field.
-
Click on the right Text 2 inside of the table so that the edit or pen icon
appears.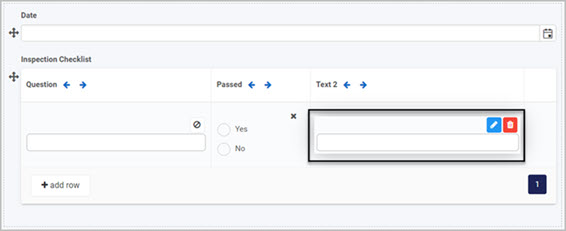
-
Click on the edit or pen icon
to open the Edit field dialog box. -
Change the Title to Comment.
-
Chane the Name (unique) to a unique identifier.
-
In the Mode options, select Multiple lines of text. Selecting Multiple lines of text adds another option called Rows. To learn more about text box options, go to Text box control.
-
Click on the Rows option and type “3” or use the up arrow to increase and down arrow to decrease.

-
Click on OK on the Edit field dialog box.
Adding a File field - Upload Image
The Upload Image field allows the engineer to upload an image into our form and into a specific check within the checklist. From the File options, we need to save the uploaded file in our database, for example SharePoint, this database needs to be pre-created. To learn more about File input go to File upload control.
-
To add a File field, first select the Comment field in the checklist table so that the edit or pen icon
appears. -
Click on Controls in the left-hand pane to expand the Controls menu.
-
Select Input to view the range of Input controls.
-
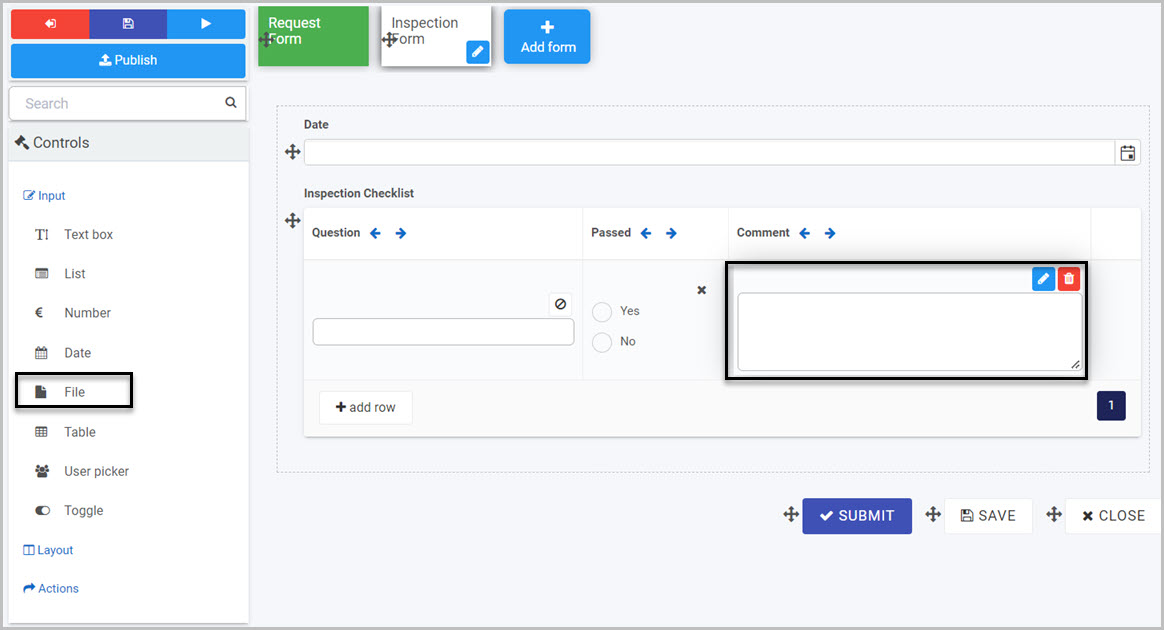
Click on File.
-
Change the Title to Upload Image.
-
Chane the Name (unique) to a unique identifier.
-
Click on Destination
 to open datasource dialog box.
 -
Select your desired location to save the file.
-
Click on OK on the Datasource dialog box.
-
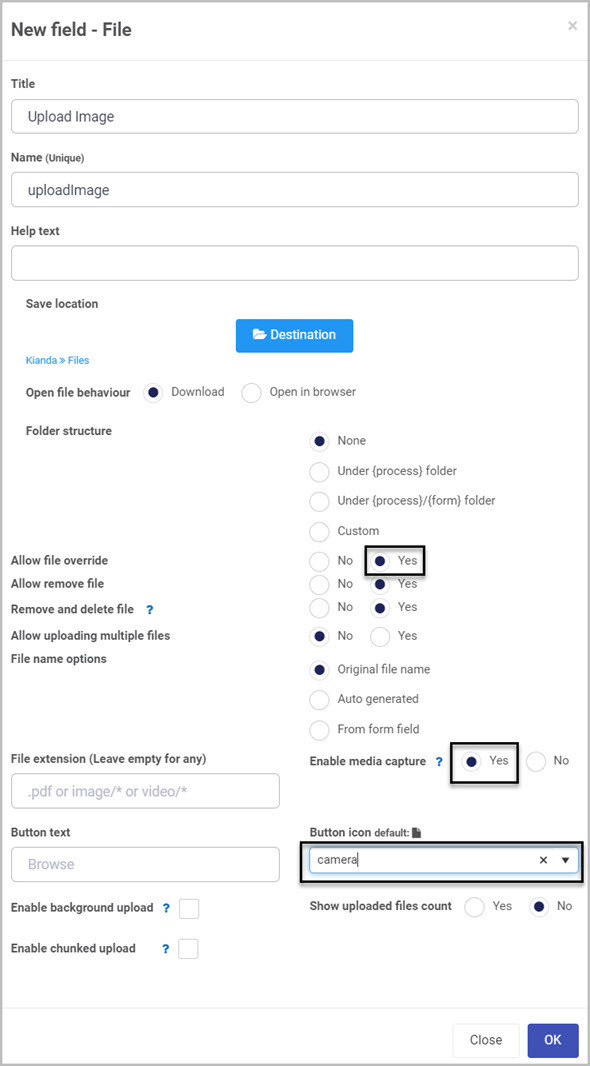
With the Allow file override option you can choose whether or not to allow file override. If you choose ‘Yes’, if a user goes back into the form and uploads another file to the File upload field, this will override the original file they had uploaded. This option works in conjunction with the Allow uploading multiple files option - if you choose to allow multiple files to be uploaded, then the ‘Allow file override’ option is no longer relevant (as uploading more files will not override file/files already uploaded). We will choose Yes for our process.
-
With the Enable media capture if you choose Yes, this enables the user to capture media to upload - on a mobile device, when the user clicks on the Upload button their camera/video recorder will open (depending on whether you’ve selected the file extension to be image or video). We will choose Yes for our process.
-
Button icon by default, the file upload icon is
 but you can change this by clicking the Button icon drop-down menu and choosing a different icon from the large range of icons available. We will choose a camera icon for our process.
 -
Click on OK on the New field - File dialog box.
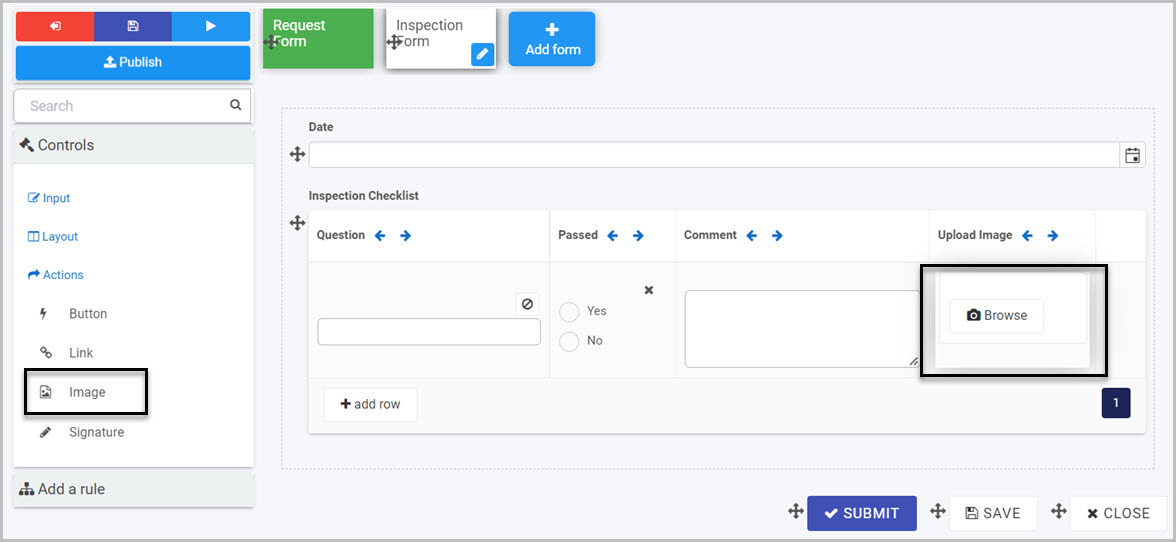
Adding an Image field - Image
The Image field is used for holding an image. In our case we will use this field to hold the image that is uploaded by the engineer during the inspection. To learn more about Image fields, go to Image control.
-
To add an Image field, first select the Upload Image field in the checklist table so that the edit or pen icon
appears. -
Click on Controls in the left-hand pane to expand the Controls menu.
-
Select Actions to view the range of Action controls.
-
Click on Image.
-
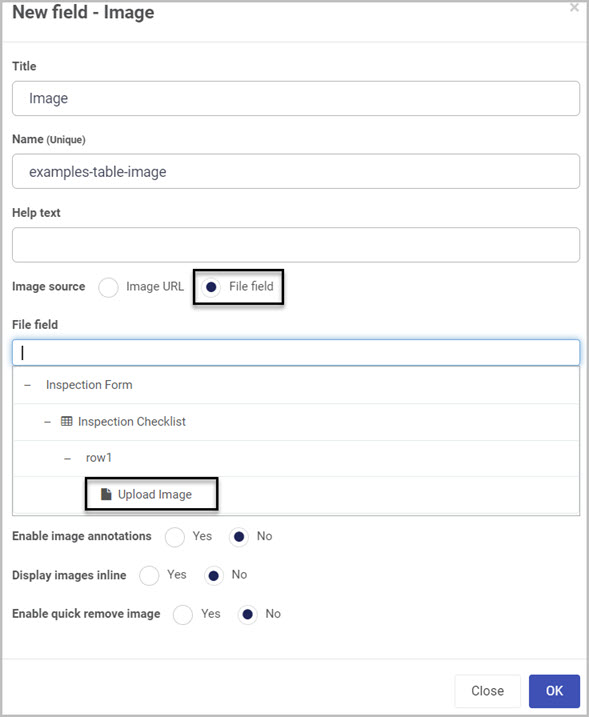
Change the Title to Upload Image.
-
Chane the Name (unique) to a unique identifier.
-
Select File field from the Image source option, from the Inspection Form drill down and select Upload Image.
-
In the Image max height and Image max width type in 100.
-
Click on OK on the New field - Image dialog box.
Adding rows to Table - Checklist
We have now created all fields needed for our Inspection Checklist. The First row we created is a template for all other rows and will NOT be visible and editable by a user of the form. To learn more about Tables, go to Table control. In our Table we will have three different checks that we need our engineer to complete therefore we will add three rows.
-
To add a row click on Add Row.
-
Repeat step 1 two more times to have three rows. You can delete a row by clicking the red trash
 on the right-hand side of the row.
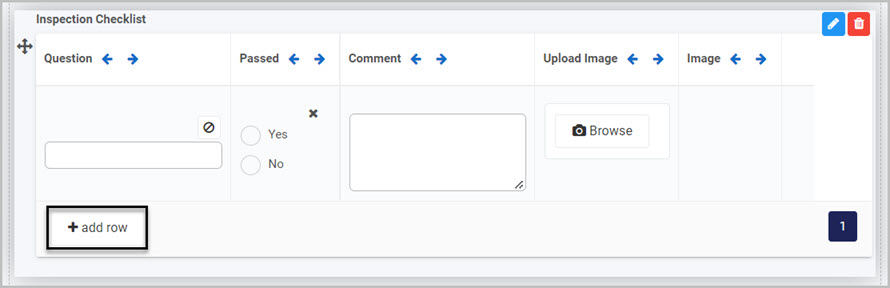
-
In the First row of the Question field type in Are there adequate safety warnings?
-
In the **Second **row of the Question field type in Are the rotors in motion? in the Question field.
-
In the Third row of the Question field type in Does the tower pass a visual inspection? in the Question field.
Disabling row adding and removing
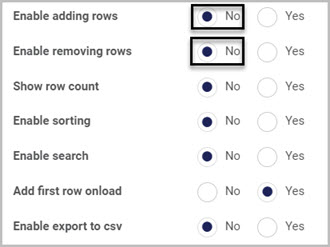
For our Inspection Form we will disable row adding and row removing from the Checklist. This will prevent the engineer to add and remove rows from the checklist when he is completing the inspection.
-
Select the Table so that the edit or pen icon
appears. -
Click on the edit or pen icon
to edit the Table. -
Select No on the Enable adding rows option.
-
Select No on the Enable removing rows option.
-
Click on OK on the Edit field dialog box.
Creating a Utility panel
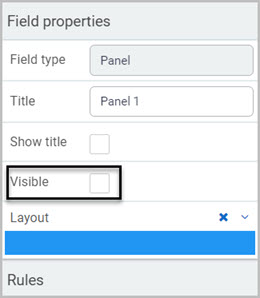
The utility panel will hold our word document template and the generated PDF file of our inspection. First we need to create a utility panel and make it invisible to the user. Utility panels are useful in processes as they can act as containers for information or data that are used with in a process but not seen by other users.
Adding a Panel field
-
To add a Panel field, first select the Inspection Form so that the edit or pen icon
appears. -
Click on Controls in the left-hand pane to expand the Controls menu.
-
Select Layout to view the range of Layout controls.
-
Click on Panel.
-
Select the Panel field so that the edit or pen icon
appears. -
Click on Field properties in the right-hand pane.
-
Click on the Visible checkbox to uncheck it.
-
Click on the edit or pen icon
to edit the Panel. -
Change the Title to Utility panel.
-
Chane the Name (unique) to a unique identifier.
-
Click on OK on the Edit field dialog box.
Adding a File field - Upload template
The Upload template is a File field. This field will be used to upload a word document which will be the template for creating the PDF file.
-
To add a File field into the Panel, first select the Panel field so that the edit or pen icon
appears.
-
Click on Controls in the left-hand pane to expand the Controls menu.
-
Select Input to view the range of Input controls.
-
Click on File.
-
Change the Title to Upload template.
-
Chane the Name (unique) to a unique identifier.
-
Click on Destination
to open datasource dialog box. -
Select your desired location to save the file.
-
Click on OK on the Datasource dialog box.
-
Click on OK on the Edit field dialog box.
Adding a File field - Generated PDF
The Generated PDF file is a File field which is used to hold our PDF from the above template.
-
To add a File field into the Panel follow steps 1 through 4 in the above Adding a file - Upload template section.

-
Change the Title to Generated PDF.
-
Chane the Name (unique) to a unique identifier.
-
Click on Destination
to open datasource dialog box. -
Select your desired location to save the file.
-
Click on OK on the Datasource dialog box.
-
Click on OK on the Edit field dialog box.
Creating a Word template
You can generate reports within Kianda processes and populate the reports with data captured within each process instance. We will be generating a PDF file for inspection reports where a report template can be used to show the information the engineer input to a Kianda form during his inspection. Each time an inspection is performed, a report is generated based on a Word template and the report shows the relevant information that was captured during that particular inspection.
To learn more on how to create the Word template using Kianda Add-in in Word go to Kianda Add-in to watch a short video going through the process step by step. Alternatively you can also go through the steps of learning the process by going to Word document add-in.
Adding rules to Submit button
To take a look back at our requirements for our Inspection form, we need 3 rules for the Submit button.
- Set status to Complete - Sets the status field that we created to “Complete”.
- Generate a PDF using word template - Generates a PDF file using a word template which we created using the Kianda Add-in.
- Send email to Safety Manager - Sends an email to the selected user from the Safety Manager field from our Request form.
Creating a Set form field rule - Set status to Completed
With this rule we will be setting our Status field to “Completed”. We will be using the Set form field rule from the Data set of rules.
-
Select the Submit button by clicking on it so that the edit or pen icon
appears. -
In the Left-hand pane click on Add a rule.
-
Click on Data.
-
Select Set form field.
-
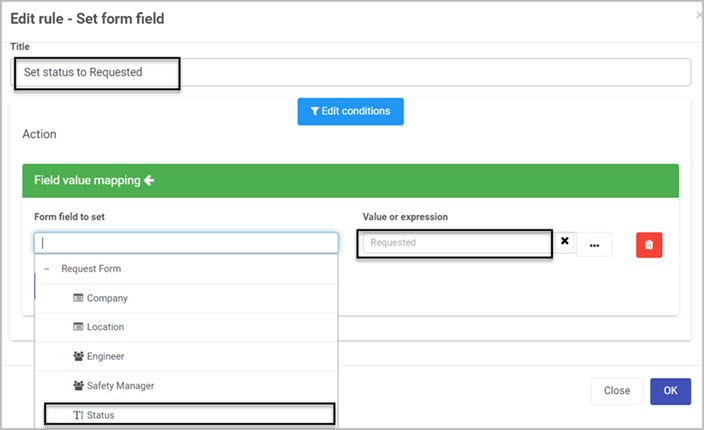
In the Edit rule dialog box, change the Title to “Set status to Completed”
-
Click on Form field to set dropdown.
-
Under the Request Form select Status field.
-
In the Value or expression box, type Completed.
-
Click on OK button to save rule.
-
With the Submit button selected, in the Right-hand pane click on the Rules.
-
The Set status to Completed is under the Close rule. Drag and drop the Set status to Completed rule to the top of the list.
Creating a Generate word document rule - Generate PDF using word template
-
Select the Submit button by clicking on it so that the edit or pen icon
appears. -
In the Left-hand pane click on Add a rule.
-
Click on File Management.
-
Select Generate word document.
-
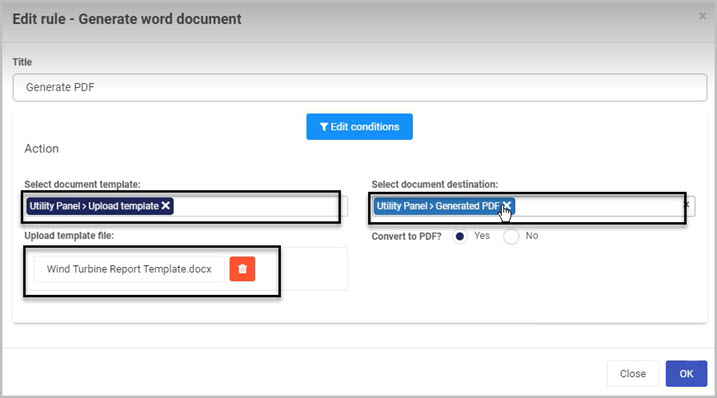
In the Edit rule dialog box, change the Title to “Generate PDF using word template”
-
In the Select document template option, select Upload template field.
-
In the Select document destination option, select Generated PDF field.
-
In the Upload template file, brows for the created word template file.
-
Click on OK in the Edit rule dialog box.
-
Move the Generate PDF using word template rule under the Set status to Completed rule.
Creating a Send email rule - Send email to Safety Manager
This rule will be used to send an email to the selected Safety Manager. We will be using the Send email rule from the Communications set of rules. In this rule we will add expressions, to learn more go to Expressions.
-
Select the Submit button by clicking on it so that the edit or pen icon
appears. -
In the Left-hand pane click on the Add a rule tab.
-
Click on Communications.
-
Select Send email.
-
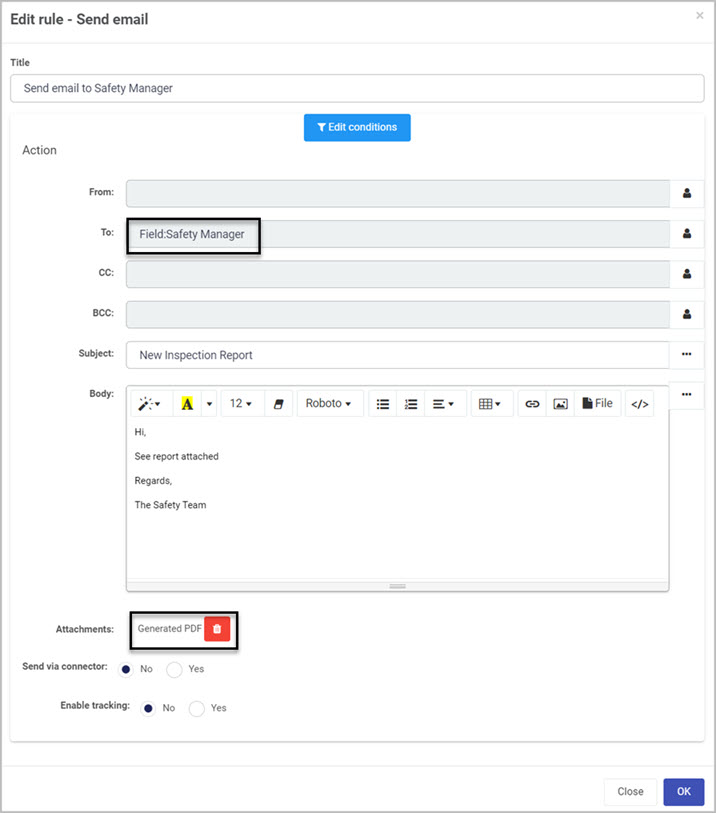
In the Edit rule box, change the Title to “Send email to Safety Manager”
-
Click on the person icon
 on the To: part of the email.
 -
In the Select email users box select the User(s) defined in a user field radio button.
-
In the Select a user field select Safety Manager from the Request form.
-
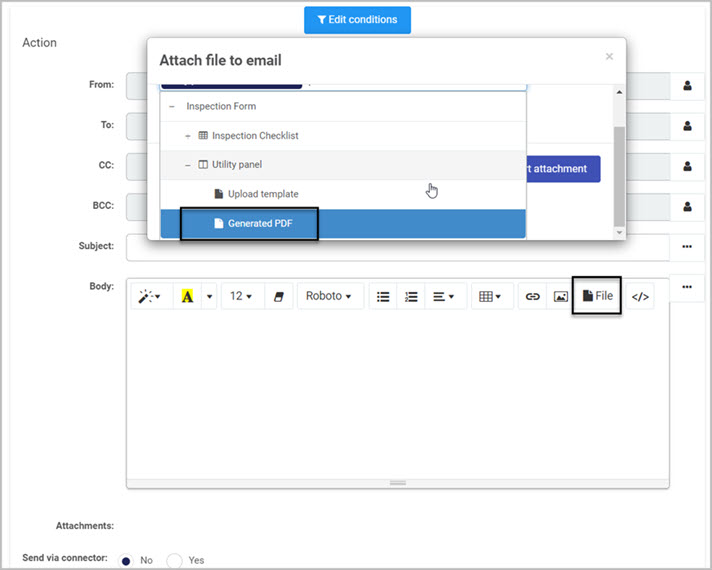
To attach the created PDF file to the email, click on File icon in the Body of the email.
-
In the Attach file to email dialog box, drill down and choose Generated PDF from the Inspection Form.
-
Change the body of the email to:
Hi, See report attached Regards, The Safety Team -
Click on OK on the Edit rule dialog box.
-
Move the Send email to Safety Manager rule under the Generate PDF using word template rule.
-
To save your changes to the form, click on the Save button
Inspection Form Summary
To summarise our Inspection From, we created all fields, buttons and rules that we stated in our requirements. Our Engineer can fill out our Inspection Checklist and submit the form which automatically sends an email to an Safety Manager with the generated PDF file of the report. We are also updating our Status field to Completed.
What’s next 
To follow a step by step guide on creating our Inspection From, go to Creating Dashboard.
Feedback
Was this page helpful?
Glad to hear it! Please tell us how we can improve.
Sorry to hear that. Please tell us how we can improve.