Request Form
Creating the Request Form
Configuring Form Settings
-
From the process creation page, click on form 1 to select the form. This can be found at the top of your screen.

-
Click on the edit or pen icon
 on the selected form to edit it.
 -
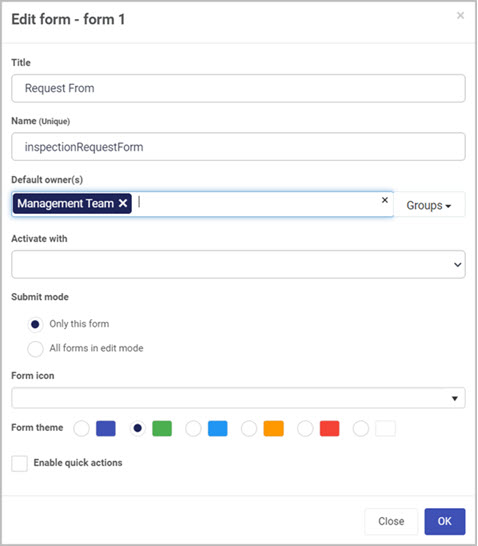
An Edit form dialog box appears on your screen. There are 8 different fields to fill in.
- Title - Name to represent this form. In our case we will call it Request Form.
- Name (unique) - A unique identifier for our form. You can give this any name you would like as long as it’s unique.
- Default owner(s) - This field identifies which users can fill out our form when it’s complete. In our case we will choose from Groups and choose our Management Team. To learn more about how to create groups in Kianda go to creating groups.
- Activate with - Means that the form can be activated with other forms within the process, so they can be edited at the same time. This means several forms become the current form in a form group. In our case we will leave this blank.
- Submit mode - This option means that when a process instance is running you can choose only this form to be submitted, or you can choose all forms in edit mode meaning that several forms could have their details submitted or saved. Choose Only this form radio list.
- Form icon - Dropdown field to select an icon for the form.
- Form theme - This option is used to change the colour of the form tile, for example Green.
- Enable quick actions - if you tick the checkbox, you can select from the options a) Enable re-assign b) Enable edit and c) Enable custom action. We will leave this box unchecked.
-
Click on the OK button when you are finished editing to save your changes or click on Close to exit the dialog box without saving.
-
To save your changes to the form, click on the Save button

Creating Form Fields
On the Request form there is 5 different fields which will be used to make a request for an inspection:
- Company - Which company we need the inspection to be completed in.
- Location - What location of that company we need to go to.
- Engineer - Assign an engineer to complete the inspection.
- Safety Manager - Assign a safety manager which will receive a completed Inspection form.
- Status - Field representing the status of the process. For example the status can be Requested or Completed.
Creating a List field- Company
The Company field represents the company we want our inspection to take place at. It is a List input which is populated from our SharePoint datasource. To learn more about List input, go to List Control.
-
Click on Controls in the left-hand pane to expand the Controls menu.
-
Select Input to view the range of Input controls.
-
Click on List.
-
A New field - List dialog box will open with a range of options you can choose from for your new List field.
-
Change the Title to “Company”.
-
Change the Name (unique) to a unique identifier.
-
Select the Data source within the List source radio list.
-
Click on the Datasource
 button. This will open a data source selector dialog box. To learn more about adding a SharePoint data connector, go to Connecting to SharePoint.
 -
Click on your SharePoint connector and select Companies(the companies data should be pre-created in your SharePoint, see the image below for an example). Click on OK on the Datasource dialog box.
SharePoint Companies List

-
From the dropdown on the Display, Value and Sort by fields select Title.
-
Leave all of the other options as default. Click on **OK **in the Edit field dialog box.
Creating a List field- Location
The Location field represents the location of our inspection. This field is a cascading dropdown selection which corresponds to the Company field (see above). The goal is to display only the locations of the selected company. We will add a condition to this field, you can see how that’s done below. To learn more about cascading dropdown lists go to Cascading dropdown lists.
-
Click on Controls in the left-hand pane to expand the Controls menu.
-
Select Input to view the range of Input controls.
-
Click on List.
-
A field edit box will appear in which we change the Title to “Location”.
-
Change the Name (unique) to a unique identifier.
-
Select the Data source within the List source radio list.
-
Click on the datasource
button. This will open a data source selector box. -
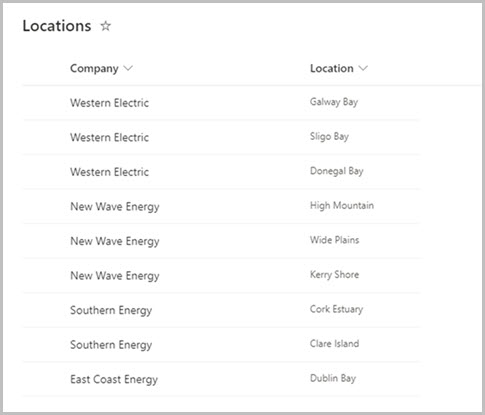
Click on your SharePoint connector and select Location(the location data should be pre-created in your SharePoint, see the image below for an example). Click OK on the Datasource dialog box.
SharePoint Locations List
-
From the dropdown on the Display, Value and Sort by fields select Locations.
-
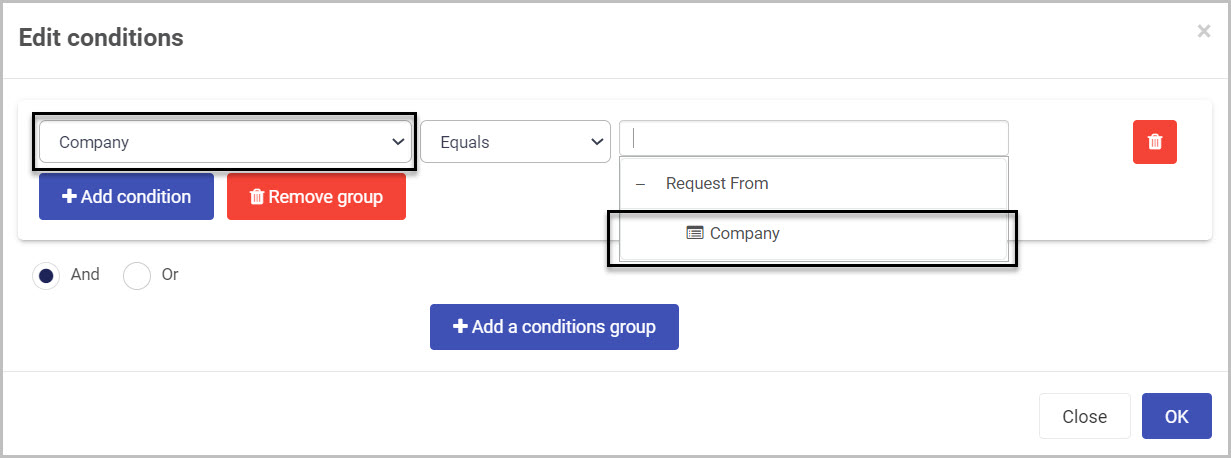
To create the cascading selection we add a condition. Click on Edit conditions

-
In the Edit condition dialog box, select Company in the first dropdown.
-
Select Equals in the second dropdown.
-
Select Company in the third dropdown.
-
Click on OK on Edit conditions dialog box.
-
Leave all of the other options as default. Click on OK in the Edit field dialog box.
Creating a User Picker field - Engineer
The Engineer field represents the engineer we want to complete the inspection. This field is a User picker field in which we can pick any of our Kianda users.
- Click on Controls in the left-hand pane to expand the Controls menu.
- Select Input to view the range of Input controls.
- Click on User picker.
- In the Edit field box change the Title to “Engineer”.
- Change the Name (unique) to a unique identifier.
- Click on OK
 to save.
Cloning a User Picker field - Safety Manager
The Safety Manager field represents the manager which requests the inspection. This is a User picker field just like the above Engineer. We will go through how to clone a field and add it into our form.
- Select the Engineer field so that the edit or pen icon appears. This means you are now in edit mode of the field.
- Go to the Right-hand pane and click on Clone

- A Duplicate or move field dialog box appears. Click on the dropdown list and select Request form.
- Leave Move field instead checkbox unchecked and click OK.
- Select the Engineer copy field so that the edit or pen icon appears.
- Click the edit or pen iconto edit the properties.
- Change the Title to Safety Manager.
- Change Name (unique) to a unique identifier.
- Click OK to save changes.
Status field - text box
The Status field represents the current status of the whole process. We will make the status field invisible so we can track the inspection progress but not show it to the user. The Status field will be used in the dashboard at a later stage in this example.
- Click on Controls in the left-hand pane to expand the Controls menu.
- Select Input to view the range of Input controls.
- Click on Text box.
- Select the Text box 1 field so that the edit or pen icon appears.
- Change the Title to “Status”.
- Change Name (unique) to a unique identifier.
- Click on **OK **to save the field.
- Select the Status field so that the edit or pen icon appears.
- In the Right-hand pane, under Field properties click on the Visible checkbox to uncheck it. To learn more about field properties, go to Field properites.
Adding rules to Submit button
To take a look back at our requirements for our Request form, we need 2 rules for the Submit button.
- Set status to Requested - Sets the status field that we created to “Requested”.
- Send email to Engineer - Sends an email to the selected engineer from the Engineer field.
Creating a Set form field rule - Set status to Requested
With this rule we will be setting our Status field to “Requested”. We will be using the Set form field rule from the Data set of rules.
-
Select the Submit button by clicking on it so that the edit or pen icon
appears. -
In the Left-hand pane click on Add a rule.
-
Click on Data.
-
Select Set form field.
-
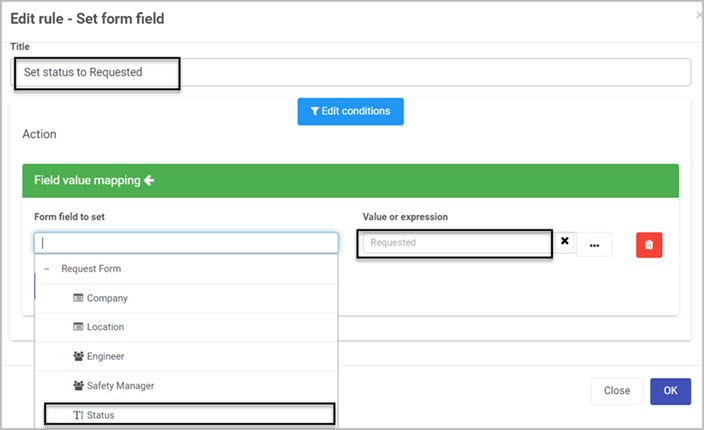
In the Edit rule dialog box, change the Title to “Set status to Requested”
-
Click on Form field to set dropdown.
-
Under the Request Form select Status field.
-
In the Value or expression box, type Requested.
-
Click on OK button to save rule.
-
With the Submit button selected, in the Right-hand pane click on the Rules.
-
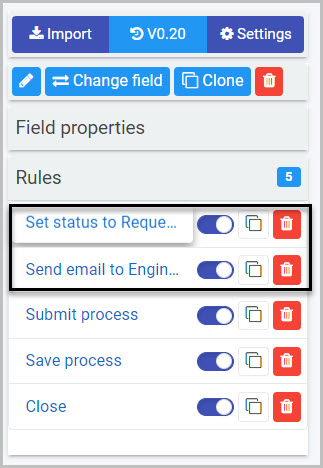
The Set status to Requested is under the Close rule. Drag and drop the Set status to Requested rule to the top of the list.
Creating a Send email rule - Send email to Engineer
This rule will be used to send an email to the selected Engineer. We will be using the Send email rule from the Communications set of rules. In this rule we will add expressions, to learn more go to Expressions.
-
Select the Submit button by clicking on it.
-
In the Left-hand pane click on the Add a rule tab.
-
Click on Communications.
-
Select Send email.
-
In the Edit rule box, change the Title to “Send email to Engineer”
-
Click on the person icon
 on the To: part of the email.
 -
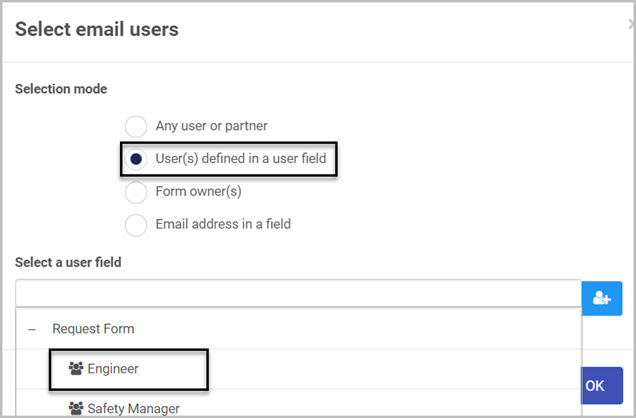
In the Select email users box select the User(s) defined in a user field radio button.
-
In the Select a user field select Engineer.
-
Change the subject to New Inspection Request.
-
Change the body of the email to:
Hi, You are requested to visit ...... to complete an inspection for ...... Please ...... to view the Inspection Form. Regards, The Safety Team -
Adding Expressions:
-
Location
- To add an Location click your cursor where you want to add it. In our case it is in the blank space between the words “visit” and “to”.
- Click on the 3 dots button
 on the the right-hand side of the Body box.
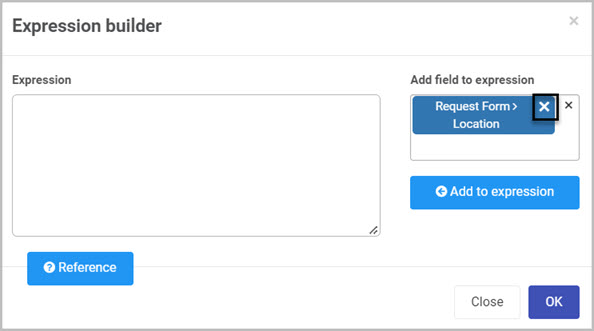
 - Click on the Add field to expression and select Location from the dropdown list.
- Click on Add to expression
 The expression is added into the Expression window. Note that the expression is the unique identifier for that field.
 - Click on OK on the Expression builder dialog box.
-
Company
-
To add the Company expression, start off by clearing Add field to expression field and follow the steps above.
-
-
ProcessLink() - Links you to the open form of this process.
-
To add the ProcessLink() expression, click on the 3 dots button
on the the right-hand side of the Body box. -
Click on the Reference
 button.
 -
From the Expression reference copy ProcessLink()
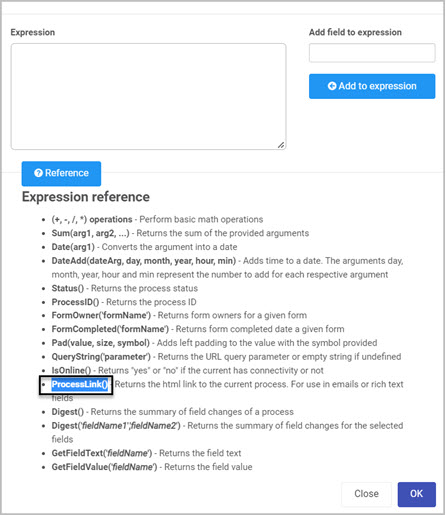
-
Click on Close on the Express builder dialog box to exit.
-
Paste in the ProcessLink() in between “Please” and “to” on the second line of the email.
-
In the parentheses of the ProcessLink() open up quotation marks and in between, type click here.
-
-
-
Click on OK in the Edit rule dialog box.
-
With the Submit button selected, in the Right-hand pane click on the Rules.
-
Send email to Engineer is located under the Close rule. Drag and drop the Send email to Engineer rule in between Submit process and Set status to Requested.
-
To save your changes to the form, click on the Save button
Request Form Summary
To summarise our Request From, we created all fields, buttons and rules that we stated in our requirements. Our Safety Managers can fill out our Request Form which automatically sends an email to an engineer stating what Location to visit and at what Company. We are also updating our Status field to keep track of the process.
What’s next 
To follow a step by step guide on creating our Inspection From, go to Creating Inspection Form.
Feedback
Was this page helpful?
Glad to hear it! Please tell us how we can improve.
Sorry to hear that. Please tell us how we can improve.