Create your first Kianda process
You can create an end-to-end process quickly and simply in Kianda and then use this prototype to develop your ideas through an iterative process. This agile approach results in significantly faster development time which is cost effective and reduces risk.
Agile development cycle
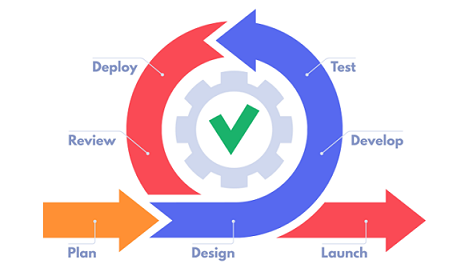
The main phases of an agile project are:
- Planning - this involves determining the scope of the project, namely what is it you want to achieve, what end-users will be supported and how. The outcome will be a list of requirements that can be adjusted as the process is developed.
- Design - this involves constructing one ore more draft processes. Previewing the draft is included in this phase and there may be several rounds of revisions.
- Launch - this phase includes piloting the process with a number of users, monitoring results, getting feedback and then releasing the process including all related documentation.
Mapping these phases to process creation in Kianda, results in three main steps: Plan > Design > Publish. Each step contains three substeps.
Creating your Kianda processes in an agile way
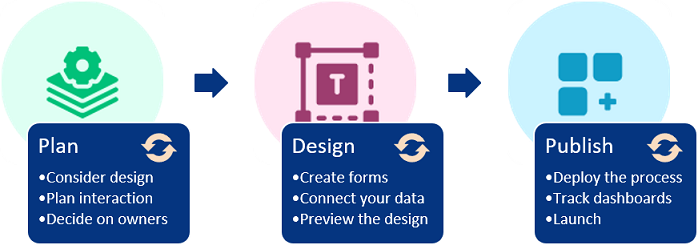
Three steps to create a process
Using Kianda allows you to leverage the agile development process to maximum effect:
-
Plan - our documentation will guide you when it’s time for you to capture your requirements.
 What forms and fields do you need in your process based on what you want to do?
 What rules can be applied to create smart, automated processes?
 Who needs access to the forms as a user and form owner? Review these questions as you modify the process.
-
Design - you can create draft processes and restore to earlier versions, allowing you complete control over production.
 Processes are made up of interactive forms which you can create at the click of a button.
 Forms connect to your datasources so, as your organisation changes, your processes respond accordingly.
 Use the in-built previewer to preview and test your design, then save new versions as you modify your process design.
-
Publish - expand access to published processes as you become comfortable with the design.
 Allow individual user, group or partner access in order to deploy your solution in a controlled way.
 View key metrics in process dashboards to get insights into how to improve your process and organisation.
 Launch and release your process, including documentation which can feed into future development projects.
What’s next 
Now that you are familiar with the development cycle, you can start to develop your Kianda process following these simple steps:


If you have coding experience and want to delve straight into how you can use Kianda to create your own widgets, go to Developer to learn more.
To return to the previous pages click on the links below 
Feedback
Was this page helpful?
Glad to hear it! Please tell us how we can improve.
Sorry to hear that. Please tell us how we can improve.