After you have created a process, you are then ready to add forms. This is the second step in building a process.
Build process steps
As you work on your process, you can save drafts. This allows you make changes and restore to earlier versions if needed - see Version History for more information.
Before you begin
When adding forms, refer back to your process plan to determine what forms you need and who will have access to these forms as an administrator. As an example, we will keep our Training Process requirements in mind as we go.
In this Training Process example, we will create two forms: Training Request Form and a Training Approval Form.
The video below highlights how Kianda Designer works and How to get started runs through how to create forms for a sample Training Process.
Kianda Designer introduction
How to get started
Once you have created a new process, you are automatically in Kianda Designer. This page allows you to: add and edit forms, add elements to those forms (like controls and rules), save, publish and preview forms, and view and edit form and field properties.
Kianda Designer has 3 key areas:
Left-hand pane is used to add form elements like controls and rules. This pane also houses the Exit Designer SavePreview and Publish buttons.
Central form canvas displays the current form you are working on.
Right-hand pane is used to view and edit process, form and field properties.
Kianda Designer
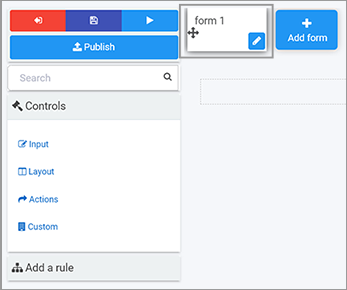
Note: By default, a first form, “form1”, is added to any new process you create. Click on the Edit form button (Pen icon ) to start editing this form to make it your own.
Click on the Edit form button (Pen icon ) to edit ‘form1’.
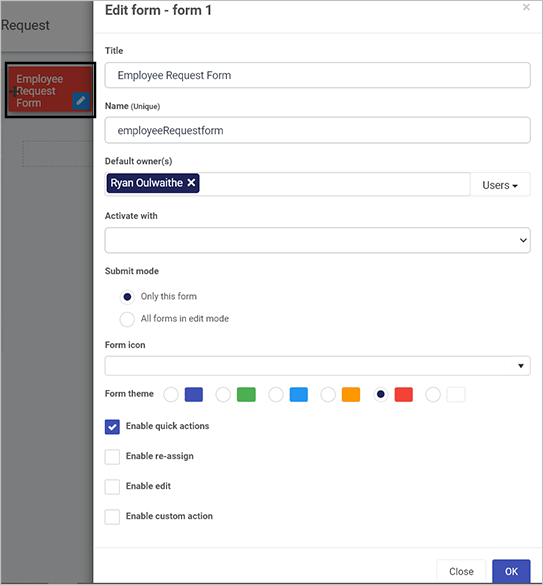
Complete the details in the Edit form dialog box - that is Title, Name, and Default owner(s) (people who will be able to administrate this form - choose from Users or Groups). There are other options like Form theme which are colours that you can apply to the form tab. These options are explained in further details in Designer. Changes made are visible in real-time in the form canvas.
Edit a form
Click on OK button when complete.
Click on the Add form button to add a second form. Repeat to add as many forms as needed.
Once you have added one or more forms to your process, you are ready to Add controls and rules to your forms! In our example we have two forms: Training Request and Training Approval.
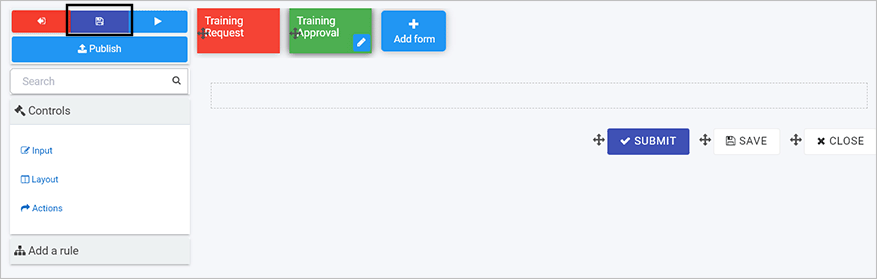
Save your work as you go by clicking on the Save button.
You may have chosen to use predefined processes from the Kianda App Store. It is worth taking the time to check out how these processes are built to give you an initial idea of what is possible in Kianda.
Use the Exit button to return to the main process view and then click on a process of choice to see details.
You can preview forms by clicking on the Preview button - see Previewer for more details.
There are many ways to then reuse elements within forms - for example, using the Group field and cloning. For more information, see the video Reusability of process and form components.
Forms are assignable - means that only a form assignee can edit a particular form. This can be a combination of users and groups.
Only form owners can edit a given form by default. Any other user with access to view the form will see it in read-only mode.
Multi-step processes use the concept of “current form”. Only the form matching the process status will be made editable.
In a multi-step process, other forms that are not “current form” can be configured to activate with the current form, meaning they might also be editable and will form a form group.
These rules work together to determine if the form is in edit mode or display mode. Form designers have at their disposal business rules, such as assign form, go to form and submit rule, to dynamically control the ability of end-users to edit a particular form or a section of a form.
To return to the previous pages click on the links below
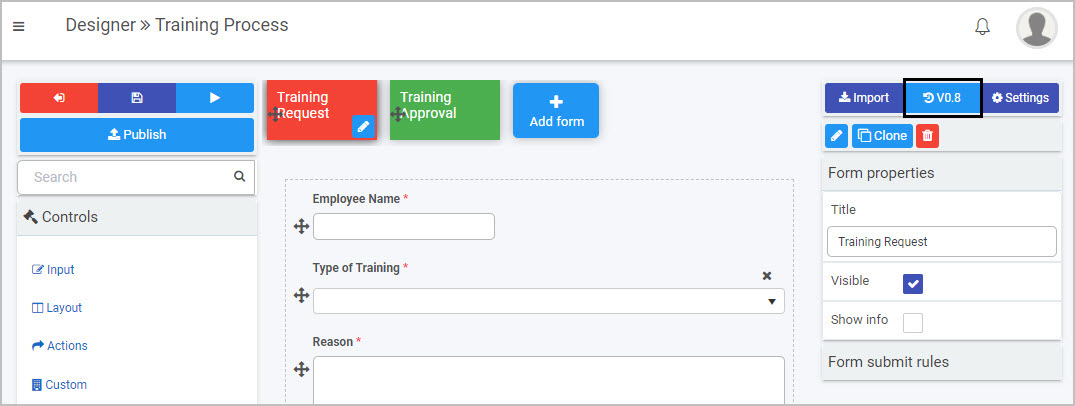
The current or active version of a process is always visible in the right-hand pane, for example V0.8 for the process as shown below.
Process version
The first version of a process is 0.1 and will increment to 0.2 and so on, each time a process is saved. Once the process is published the version changes to 1.0 and increments with each publication. This makes it is easy to keep track of who made changes and when, and to restore an older version if needed.
The video below introduces version control and the section How to get started runs through how to view process versions and restore an older version.
Version control
How to get started
To view the version history click on the Design version history button which may look like V0.1 or whatever the current version is for your process, for example or .
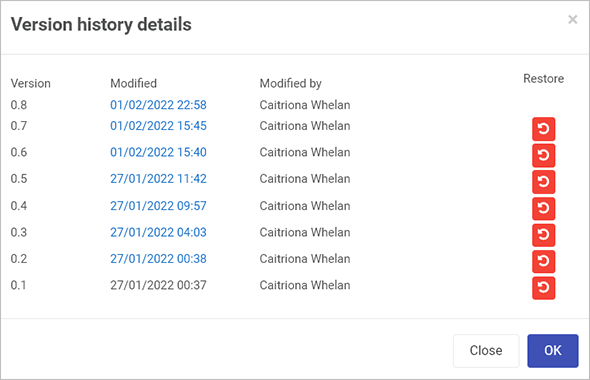
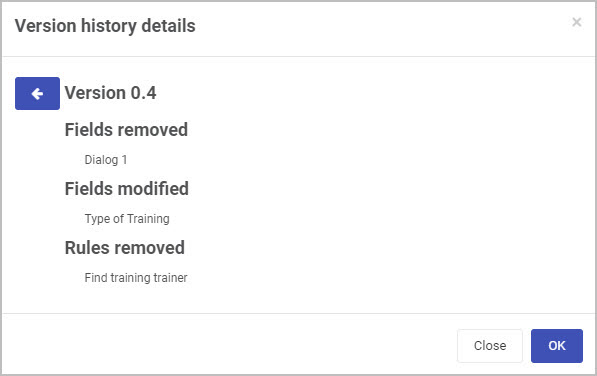
A pop-up shows the version history details including when the version was created and who created it.
In the example below, there are 8 versions of the process, all are drafts indicated by the 0 in front, such as 0.8.
Version history
Click on a particular version to see the version information, for example forms, fields and rules that were added, modified or removed.
Version details
To restore an earlier version, click on the Restore button beside a particular version and then click on Ok to confirm that you want to restore to that version.
What’s next
To learn more about adding different elements to your form go to Add controls and rules.
To return to the previous pages click on the links below
Kianda low-code development platform - process designer
Kianda process Designer empowers you to easily start building forms and workflows for any business use case. Forms are an important component of any process. They might be used as a stage of a process and can be made active individually or at the same time (parallel forms).
There are 3 key principles to consider when working with forms:
Form design - what a form looks like, what elements it contains, for example controls and rules, see Designer layout.
Form interaction- how users can use forms depending on certain sequences happening, see Rules.
Form management - who can edit and access forms is set when creating a new form, see New forms.
Designer layout
To access processes, go to the left-hand pane and Administration > Designer and click on a process that you have created or imported, see Design and build your process.
From the main process view, click on any process to add forms, for example Training process as seen below.
Main process view
The designer window opens and is made up of 3 main parts.
Kianda Designer
The key components of the designer are:
Left-hand pane is used to add form elements like controls and rules. This pane also houses the Exit Designer SavePreview and Publish buttons.
Central form canvas displays the current form you are working on.
Right-hand pane is used to view and edit process, form and field properties.
Note the name of the process you are working on is shown in the top menu bar, for example Training Process.
The video below demonstrates how to get started using Kianda Designer, and go to How to get started to follow through on different ways to import forms or start from scratch.
Introduction to Kianda Designer
How to get started
How you get started with forms depends on:
if you have created a process using the App Store, see Predefined forms
if you have created a process from scratch or want to create a form from scratch, see New forms
if you import forms that have already been created, see Import forms
Once your form is created, you are ready to start adding elements to your form, see Add controls and rules.
If you have created a process using the App Store, then a number of forms will already be part of the process. For example the process Security Incident Management has 5 forms attached: Incident detail, Data breach, Malware outbreak, Root cause remedy and Caller review.
To edit form details, simply click on a form and click on the Pen button to edit the form. You can also click on the Add form button to add a new form. Edit options are shown under New forms.
New forms
If you have created a process from scratch, an empty form is added to your process by default, called “form 1”. This is the first form. Click on this form and the Pen button to customise it. You can also click on the Add form button to add a new form.
Adding a form
There are a number of edit options below.
Editing a form
Note: as you change any of the options in the dialog box, the impact will be shown in real-time on the form in the background, for example a title, or colour form theme.
Title - the form title, for example Employee Request Form
Name - this is a unique name for the form
Default owner(s) - by default the form creator is an owner. You can remove this owner by clicking on and add other owners by clicking on the arrow and choose from Users, Groups or Partners.
Users - allows you to choose individual owners
Groups - allows you to choose from defined groups for example HR Team or Management Team
Partners - allows you to choose predefined partner organisations that you want to share with or provide permissions
Activate with - will decide when the form will be active. If you have several forms attached to a process, then select from a dropdown list the form you want to activate with the current form. If you leave the field blank, the new form will be activated sequentially after the first form is submitted.
Submit mode - options are a) Only this form (the current form) or b) All forms in edit mode
Form icon - click on the arrow to choose from hundreds of icons to attach to your form.
Form theme - choose from Navy, Green, Blue, Amber, Red or White Colours for your form.
Enable quick actions - if you tick the checkbox, you can select from the options a) Enable re-assign b) Enable edit and c) Enable custom action. Click on Ellipsis button to further modify the action settings.
If you click on Enable re-assign, you can reassign action settings to particular Users, Groups or Partners. Click on Allow form owners if you want form owners to be able to reassign actions.
If you click on Enable edit, you can allow certain Users, Groups or Partners to edit the form, along with form owners by clicking on Allow form owners.
Other options include a checkbox for When editing auto hide form footer buttons and Trigger rules on save.
If you check Trigger rules on save then click into the Save action field to choose from an action trigger as to when the form is saved, for example Submit, Save or Close. These can be other actions depending on what you have defined.
Edit action settings
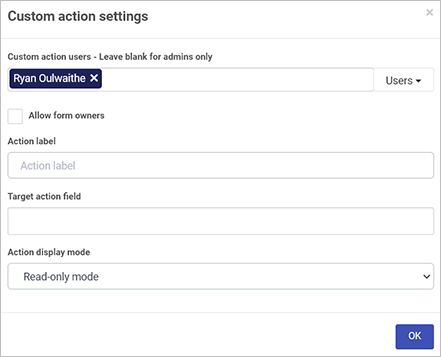
If you click on Enable custom action, you can allow certain Users, Groups or Partners to edit the form, along with form owners by clicking on Allow form owners.
Other options include Action label, Target action field and Action display mode, for example Read-only mode, Edit mode or Both.
Custom action settings
As a form designer you can set up actions dependent on certain conditions, for example an Action label that targets a certain button appearing for example Close button, only when a certain display mode is chosen, for example Read-only mode. If Edit mode is chosen, then the button will only appear when the form is being edited. In this way you can create dynamic forms that suit user interactions.
Click on the OK button when you are finished editing to save your changes or click on Close to exit the dialog box without saving.
To save your changes to the form, click on the Save button .
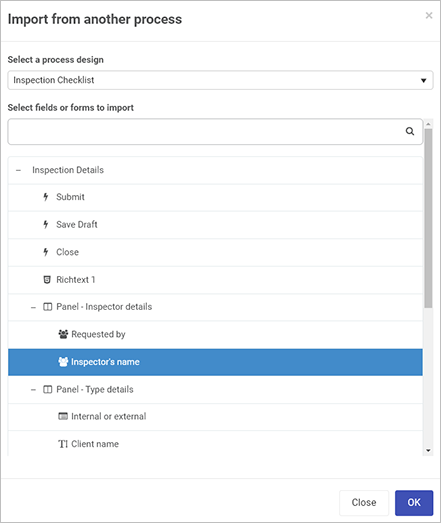
You can import a previously designed form by clicking on the Import button .
Click on the arrow to select from the drop down list to Select a process design.
Click on a process of interest and then click on the forms to import. Forms are indicated by a + symbol and can be expanded to show elements within a form for example a panel containing different fields such as lists and text boxes. This means you can import a whole form, or just elements of a form. In this way you can very quickly reuse some or all parts of an existing form.
Importing from another process
Click on the OK button when you are finished editing to save your changes or click on Close to exit the dialog box without saving.
Adding form elements
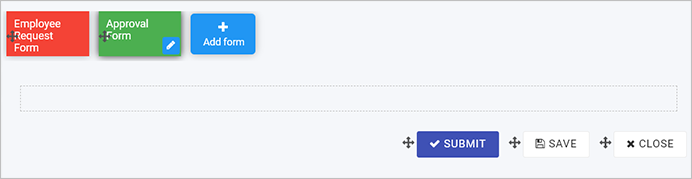
If you have added a new form during the form creation process, then a blank canvas with 3 default buttons are available to you: Submit, Save and Close.
Edit form information by selecting a form and clicking on the Pen button .
Change a field to another field by clicking on Change field.
Create a duplicate form by selecting a form, clicking on the Clone button and then click on Ok. A version called ‘Form Name Copy’ is created and available to edit on the canvas. The Clone button can also be used to clone form elements like controls or buttons.
Delete a form by selecting a form, clicking on the Bin/Trash button and then click on Ok after you have reviewed the form title and you are sure this is what you want to delete. Click on Cancel if you wish to cancel the deletion.
You can edit process settings by clicking on the Settings button in the right-hand pane.
Choose from the settings:
Process id settings - choose from a) Default or b) Custom and use a combination of [ProcessName]-[UniqueNumber]-[FieldName]
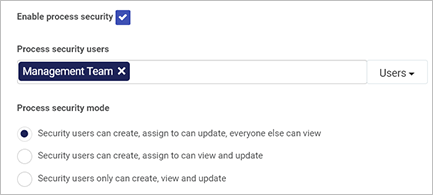
Enable process security - if you tick the checkbox, can allow certain Users, Groups or Partners to have certain privileges related to the radio button options to create, assign and view as shown below.
Enable process security
The default setting is Security users can create, assign to can update, everyone else can view.
On load rules execution mode - options are a) Always b) When in edit mode or c) When open new. The default setting is Always.
Hide form tabs - gives you the ability to hide form tabs, options are a) Yes or b) No
Hide left nav - gives you the ability to hide navigation elements, options are a) Yes or b) No
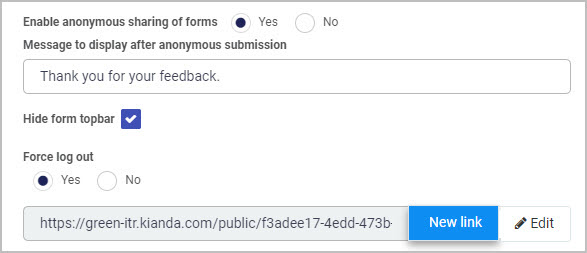
Enable anonymous sharing of forms - gives you the ability to share forms with people outside your organisation for example a feedback form or GDPR subject access request. Options are a) Yes or b) No. If you click on Yes there are various options that you can add:
Message to display after anonymous submission - to add a display message
Enabling anonymous sharing
Hide form topbar - checkbox to hide the form topbar.
Force log out - options are a) Yes or b) No to force user logout once the form is submitted
Click on New link to generate a new anonymous form link to share with users and click on Edit to change the link.
Enable mobile bottom navigation - options are a) Yes or b) No
Instance delete settings - options are a) Any user can delete b) Creator can delete c) “Current form owner” can delete d) “Security users” can delete e) “Admins only” can delete. The default setting is Creator can delete.
Enable form assignment notification - options are a) Yes or b) No
Prevent closing instance with unsaved data - options are a) Yes or b) No
Selected tab theme - choose from Navy, Green, Blue, Amber, Red or White as a colour when a form is selected.
Completed tab theme - choose from Navy, Green, Blue, Amber, Red or White as a colour when a form is completed.
Click on the OK button when you are finished editing to save your changes or click on Close to exit the dialog box without saving.
Click on the Exit button to go back to the process list, the Save button to save your work, the Preview button to preview what you have created and the Publish button to publish your work.
What’s next
To learn more about rules and controls that can be applied to forms go to Controls and Rules.


 Save
Save  Preview
  and Publish
  buttons.
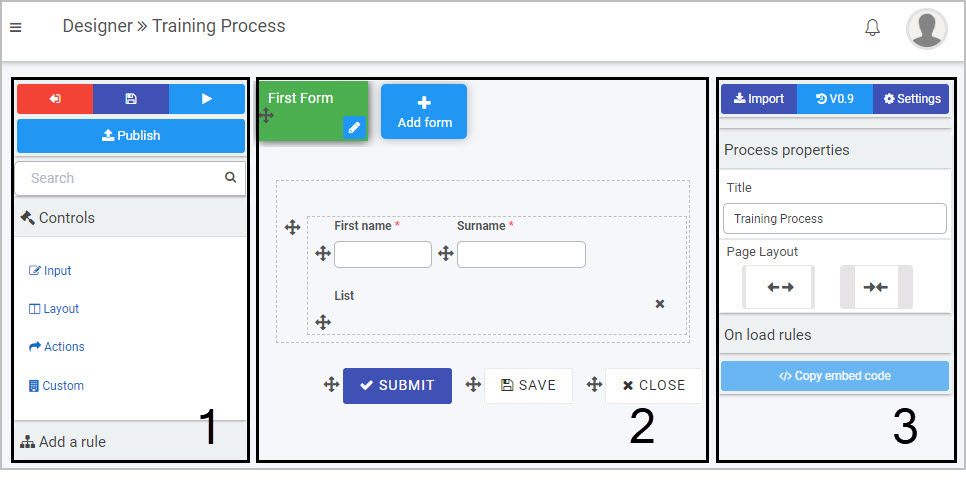
 ) to start editing this form to make it your own.
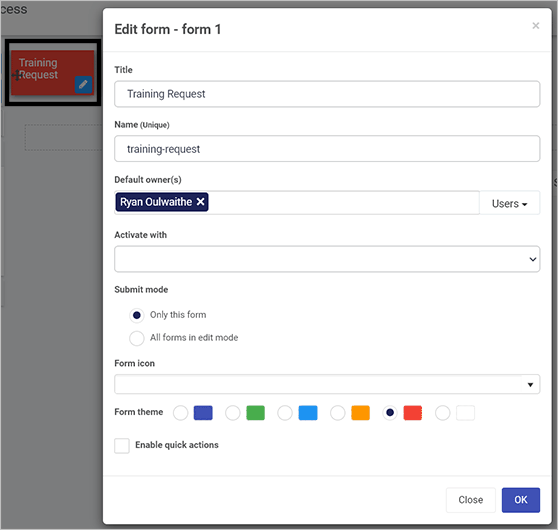
 when complete.
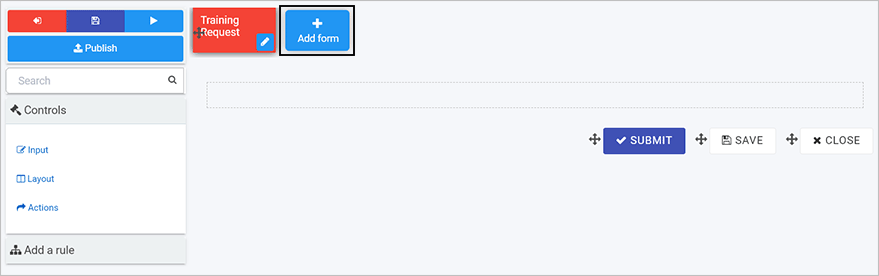


 or
or  .
.
 beside a particular version and then click on Ok to confirm that you want to restore to that version.
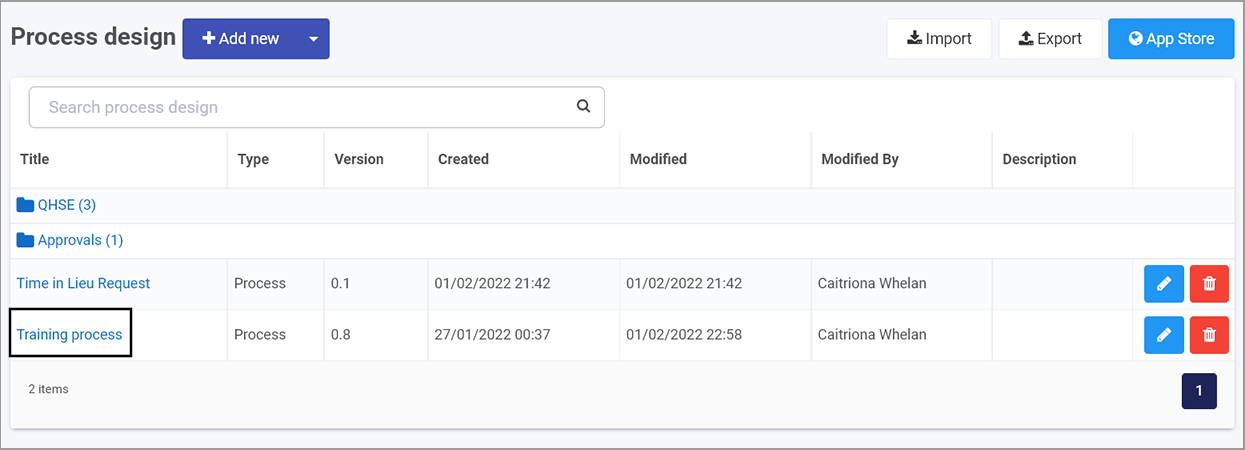
 and add other owners by clicking on the arrow and choose from Users, Groups or Partners.
 to further modify the action settings.
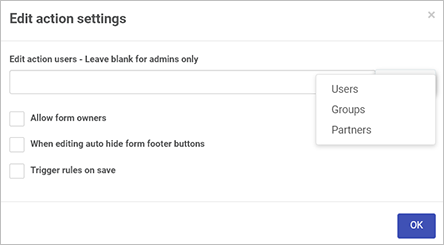
 .
.
 beside the item and dragging it to where you want to place it.
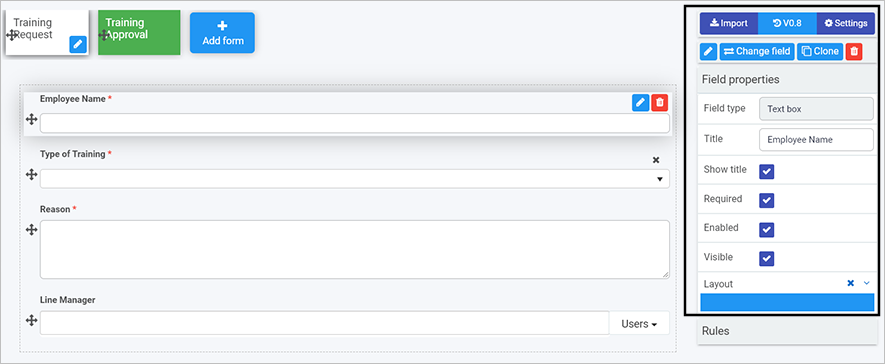

 and then click on Ok. A version called ‘Form Name Copy’ is created and available to edit on the canvas. The Clone button can also be used to clone form elements like controls or buttons.
 and then click on Ok after you have reviewed the form title and you are sure this is what you want to delete. Click on Cancel if you wish to cancel the deletion.