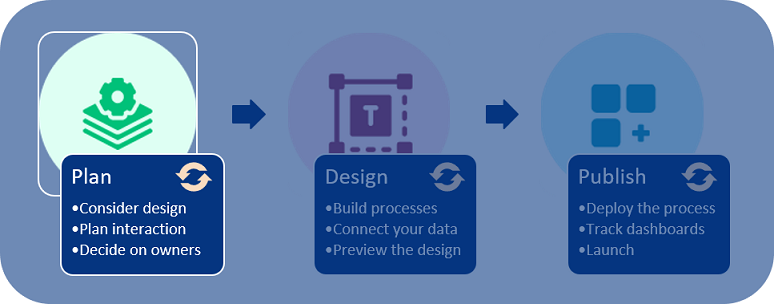
Plan your process
You may currently have paper forms or email flows that you want to formalise, digitise and, most importantly, link to dashboards to see at a glance how processes are running and where organisational improvements are needed.
For example, take the scenario of a Training Request process. The current process may require an employee to email their line manager to request to attend training. The line manager either approves or disapproves the request by returning an email or calling the employee. If the training request is approved, then the line manager emails the training manager stating that the employee will attend training and to schedule this.

Rather than continuing with email trails, with no easy way to see the status of each step and process overall, creating a solution in Kianda will save time, increase efficiencies and therefore reduce costs. In this way, you can become a citizen developer, a business professional who uses low-code/no-code tools to solve business needs.
Planning in an agile way
Planning involves 3 considerations: Design , Interaction and Management. We will now look at each of these areas in turn.
Planning process
To plan a solution, you could use Microsoft Office Tools or another preferred program or method to chart out what you need. Each heading will guide through what you need to consider.
If you already have a process workflow mapped out, you can go straight to designing and building in Kianda.
Planning your design
Design considers what a process needs to do and how it might look. Information can be gathered through various methods like Really Round Robin, hackathons and surveys, and captured in product vision boards. Using the 5W’s of who, what, when, where and why, along with how, can help map out the necessary information during the project initiation phase.
In particular, consider what forms you need in your process. What kinds of fields do you need in order to get the data you seek? What about information you need to provide to form users? Connecting to datasources like information in SharePoint, Salesforce or SAP will make your processes dynamic and always up to date.
In the example of the Training Request process we already discussed, we will need two forms: 1) Training Request form and 2) Training Approval form. The information that we need to capture in each form is listed here, with potential field types in brackets. The information that will be provided to users in each form, for example a SharePoint list for users to scroll through, is also listed.
| 1) Training Request Form | |||
|---|---|---|---|
| Information provided: | Type of Training (a SharePoint list) | ||
| Information needed: | Employee Name (textbox) | Reason for the Request (textbox) | Line Manager (user picker) |
| 2) Training Approval Form | ||
|---|---|---|
| Information provided: | Name, Reason, Type (group from Request form) | Line Manager (signature) |
| Information needed: | Decision (a Yes/No radio list) | Feedback (text box) |
As you begin to capture the requirements for the process you want to create, it may be useful to refer to the different types of fields available in Kianda - see Controls for more information on field types.
Planning interaction
Interaction considers how users will use the process and what series of events might happen to create different desired outputs. Decide on the sequence of events and what rules can or need to be applied to create a trigger for the next event in the process.
In the Training Request process, we’ll introduce Submit buttons to trigger actions, and a Rule so that the form will appear differently based on different user inputs.
| 1) Training Request Form | ||
|---|---|---|
| Actions: | Submit (button) allows Employees to submit a form. | Save (button) to save a draft form. |
| Rule: | Send email to a Line Manager when form is submitted. |
| 2) Training Approval Form | ||
|---|---|---|
| Actions: | Submit (button) allows Line Managers to submit an approval. | Save (button) to save a draft. |
| The approval appears in a dashboard for the Training Manager. | ||
| Rule: | If Yes is chosen from a radio list, then input signature. | |
| If No is chosen, then hide the signature and show a Reason text box. |
As you start to think about what rules you may need to trigger the sequence of events in your process, it may be useful to refer to the different types of rules available in Kianda - see Rules for more information.
Planning management
Next, you need to consider who will have access to the information. When designing forms, you can enable elements within a form so that they appear as visible-only or editable.
You also need to consider who the form owners will be, that is, who will have editing access to the forms themselves. This information is needed when you create a process and add forms to it. At this point, you will need to decide what users, or groups will act as form and process administrators. Here, we have outlined the form owners and users for the two forms in our Training Request process example:
| 1) Training Request Form | |
|---|---|
| Access: | All Employees can access the form. |
| Owner: | Only the Training Manager can edit the form template. |
| 2) Training Approval Form | |
|---|---|
| Access: | Only Line Managers can access the form. |
| Owner: | Only the Training Manager can edit the form template. |
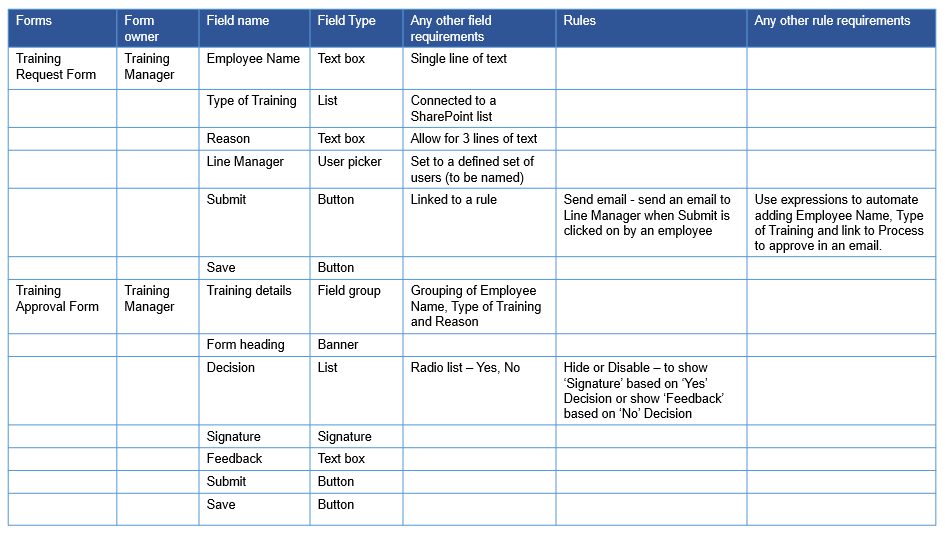
Summary of requirements
Finally, we can summarise all the information we need in a spreadsheet. Field types or controls and rules will become more familiar as you work with Kianda. For now, use this example as a way to get to know what is possible in Kianda.
Examples of Requirements for a Training Request and Approval Process
What’s next 
Now that you know what you need to consider when planning a process, you can go to design your process to learn how to get started in the Kianda Designer. You can use this template, populated for a sample Training Process, to help get you started: Requirements template
If you would like to learn more about citizen development, have a look at Kianda’s articles on the Project Management Institute (PMI) blog: https://www.projectmanagement.com/blog-post/69464/citizen-development-part-2--getting-started
To return to the previous pages click on the links below 
- What is low-code development
- What is no-code development
- Logging in to Kianda
- Create your first Kianda process
- Add forms
- Add controls and rules
Feedback
Was this page helpful?
Glad to hear it! Please tell us how we can improve.
Sorry to hear that. Please tell us how we can improve.