This is the multi-page printable view of this section. Click here to print.

Return to the regular view of this page.

Plan your process

You may currently have paper forms or email flows that you want to formalise, digitise and, most importantly, link to dashboards to see at a glance how processes are running and where organisational improvements are needed.

For example, take the scenario of a Training Request process. The current process may require an employee to email their line manager to request to attend training. The line manager either approves or disapproves the request by returning an email or calling the employee. If the training request is approved, then the line manager emails the training manager stating that the employee will attend training and to schedule this.

Email trail

Rather than continuing with email trails, with no easy way to see the status of each step and process overall, creating a solution in Kianda will save time, increase efficiencies and therefore reduce costs. In this way, you can become a citizen developer, a business professional who uses low-code/no-code tools to solve business needs.

Planning in an agile way

Planning involves 3 considerations: Design , Interaction and Management. We will now look at each of these areas in turn.

Planning process
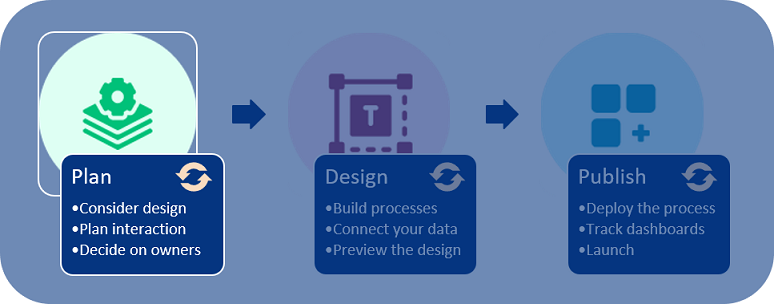
Planning

To plan a solution, you could use Microsoft Office Tools or another preferred program or method to chart out what you need. Each heading will guide through what you need to consider.

If you already have a process workflow mapped out, you can go straight to designing and building in Kianda.

Planning your design

Design considers what a process needs to do and how it might look. Information can be gathered through various methods like Really Round Robin, hackathons and surveys, and captured in product vision boards. Using the 5W’s of who, what, when, where and why, along with how, can help map out the necessary information during the project initiation phase.

In particular, consider what forms you need in your process. What kinds of fields do you need in order to get the data you seek? What about information you need to provide to form users? Connecting to datasources like information in SharePoint, Salesforce or SAP will make your processes dynamic and always up to date.

In the example of the Training Request process we already discussed, we will need two forms: 1) Training Request form and 2) Training Approval form. The information that we need to capture in each form is listed here, with potential field types in brackets. The information that will be provided to users in each form, for example a SharePoint list for users to scroll through, is also listed.

1) Training Request Form
Information provided:Type of Training (a SharePoint list)
Information needed:Employee Name (textbox)Reason for the Request (textbox)Line Manager (user picker)
2) Training Approval Form
Information provided:Name, Reason, Type (group from Request form)Line Manager (signature)
Information needed:Decision (a Yes/No radio list)Feedback (text box)

As you begin to capture the requirements for the process you want to create, it may be useful to refer to the different types of fields available in Kianda - see Controls for more information on field types.

Planning interaction

Interaction considers how users will use the process and what series of events might happen to create different desired outputs. Decide on the sequence of events and what rules can or need to be applied to create a trigger for the next event in the process.

In the Training Request process, we’ll introduce Submit buttons to trigger actions, and a Rule so that the form will appear differently based on different user inputs.

1) Training Request Form
Actions:Submit (button) allows Employees to submit a form.Save (button) to save a draft form.
Rule:Send email to a Line Manager when form is submitted.
2) Training Approval Form
Actions:Submit (button) allows Line Managers to submit an approval.Save (button) to save a draft.
The approval appears in a dashboard for the Training Manager.
Rule:If Yes is chosen from a radio list, then input signature.
If No is chosen, then hide the signature and show a Reason text box.

As you start to think about what rules you may need to trigger the sequence of events in your process, it may be useful to refer to the different types of rules available in Kianda - see Rules for more information.

Planning management

Next, you need to consider who will have access to the information. When designing forms, you can enable elements within a form so that they appear as visible-only or editable.

You also need to consider who the form owners will be, that is, who will have editing access to the forms themselves. This information is needed when you create a process and add forms to it. At this point, you will need to decide what users, or groups will act as form and process administrators. Here, we have outlined the form owners and users for the two forms in our Training Request process example:

1) Training Request Form
Access:All Employees can access the form.
Owner:Only the Training Manager can edit the form template.
2) Training Approval Form
Access:Only Line Managers can access the form.
Owner:Only the Training Manager can edit the form template.

Summary of requirements

Finally, we can summarise all the information we need in a spreadsheet. Field types or controls and rules will become more familiar as you work with Kianda. For now, use this example as a way to get to know what is possible in Kianda.

Examples of Requirements for a Training Request and Approval Process
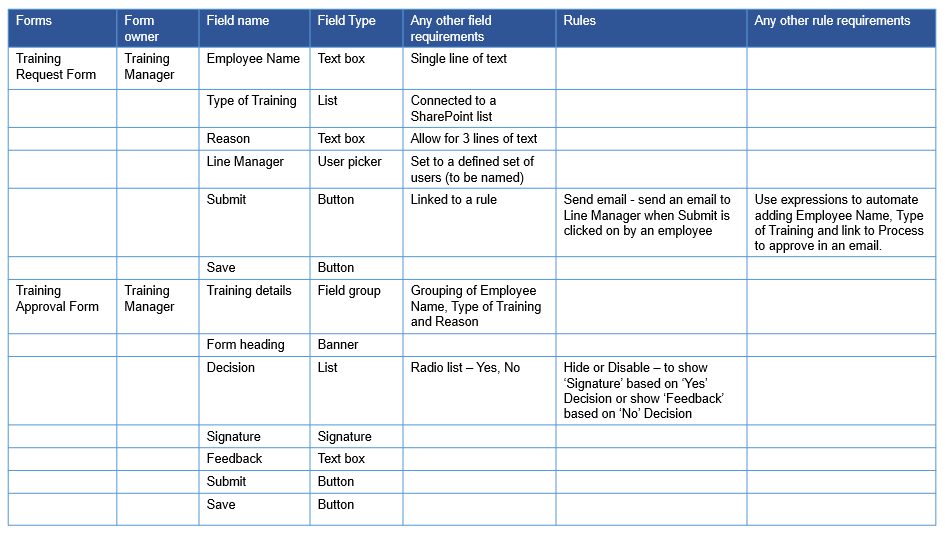
Training Process requirements

What’s next Idea icon

Now that you know what you need to consider when planning a process, you can go to design your process to learn how to get started in the Kianda Designer. You can use this template, populated for a sample Training Process, to help get you started: Requirements template

If you would like to learn more about citizen development, have a look at Kianda’s articles on the Project Management Institute (PMI) blog: https://www.projectmanagement.com/blog-post/69464/citizen-development-part-2--getting-started

1 - Getting Started - Controls

Controls are predefined field widgets that allow you to add specific elements to your forms and processes, such as buttons, lists, text boxes and tables. There are 16 different types of controls (fields) to choose from - see Controls list.

If you have developer skills, you can create your own custom field widget - see Developer for more information.

Getting started with Controls

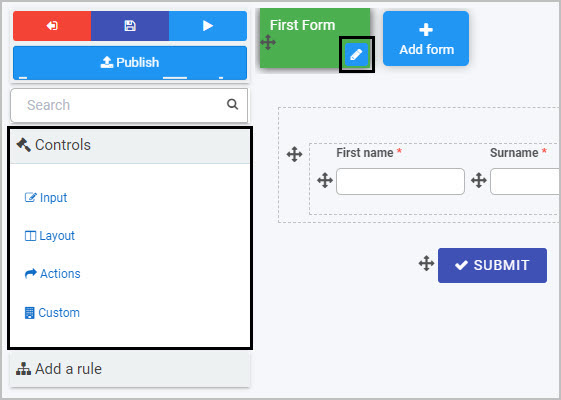
If you go to Side menu >Administration > Designer and click on an existing process or create a new process and then select a form within that process (so that the Edit form buttton - Pen icon - is visible), you will see the pre-defined Controls options in the left-hand pane. If the Controls menu is collapsed, click on it to expand it.

Control categories

Form controls

By default, there are three categories of fields:

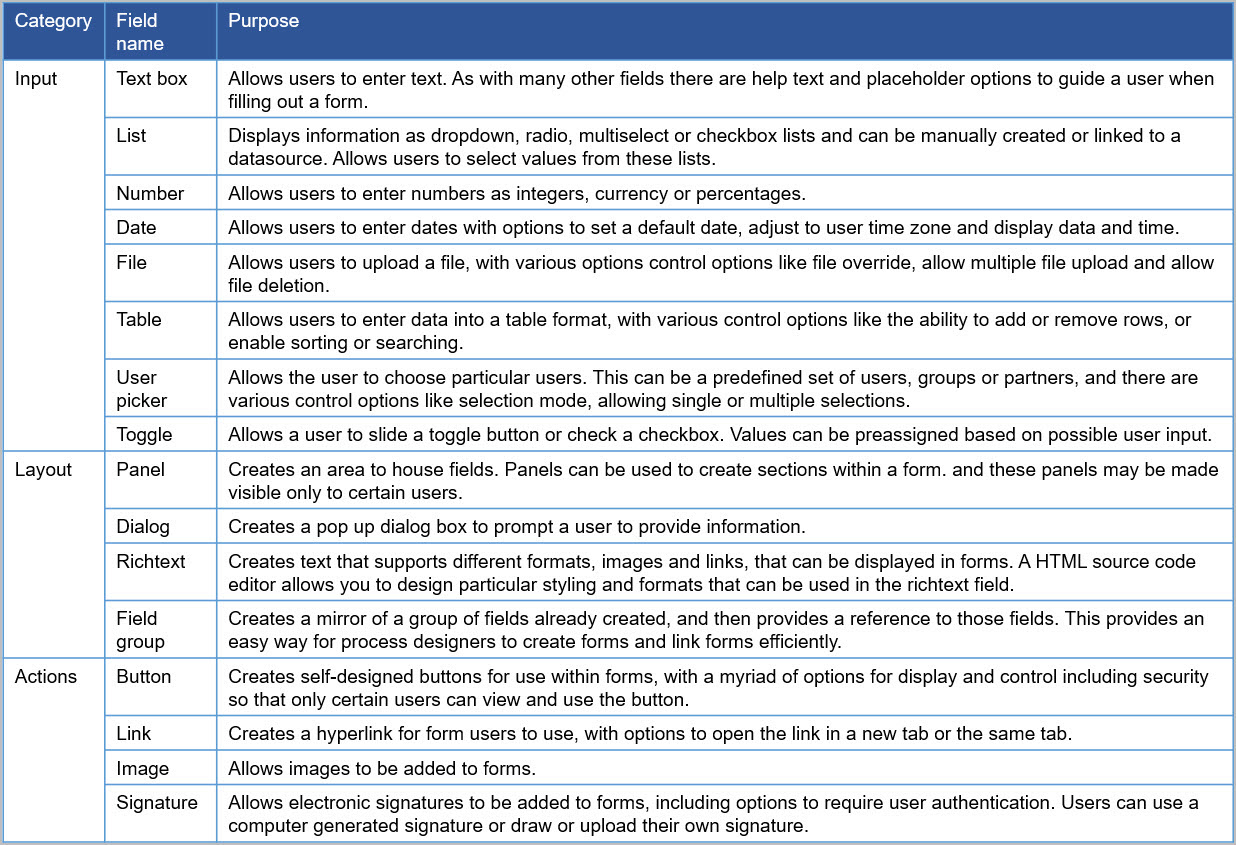
  1. Input - There are eight types of Input fields. They include the most common data fields such as textbox, user picker, date field, table, checkbox, drop-down and number fields.
  2. Layout - There are four Layout fields that serve the purpose of perfecting the layout of your form. They include responsive panels, dialog box, field groups and rich text fields.
  3. Action - There are four Action fields that allow you to insert user interface actions like buttons, links or even signature components. By default, three buttons are automatically added to each new form created - Submit, Save and Close.

A fourth category, Custom fields, exists if Kianda Developer has been used to create custom field widgets - see Developer for more details.

All fields will have edit options when you start creating the field, as well as field properties that you can edit. Each field can also have rules applied to it.

Controls list

A full list of controls (fields) is shown here.

Control categories, with field names and purpose

Form controls

What’s next Idea icon

To learn more about rules that can be applied to fields go to Rules.

To learn more about field properties, go to Field properties.

2 - Business rules

Business rules are what make Kianda forms come alive. They represent the actual actions users intend to perform when they interact with form components - for example, sending automated emails, revealing certain parts of a form based on user interactions and automatically generating Word and PDF documents from completed forms.

There are 60 predefined rules across 10 categories and they can be applied to fields (controls), forms, groups of forms or even to a whole process - see Rules list for more details.

There are two key principles to consider when working with rules:

  1. Rule design - Consider the type of rule you are going to apply and what you are going to apply it to - for example, to a button, field or form. As part of your design considerations it is important to know what you can do with rules, in particular, the use of conditions and expressions.

  2. Rule order - If there are several rules attached to an item like a button, then the order the rules are going to be executed in becomes important. You can change the rule execution order to suit your needs.

How to get started

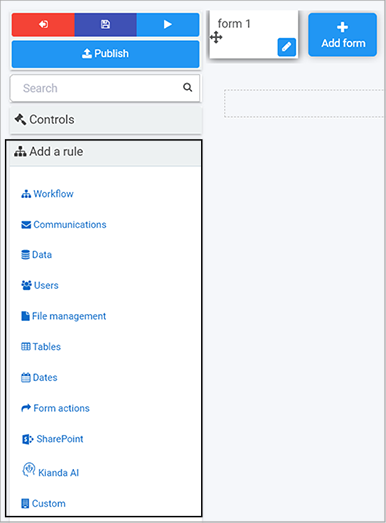
If you go to Side menu > Administration > Designer, click on a process or create a new process, and then select a form within the process so that the Edit form button (Pen icon Pen button) appears. The predefined rules will can then be found in the left-hand pane under Add a rule.

Rule categories

Rules list

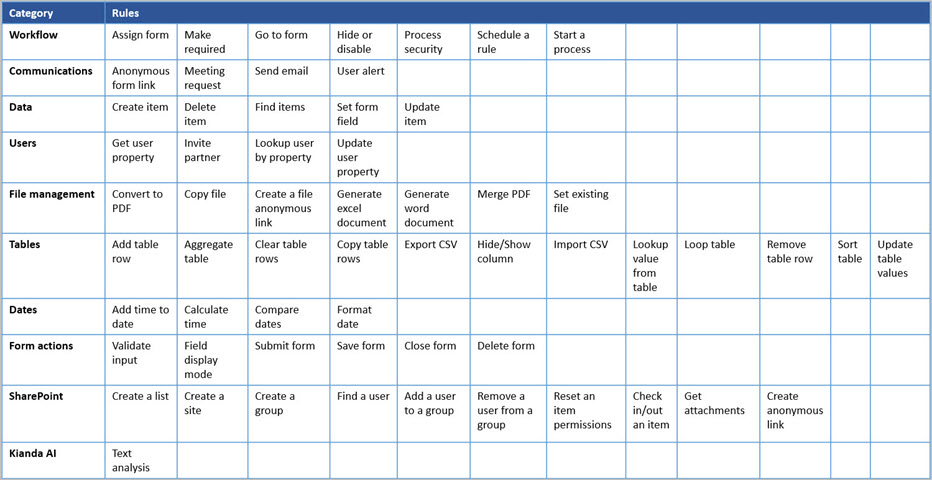
There are 10 categories of rules available (see Rules list for the full list of names of the 60 predefined rules):

  1. Workflow - There are seven workflow rules that represent the actions a user intends to perform when they interact with form components.
  2. Communications - There are four communication rules associated with user communication - for example, sending an email or triggering a user alert.
  3. Data - There are five data rules associated with database operations like create, update and delete.
  4. Users - There are four user rules associated with user properties, allowing user lookup or to update a user.
  5. File management - There are seven file management rules concerned with generating documents such as Word, Excel or converting to PDF.
  6. Tables - There are 12 table rules associated with table operations such as updating, adding and removing table rows.
  7. Dates - There are four date rules to calculate time and format dates.
  8. Form actions - There are six form rules linked to actions that are part of forms - for example, submit, close or save.
  9. SharePoint - There are 10 SharePoint associated rules such as adding, finding or removing users.
  10. KiandaAI - there is one KiandaAI rule related to text analysis.

An additional Custom category exists if Kianda Developer has been used to create custom rule widgets - see Developer for more details.

When to use rules

You can add rules:

  • to a field
  • to a form
  • to a process (the rule will run on load)

Rule design

  1. Click on an existing process by going to Administration > Designer and decide which form or field you want to apply the rule to by clicking on that item so that you’re viewing it in edit mode (so the Pen icon Pen button appears) - for example, you could select a form called Training Approval or could select a button like Submit to apply a rule or rules to.

    Field editing

    Edit mode for forms and fields

  2. Click on Add a rule in the left-hand pane and select the category of rule you want, such as Communications, and then click the particular rule you want to insert within that category, for example User alert.

Rule order

If there is more than one rule for an item like a field or button, then you need to consider the order of execution.

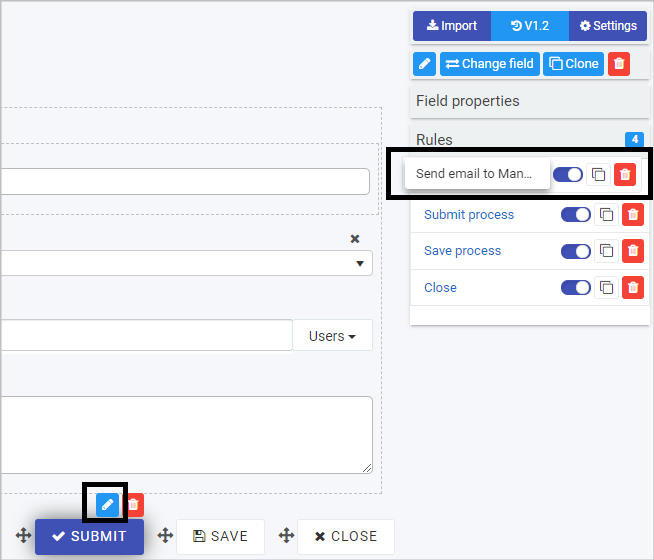
For example, for a Submit button on a form you may want a Send email rule to be executed first before any other rule is executed. To do this, click on the Submit button to make sure you are in Edit mode, and under Rules in the right-hand pane, drag the Send email rule to the top of the list of rules by clicking on the rule and dragging it to the top.

Rule order

Rule order

Rules list

This table contains a full list of the available predefined rules.

Rules by category and title

Rules list

What’s next Idea icon

To learn more about control fields, go to Controls.

To find out how to get the most out of rules, see Conditions and Expressions.

3 - Conditional logic

Conditions are a key component of Kianda rules. They are the triggers that result in fully dynamic forms and add an important level of interactivity, creating pathways within a process based on user interaction.

Conditions work on the ‘if…then…else’ principle: ‘if’ the condition exists ’then’ an action happens, ’else’ another action happens. There are three parts to applying a condition to a rule (depending on the rule that is used):

  1. Create the condition(s)
  2. Create the action(s) that will be applied as a result of the first condition being in place
  3. Create the otherwise action(s) based on other conditions being in place

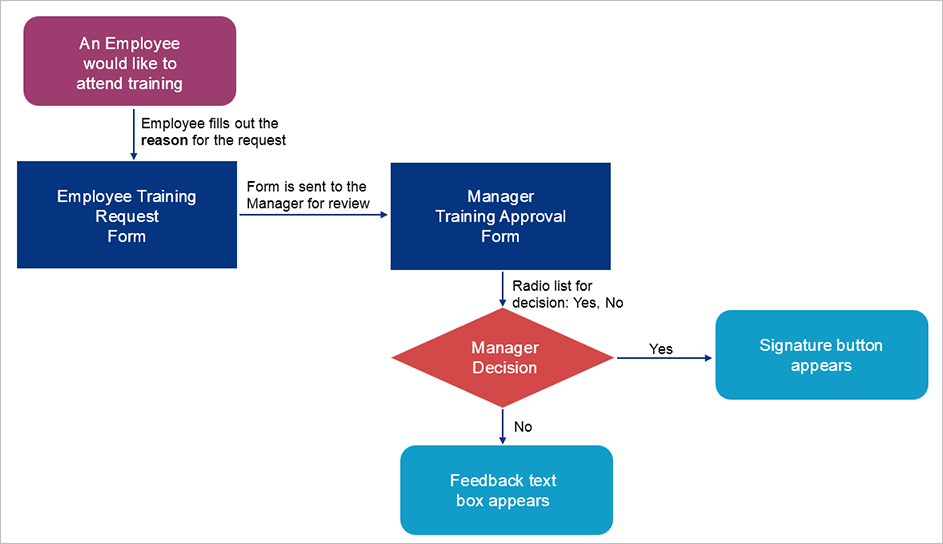
For example, let’s take a simple Training Request and Approval Process, whereby an employee fills out a request form, the details of which are sent to a manager for review in an approval form. In this approval form, the manager can either a) approve the request with a signature or b) not approve the request and provide feedback on why.

Training Process flowchart

Training Process flowchart

A condition is created based on the Manager Decision radio list:

  1. Condition: If the decision is ‘Yes’
  2. Action: Then the Signature button appears
  3. Otherwise action: Else the decision is ‘No’ and the Feedback text box appears

One of the most commonly used rules that uses conditions is the Workflow rule Hide or Disable. This is used as an example in the video and in the Getting started section below.

Using conditions in rules: Example of Hide or disable

Getting started with conditions

Conditions are recognisable in Kianda from the Conditions button Conditions button found in rules and dashboards.

To create a condition:

  1. Select a form or forms, field or fields and then, a rule, for example Hide or disable, as found in the left side menu > Add a rule > Workflow > Hide or Disable.
  2. Click on Edit conditions.
  3. Click on Add a conditions group.
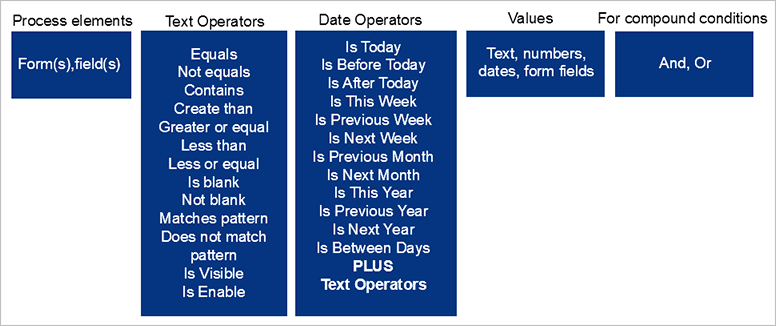
  4. In the Edit conditions dialog box, choose from the elements below, by drilling down to the form(s) or field(s) that you want to apply the rule to.

Condition elements

Condition elements

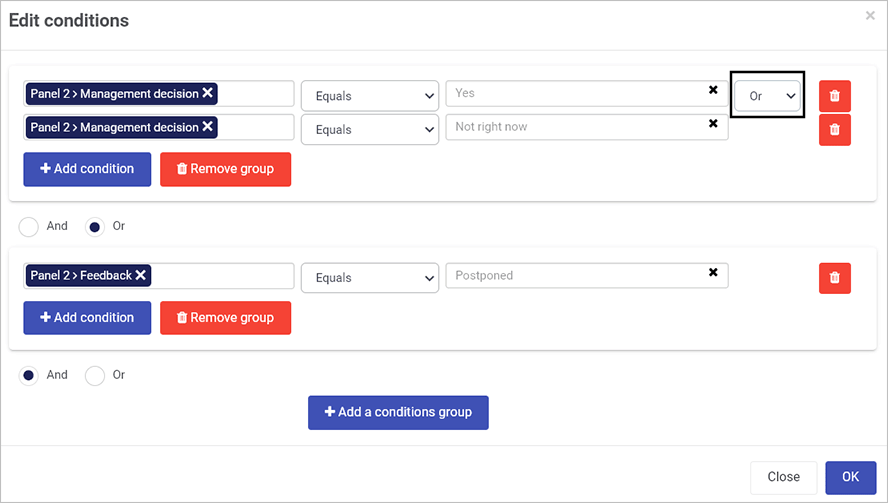
In the case of multiple conditions, you can use And or Or to create compound conditions.

Compound conditions

Compound conditions

  1. Click on OK.
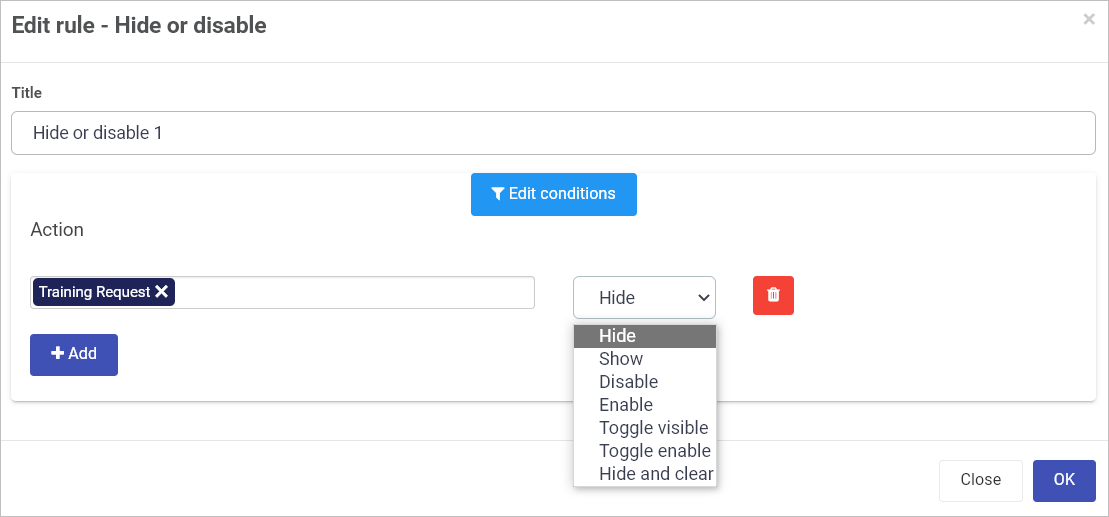
  2. Create the actions and, where applicable, otherwise actions. The action will depend on the rule that is chosen. For example, for the Workflow rule, Hide or Disable, click on the field under Action and choose the form(s) or field(s) where you want an action applied.

Action elements for Hide and Disable

7 actions for Hide or Disable

  1. Then click on the field for actions and choose one of seven possible actions to apply.

    The actions within Hide or disable are:

    a) Hide will hide a process element (forms or fields) from view

    b) Show will show the element

    c) Disable blocks a user from editing an element

    d) Enable allows a user to add a value to an element

    e) Toggle visible will toggle between showing an element or not, based on subsequent clicks of a field that the rule is applied to

    f) Toggle enable will toggle between allowing an element to be edited or not, based on subsequent clicks of a field that the rule is applied to

    g) Hide and clear will allow you to hide a process element and clear the details. For example, if a toggle button has this rule applied, with an otherwise action of show as actions on a textbox, then if one value is chosen on the toggle button, the user is allowed enter details into the textbox, otherwise the field is hidden and cleared of data so that no data can be retrieved; this may be useful for sensitive information like a social security number on a form.

  2. Click on + Add to add more actions.

  3. Click on Add otherwise action to add more actions based on other values for the condition.

The video demonstrates how a condition works within the Hide and Disable rule and highlights that multiple groups of conditions can be used to impact multiple actions to create highly sophisticated form interactions.

User tip Target icon

You can use rules to create actions without conditions too. In this case, the rule will simply execute - for example, when the form or field is clicked on.

What’s next Idea icon

To learn more about controls (fields) go to Controls.

To find out more about how expressions are used in rules go to Expressions.

4 - Expressions

Expressions allow you to put together form identifiers and constants with operators and functions to return a dynamic value that can be used in a rule to automate processes.

For example, expressions could be used in the body of an automated email sent using the Send email rule, as shown here.

Expression examples

Expression examples

In the example above, [RequesterName] and [category] are identifiers, that are unique IDs for form fields. ProcessLink() is a function that will return a link to that process instance. Using these expressions in an email will mean that every time an instance of the process runs, the values will be presented in an automated email, creating greater efficiencies and personalising the email for the recipient.

One of the most commonly used rules that uses expressions is the Communications rule, Send email - we will use this as an example in the video and in the Getting started section below.

Using expressions: Example of Sending email

Getting started with expressions

Expressions are recognisable in Kianda from the Expressions button Expressions button found in edit rule dialog boxes and other menu items, such as enabling quick actions for processes.
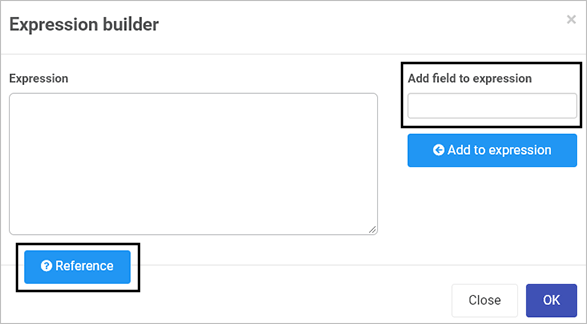
Within rules, expressions can be created using the Expression builder where you can select Add field to an expression or use the handy Reference guide to get a list of commonly used functions.

Expression builder

Expression builder

Now let’s go step by step through the process of adding an expression to the Body of an email that is being sent using the Send email rule. To create an expression:

  1. Select a form or forms, field or fields and then, a rule, for example Send email, as found in the left side menu > Add a rule > Communications> Send email.
  2. Under Action, click on the Expressions button Expressions button beside Body.
  3. Click on the field under Add field to expression and find the field you want to reference in your email - for example, a text box titled EmployeeName.
  4. Click Add to expression.
  5. Click OK.
  6. To add additional field expressions, click on the Expressions button Expressions buttonagain, under Add field to expression, click on X beside the field name to clear the expression box and then search for the desired field from a form.
  7. To add a function, click on Reference and copy the function into the body of the email. A list of expression functions are available here:
    • (+, -, /, *) operations - Perform basic math operations
    • Sum(arg1, arg2, …) - Returns the sum of the provided arguments
    • Date(arg1) - Converts the argument into a date
    • DateAdd(dateArg, day, month, year, hour, min) - Adds time to a date. The arguments day, month, year, hour and min represent the number to add for each respective argument
    • Status() - Returns the process status
    • ProcessID() - Returns the process ID
    • FormOwner(‘formName’) - Returns form owners for a given form
    • FormCompleted(‘formName’) - Returns form completed date for a given form
    • Pad(value, size, symbol) - Adds left padding to the value with the symbol provided
    • QueryString(‘parameter’) - Returns the URL query parameter or empty string if undefined
    • IsOnline() - Returns “yes” or “no” if the current has connectivity or not
    • ProcessLink() - Returns the html link to the current process. For use in emails or rich text fields.
    • Digest() - Returns the summary of field changes of a process
    • Digest(’*fieldName1*’,’*fieldName2*’) - Returns the summary of field changes for the selected fields
    • GetFieldText(’*fieldName*’) - Returns the field text
    • GetFieldValue(’*fieldName*’) - Returns the field value
  8. Click on OK when complete.

What’s next Idea icon

To learn more about control fields go to Controls.

To find out more about how conditions are used in rules go to Conditions.