Expressions
Expressions allow you to put together form identifiers and constants with operators and functions to return a dynamic value that can be used in a rule to automate processes.
For example, expressions could be used in the body of an automated email sent using the Send email rule, as shown here.
Expression examples

In the example above, [RequesterName] and [category] are identifiers, that are unique IDs for form fields. ProcessLink() is a function that will return a link to that process instance. Using these expressions in an email will mean that every time an instance of the process runs, the values will be presented in an automated email, creating greater efficiencies and personalising the email for the recipient.
One of the most commonly used rules that uses expressions is the Communications rule, Send email - we will use this as an example in the video and in the Getting started section below.
Using expressions: Example of Sending email
Getting started with expressions
Expressions are recognisable in Kianda from the Expressions button  found in edit rule dialog boxes and other menu items, such as enabling quick actions for processes.
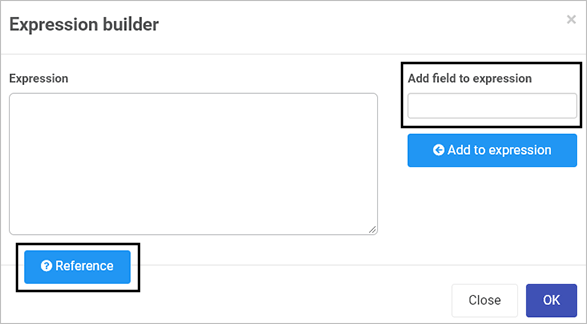
Within rules, expressions can be created using the Expression builder where you can select Add field to an expression or use the handy Reference guide to get a list of commonly used functions.
Expression builder
Now let’s go step by step through the process of adding an expression to the Body of an email that is being sent using the Send email rule. To create an expression:
- Select a form or forms, field or fields and then, a rule, for example Send email, as found in the left side menu > Add a rule > Communications> Send email.
- Under Action, click on the Expressions button beside Body.
- Click on the field under Add field to expression and find the field you want to reference in your email - for example, a text box titled EmployeeName.
- Click Add to expression.
- Click OK.
- To add additional field expressions, click on the Expressions button again, under Add field to expression, click on X beside the field name to clear the expression box and then search for the desired field from a form.
- To add a function, click on Reference and copy the function into the body of the email. A list of expression functions are available here:
- (+, -, /, *) operations - Perform basic math operations
- Sum(arg1, arg2, …) - Returns the sum of the provided arguments
- Date(arg1) - Converts the argument into a date
- DateAdd(dateArg, day, month, year, hour, min) - Adds time to a date. The arguments day, month, year, hour and min represent the number to add for each respective argument
- Status() - Returns the process status
- ProcessID() - Returns the process ID
- FormOwner(‘formName’) - Returns form owners for a given form
- FormCompleted(‘formName’) - Returns form completed date for a given form
- Pad(value, size, symbol) - Adds left padding to the value with the symbol provided
- QueryString(‘parameter’) - Returns the URL query parameter or empty string if undefined
- IsOnline() - Returns “yes” or “no” if the current has connectivity or not
- ProcessLink() - Returns the html link to the current process. For use in emails or rich text fields.
- Digest() - Returns the summary of field changes of a process
- Digest(’*fieldName1*’,’*fieldName2*’) - Returns the summary of field changes for the selected fields
- GetFieldText(’*fieldName*’) - Returns the field text
- GetFieldValue(’*fieldName*’) - Returns the field value
- Click on OK when complete.
What’s next 
To learn more about control fields go to Controls.
To find out more about how conditions are used in rules go to Conditions.
To return to the previous pages click on the links below 
Feedback
Was this page helpful?
Glad to hear it! Please tell us how we can improve.
Sorry to hear that. Please tell us how we can improve.