What is No-Code Development?
No-Code development involves the creation of applications or business processes without the need to code. A no-code platform provides a Graphical User Interface (GUI) so that citizen developers or non-IT business professionals can easily create and deploy digital solutions to meet business needs.
Regardless of how the solution is created, the output must meet all the requirements of a modern web application - being accessible through all major browsers and platforms and responsive in design so that it can be used on a variety of devices.
Kianda form Designer provides an intuitive interface where both technical and non-technical users can quickly start building digital processes, forms and apps for use on any type of device.
You don’t need to know how to code to take advantage of Kianda’s key features to create modern web application design. These features include:
- Multibrowser and multidevice access to a platform which can be used online and offline.
- Intuitive Designer to create forms at a click, with options to clone and activate several forms together.
- Wide array of predefined fields to choose from.
- Responsive form layout.
- Vast selection of properties and settings to customise your design.
- Connection to external datasources to create up-to-date, scalable processes such as highly dynamic forms. For example, lists with cascading dropdown options.
- Ability to allow multimedia capture and image annotation through forms.
- Rules to make forms reactive and interactive.
- Anonymous forms so that processes can be shared externally.
- Dashboards to monitor processes in detail.
- Options to create custom fields, rules and dashboard widgets
Click on each of these links to find out more.
Multibrowser and multidevice access
Kianda is a Progressive Web Application (PWA) which means it can be used across a range of up-to-date browsers, on any platform - Windows, MacOS or Linux - and on any device. As a PWA, this means you can browse Kianda when not online, increasing engagement and availability.
This is particularly useful when operating in remote areas - for example, performing a maintenance check of a wind turbine or other equipment in the field, and capturing information in draft form for submission later on back at the office.
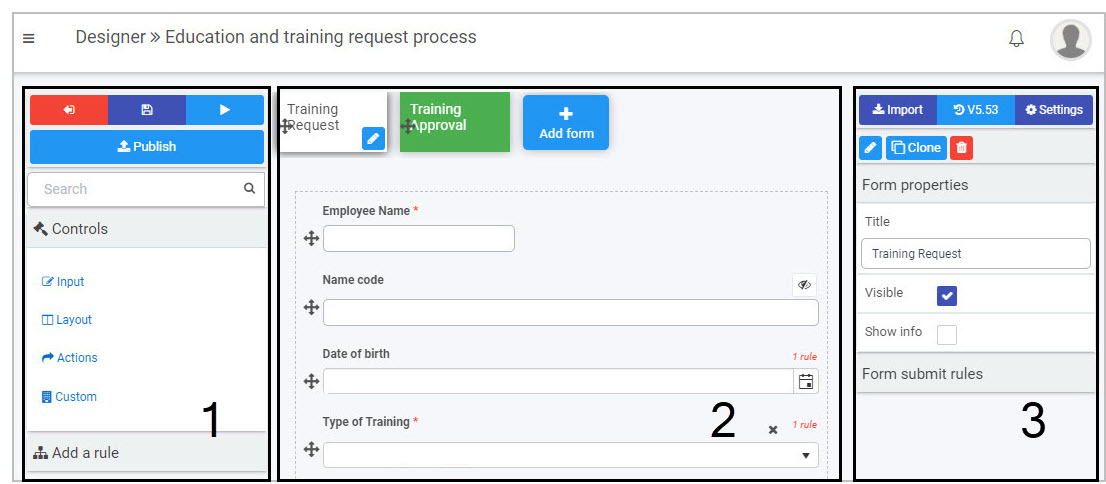
Intuitive Designer
Kianda form Designer provides an easy way to build forms and process components.
The key components of the form designer are:
- Left-hand pane is used to add form elements like controls and rules. This pane also houses the Exit Designer
 Save
Save  Preview
  and Publish
  buttons.
 - Central form canvas displays the current form you are working on and show the changes you are making in real time.
- Right-hand pane is used to view and edit process, form and field properties and rules.
Kianda Designer
For more information, go to Designer and view the following video.
How Kianda Designer works
Predefined fields
Kianda comes with 16 predefined field widgets, see Controls for a full list. You can also use Kianda Developer to create custom fields if you have some development experience and none of the predefined field widgets satisfy your specific needs.
The default fields fall into four main categories:
- Input - Input fields include the most common data fields such as textbox, user picker, date field, table, checkbox, drop-down and number fields.
- Layout - Layout fields are the fields that serve the purpose of perfecting the layout of your form. They include responsive panels, dialog box, field groups and rich text fields.
- Action - Action fields are fields that allow user interface actions like buttons, links or even signature components.
- Custom - Under custom fields, you will find any custom-developed fields developed using Kianda Developer.
For example, layout fields play an important role when building a modern user interface as they allow you to add Richtext and Dialog boxes. You can use these fields together to create a modal dialog, allowing you as the form designer to create an alert for a form user - for example, when requiring user confirmation or making a final decision or check.
Example of fields in action - creating a modal dialog
Responsive form layout
Form fields are made to with a mobile-first approach, giving you design once and deploy everywhere opportunity.
By using the Layout option in the property panel, you will be able to simply define the layout of your fields or panels within a form. Clicking on the Collapse or expand  button quickly uncovers the layout mode for desktop and mobile.
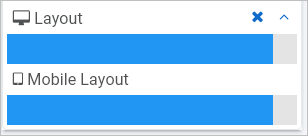
This allows you to specify a layout made of 1 to 12 columns and is based on bootstrap, a popular CSS framework that allows you to design web interfaces with a mobile-first approach. You can see this layout in action in this video.
Editing forms
Properties and settings
Kianda form usability is brought to life with the help of the various input fields that are specifically adapted to work in mobile, tablet or desktop modes.
For each type of input field - such as textbox, date picker, numeric input, file upload and table - Kianda offers a flexible array of controls that can be adjusted through properties and settings to work with a myriad of scenarios.
Each field comes with its own range of settings like autofill for textbox and currency format for numeric input.
These are some of the common properties of input fields:
- Title - Each field comes with a title property that is usually displayed on top of the field and can serve as a prompt to a user.
- Required - Using this checkbox makes a field mandatory for form users to fill in.
- Visible - Displays the field in the form if checked.
- Layout - Defines both desktop or mobile layout.
In addition to these common properties, each field also has its own range of settings. For example, a list can have data entered manually, via a form, or from an external data source such as SharePoint or Salesforce and that list can be displayed as a dropdown, radio, multiselect or checkbox list.
Connecting to datasources
By connecting Kianda forms to existing external datasources such as lists in SharePoint, Google Drive or SQL tables, your processes will always stay relevant, up-to-date and perform as your data grows, creating a scalable solution.
There are currently 19 different predefined data connectors that allow you to connect external data sources to Kianda processes, as outlined in this video.
Example connecting to a SharePoint datasource
The example in the video shows how a list field that is connected to SharePoint information can be used in a form, so that as the list grows on SharePoint, the information in the Kianda process will update dynamically.
The list field, in conjunction with datasources, allows you to define an unlimited level cascading dropdown hierarchy very easily.
Cascading dropdown example
Let’s say, for example, that you have SharePoint or Salesforce lists of customers in different countries and different cities. You can then use the list data source conditions options to filter content based on that parent list.
This video shows how cascading lists connected to data sources works in practice.
How to create cascading dropdowns
Multimedia capture
When creating forms, there are options to capture user input in a variety of ways - for example, by clicking on radio buttons, selecting options from dropdown lists, entering text, uploading files, capturing images, videos, QR codes and voice input. This video goes through some of the possiblities you have when building forms with Kianda.
Examples of possibilities with Kianda forms
Rules
Rules are an important component of any process as they can be used to trigger automated actions, requiring minimal user management once created. There are 60 predefined rules in Kianda, covering areas such as workflow applications, communications and file management.
This video goes through an example of a rule that sends an automated email once a Submit button is clicked on a form.
Examples of possibilities with Kianda forms
Anonymous Forms
Anonymous forms are a great way of allowing people outside of your organisation to interact with your processes - for example, simple feedback forms to GDPR data requests that hop between multi divisions before sending back a response to the requester with the level of information held by the organisation.
Even with a simple contact form or feedback form, the process rarely ends when the form is submitted. There is always a process or a series of steps behind each public/anonymous form that might culminate with an actionable result that goes back to the person who started the submission.
Anonymous forms can be embedded in iframes and safely displayed within other web-based applications.
Dashboards
Use Kianda’s predefined widgets to create charts in a dashboard page for your process. There are seven different widgets that allow you to visualise different aspects of your process, allowing you to zone in on key data you want to highlight.
Creating a dashboard
Creating custom fields
The Custom fields section of Kianda, called Developer, provides access to fields that are built for extensibility of Kianda capabilities. It is particularly useful in situations where existing fields or rules will not provide the required functionality.
Custom fields have the purpose of providing a user interface for end-users. If you need to build “an action”, then you should use a custom rule widget.
Custom fields allow developers to build a reusable component that can then be used by process designers in real processes.
Check-out the development section for more details on how to build custom widgets in Kianda.
What’s next 
To start your no-code development journey, follow these simple steps:


Feedback
Was this page helpful?
Glad to hear it! Please tell us how we can improve.
Sorry to hear that. Please tell us how we can improve.