How does Kianda Low-Code Development Work?
Introduction to the technologies used
As Kianda is built using front-end technologies like CSS and JavaScript, you can use your software development skills to customise your given workspace design and functionality by editing files found under the Subscription function.
More specifically the building blocks of the Kianda platform are Ember.js and Handlebars. These are explained in more detail below. It is important to have some knowledge of Ember.js and Handlebars when creating custom widgets for dashboards, data connectors, fields and rules as part of Kianda’s low-code development interface, Kianda Developer.
Ember.js 
Kianda uses Ember.js, an open-source JavaScript web framework used to build highly interactive applications that work on any device. Ember is built using JavaScript hence the .js extension.
The Ember.js environment provides you with the tools to develop your applications, like libraries, templates, models and so on. One of the tools used more specifically used building Kianda form components is the Handlebars templating library described below.
The beauty of Ember.js is that it allows you can create advanced web applications with less code. To read more about Ember.js go to https://guides.emberjs.com/release/ and also best practices Using the Ember Inspector for information on using the Ember inspector to view existing code.
Handlebars 
Ember.js uses the Handlebars templating library to build the user interface for applications. Handlebars uses a template and an input object to dynamically generate HTML or other text formats. Handlebars also includes built-in helper functions and allows you to build your own custom helper functions. To read more about Handlebars go to https://handlebarsjs.com/guide/ and also Templating basics for more information.
What can you do as a developer
Using your administrator role, and accessing Administration functions there are several ways you can customise your Kianda environment as a developer, typically by:
-
Editing the Global JavaScript file
-
Editing the Global CSS file
-
Building widgets for rules, fields, dashboards and data connectors using Kianda Developer
-
Customising list widgets to present data in dashboards
-
Creating beautiful rich text for emails and forms
In addition to the above customisations, you can use your JavaScript knowledge to create smart expressions that can be used in text box, number and rich text fields, as well as anywhere that uses rich text like Send email rule body text for emails, Meeting request rule and rich text widget for dashboards.
Click on the links above to get more information on the areas mentioned. Building custom widgets is introduced below.
Kianda Developer
Kianda comes with several pre-defined field, rule, data connector and dashboard widgets. In case you want to create something else to satisfy your specific needs you can create your own custom widget if you have some level of development skills in JavaScript and HTML.
Kianda offers a user-friendly interface, Developer, to create custom widgets in a few minutes. A custom widget could be a ‘Field’ widget or a ‘Rule widget’, for example getting started to create a custom field widget as shown in the video below.
Using Kianda Developer you can create reusable widgets, allowing you to extend the functionality of the system. There are four types of widgets you can create:- Field or control widgets - that allow you to create elements that will appear on screen to user
- Rule widget - these are used to automate actions, like extracting data from a form or setting a particular status within a process
- Dashboard widget - used to create a particular type of display in a dashboard page
- Data connector widget - used to connect to a particular data source so that Kianda can push or pull information to/from that data source
Using Kianda developer
You can access Kianda Developer if you have an administration or developer role. To use Developer:
-
In the left-hand side pane click on Administration and then click on Developer.
-
Any customised widgets that have been created within your organisation will be visible in the Developer resources main widget view. Here you can see widgets by name, when the widget was last modified, who modified it, and the widget type.

-
From the Developer resources main widget view you can:
-
View the widget creation history by clicking on the Version History button

The Version history dialog box opens showing the different versions of the widget. From here you can restore a version of the widget by clicking on the Restore button
 . Click on Close to exit the dialog box.
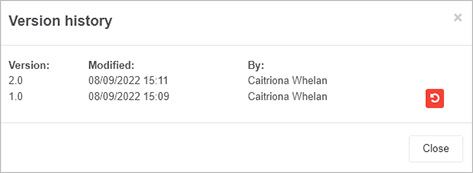
-
Edit a widget by clicking on the Edit (Pen) button

-
Delete a widget by clicking on the Bin/Trash button

-
-
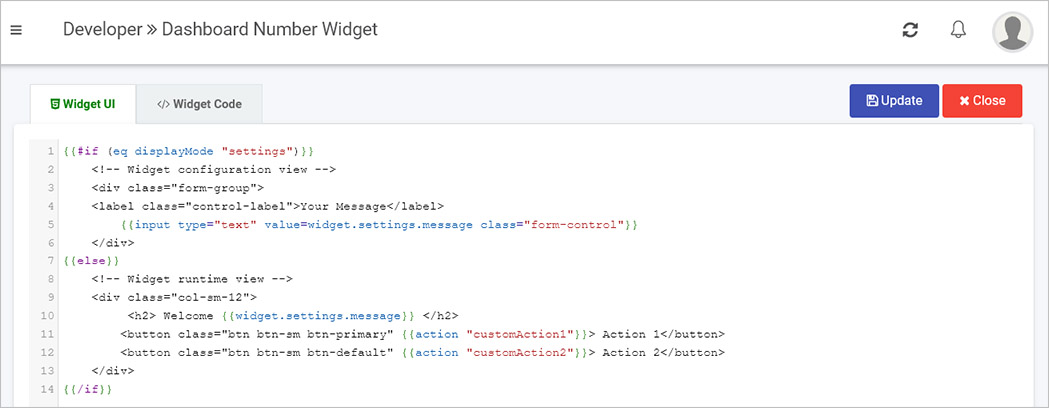
To view details for existing widgets, click on the widget name such as ‘Dashboard Number widget’ as shown in the list above.
-
In the Widget page you can update existing Widget UI and Widget Code within the editor and then click on Update
 . Alternatively click on Close to exit the page at any time.
 -
To create a new widget click on New widget
 . This will open the Edit widget dialog box.
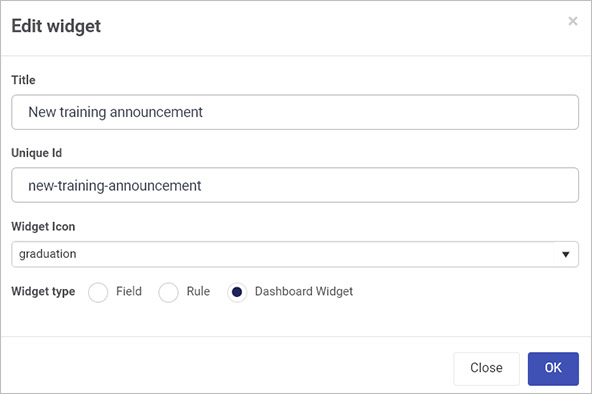
Fill out details as follows:
-
Title - fill out a title for the widget.
-
Unique Id - this is a unique value that is autofilled from the Title.
-
Widget Icon - choose an appropriate icon from the drop-down list.
-
Widget type - choose from Field, Rule, Dashboard widget or data connector widgets.
Click on the links above to learn more about building specific types of widgets.
-
-
When you are finished editing the dialog box click on OK or click on Close at any time to exit. The output is shown in the next section.
When a custom widget is created it can be exported within a Kianda file along with process design and/or dashboards, or on its own. This file can then be imported into the same or different Kianda environments of your choosing, giving you flexible access to your custom widgets. To learn more about this, see Exporting processes and Importing processes.
Example of a Field widget
The code blocks below display the default code for ‘Widget UI’ and ‘Widget Code’.
The ‘Widget UI’ uses Handlebars syntax and defines the HTML, handlers, expressions and more.
{{#if (eq displayMode "design")}}
	{{input required=field.required maxlength="4" type="text" value=field.text class="form-control"}}
{{/if}}

{{#if (eq displayMode "edit")}}
	{{input required=field.required maxlength="4" type="text" value=field.text class="form-control"}}
{{/if}}

{{#if (eq displayMode "settings")}}

{{/if}}

{{#if (eq displayMode "display")}}
	<p class="text-muted">{{field.text}}</p>
{{/if}}
The ‘Widget Code’ is written in JavaScript and defines the logics and functions.
{
 edit:function(){
 },
 display:function(){
 },
 settings:function(){
 }
}
For more information on the other areas of customisation/widget development, click on the links below:
Custom Connectors
Learn about custom connectors, what they are and why they are used
Feedback
Was this page helpful?
Glad to hear it! Please tell us how we can improve.
Sorry to hear that. Please tell us how we can improve.