Steps to create a custom connector
Introduction
This section will detail how to create a new Custom Connector which is a customised data connector for your organisation.
Note: You must be have an Administrator or Developer role to create a custom connector.
Before you begin
Please note before you begin that there are three key steps that need to be implemented in order to create and use a customised connector.
-
Microservice - create a microservice that will implement metadata, query and test functions, click on the Microservice link to get further details.
-
Use Kianda features to create and test your customised connector - use Developer to register a new connector and use Data sources to create a connector datasource for the newly customised connector.
-
Process - use the custom connector to bring data into a process and use the query hook to filter the data.
Register a new connector
To create a new customised connector, follow the steps below:
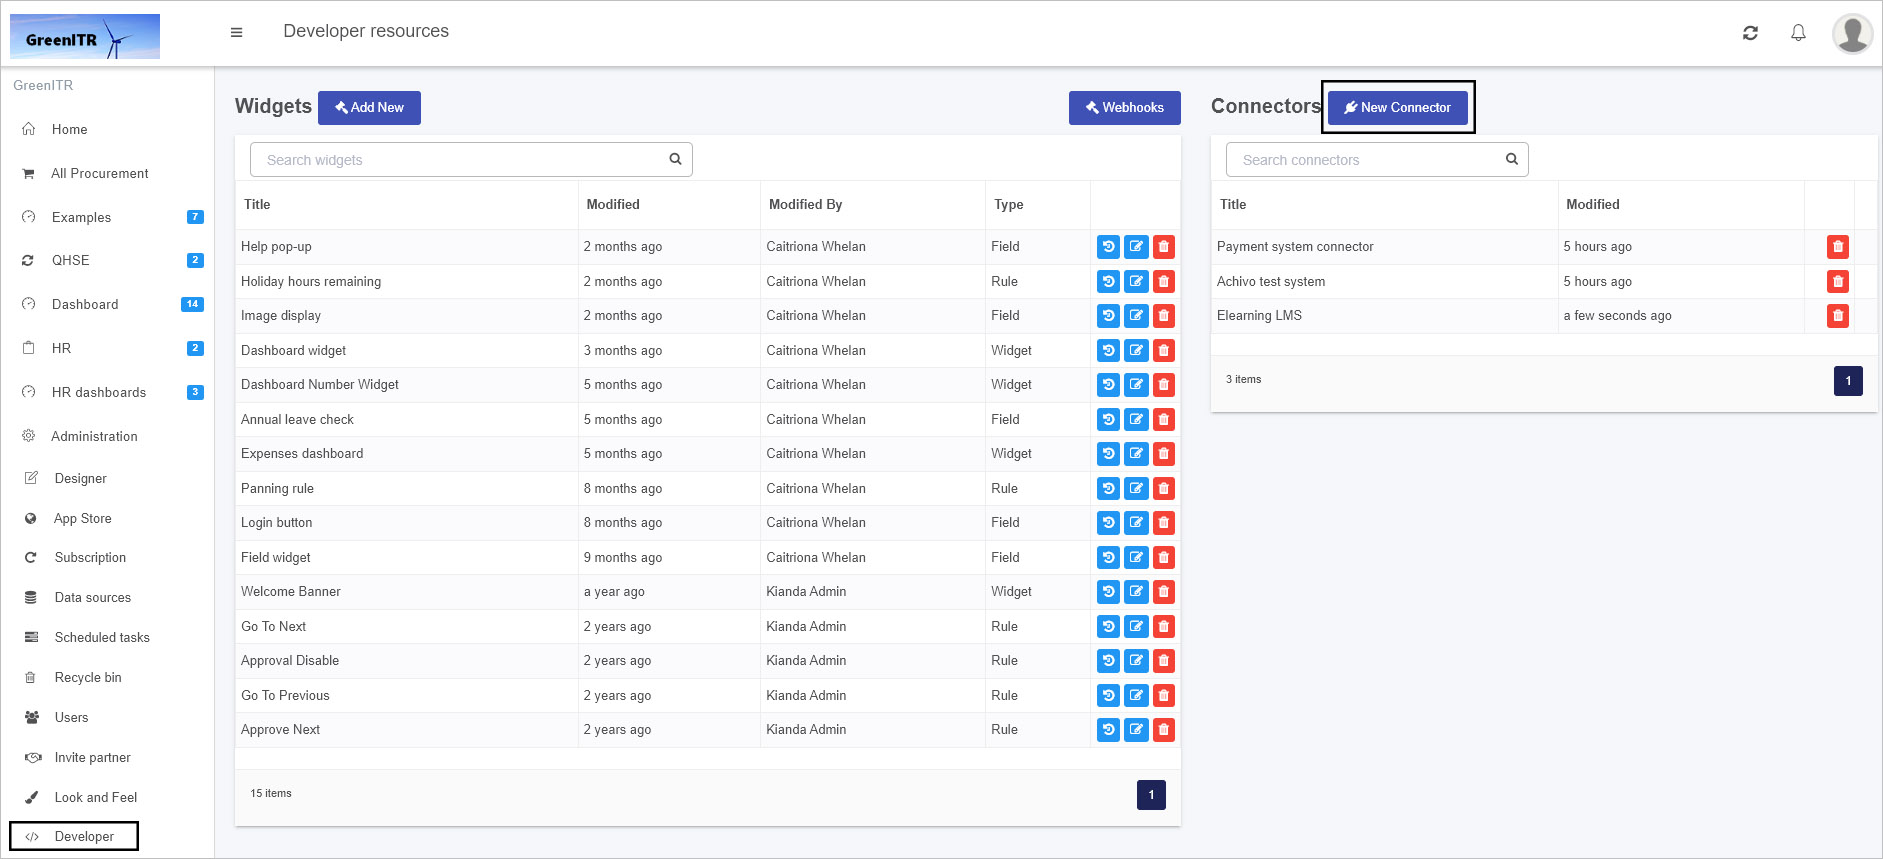
- From the left-hand side menu, go to Administration > Developer then within the Connectors panel click on New Connector.
-
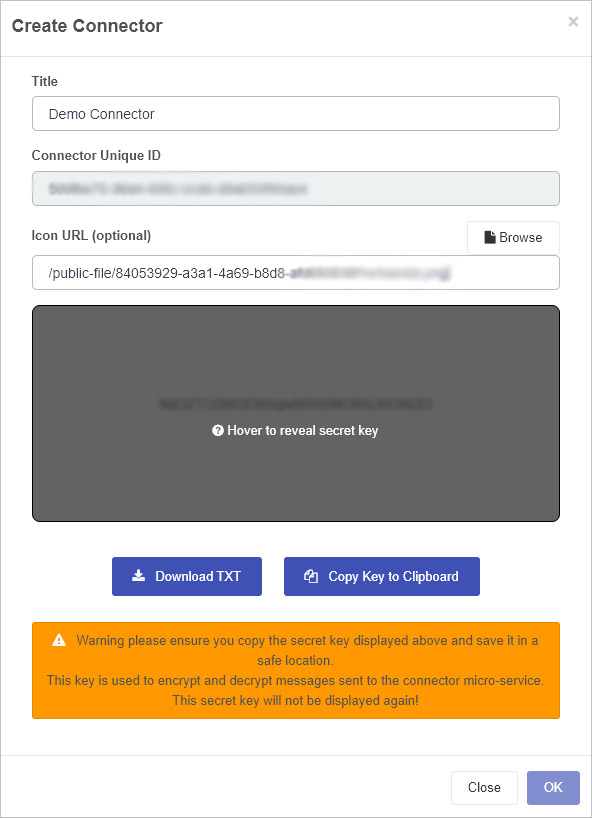
In the Create Connector dialog box, add a Title and browse for an Icon URL for your connector. The Connector Unique ID is automatically generated by the system.
-
Make sure to copy the secret key to a safe location where you will find it as it will be needed later. You can do this by a) clicking on Download TXT which will result in the Secret Key being downloaded as a CSV file or b) clicking on Copy Key to Clipboard, then click on OK when done.
-
Ensure that this secret key is added to your Microservice code, see Encryption and Decryption sample code, where you need to replace the string in the
GetSecretKeyfunction as shown below:private static string GetSecretKey() { return "{secret key generated from Kianda}"; //REPLACE ME } -
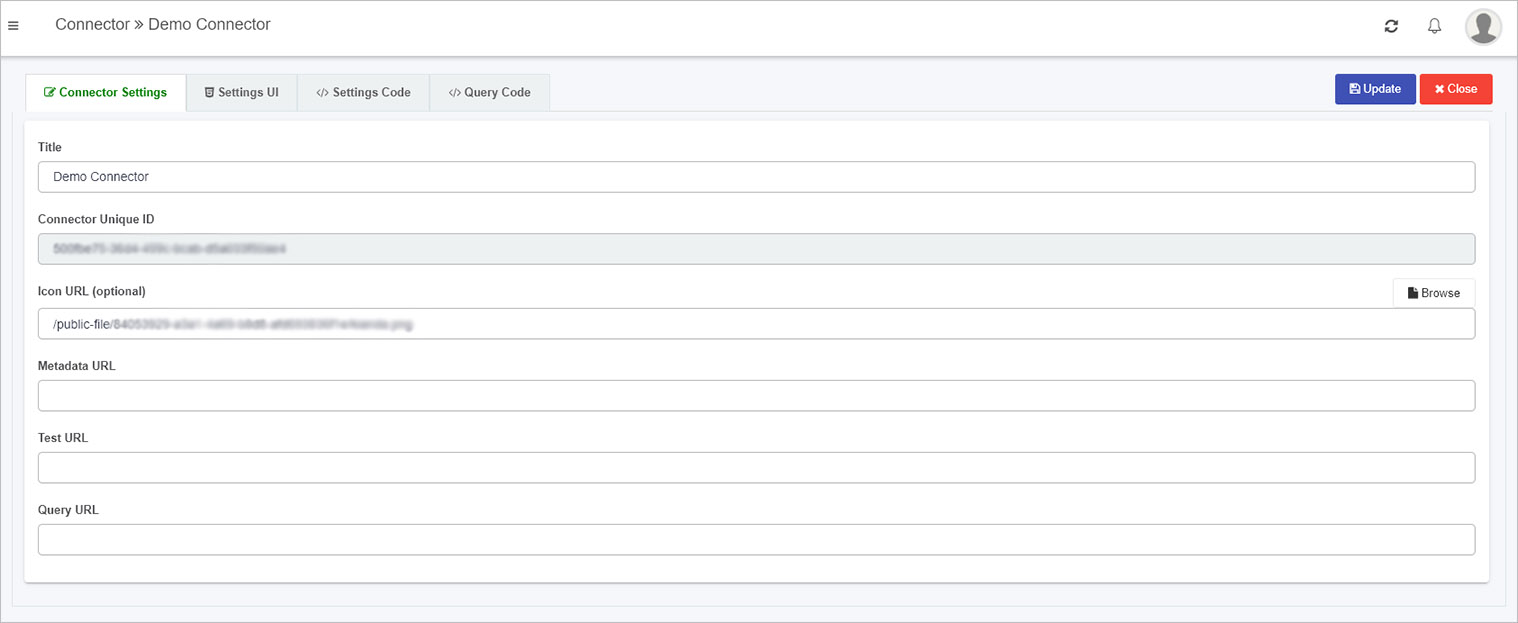
After populating the initial dialog box, the next screen will show you the title of the connector and contains four tabs: Connector Settings, Settings UI, Settings Code and Query Code.
The details of these tabs are found in the following sections.
Connector Settings tab
This is where the Connector Title and Icon can be changed. These details will be seen in the Data connectors function, once the customised connector is created.
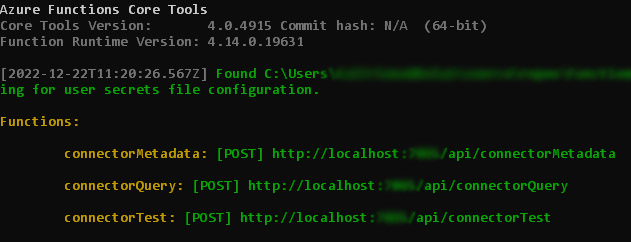
The URLs for metadata, test and query can be edited here too. The Metadata, Test and Query URL’s can be populated when the microservice is created, see Create a Microservice link for more details.
For example when your Microservice is running you should receive an output similar to the following shown using Azure functions and use these URLs in the Connector Settings tab.
To save details click on Update, then click on Close to return to the Developer resources page.
Settings UI tab
The Settings UI sets the user interface for a customised data connector within the Data sources function, found within Administration in the left-hand pane. By default there is sample code in this tab. This code will be rendered when the datasource for this connector is activated.
<div class="form-group">
   <label class="control-label">Client ID</label>
   {{input type="text" value=datasource.settings.clientID class="form-control"}}
</div>
<div class="form-group">
   <label class="control-label">Readwrite </label>
   {{radio-button default=true name='readwrite' label='No' value='no' group=datasource.settings.readwrite}}
   {{radio-button name='readwrite' label='Yes' value='yes' group=datasource.settings.readwrite}}
</div>
<div class="form-group">
   <button type="button" class="btn btn-primary" {{action 'authorize'}}>
   {{#if datasource.settings.authorized}}
   Re-Authorize
   {{else}}
   Authorize
   {{/if}}
   </button>
</div>
This code creates the content on the screen seen below, available in the Data sources function on the Datasource details page. Within the class form-group listed in the code above there is an Environment setting with labels ‘Demo’ and ‘Live’ which can be seen in the screen below. Also note an Authorize button added in the code above which has an action ‘authorize’ which is handled by the code in the Settings Code tab.
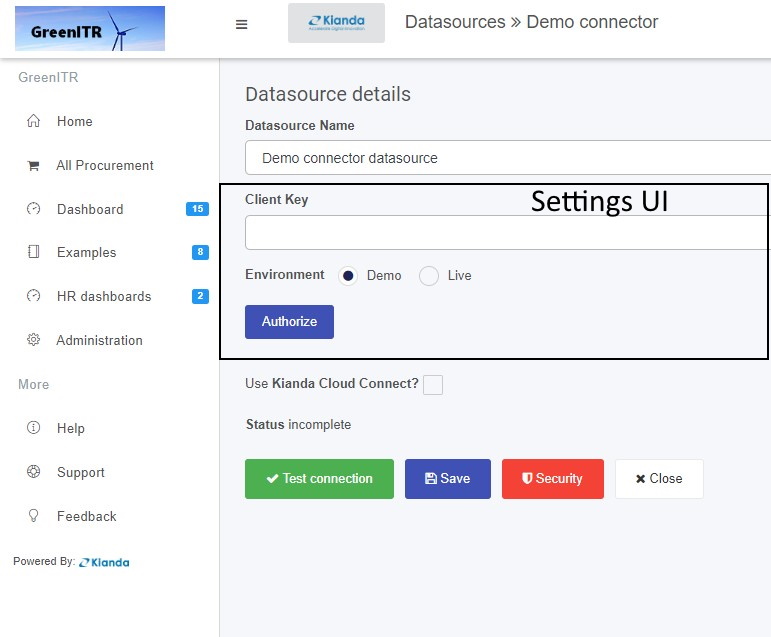
Other details on the screen above, like the name of the page Datasource details, Use Kianda Cloud Connect and buttons Test connection, Save, Security and Close are automatically part of the UI for customised data connectors. However, custom handlebars can be added for the settings of the connector datasource using code in the Settings UI tab, namely fields like Datasource Name and Client Key as shown in the image above. This principle works the same as Widget UI, which is seen when creating custom rule widgets or field widgets for example.
Settings Code
In a similar manner to creating custom rule widgets or field widgets where there are Widget code tabs, the connector widget has a tab called Settings Code which is used to create the JavaScript code for the settings UI.
By default there is code in this tab, for example the Authorize button shown in the Datasource details page above has an ‘authorize’ function which is the first segment of code below.
{
   actions: {
      authorize() {
         let clientId = this.get("datasource.settings.clientID");
         let redirectUri = 'https://app.kianda.com/index.html';
         let scope = 'openid User.Read.All Directory.Read.All ';
         var readWrite = this.get("datasource.settings.readwrite");
         if (readWrite === 'yes') {
            scope += 'Directory.ReadWrite.All Group.ReadWrite.All User.ReadWrite.All Directory.AccessAsUser.All';
         }
         this.set("scope", scope);
         let guid = uuidv4();
         let consentUrl = 'https://login.microsoftonline.com/common/oauth2/v2.0/authorize?' +
            'client_id=' + clientId +
            '&response_type=code' +
            '&redirect_uri=' + redirectUri +
            '&response_mode=query' +
            '&scope=' + scope +
            '&state=' + guid +
            '&prompt=login';
         var authWindow = window.open(consentUrl, '_blank', 'height=750,width=700,scrollbars=yes,location=yes');

         try {
            authWindow.focus();
         } catch (e) {
            $.notify('Error during authentication, please try again', {
               status: 'warning'
            });
         }
         var that = this;
         var handleCallback = function (evt) {
            if (that.isDestroyed !== true && evt.origin.indexOf('kianda.com') > -1 && evt.data) {

               let accessCode = evt.data;

               let scope = that.get("datasource.settings.scope");
               let openid = that.get("datasource.settings.openid");
               that.set('datasource.settings.accessCode', accessCode);
               that.set('datasource.settings.accessToken', null);
               that.set('datasource.settings.refreshToken', null);
               that.set('datasource.settings.authorized', false);
               that.set("datasource.settings.scope", scope);
               that.datasource.save().then(function () {
                  that.sendAction('test', that.datasource);
               });
            }


            window.removeEventListener('message', handleCallback);
         };
         window.addEventListener('message', handleCallback, false);
      }
   }


}
Other aspects to note in this sample code are the datasource settings, for example datasource.settings.accessToken and datasource.settings.environment denoting that you can add whatever settings you want to the UI within the Datasources details page using this type of code. These settings could be then used in a Microservice to create an action based on a chosen setting.
Query Code
When using a data source, all data sources will have built-in metadata, query and querySuccess functions to allow content searches, including metadata content or information about the content, such as title, author and creation date. The Query code tab contains the code needed for these three functions. Default code is provided to help you get started, see below.
{
  metaData(tree, datasource) {
    return tree;
  },
  query(datasource, query, rule, process) {
    return query;
  },
  querySuccess(datasource,rule,result,process) {
     //this.get("dataservice").mapSuccess(result,rule,process); //uncomment to use default mapping behaviour
    return result;
  }
}
The default code contains three hooks that allow you to tap in to a module to trigger certain behaviours or actions. These hooks are:
Click on each of the links above to see further details.
In Ember, bubbling will search for each of the actions in the code above, and if not found, then a default action is used, but if found the default is overwritten. This principle is useful when something is created multiple times which is the case when creating custom data connectors.
Metadata hook
The Metadata hook is where the return of the tree or metadata call can be altered for a chosen datasource used in Kianda form design.
The treeparameter as part of this hook is seen in the sample code snippet below.
  metaData(tree, datasource) {
    return tree;
  }
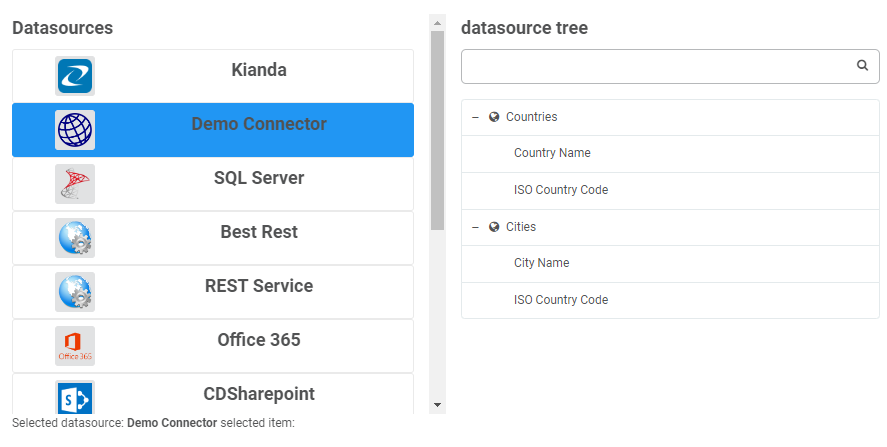
An example of the tree structure is shown below.
The tree follows the structure that there is a root node, in this example Countries and Cities is the root. The tree can be customised by adding an icon and making nodes selectable.
{
  "text": "Countries And Cities",
  "name": "countriesAndCities",
  "icon": "fa fa-database",
  "selectable": false,
  "nodes": [
    {
      "text": "Countries",
      "icon": "",
      "desc": "",
      "nodes": [
        {
          "text": "Country Name",
          "title": "Country Name",
          "name": "countryName",
          "type": "string",
          "desc": ""
        },
        {
          "text": "ISO Country Code",
          "title": "ISO Country Code",
          "name": "ISOCode",
          "type": "string",
          "desc": ""
        }
      ],
      "fields": [
        {
          "text": "Country Name",
          "title": "Country Name",
          "name": "countryName",
          "type": "string",
          "desc": ""
        },
        {
          "text": "ISO Country Code",
          "title": "ISO Country Code",
          "name": "ISOCode",
          "type": "string",
          "desc": ""
        }
      ]

    },
    {
      "text": "Cities",
      "name": "cities",
      "icon": "",
      "desc": "",
      "nodes": [
        {
          "text": "City Name",
          "title": "ISO Country Code",
          "name": "cityName",
          "type": "string",
          "desc": ""
        },
        {
          "text": "ISO Country Code",
          "title": "ISO Country Code",
          "name": "ISOCode",
          "type": "string",
          "desc": ""
        }
      ],
      "fields": [
        {
          "text": "City Name",
          "title": "ISO Country Code",
          "name": "cityName",
          "type": "string",
          "desc": ""
        },
        {
          "text": "ISO Country Code",
          "title": "ISO Country Code",
          "name": "ISOCode",
          "type": "string",
          "desc": ""
        }
      ]
    }
  ]
}
This structure will result in the output as shown in the image below,
Query Hook
The Query hook allows a query to the datasource to be customised. Parameters are passed into this function to allow customisation to happen. These parameters are: datasource, query, rule and process; sample schemas are available for each at the Sample schema link.
In the sample code below, the filter is obtained by drilling into the query conditions object. This is just one example of how the query can be customized before being processed, which is an advantage of using custom connectors. Take a look at the query schema for more information
 query(datasource, query, rule, process) {
    if(query.conditions)
    {
      query.filter = query.conditions[0].conditions[0].arg2.value;
    }
    return query;
  }
This ties in with the query success hook which handles the result which is returned from the datasource, which can also be customized.
QuerySuccess hook
The idea of the query success hook is to be able to customize the response of a datasource query for example drill into a complicated json response based on a condition.
querySuccess(datasource,result,rule,process) {
    // this.get("dataservice").mapSuccess(result,rule,process); //uncomment to use default mapping behaviour
   return result;
  }
Once the connector is created, the connector is available from the Data sources function under Administration, see Creating a datasource for details.
Feedback
Was this page helpful?
Glad to hear it! Please tell us how we can improve.
Sorry to hear that. Please tell us how we can improve.