Templating basics
Introduction
Kianda uses Ember.js to build modern web applications for your business, and in particular the Handlebars templating library to power the application’s user interface. Handlebars is a templating language that generates HTML or other text formats to build web pages. Handlebars allows two-way binding so that you can write data into models, and that data can be used by HTML to generate the final interface/screen.
Handlebar templates are written as expressions using double curly braces {{}} for example:
<p>{{firstname}} {{surname}}</p>
When the template is executed, the expressions above between the braces are replaced with values from an input object. For example in a Kianda form if a user types in values or a rule dynamically assigns values to text boxes for example, the values are applied to the input object as follows:
{
  firstname: "Ryan"
  surname: "B'Oul"
}
The expressions will be replaced by the values resulting in:
<p>Ryan B'Oul</p>
In this way you can define a JavaScript object like ‘person’ below, with properties ‘firstname’ and ‘surname’:
{
 person: {
  firstname: "Ryan"
  surname: "B'Oul"
  },
}
A dot notation can be used in the Handlebars expression to access the property of the ‘person’ object:
<p>{{person.firstname}} {{person.surname}}</p>
In this way the properties of the JavaScript object can be leveraged within the template above so that the generated HTML output is: Ryan B'Oul.
Handlebar basics
Handlebar templates contain static HTML and dynamic content inside Handlebars expressions. The advantage of this is that if the property changes, for example ‘firstname’ shown in the Introduction above, then the value dynamically changes in real time. This is because dynamic content inside a Handlebars expression is rendered with data-binding. This means if you update a property, your usage of that property in a template will be automatically updated to the latest value.
You can also use HTML with the Handlebars template as follows:
<h1>
{{person.firstname}}{{person.lastname}}
</h1>
In this way you can define the logic that you want and then update the properties of the objects as before.
You can also use built-in block-helpers with Handlebars to apply functionality that is not part of the Handlebars language. For example a built-in helper like each allows you to access the properties of objects using Handlebars expressions. For example you can have simple expression using an each statement as follows:
<ul class="employee_list"
 {{#each employee}}
  <li>{{this}}</li>
 {{/each}}
</ul>
You can have an list of employees:
{
 employee: [
   "Ryan B'Oul"
   "Mike Balcoome"
   "Maddie Lehane"
 ],
}
The dynamically generated output is the following HTML:
<ul class="employee_list"
 <li>Ryan B'Oul</li>
 <li>Mike Balcoome</li>
 <li>Maddie Lehane</li>
</ul>
For more information on Handlebars see https://handlebarsjs.com/guide/, for more information on Helpers see below.
Helpers
In the section above an example of each-helper was shown. This is an example of a built-in helper block that is available amongst other built-in helpers that you can use, see https://handlebarsjs.com/guide/builtin-helpers.html#if for other examples. Helpers are functions that can work out values and be used in templates. Helpers are written in JavaScript using Ember.js framework and used by Handlebars.
For example if we look the if built-in helper block, if can be used in a Handlebars expression as follows:
<div class="department"
{{#if manager}}
<h1>{{firstName}} {{lastName}}</h1>
{{/if}}
</div>
Properties can be passed through as follows:
{
  manager: true,
  firstName: "Mike",
  lastName: "Balcoome",
}
When the manager property is true, then the generated HTML output will be:
<div class="department">
<h1>Mike Balcoome</h1>
</div>
If the manager property is set to false, then the firstName lastName part will not display, in this way the helper is used to dynamically generate or hide the HTML output.
Creating your own helpers
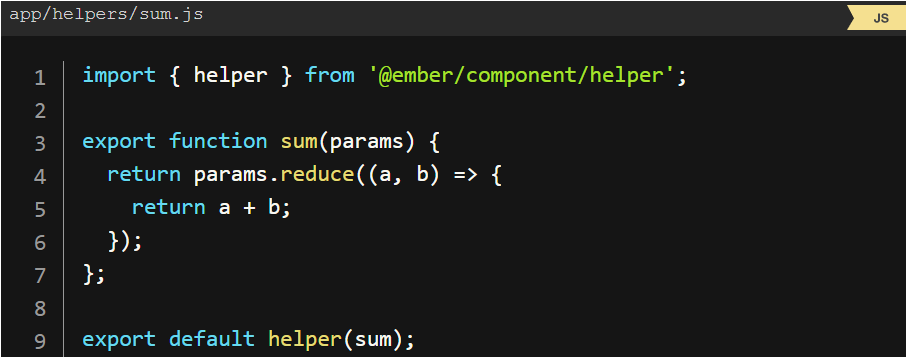
Using Ember.js gives you the ability to write your own helpers, to bring a minimum of logic into Ember templating. For example, let’s say you would like the ability to add a few numbers together, without needing to define a computed property everywhere you would like to do so, you could create the following JavaScript code:
Helper example
Conditionals
Statements like if and unless are implemented as built-in helpers. Helpers can be invoked three ways; inline invocation, nested invocation and block invocation. For more details, click on the following link https://guides.emberjs.com/v2.18.0/templates/conditionals/.
Feedback
Was this page helpful?
Glad to hear it! Please tell us how we can improve.
Sorry to hear that. Please tell us how we can improve.