This is the multi-page printable view of this section. Click here to print.

Return to the regular view of this page.

Form basics

Introduction

Processes in Kianda are made up of forms. Forms contain all the buttons, fields, and rule triggers needed to execute your process.

Using your Administrator or Design business process role, you will use Kianda Designer to design forms for end users who will use the platform to submit, save and review information, either as named users in the platform, users who receive a link to an anonymous form, or partners who can access shared processes. These end users will create new process instances or records in the system, or access existing process instances which shows information that has either been saved or submitted in a form.

When discussing forms we’ll talk about form design that is creating and updating forms within a process using Kianda Designer as well form use which refers to end users who will edit or read forms in a process instance/record in the system, built using the Designer.

Form design principles

As you work with Kianda Designer you are designing the ‘user interface’ for users to interact with a particular process. Keeping the end user in mind, there are three design principles:

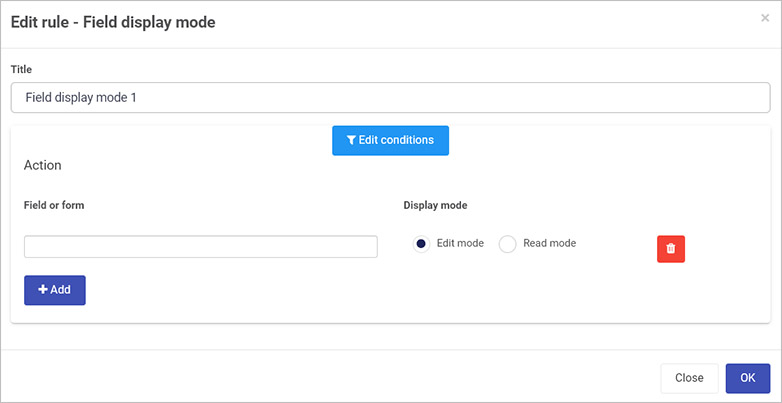
  1. Reading modes: Form users can either use/access forms in edit mode or read mode. Edit mode means that users can submit information, while read mode means that users can only view forms. The latter may be useful for example for certain staff to review customer feedback in a form, but not be able to change/edit the feedback form.

  2. Current form: Typically there are several forms in a process, and by default the first form in a process is the current form.

    Three form process example

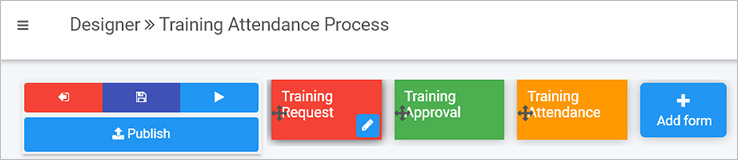
    For example in the Training Attendance Process above, the process flow is as follows:

    • Training Request - an employee initiates a process instance by filling out this form

    • Training Approval - the manager approves the request using this form

    • Training Attendance - when training approval occurs, a trainer invites the employee to attend training and once complete, the trainer completes a this form to evaluate the employee’s participation.

      Therefore when a process instance is initiated upon submission of the Training Request form, then the next form in the process becomes the current form, in this case the Training Approval form.

      Only the form that has the status ‘current form’ is editable by a form owner (see point 3 below). In a complex multi-step process, several forms can be configured to activate with the current form, meaning they are also editable at the same time, creating a form group, see section 2 of New form creation. Rules can also be used to change the workflow and make other forms the ‘current form’.

      Also note that all first forms in a process flow add the current user as a ‘form owner’ therefore allowing all users to edit the first form, as clicking on ‘submit’ or ‘save’ in the first form results in a new process instance.

  3. Form owner: The default owner is the person or group that the form is assigned to, this means they can edit the current form(s) in a process instance. Default owners are typically set when a form is created, see section 1 of New form creation below. By default, only this person or group can edit the current form in a process instance. All other users can only view forms in read mode. The default owner however can reassign forms to other individuals and/or groups. Form ownership can also be assigned dynamically using the Assign form rule.

These three considerations are established when the form is created, as seen in the dialog box below, and these parameters can be updated at any time by editing the form design. These properties can also change dynamically as a result of implementing rules, for example the Go to form rule can change the workflow in a process.

New form creation

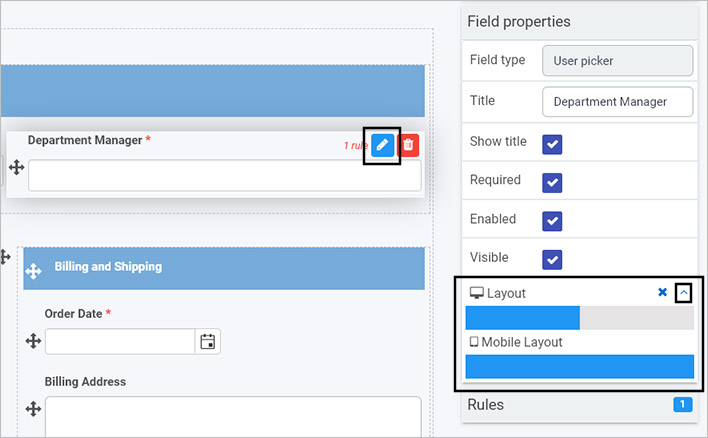
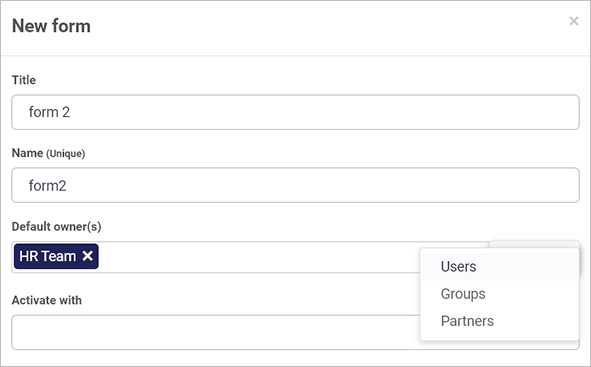
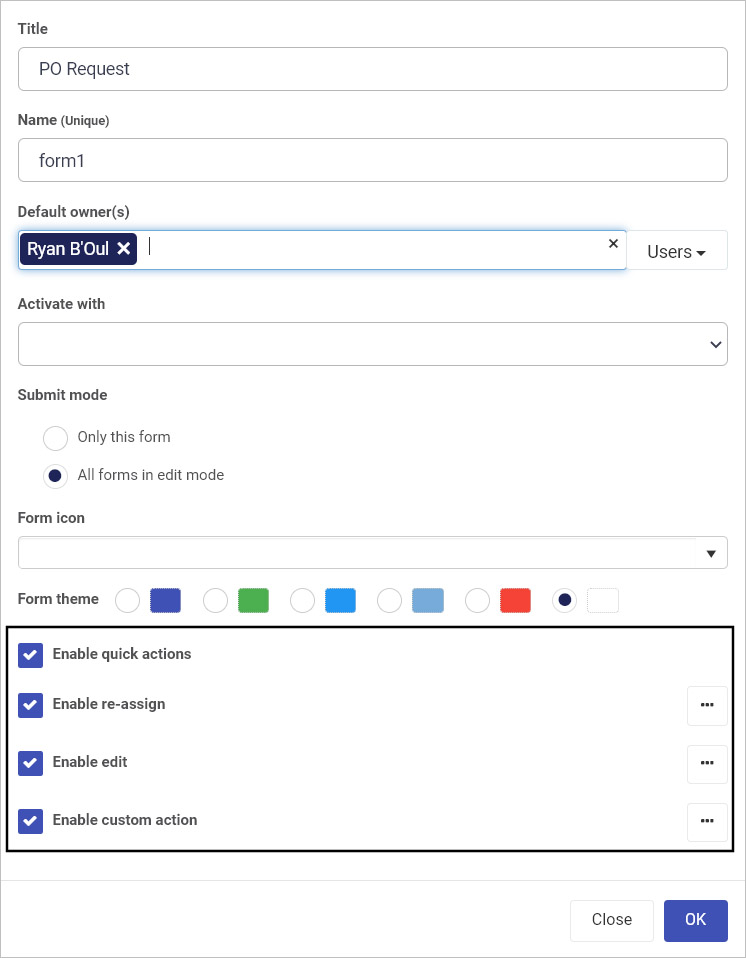
As mentioned in the Introduction there are certain considerations to keep in mind when working with forms. The image below shows a New form dialog box that is created when the Add form button is clicked in Kianda Designer. At any time if you click on a form and then the Edit/pen button Edit/pen button an Edit form dialog box appears which has the same parameters as the one shown in the image below.

New form dialog box

img

New form considerations
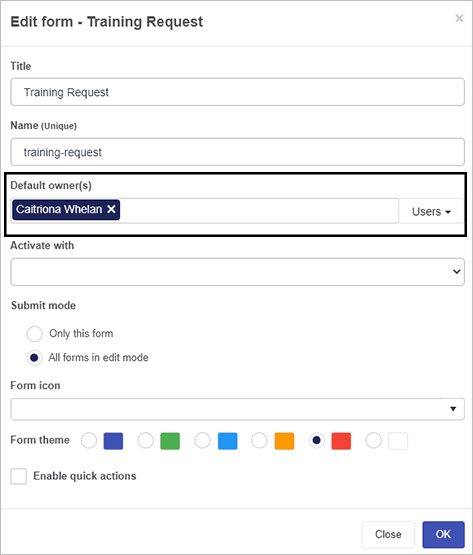
  1. The Default owner(s) field is where you can set individuals and groups as the default form owners who can edit the form.
  2. Activate with means that the form can be activated with other forms within the process, so they can be edited at the same time. This means several forms become the current form in a form group.
  3. Submit mode means that when a process instance is running you can choose only this form to be submitted, or you can choose all forms in edit mode meaning that several forms could have their details submitted or saved.
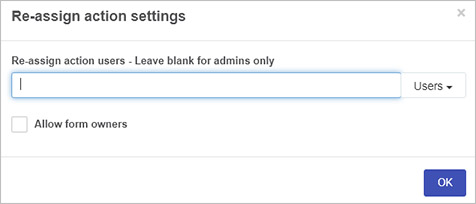
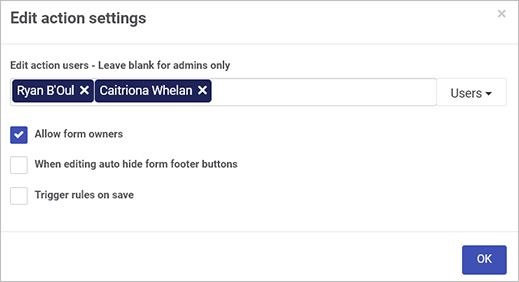
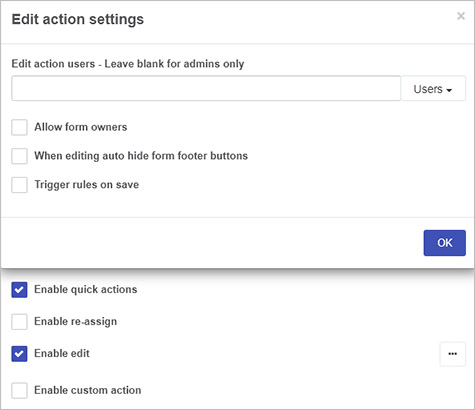
  4. Enable quick actions allows you to statically enable a) reassignment, b) edit, and c) custom actions on any form. For a) and b) you can choose individuals and/or groups who can reassign or edit forms. In the case of b) edit there are options to hide form footer buttons when editing, and to trigger rules on save against a set field when saving edits. For c) custom actions, you can set your own custom action and create an action label against a particular form field. This means that the user(s) assigning the custom action will see the labelled action designated for them. As a designer you can choose the action display mode as read-only, edit or both, so you can decide what type of access the user(s) will have.

What’s next Idea icon

We have briefly introduced the principles of working with forms. To read more about working with forms, click on the links below:

1 - Form owners

Introduction

When creating forms, it is important to consider form access during the design phase, that is who can access and edit forms in a process instance. For example if an employee submits a performance review form, a line manager may wish to access that submitted process instance/record and edit the form, adding in comments and performance grades.

There are two key principles to keep in mind in terms of form access:

  1. Forms are assignable - this means that forms can be assigned to individuals and/or groups, and then only they can edit the form, when it is the current form, in a process instance. The ‘assignee’ can be a combination of users and groups. There are various ways a form can be assigned to a user:

    ​ a) Using Rules, in particular the Workflow rule Assign form, see Assign form for details

    ​ b) Using Quick actions, see Form Quick action for details

    ​ c) Creating form owners when creating or updating a process design, see Creating form owners for details

  2. Only form owners can edit a given form when it is a current form in a process flow by default. Any other user with access to view the form will see it in read-only mode.

So what is form owner? A form owner is assigned when a form is created in Kianda Designer. Form owners can also be added to a form design at a later stage by editing the form. Only the form owner will be able to edit current forms in process instances (records), see below.

Getting started with Form owners

Creating form owners

  1. Click on a process by going to Administration > Designer and click on an existing process or create a new process by clicking on Add new and complete the Add new process dialog box.
  2. Then within Kianda Designer click on a form of interest and then click on the Edit/(Pen) Edit/Pen button button for that form.
  3. In the New form/Edit form dialog box you can add form owners in the Default owner(s) field.

Partner account details attributes

​ Using the dropdown list choose from:

  • Users - Users must already be in the system, see Users & Groups
  • Groups - Groups must be defined in advance, see Users & Groups
  • Partners - Partners must be already in the system and active, see B2B portals
  1. If you make a mistake, or form owners need to be changed in an existing process, click on the x beside the name of the Users, Groups or Partners to remove them and choose from the dropdown list again.
  2. Add to or edit the remaining parameters in the dialog box as desired, see Editing forms and click on OK when complete, or Close to exit the dialog box at any time.

Changing form access

The default owner is the person or group that the form is assigned to using the default owner field in the new form dialog box as shown above. By default, only this person or group can edit the current form in a process instance. All other users can only view forms in read mode. The next section details how to Change default owners.

It is also possible to allow other users to have edit access to forms using the Assign rule and Quick actions.

Changing default owners

  1. Using your Administration or Design business process role, go to Administration > Designer > select a process > select a form in the process.

  2. Click on the form so the Edit/Pen button appears in the form name.

    Select form to edit

  3. Then click on the Edit/Pen button itself to edit the form.

  4. An Edit form dialog box opens which has the same layout as the New form dialog box seen in Creating form owners above.

    Edit form dialog box

  5. Here you can change the default owner choosing from Users, Groups and Partners as before.

What’s next Idea icon

To learn more about rules including Assign rule go to Rules.

To find out how forms work within processes go to Process.

2 - Form display modes

Introduction

Remember there are three principles to consider when working with forms:

  • Reading modes: Form users can either use forms in edit mode or read mode. Edit mode means that users can submit information, while read mode means that users can only view forms. The latter may be useful for example for certain staff to review feedback in a form, but not be able to edit/update it.
  • Form owner: The default owner is the person or group that the form is assigned to when the the form is created. By default, only this person or group can edit the current form. All other users can only view forms in read mode. The default owner however can reassign forms to other individuals and/or groups.
  • Current form: Typically there are several forms in a process, and only the form that has the status ‘current form’ is editable. However, in a complex multi-step process, other forms can be configured to activate with the current form, meaning they can also become editable at the same time, creating a form group.

These three considerations are established when the form is created, as seen in the dialog box below.

New form dialog box

New form dialog box

These properties can also change dynamically as a result of rules being applied, see Rules.

Setting display modes statically

Remember forms in process instances are either in edit mode meaning they can be edited/changed or read mode where the details are visible to form users but cannot be changed. The actions below refer to making forms editable so if the actions below are not used, then the forms are in read mode. The actions below refer to static or fixed use, set when the form is first created or updated at a later time.

  1. Forms in process instances will be editable for Default owner(s), that is the form owners defined when the form is created, or a form is edited. Form owners are defined in the New form/Edit form dialog box, shown in part 1 of the image above. When a process instance runs, the form owner can then edit the form in that instance.

  2. By default the first form in a process becomes the current form, so only this form will be editable. However if several forms are activated with the current form when the form is created or edited in the New form/Edit form dialog box shown above, then all forms in that group will be editable by the form owner in a process instance.

  3. By default the Submit mode for forms is Only this form meaning that when a process instance is running you can choose only that particular form can have details submitted or saved. Alternatively you can choose all forms in edit mode, meaning that several forms can have their details submitted or saved. For example if several forms are activated together and all are in edit mode then the details of all these forms can be submitted together in the database.

  4. Forms can be statically set to allow Quick actions including allowing editing. When a form is created or edited using the New form/Edit form dialog box, clicking on Enable quick actions allows you to statically enable:

    a) reassignment of forms

    b) editing of forms

    c) custom actions on any form

    For a) and b) you can choose individuals and/or groups who can reassign or edit forms. In the case of b) edit there are options to hide form footer buttons when editing, and to trigger rules on save against a set field when saving edits.

    Enable edit action

    For c) custom actions, you can set your own custom action and create an action label against a particular form field. This means that the user(s) assigning the custom action will see the labelled action designated for them. As a designer you can choose the action display mode as read-only, edit or both, so you can decide what type of access the user(s) will have.

Changing form display dynamically with rules

If you use the Form action rule called Field display mode, you can change how a field or form displays dynamically. For example you have a condition set that the display will change based on the condition being present or not.

When you add this rule, under Action you can choose a field or form and choose from Edit mode or Read mode.

Field display rule

For more information on this rule go to Field Display mode rule.

Other rules can be used in other ways to change process workflow and therefore how forms behave. For example using the Assign form rule you can assign a form to a particular user, making them the form owner, and therefore giving them edit access to the form.

What’s next Idea icon

To read more about form ownership go to Form owner. To read more about quick actions, go to Form quick actions menu.

3 - Form quick actions menu

Introduction

The Form quick action menu will appear to designated users as a quick action menu option in the top right-hand corner of a form.

Depending on what type of quick actions are enabled and if you are assigned quick actions as a form user,, then you will see options when you click on the quick action button Quick action menu, for example to reassign a form to someone else, or to perform a custom action like signing off on a purchase order.

Quick action menu

How to get started

To enable quick actions, click on a process with Kianda Designer and then a form of choice so that the Edit (Pen) icon is visible.

  1. Click on the Edit pen icon to edit a form.

  2. In the Edit form dialog box, check the checkbox beside Enable quick actions.

  3. When you select Enable quick actions then you have three options to select:

    • Enable re-assign - allows a form in a process instance to be reassigned to a by a designated person/group
    • Enable edit - allows a form in a process instance to be edited by a designated person/group
    • Enable custom action - allows a form in a process instance to have customised actions associated with it, and these actions are assigned to a designated person/group

    Quick action menu

    Check the checkbox beside the desired action as necessary. Each option is further explored below.

Enable reassignment

When you check a checkbox for example Enable re-assign then you can click on the Ellipsis button Ellipsis button
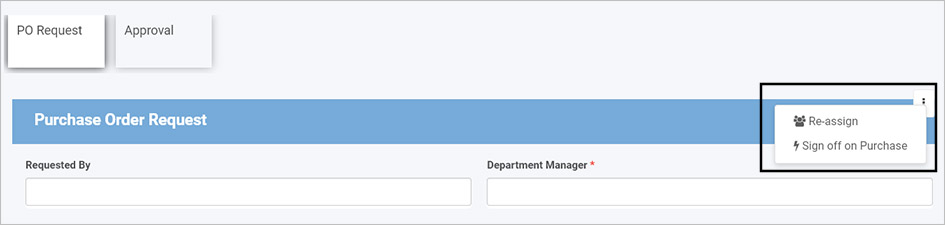
then you can select Users, Groups and Partners who can be chosen to reassign the form to. There is also a checkbox to allow form owners to reassign forms to other users.

Re-assign action settings

Enable edit

This opens the Action settings dialog box, such as the Edit action settings box shown in the image below.

Edit action settings

  1. Choose from the options in the action settings dialog box:

    • Edit action users - select the Users, Groups or Partners who will use the action
    • Allow form owners - allows form owners to use the action
    • When editing auto hide form footer buttons - hides form footer buttons when users are editing forms in a process instance
    • Trigger rules on save - allows rules to be triggered when a form is saved/submitted. In this case, select the button name used as the trigger in the Save action field
  2. Click on OK when complete or Close to exit the dialog box.

Trigger rule quick action

Enable custom action

If you check Enable custom action users who have been selected using the Users, Groups and Partners option, will be able to perform a customised action on a form, defined using the dialog box within this section.

What’s next Idea icon

To read more about how to create processes and forms go to Application Designer.

To find out about help and support, go to Help.

4 - Form responsive layout

Responsive layout refers to the fact that all forms will display equally well on laptop screens, tablets and mobile phone screens. As a form designer you can set the appearance of form fields using the layout function.

How to get started

Within Kianda Designer, click on a process, then a form of choice so that the Edit (Pen) icon is visible.

  1. Click on a field of choice within the form so the Edit (Pen) icon Edit pen icon is visible for the field.
  2. Click on the Edit (Pen) icon button for the field.
  3. Click on Layout under Field properties in the right-hand pane. Layout property
  4. Click on the ExpandLayout expand button within Layout to see desktop layout see Layout bar and Mobile Layout for the field.
  5. Click on the blue bars to extend the size of the field, for example in the image above, the desktop layout is 50% of the maximum width available, so the field ‘Department Manager’ would only take up half the width of the form. The mobile layout however is set to 100% and the field would take up the maximum width available. There are 12 possible width options that can be used within these bars.
  6. Click on the Collapse button to minimise the Layout property.

What’s next Idea icon

To read more about how to create processes and forms go to Application Designer.

To find out about help and support, go to Help.