This is the multi-page printable view of this section.
Click here to print.
Return to the regular view of this page.
Kianda B2B Portals
B2B Portals are a means of connecting your clients to your Kianda subscription through their own subscription. This provides a means of allowing your clients to interface with processes you have already created. This could involve updating existing processes, deleting processes or creating processes. Access to the B2B Portal can be controlled by your own administrator and each B2B Portal can have multiple users for your clients.
Your client’s subscription will need to be configured by Kianda so please reach out to your Account Manager or Kianda Support to arrange the set up.
B2B Portals can be configured by users with the role Administrator or Manage partners. These users can access the function, found under Administration > Invite Partner.
What’s next 
We have briefly introduced the concept of B2B Portals within Administration. Now let’s look at the following areas in more detail:
1 - Shared processes
Introduction
A Shared Process is a process which you create within your own subscription with the intention to share with your B2B Portal. This process, as with all processes, can be used to review data, create new instances, update or delete instances.
Within a shared process, you can also create a Shared Dashboard which is a dashboard created within your own subscription with the intention to share with your B2B Portal. This dashboard, as with all dashboards, can be used to review data, access Shared Processes by creating new instances, updating or deleting instances.
When to use
Using the Shared Process feature will allow users within the B2B Portal to have access to a process you have created. By sharing this process you will give your partner the opportunity to work on the process by updating, creating and deleting instances.
It terms of dashboards, it is necessary to share your dashboard with your B2B Portal when sharing processes and dashboard widgets with your Client. Before you can share a dashboard you must first create one. This dashboard can be one that you have already created, however, we recommend creating a unique dashboard that will be used specifically for sharing with B2B Portals. Go to Dashboards to learn more about how to create dashboards.
The following sections will step through how to share a process (steps 1-3) and share a dashboard (step 4) and how to conclude and update partners (steps 5-6).
How to get started
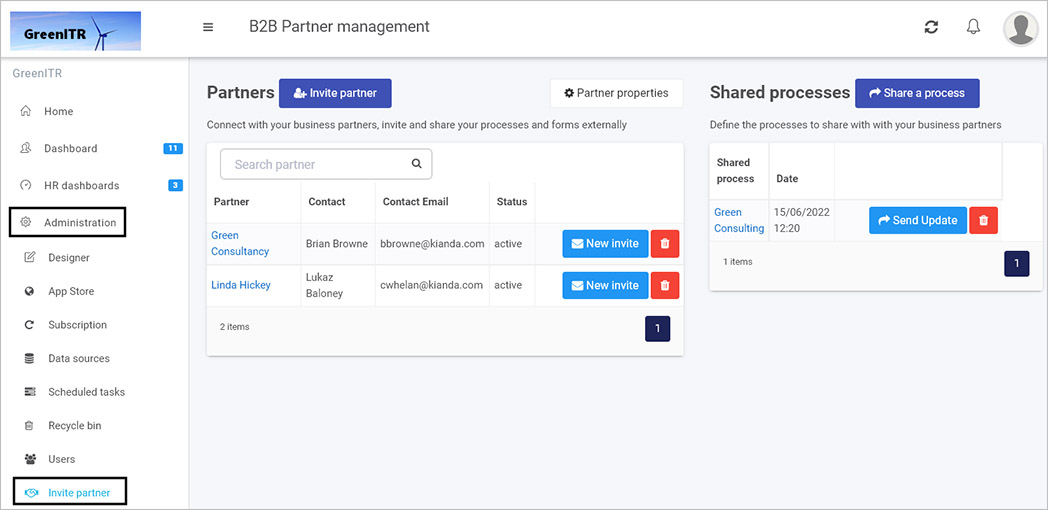
Log into your subscription and navigate to the Invite Partner section located within Administration. Your role needs to be Administrator or Manage partner to view Invite Partner. Using one of these roles:
-
Navigate to Invite Partner within the Administration section.
-
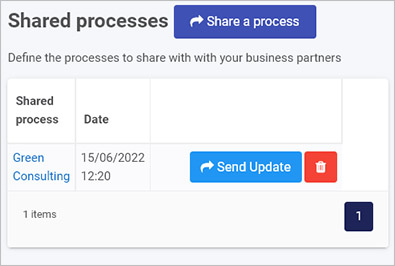
In the Shared processes section, click on the Share a process button  .
.
-
The Create a Shared Process dialog box opens.
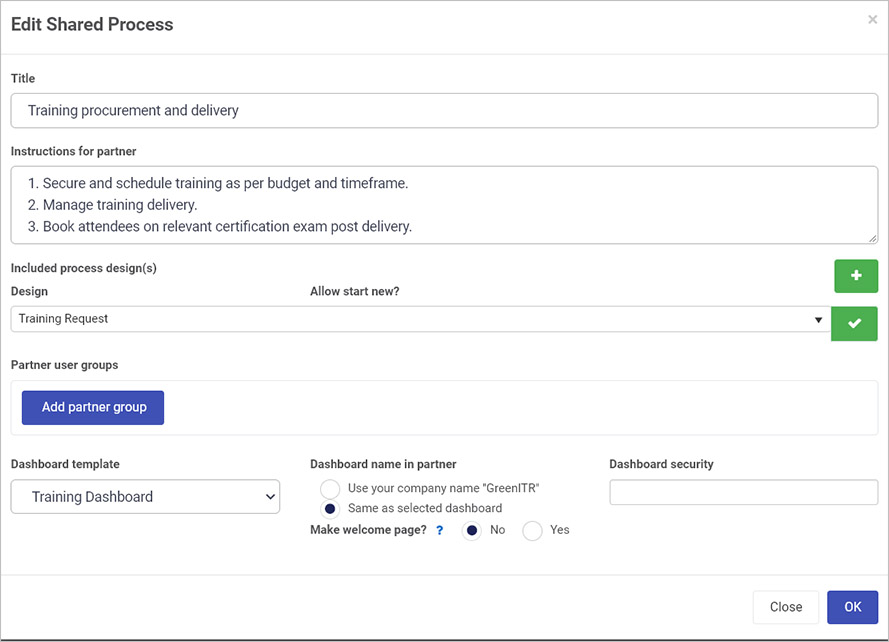
Populate the fields as desired:
-
Title - provide a title for the shared process
-
Instructions for partner - provide instructions for the selected partner
-
Click on the plus symbol  to add a selected process design to share. Then click on the dropdown list to search for a process to share.
-
Click on the tick symbol  to add the selected shared process. To change the selected shared process properties by clicking on the Cog/Settings button
  or delete the selected shared process by clicking on the Bin/trash button
  .
.
Shared dashboards
There are a set of dashboard parameters under the field Add partner group. These are:
-
Under Dashboard template click on the dropdown list to select an existing dashboards to share with the selected processes. If you choose to share a dashboard then you can select parameters:
-
Dashboard name in partner - choose from Use your company name ‘Name of your organisation’ or Same as selected dashboard
-
Make welcome page - choose from Yes or No. If you choose Yes then the selected dashboard becomes the welcome page for the partner if no other welcome page is configured.
-
Dashboard security - choose from created partner groups within this field to ensure that only users in these partner groups can access the dashboard. This is the method to set security on the dashboard specifically.
-
When you are finished editing the dialog box, click on OK, or else click on Close to exit the dialog box at any stage.
-
Once you have completed configuring or modifying the Shared Process you will need to send the shared process to your partner. To do this press the Send Update button which appears in the main view of the Shared processes section.
What’s next
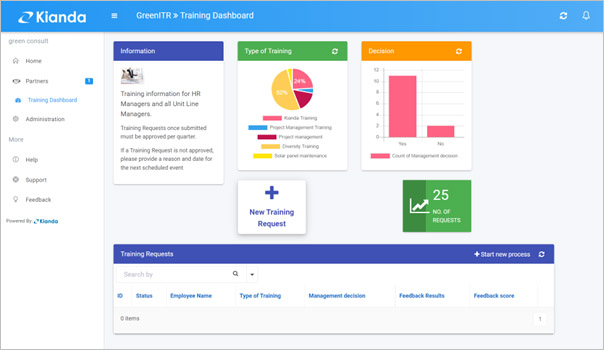
Once you have successfully creating a shared process and dashboard, these will be available in the B2B Portal for partners, for example when your partner users log into the B2B Portal they will be able to see the newly shared dashboard. From here they will be able to see the widgets within the dashboard and interact with the Processes. Go to the Secure Data Access to read more about security in shared processes and data sources.
2 - Partner profile
Introduction
Within the B2B Portal your client’s administrator will be able to create as many Partner Profiles (users) as they wish. By creating these users, they will have the ability to access the B2B Portal and interact with the Dashboards and Processes shared with them. For more information on how B2B Portal users access shared data go to Data access, Shared processes for information on processes, as well as Shared dashboards for information on dashboards.
When to use
Your client will need to add Partner Profiles in order for their employees to have access to the B2B Portal. At this point your subscription will need to have been created and Administrators created. If this has not happened yet, please get in touch with your Account Manager or Kianda Support to begin the process.
How to get started
In order to begin a user with an Administrator role or Manage partner role will need to log into your subscription. Using one of these roles:
-
Navigate to Invite Partner within the Administration section.
-
Within this page click on the Invite Partner Button.
-
In the Invite partner dialog box populate the fields with the details of the person you want to share your Processes and Dashboards with.
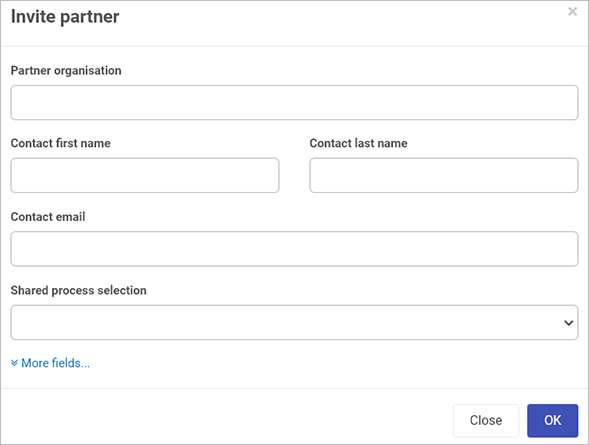
The fields in this box are:
-
Partner organisation - provide the name of the partner organisation
-
Contact first name - provide the first name of a contact in the partner organisation
-
Contact last name - provide the surname of a contact in the partner organisation
-
Contact email - provide the email of a contact
-
Shared process selection - in the dropdown list choose a shared process created using the steps listed in How to get started with shared processes.
-
Click on More fields to see more fields these include: Partner country, Partner city, and Partner logo which you can add by clicking on Browse and browsing your PC or network.
-
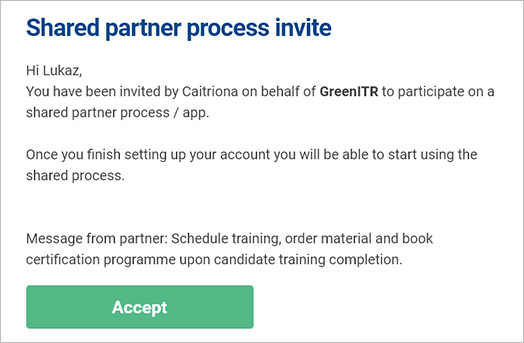
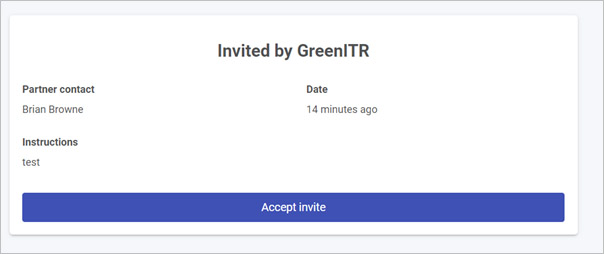
When you are finished editing the dialog box, click on OK, or else click on Close to exit the dialog box at any stage. Clicking on OK will save the partner and will result in an invitation being sent to their email address, similar to the one below.
-
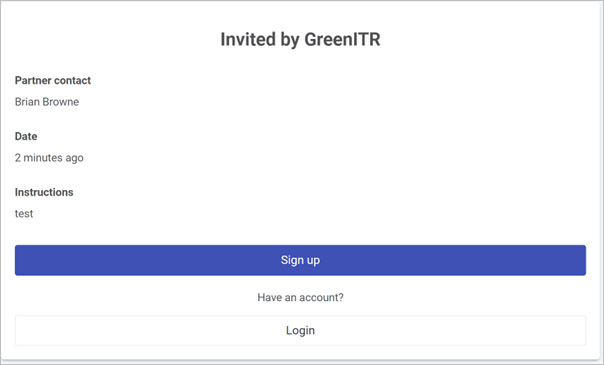
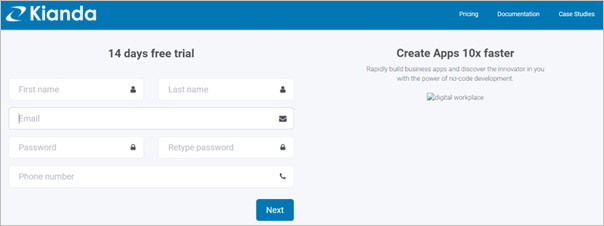
As a partner click on the Accept button. Then you are linked to a greeting page asking you to sign up to Kianda if you don’t have a login. Click on the Sign up button if you don’t have a subscription.
Accepting a partner invite without a subscription
- If you do have a subscription please continue to the section detailing what to do after when login is clicked Accepting a partner invite with a subscription, otherwise create a subscription, by entering your Firstname, Lastname, your email, a password and a phone number. Click Next when you are ready to continue.
-
In the next page configure the name of the subscription for the B2B Portal. Enter your Company name, an Identity that will form the beginning of your URL, the Company Size, Industry, Address, Country and City. Click Start Trial when ready to proceed. This will create and automatically log you into your subscription.
-
Return back to the email you received. Click on the Accept Invite button again. Now that your subscription is created and you are logged in the invite will be changed and will instead ask you to Accept Invite.
-
Click on the Accept Invite button. You will be redirected to the Home page of the Subscription. You will now see the contents of the Shared Process.
Accepting a partner invite with a subscription
If you already have a subscription you can choose to Login instead of Signing up. By logging in you can log into your subscription and you will be given the option to accept the invite. Please note that you will need to be an administrator in your portal in order to accept the invite.
-
Click on the Accept Invite button.
-
You will be redirected to the Home page of the Subscription. You will now see the contents of the Shared Process.
What’s next
Within your subscription you will be able to see if an invited partner has accepted their invitation based on the status. Pending means they have not accepted the invite, active means they have accepted the invite.
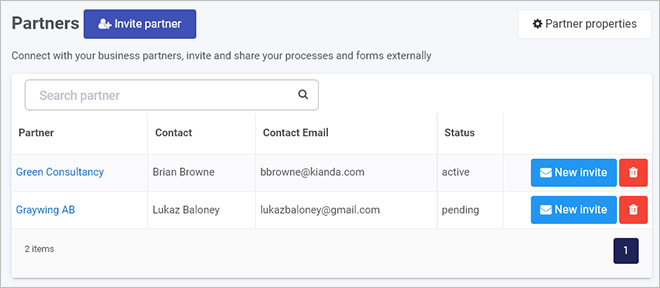
Once an invite is accepted, your client’s/invited partner’s employees can now access the B2B Portal and interact with the Dashboards and Processes that have been shared with them. For more information on how B2B Portal users access shared data go to Data access, as well as Shared dashboards for information on dashboards, and Shared processes for information on processes.
3 - Secure Data Access
Introduction
Access to the B2B Portal is controlled through standard user and group creation, dashboard security and through how the Shared Processes and Dashboards are defined.
When to use
B2B Portals are a means of connecting your clients to your Kianda subscription through their own subscription. This provides a means of allowing your clients to interface with processes you have already created, be it through updating existing processes, deleting processes or creating processes. Access to the B2B Portal can be controlled by your own administrator and each B2B portal can have multiple users for your clients.
How to get started
To share data with B2B portal users, there are a number of steps involved starting with:
a) Creating users and groups
b) Create dashboards to share
c) Create shared processes and attach dashboards to share
These steps are covered within the headings below. In addition you can manage data access at a datasource level, click on the link to see more details.
Create users and groups for the B2B portal
-
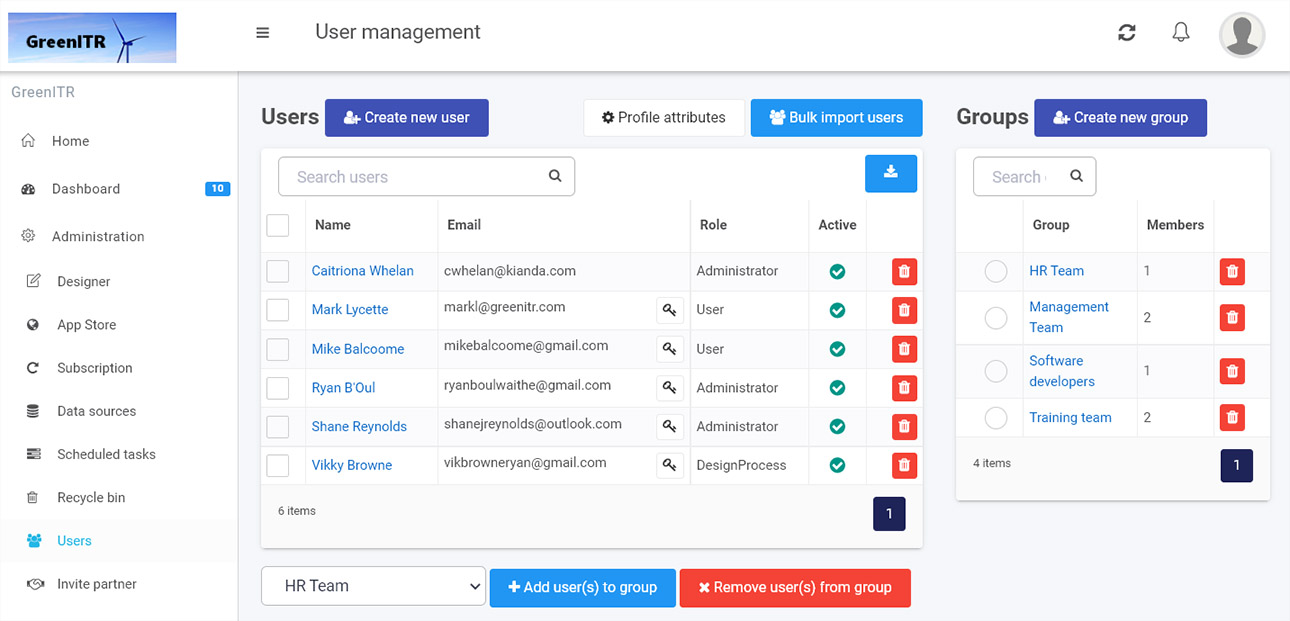
To begin create Users and Groups for the B2B portal. If you are an administrator, navigate to the Administration section in the left-hand side menu and click on Users.
-
Within this page you will be able to view all existing Users and Groups in the portal. In the left-hand side, under Users you can see user names, emails, role and if they are active or not. All existing Groups can be seen in the right-hand side of the screen. Here you can see group names and the number of members.
-
For full details on how to create, edit and delete users and groups go to Users.
Create dashboards to share
- Within your own portal you may then wish to create Dashboards to share. Dashboards provide a convenient way to gain insights into how your business processes are performing. They offer easy reporting, permissions management, quick build, condition-based filtering amongst other features. For details on how to get started with dashboards go to Dashboards.
Create shared processes and attach dashboards to share
-
When the dashboard that you want to share within your B2B portal has been created, then you can control access by two means: a) Using the Shared Processes feature within Invite partner within Administration and b) within the B2B portal itself.
-
To implement a) go to Administration > Invite partner and within the Shared processes section, click on Share a process.
-
Type in a Title and Instructions for partner, click on the plus symbol to add a selected process design to share.
-
Then click on the dropdown list to search for a process to share.
-
Click on the tick symbol to add the selected shared process.
-
Click on the Add partner group button to add a group from step 3 and click on Dashboard template to add the desired Dashboard (from step 4) to share. Security can be set on this dashboard so that only a defined group can see the dashboard - click on the field under Dashboard security to add in a named ‘partner group’ to enable access to this group only.
-
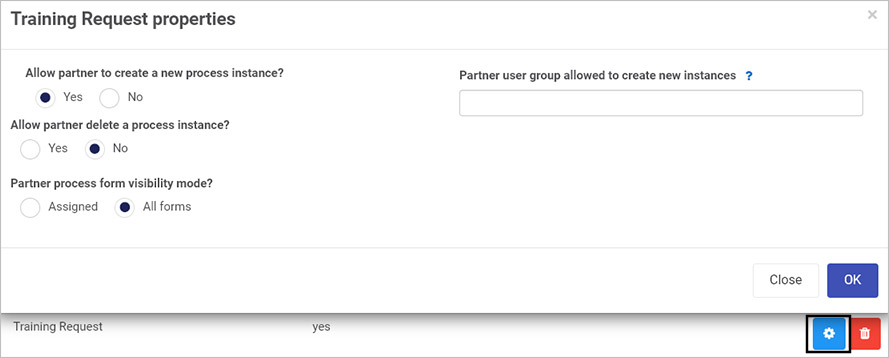
Add as many shared dashboards and partner groups as needed using the previous instructions. In addition the level of access for each shared process can be controlled through system settings. Click on the on the tick symbol to change the shared processes details, and then click on the Cog/Settings button and edit the details within the Process properties dialog box, for example as shown for a Training Request process below.
-
Within the Process properties dialog box you can check radio buttons for:
- Allow partner to create a new process instance - choose from Yes or No. If you choose Yes, then you are allowing invited partner(s) to create new process instances from the chosen shared process design. A field Partner user group allowed to create new instances appears, where you can define the group(s) in the partner organisation, that can create these new process instances. If you leave the field blank, then anyone in the partner organisation can create process instances.
- Allow partner delete a process instance - choose from Yes or No. If you choose Yes, then you are allowing invited partner(s) to delete new process instances from the chosen shared process design.
- Partner user group allowed to create new instances- choose from the Partner user groups that you created previously. By selecting a group here this dictates who can enter the process. Thus, defining a sub set of your B2B Portal users which can interact with that specific process.
- Partner process form visibility mode - choose from Assigned or All forms. If you choose Assigned, then the invited partner(s) can view only assigned form versus all forms, if All forms is chosen.
-
When you are finished editing the dialog box, click on OK, or else click on Close to exit the dialog box at any stage.
Data access at a datasource level
When a process is shared within the B2B portal, you may choose to include one or more of your datasources. You may not wish to share all records from the datasource within the B2B portal, so you can limit access within the datasource itself. B2B Security can be enabled with the following datasources:
- Active Directory
- Docusign
- Dropbox
- Email
- File system
- FTP
- Global Payments
- Google Drive
- MySQL
- Office 365
- Oracle
- PowerShell
- REST Service
- Salesforce
- SAP
- SharePoint
- SQL Server
- SOAP Service
-
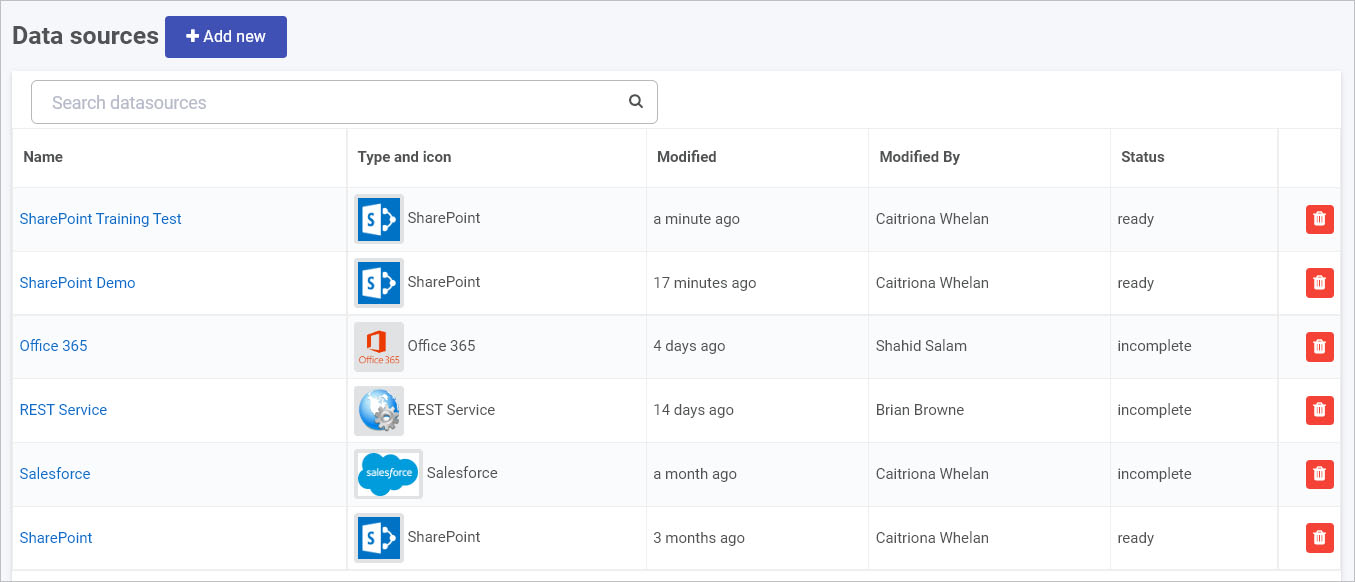
Go to Administration > Data sources.
-
From the Datasource management main view, click on a data source that has already been created with a status of ready, by clicking on the name of the data source, or create a new Data source by clicking on Add new, see Data sources for more details.
-
In the Data source details screen, click on the Security button  .
.
-
In the Security settings dialog box, complete the fields as shown on screen, starting with Connection administrators.
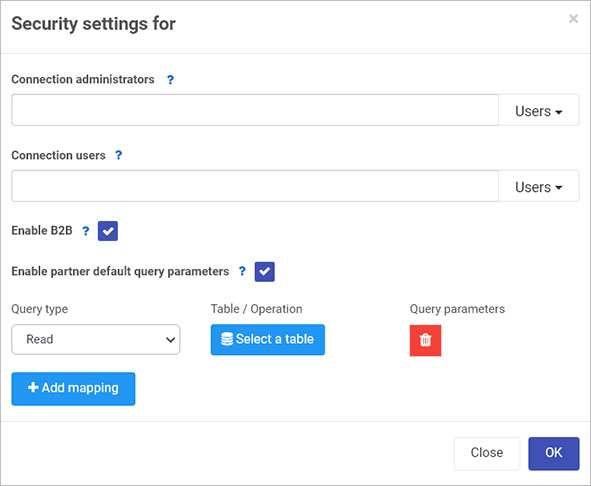
Connection administrators - only users or groups listed here are allowed to modify the connection settings. Click on the dropdown list to choose Users and/or Groups. If you leave the field blank, all Administrators and those users with the Manage datasources role can edit the connection.
-
Complete the field for Connection users. Only users or groups listed here are allowed to query data using this connection. Click on the dropdown list to choose Users and/or Groups. If you leave the field blank, any user can query data within the datasource.
-
Check/Uncheck Enable B2B. If you check the checkbox, this allows B2B external users to query the connection. The Enable partner default query parameters checkbox appears.
-
Check/Uncheck Enable partner default query parameters. If you check the checkbox, you can define default query parameters that are applied to any partner originated query. Parameters defined here take precedence over any design time queries. Click on Add mapping to choose a query type and table/operation as follows:
-
Query type - choose from Create, Read, Update, Delete (CRUD). These CRUD operations allow you to create, read, update and delete records within your datasource.
-
Table/Operation - click on Select a table to select a resource within the data connector. Click on OK when you are finished editing, or Close at any time to exit the dialog box.
-
Query parameters - when a datasource resource is chosen, for example a SharePoint list called ‘Countries’ below, then you will have an option to set conditions for filtering data.
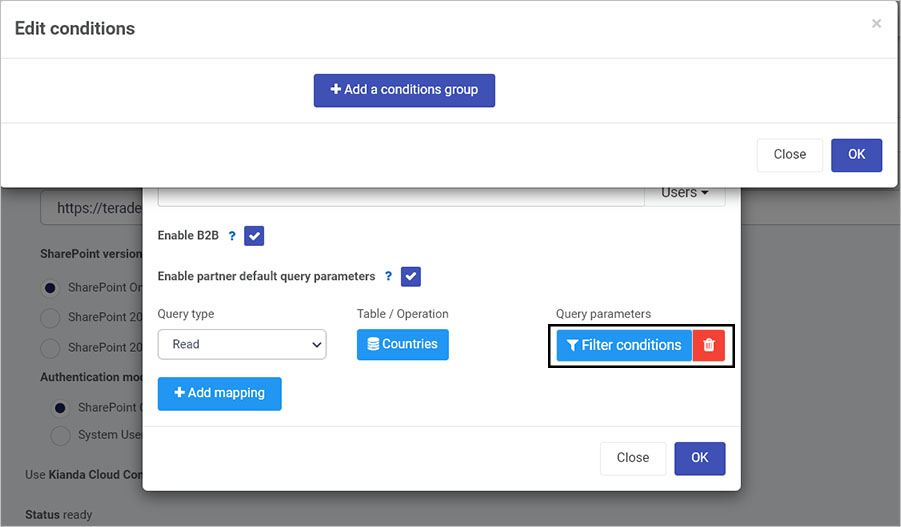
Click on Filter conditions to open an Edit conditions dialog box and from there click on Add a conditions group.
-
If you choose to set conditions using the steps above, then in the Edit conditions dialog box, you can set conditions based on data source parameters, operators and form fields.
- The parameter on the left comes from the data source, for example for SharePoint, there are 18 possible values listed in SharePoint parameters. See Data sources for information about other data connectors.
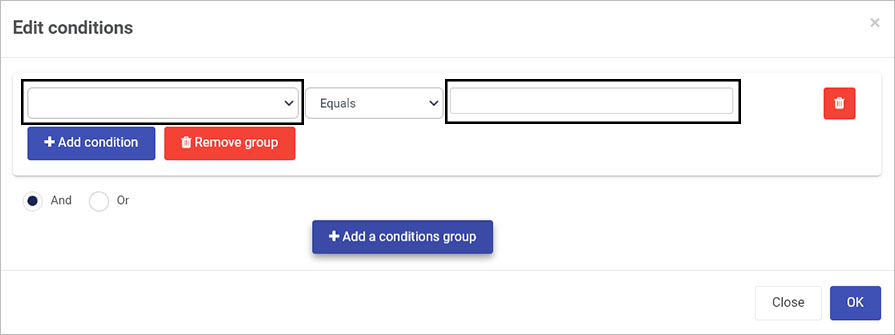
-
Within this dialog box you can also use different operators, for example Equals as shown above. See Conditions for more details on using conditions in Kianda.
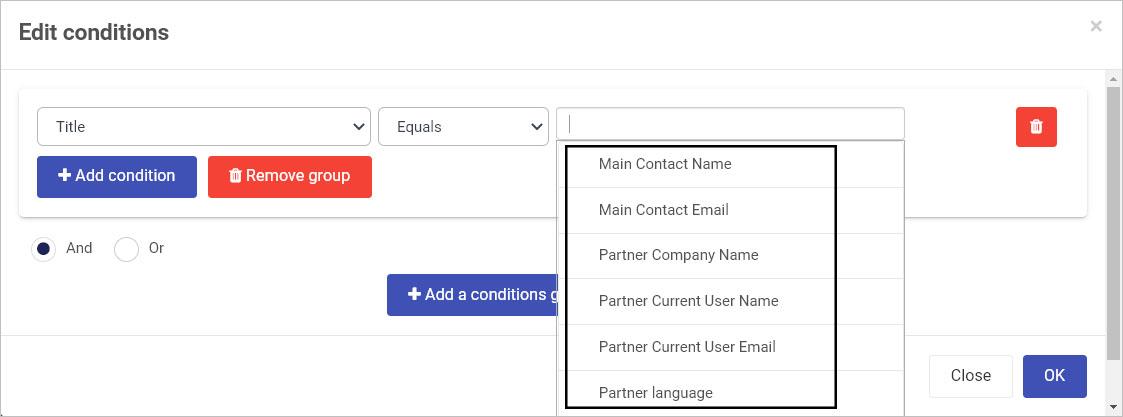
-
The right-most field relates to the B2B Portal and B2B User. There are standard options listed below:
- Main Contact Name – the first name and last name of the Partner
- Main Contact Email – the email of the Partner
- Partner Company Name – the Partner organisation of the Partner
- Partner Current User Name – the user within the B2B Portal that is accessing the datasource
- Partner Current User Email – the user’s email within the B2B Portal that is accessing the datasource
-
When you have added conditions click on OK, or click on Close at any time to exit the dialog box.
-
When you are finished editing the security settings dialog box, click on OK, or click on Close at any time to exit the dialog box.
What’s next
To read more about User and group management, go to Users.
To read more about Dashboards, go to Dashboards.
To read more about Conditions, go to Conditions.
To read more about data source parameters, go to Connectors and from there navigate to the different predefined data connectors.