Secure Data Access
Introduction
Access to the B2B Portal is controlled through standard user and group creation, dashboard security and through how the Shared Processes and Dashboards are defined.
When to use
B2B Portals are a means of connecting your clients to your Kianda subscription through their own subscription. This provides a means of allowing your clients to interface with processes you have already created, be it through updating existing processes, deleting processes or creating processes. Access to the B2B Portal can be controlled by your own administrator and each B2B portal can have multiple users for your clients.
How to get started
To share data with B2B portal users, there are a number of steps involved starting with:
c) Create shared processes and attach dashboards to share
These steps are covered within the headings below. In addition you can manage data access at a datasource level, click on the link to see more details.
Create users and groups for the B2B portal
-
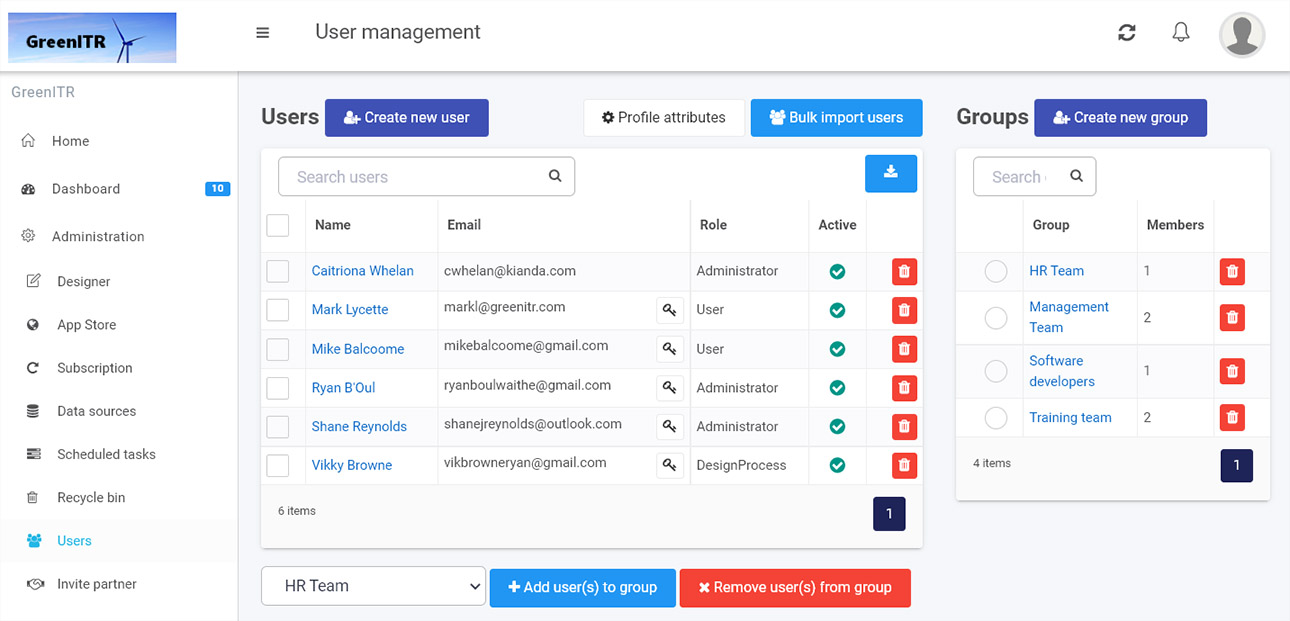
To begin create Users and Groups for the B2B portal. If you are an administrator, navigate to the Administration section in the left-hand side menu and click on Users.
-
Within this page you will be able to view all existing Users and Groups in the portal. In the left-hand side, under Users you can see user names, emails, role and if they are active or not. All existing Groups can be seen in the right-hand side of the screen. Here you can see group names and the number of members.
-
For full details on how to create, edit and delete users and groups go to Users.
Create dashboards to share
- Within your own portal you may then wish to create Dashboards to share. Dashboards provide a convenient way to gain insights into how your business processes are performing. They offer easy reporting, permissions management, quick build, condition-based filtering amongst other features. For details on how to get started with dashboards go to Dashboards.
Create shared processes and attach dashboards to share
-
When the dashboard that you want to share within your B2B portal has been created, then you can control access by two means: a) Using the Shared Processes feature within Invite partner within Administration and b) within the B2B portal itself.
-
To implement a) go to Administration > Invite partner and within the Shared processes section, click on Share a process.
-
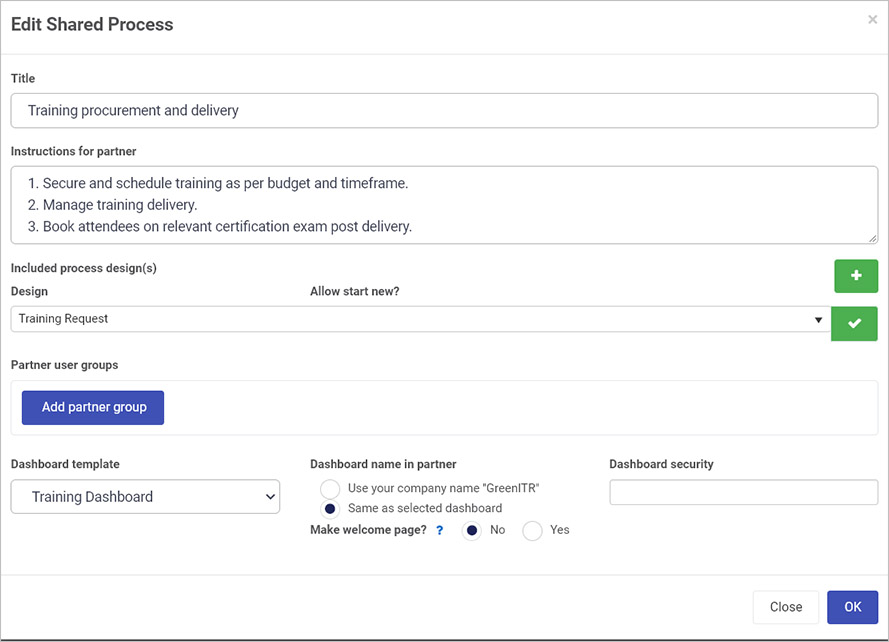
Type in a Title and Instructions for partner, click on the plus symbol
 to add a selected process design to share.
 -
Then click on the dropdown list to search for a process to share.
-
Click on the tick symbol
 to add the selected shared process.
 -
Click on the Add partner group button to add a group from step 3 and click on Dashboard template to add the desired Dashboard (from step 4) to share. Security can be set on this dashboard so that only a defined group can see the dashboard - click on the field under Dashboard security to add in a named ‘partner group’ to enable access to this group only.
-
Add as many shared dashboards and partner groups as needed using the previous instructions. In addition the level of access for each shared process can be controlled through system settings. Click on the on the tick symbol
 to change the shared processes details, and then click on the Cog/Settings button
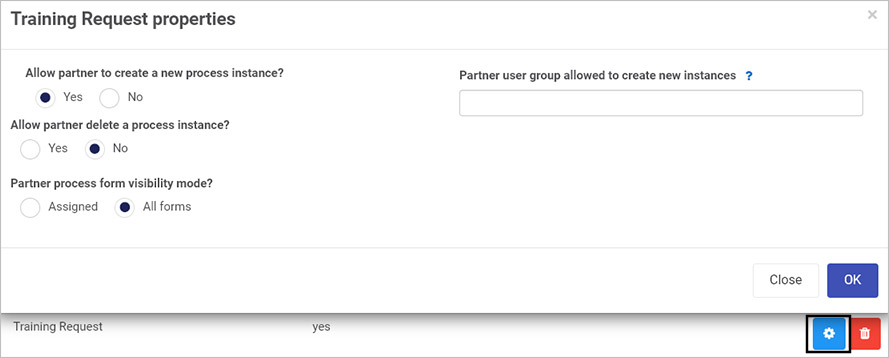
  and edit the details within the Process properties dialog box, for example as shown for a Training Request process below.
-
Within the Process properties dialog box you can check radio buttons for:
- Allow partner to create a new process instance - choose from Yes or No. If you choose Yes, then you are allowing invited partner(s) to create new process instances from the chosen shared process design. A field Partner user group allowed to create new instances appears, where you can define the group(s) in the partner organisation, that can create these new process instances. If you leave the field blank, then anyone in the partner organisation can create process instances.
- Allow partner delete a process instance - choose from Yes or No. If you choose Yes, then you are allowing invited partner(s) to delete new process instances from the chosen shared process design.
- Partner user group allowed to create new instances- choose from the Partner user groups that you created previously. By selecting a group here this dictates who can enter the process. Thus, defining a sub set of your B2B Portal users which can interact with that specific process.
- Partner process form visibility mode - choose from Assigned or All forms. If you choose Assigned, then the invited partner(s) can view only assigned form versus all forms, if All forms is chosen.
-
When you are finished editing the dialog box, click on OK, or else click on Close to exit the dialog box at any stage.
Data access at a datasource level
When a process is shared within the B2B portal, you may choose to include one or more of your datasources. You may not wish to share all records from the datasource within the B2B portal, so you can limit access within the datasource itself. B2B Security can be enabled with the following datasources:
- Active Directory
- Docusign
- Dropbox
- File system
- FTP
- Global Payments
- Google Drive
- MySQL
- Office 365
- Oracle
- PowerShell
- REST Service
- Salesforce
- SAP
- SharePoint
- SQL Server
- SOAP Service
-
Go to Administration > Data sources.
-
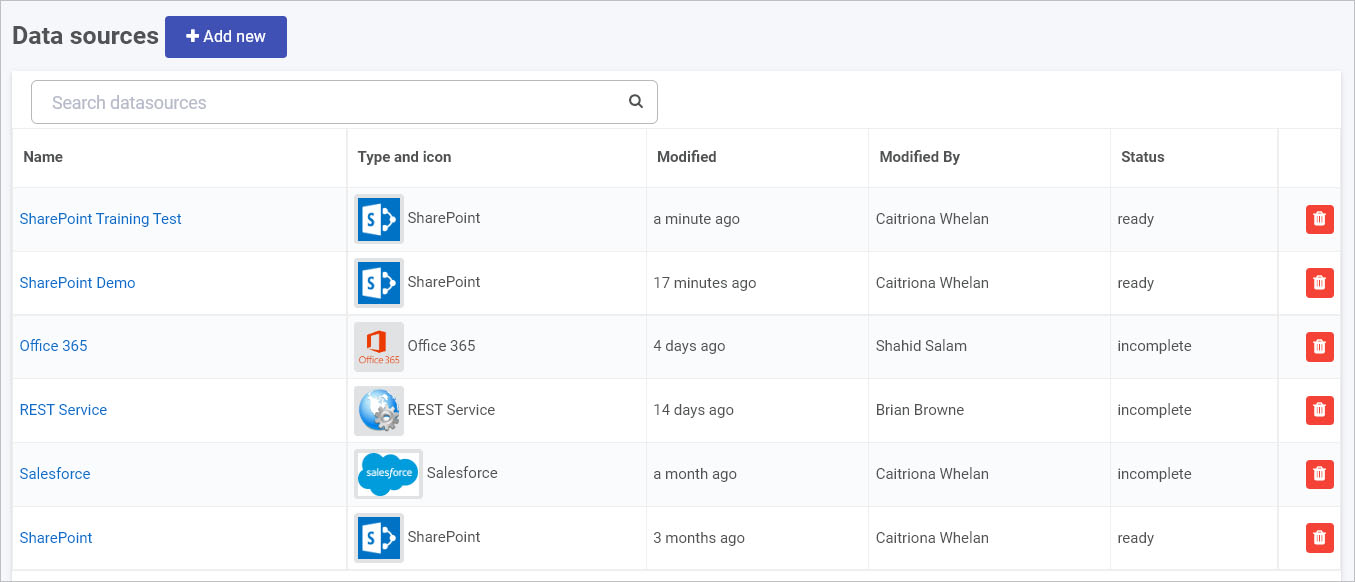
From the Datasource management main view, click on a data source that has already been created with a status of ready, by clicking on the name of the data source, or create a new Data source by clicking on Add new, see Data sources for more details.
-
In the Data source details screen, click on the Security button
 .
. -
In the Security settings dialog box, complete the fields as shown on screen, starting with Connection administrators.
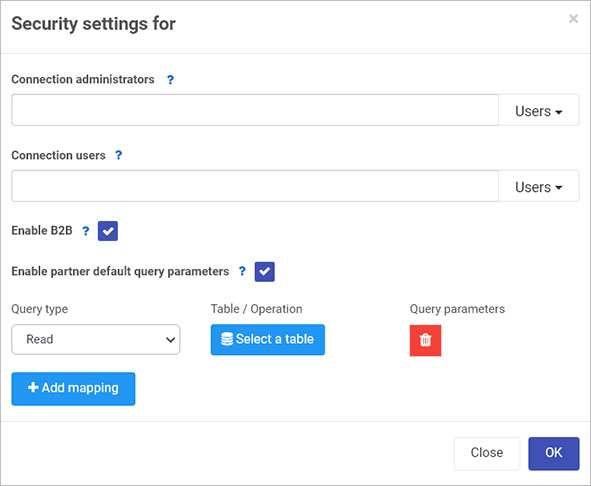
Connection administrators - only users or groups listed here are allowed to modify the connection settings. Click on the dropdown list to choose Users and/or Groups. If you leave the field blank, all Administrators and those users with the Manage datasources role can edit the connection.
-
Complete the field for Connection users. Only users or groups listed here are allowed to query data using this connection. Click on the dropdown list to choose Users and/or Groups. If you leave the field blank, any user can query data within the datasource.
-
Check/Uncheck Enable B2B. If you check the checkbox, this allows B2B external users to query the connection. The Enable partner default query parameters checkbox appears.
-
Check/Uncheck Enable partner default query parameters. If you check the checkbox, you can define default query parameters that are applied to any partner originated query. Parameters defined here take precedence over any design time queries. Click on Add mapping to choose a query type and table/operation as follows:
-
Query type - choose from Create, Read, Update, Delete (CRUD). These CRUD operations allow you to create, read, update and delete records within your datasource.
-
Table/Operation - click on Select a table to select a resource within the data connector. Click on OK when you are finished editing, or Close at any time to exit the dialog box.
-
Query parameters - when a datasource resource is chosen, for example a SharePoint list called ‘Countries’ below, then you will have an option to set conditions for filtering data.
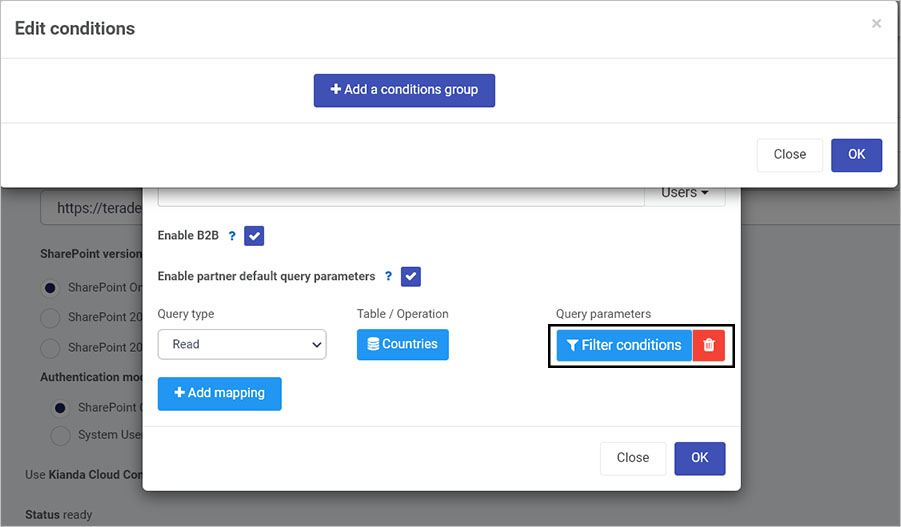
Click on Filter conditions to open an Edit conditions dialog box and from there click on Add a conditions group.
-
-
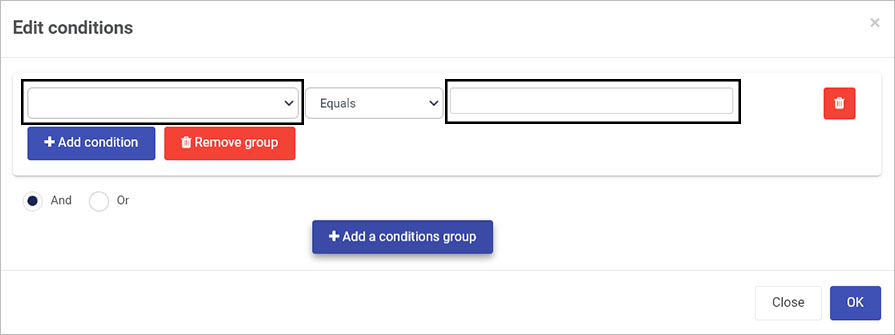
If you choose to set conditions using the steps above, then in the Edit conditions dialog box, you can set conditions based on data source parameters, operators and form fields.
- The parameter on the left comes from the data source, for example for SharePoint, there are 18 possible values listed in SharePoint parameters. See Data sources for information about other data connectors.
-
Within this dialog box you can also use different operators, for example Equals as shown above. See Conditions for more details on using conditions in Kianda.
-
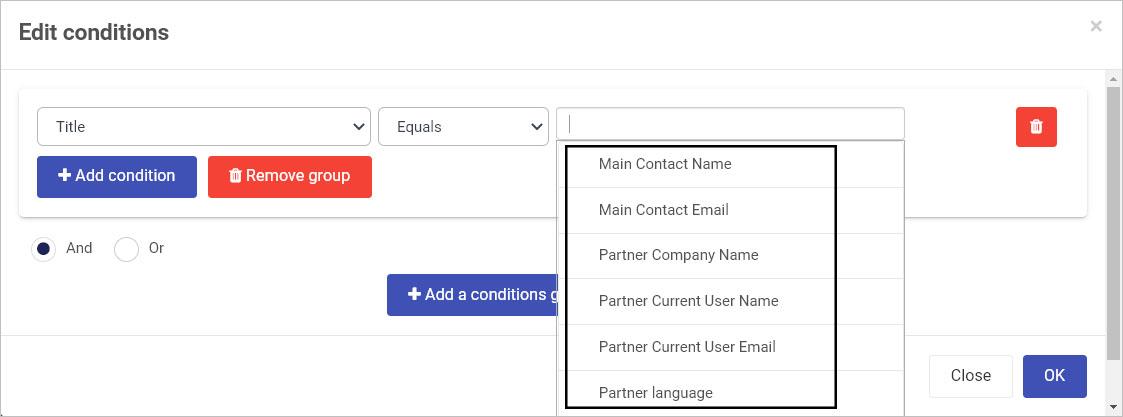
The right-most field relates to the B2B Portal and B2B User. There are standard options listed below:
- Main Contact Name – the first name and last name of the Partner
- Main Contact Email – the email of the Partner
- Partner Company Name – the Partner organisation of the Partner
- Partner Current User Name – the user within the B2B Portal that is accessing the datasource
- Partner Current User Email – the user’s email within the B2B Portal that is accessing the datasource
-
When you have added conditions click on OK, or click on Close at any time to exit the dialog box.
-
When you are finished editing the security settings dialog box, click on OK, or click on Close at any time to exit the dialog box.
What’s next 
To read more about User and group management, go to Users.
To read more about Dashboards, go to Dashboards.
To read more about Conditions, go to Conditions.
To read more about data source parameters, go to Connectors and from there navigate to the different predefined data connectors.
Feedback
Was this page helpful?
Glad to hear it! Please tell us how we can improve.
Sorry to hear that. Please tell us how we can improve.