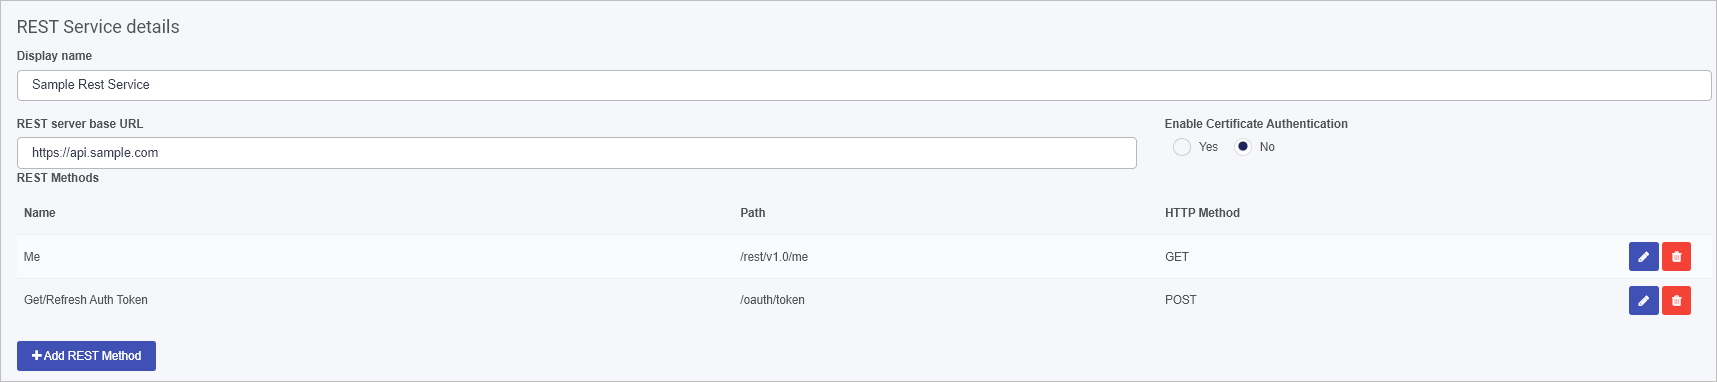
The Data sources function is found under Administration in the left-hand side menu, and provides an easy way to create connections to ERP, CRM and IT systems. These connections allow you to combine multiple sources of data in one place and from there Kianda processes can use and update the data to creative effective workflows.
Predefined data connectors
Connecting to data in Kianda is a breeze. You can quickly connect to a data source, for example data in Salesforce, and use this data in Kianda forms and dashboards. The connection is called a data connector and Kianda comes with a predefined set of data connectors, these include:
Click on each of the links above to find out more about each data connector.
If you have a data source that is not on the list above, you can use SOAP or REST to easily connect to your data source, go to SOAP or REST for more information.
If you are an experienced developer, you can also create your own Custom connector customising pre- and post-processing of queries, see Custom connector.
Viewing existing data sources
Only those with the role Administrator or Manage data sources have access to the Datasource management function. To view any existing data sources:
Go to Administration > Data sources in the left-hand side menu.
Any existing data sources that have been created for your workspace are shown in the main view under Datasource management.
Data sources are listed by: Name, Type and icon, Modified (as in the date the connector was last modified), Modified By (the person who last made changes) and the Status, for example ready means the connection has been tested and is working, while incomplete means that more details still need to be added.
To search for a data source, type in the name or type of data source in the search box.
To delete a data source, click on the Bin/Trash button beside the name of the datasource. You will receive a popup asking to you to confirm deletion by clicking OK, or you can exit the deletion by clicking on Cancel.
To see the details of a data source, click on the name of the Data source and from there you are brought to the Data source details page:
The details will vary depending on the data source, but there are some common elements:
Display name - the name of the data source as it will display in your system. Choose something meaningful, as you will use this name in process design to connect your forms to your data source.
Information about the data source - this could be a URL, Server name, Client ID, root folder path etc.
Authentication details - this could be a username, password, client secret etc.
Option to use Kianda Cloud Connect. This software allows you to connect a local system for example a file system, to Kianda. If you enable this feature and download a zip file, you can install the software on your server, allowing the Kianda system to reach your server and get access to data, for example SQL Server, making system integration quick and efficient.
Test connection - all data source detail pages will allow you to test your connection using this button to ensure data exchange can happen.
Save - at any time you can save details, even if some parameters need to be completed, allowing you to return to the configuration at any point.
Security - all data sources can have different levels of security set up, including administrators for the connection, and users of the connection, see Setting security for data sources for more details.
Close - allows you to exit from the data source details page.
Creating a datasource
The video below demonstrates how to create a datasource for SharePoint. The procedure shown is similar for other data connectors. Click on the links in Predefined data connectors to read more on how to connect to different data sources.
Connecting to SharePoint Data (On-premises or Online) example
There is also an option to create a customised data connector using the Kianda Developer Custom Connector.
Kianda Cloud Connect
Kianda Cloud Connect (KCC) is available with the following data sources, allowing you to streamline data system integration:
Active Directory
Email
File System
FTP
MySQL
Oracle
PowerShell
REST
SAP
SharePoint
SQL Server
SOAP
You can enable KCC when you add a new data source from the main by datasource management page:
Fill out details for your data source in the data source details page.
Check the checkbox beside Kianda Cloud Connect.
A link appears to Download Kianda Cloud Connect. Click on this link to download the software.
Click on the setup file in the zip package and step through the wizard to install Kianda Cloud Connect.
All data sources can have security added at different levels, for example at a role level and even database query level.
To enable security for datasources:
From the left-hand side menu, go to Administration > Data sources.
Click on an existing data source name or click on Add new to create a new data source.
In the data source details screen, click on the Security button.
The Security settings dialog box opens.
Fill out the details:
Connection administrators - click on the dropdown list to choose from Users and/or Groups who can edit the connection settings. If left blank any user with the role Administrator can edit the connection. See Users and groups for more details on how to add users and groups to the workspace.
Connection users - click on the dropdown list to choose from Users and/or Groups who are allowed to query data using this connection. If left blank any user can query data using the datasource.
Enable B2B - if you check the checkbox, this allows B2B external users to query the connection. The Enable partner default query parameters checkbox appears.
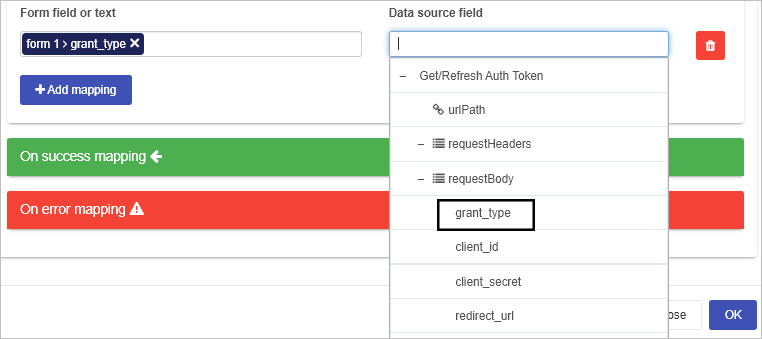
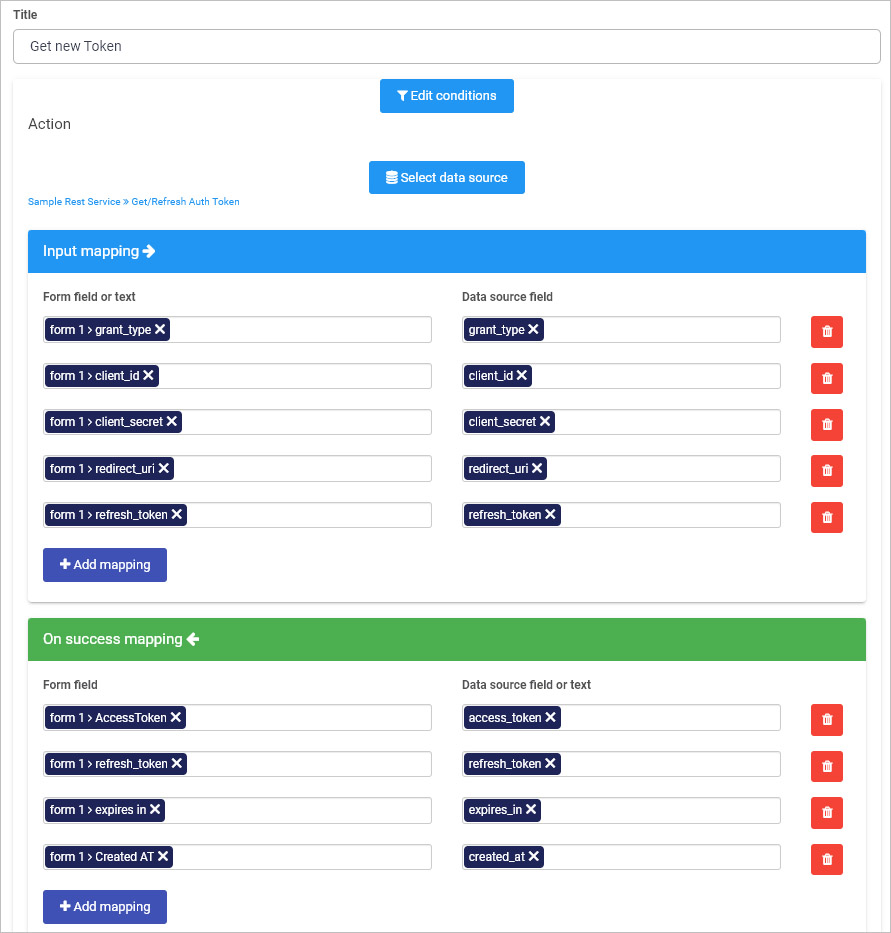
Check/Uncheck Enable partner default query parameters. If you check the checkbox, you can define default query parameters that are applied to any partner originated query. Parameters defined here take precedence over any design time queries. Click on Add mapping to choose a query type and table/operation as follows:
Query type - choose from Create, Read, Update, Delete (CRUD). These CRUD operations allow you to create, read, update and delete records within your datasource.
Table/Operation - click on Select a table to select a resource within the data connector. Click on OK when you are finished editing, or Close at any time to exit the dialog box.
Query parameters - when a datasource resource is chosen, for example a SharePoint list called ‘Countries’ below, then you will have an option to set conditions for filtering data.
Click on Filter conditions to open an Edit conditions dialog box and from there click on Add a conditions group.
If you choose to set conditions using the steps above, then in the Edit conditions dialog box, you can set conditions based on data source parameters, operators and form fields.
The parameter on the left comes from the data source, for example for SharePoint, there are 18 possible values listed in SharePoint parameters. See Data sources for information about other data connectors.
Within this dialog box you can also use different operators, for example Equals as shown above. See Conditions for more details on using conditions in Kianda.
The right-most field relates to the B2B Portal and B2B User. There are standard options listed below:
Main Contact Name – the first name and last name of the Partner
Main Contact Email – the email of the Partner
Partner Company Name – the Partner organisation of the Partner
Partner Current User Name – the user within the B2B Portal that is accessing the datasource
Partner Current User Email – the user’s email within the B2B Portal that is accessing the datasource
When you have added conditions click on OK, or click on Close at any time to exit the dialog box.
When you are finished editing the security settings dialog box, click on OK, or click on Close at any time to exit the dialog box.
What’s next
We have introduced the data sources management function within Administration. Now let’s look at each of the data connector types in more detail:
1 - Active Directory Connector
Kianda Active Directory Connector
One of the data connectors within Kianda that you can connect to is Active Directory (AD) also known as Active Directory Domain Services (AD DS). AD is a logical and hierarchical structured data store of objects which are mostly accounts. Accounts such as Users, Computers, Groups and other objects such as Printers or Group Policy Objects (GPO). For example, you can store information about user accounts within an AD such as Name, Email, Manager name, Password, Job title and Permissions.
Having an AD connector will allow you to access and update information that is stored in your AD database from your Kianda subscription. You will be able to use User-related AD functions which will allow you to use the connector when manipulating users within your AD. For example creating users, updating their permissions, moving them between groups or removing them from the directory. To use the AD functions, you can use the Data rules that are predefined within Kianda.
Before you get started
Before you can create a connection with your Active Directory and your Kianda subscription, you need to
a) download Kianda Cloud Connect
b) create a specific user for the connector, defined in your Active directory database
Kianda Cloud Connect
Kianda Cloud Connect is a piece of software that establishes a connection between your local machine and your Kianda subscription. This lightweight app will sit on your PC or server where files reside that you need to use in Kianda processes, and therefore is an on premise function .
Kianda Cloud Connect allows data to travel from your local machine to the Kianda Cloud Connect service, and then the Kianda Cloud Connect service sends data to your Kianda subscription. This data transfer works both ways depending on what operation you are performing for example Deleting a file or Creating one.
User account for the connection
You must create an account in your AD service which will serve as the connector administration account for the data connector, and this account must be a global administrator in order to allow access to functions.
this account must correspond. Note that this account can only be used to manage the connector for one subscription and cannot be used in more than one Kianda subscriptions as Kianda Cloud Connect will not be able to tell which subscription you want to connect to.
To learn more about how to download and create a connection between your Kianda subscription and Kianda Cloud Connect go to Kianda Cloud Connect.
How to get started
From the Kianda home page, click on Administration > Data sources.
Click on + Add new button and choose Active Directory from the list of data sources provided.
You will be automatically brought to the Active Directory details page, where you can start setting up the connection.
Choose from the edit options:
Display name - type in the name for your PowerShell connector. The display name is used to identify your connector.
Directory path - enter in the path to the directory. The path must be LDAP or GC (Global Connector).
AD User - enter in the domain and user that you want to connect to. To specify the domain and user correctly use the following format: <domain>/<username>
Password - enter in the password used to login for the desired user.
Use Kianda Cloud Connect - by default this option is enabled, the cloud connect is used to create a connection between the Active Directory connector and Kianda itself. To learn more about Kianda Cloud Connect and how to create a connection between Kianda and your PC, go to Kianda Cloud Connect.
Connectors - displays all available connector PC’s that have a connection established with your Kianda subscription. This option is used to select the PC connection that is running the Active Directory server.
Status - represents the current status of the connection.
incomplete - means that the details of the connector were not fully completed.
test failed - means that the details of the connector are incorrect and the connection has failed.
ready - means that the connector has successfully connected and its ready to be used.
Here is an example of a completed AD connector page, where the directory path is LDAP and this connector is connecting to LAB2 where the AD database resides.
When you have added the necessary details, you are ready to test your connection and add security. At the bottom of the PowerShell Connector page, click on Test connection button and if the service has been correctly configured, then you should receive a notification saying Connection test succeeded.
Click on Save to save the connection and you will receive a notification saying Details saved successfully.
Click on Close to close the details page and return to the data source management main view.
Active Directory Remote Procedures
Active Directory functions are User-relatedremote procedures and to use them you have to use the Data rules that are predefined within Kianda. The remote procedures that are available are listed below. To give you an idea of how they work, some of these procedures are detailed on other pages, click on the links below to find out more.
FindUsers - allows you to look for a user within your directory by defining a user attribute as a means of searching for them.
IsMemberOf - allows you to see if a user is a member of a group. You need to specify both a user and a group.
CreateUser - allows you to create a user within your directory. You need to specify a username, first name, last name, email and password to create a user successfully.
UpdateUser - allows you to update user attributes. You need to specify what user to update by providing their sAMAccountName and distinguishedName (DN).
AddUserToGroup - allows you to add a user to a group by providing the group name and both the distinguishedName and sAMAccountName of the user.
RemoveUserFromGroup - allows you to remove a user from a group by providing the group name and both the distinguishedName and sAMAccountName of the user.
Enable User - allows you to enable or disable a user by providing the enable parameter and both the distinguishedName and sAMAccountName of the user. The enable parameter is either true or false.
MoveUser - allows you to move a user to a specific path in your directory by providing the destination path and both the distinguishedName and sAMAccountName of the user.
Create User Function example
Lets take the CreateUser function as an example to show how these functions work. As mentioned earlier, we need to use the Data rules to use these functions and for this example we use the Create item rule which is available from the Data rules.
When creating a user in Active Directory, there are some required properties that we need to provide. Those properties are a username, givenName (first name), surname (last name), email and password. There are also extra properties that can be provided by expanding a properties tab within the function:
We need to create at least five fields that will be used to provide a value as the required properties. We will use a text box field for each one:
Use the create item rule to use the function. We need to map the text box fields to the appropriate properties as follow:
You can apply the create item rule to a button, for example, the submit button. This will result in a user being created in your AD whenever the submit button will be clicked.
AD Use case example - User synchronisation
Using AD you can perform user synchronisation for user groups in Kianda. For example by creating a specific group in Kianda, we can allow Group member synchronisation for that group, by choosing the option shown in the image below with, using the AD data connector. See Groups for more details on group creation.
In the example above, the Kianda environment is synchronised with AD, so that any users added to or deleted from the AD database will be added to or removed from the users of the group ‘Company Users’. This kind of user synchronisation is also possible with Office 365, SharePoint as well as AD.
By clicking on the Filter button within Groups, an LDAP Filter can be applied. The LDAP filter is an open format that allows you to perform queries with AD. For example the query below is used to query for users in the IT department with an account that is not disabled (=2).
LDAP queries and more information on LDAP can be found in many pages such as:
When you have created your Active Directory connector you can start to use the connector data in processes. To find out more about how to design processes, go to Designer.
1.1 - Active Directory Connector - Create user
Kianda Active Directory Connector - create user
One of the data connectors within Kianda that you can connect to is Active Directory (AD) also known as Active Directory Domain Services (AD DS). AD is a logical and hierarchical structured data store of objects which are mostly accounts. Accounts such as Users, Computers, Groups and other objects such as Printers or Group Policy Objects (GPO). For example, you can store information about user accounts within an AD such as Name, Password, Job title and Permissions.
When to use
Having an AD connector will allow you to access information that is stored there within your Kianda subscription. You will be able to use User related AD functions which will allow you to use the connector when manipulating users within your AD. For example creating users, updating their permissions, moving them between groups or removing them from the directory. To use the AD functions, you can use the Data rules that are predefined within Kianda.
Before you get started
Before you can create a connection with your Active Directory and your Kianda subscription, you need to download Kianda Cloud Connect. Kianda Cloud Connect is a piece of software that establishes a connection between your local machine and your Kianda subscription. This lightweight app will sit on your PC or server where files reside that you need to use in Kianda processes. It allows the data to travel from your local machine to the Kianda Cloud Connect service, and then the Kianda Cloud Connect service sends data to your Kianda subscription. This data transfer works both ways depending on what operation you are performing for example Deleting a file or Creating one.
To learn more about how to download and create a connection between your Kianda subscription and Kianda Cloud Connect go to Kianda Cloud Connect.
How to get started
From the Kianda home page, click on Administration > Data sources.
Click on + Add new button and choose Active Directory from the list of data sources provided.
You will be automatically brought to the Active Directory details page, where you can start setting up the connection.
Choose from the edit options:
Display name - type in the name for your PowerShell connector. The display name is used to identify your connector.
Directory path - enter in the path to the directory. The path must be LDAP or GC.
AD User - enter in the domain and user that you want to connect to. To specify the domain and user correctly use the following format: <domain>/<username>
Password - enter in the password used to login for the desired user.
Use Kianda Cloud Connect - by default this option is enabled, the cloud connect is used to create a connection between the Active Directory connector and Kianda itself. To learn more about Kianda Cloud Connect and how to create a connection between Kianda and your PC, go to Kianda Cloud Connect.
Connectors - displays all available connector PC’s that have a connection established with your Kianda subscription. This option is used to select the PC connection that is running the Active Directory server.
Status - represents the current status of the connection.
incomplete - means that the details of the connector were not fully completed.
test failed - means that the details of the connector are incorrect and the connection has failed.
ready - means that the connector has successfully connected and its ready to be used.
When you have added PowerShell details, you are ready to test your connection and add security. At the bottom of the PowerShell Connector page, click on Test connection button and if the service has been correctly configured, then you should receive a notification saying Connection test succeeded.
Click on Save to save the connection and you will receive a notification saying Details saved successfully.
Click on Close to close the details page and return to the data source management main view.
Active Directory functions
Active Directory functions are Users related and to use them you have to use the Data rules that are predefined within Kianda. The functions that are available are:
FindUsers - allows you to look for a user within your directory by defining a user attribute as a means of searching for them.
IsMemberOf - allows you to see if a user is a member of a group. You need to specify both a user and a group.
CreateUser - allows you to create a user within your directory. You need to specify a username, first name, last name, email and password to create a user successfully.
UpdateUser - allows you to update user attributes. You need to specify what user to update by providing their sAMAccountName and distinguishedName (DN).
AddUserToGroup - allows you to add a user to a group by providing the group name and both the distinguishedName and sAMAccountName of the user.
RemoveUserFromGroup - allows you to remove a user from a group by providing the group name and both the distinguishedName and sAMAccountName of the user.
Enable User - allows you to enable or disable a user by providing the enable parameter and both the distinguishedName and sAMAccountName of the user. The enable parameter is either true or false.
MoveUser - allows you to move a user to a specific path in your directory by providing the destination path and both the distinguishedName and sAMAccountName of the user.
Lets take the CreateUser function as an example to show how these functions work. As mentioned earlier, we need to use the Data rules to use these functions and for this example we use the Create item rule which is available from the Data rules.
When creating a user in Active Directory, there are some required properties that we need to provide. Those properties are a username, givenName (first name), surname (last name), email and password. There are also extra properties that can be provided by expanding a properties tab within the function:
We need to create at least five fields that will be used to provide a value as the required properties. We will use a text box field for each one:
Use the create item rule to use the function. We need to map the text box fields to the appropriate properties as follow:
You can apply the create item rule to a button, for example, the submit button. This will result in a user being created in your AD whenever the submit button will be clicked.
What’s next
Your Active Directory connector is now set up and ready to be used in your processes. To find out more about how to design processes go to Designer.
1.2 - Active Directory Connector - Find users
Kianda Active Directory Connector - find users
The Find Users remote procedure allows you to look for a user within your directory by defining a user attribute as a means of searching for them.
When to use
Having an AD connector will allow you to access information that is stored within your Kianda subscription. You will be able to use User related AD functions which will allow you to use the connector when manipulating users within your AD. For example creating users, updating their permissions, moving them between groups or removing them from the directory. To use the AD functions, you can use the Data rules that are predefined within Kianda.
From the Kianda home page, click on Administration > Data sources.
Click on + Add new button and choose Active Directory from the list of data sources provided.
You will be automatically brought to the Active Directory details page, where you can start setting up the connection.
Choose from the edit options:
Display name - type in the name for your PowerShell connector. The display name is used to identify your connector.
Directory path - enter in the path to the directory. The path must be LDAP or GC.
AD User - enter in the domain and user that you want to connect to. To specify the domain and user correctly use the following format: <domain>/<username>
Password - enter in the password used to login for the desired user.
Use Kianda Cloud Connect - by default this option is enabled, the cloud connect is used to create a connection between the Active Directory connector and Kianda itself. To learn more about Kianda Cloud Connect and how to create a connection between Kianda and your PC, go to Kianda Cloud Connect.
Connectors - displays all available connector PC’s that have a connection established with your Kianda subscription. This option is used to select the PC connection that is running the Active Directory server.
Status - represents the current status of the connection.
incomplete - means that the details of the connector were not fully completed.
test failed - means that the details of the connector are incorrect and the connection has failed.
ready - means that the connector has successfully connected and its ready to be used.
When you have added PowerShell details, you are ready to test your connection and add security. At the bottom of the PowerShell Connector page, click on Test connection button and if the service has been correctly configured, then you should receive a notification saying Connection test succeeded.
Click on Save to save the connection and you will receive a notification saying Details saved successfully.
Click on Close to close the details page and return to the data source management main view.
Active Directory functions
Active Directory functions are Users related and to use them you have to use the Data rules that are predefined within Kianda. The functions that are available are:
FindUsers - allows you to look for a user within your directory by defining a user attribute as a means of searching for them.
IsMemberOf - allows you to see if a user is a member of a group. You need to specify both a user and a group.
CreateUser - allows you to create a user within your directory. You need to specify a username, first name, last name, email and password to create a user successfully.
UpdateUser - allows you to update user attributes. You need to specify what user to update by providing their sAMAccountName and distinguishedName (DN).
AddUserToGroup - allows you to add a user to a group by providing the group name and both the distinguishedName and sAMAccountName of the user.
RemoveUserFromGroup - allows you to remove a user from a group by providing the group name and both the distinguishedName and sAMAccountName of the user.
Enable User - allows you to enable or disable a user by providing the enable parameter and both the distinguishedName and sAMAccountName of the user. The enable parameter is either true or false.
MoveUser - allows you to move a user to a specific path in your directory by providing the destination path and both the distinguishedName and sAMAccountName of the user.
Lets take the CreateUser function as an example to show how these functions work. As mentioned earlier, we need to use the Data rules to use these functions and for this example we use the Create item rule which is available from the Data rules.
When creating a user in Active Directory, there are some required properties that we need to provide. Those properties are a username, givenName (first name), surname (last name), email and password. There are also extra properties that can be provided by expanding a properties tab within the function:
We need to create at least five fields that will be used to provide a value as the required properties. We will use a text box field for each one:
Use the create item rule to use the function. We need to map the text box fields to the appropriate properties as follow:
You can apply the create item rule to a button, for example, the submit button. This will result in a user being created in your AD whenever the submit button will be clicked.
What’s next
Your Active Directory connector is now set up and ready to be used in your processes. To find out more about how to design processes go to Designer.
1.3 - Active Directory Connector - Update user
Kianda Active Directory Connector - update users
One of the data connectors within Kianda that you can connect to is Active Directory (AD) also known as Active Directory Domain Services (AD DS). AD is a logical and hierarchical structured data store of objects which are mostly accounts. Accounts such as Users, Computers, Groups and other objects such as Printers or Group Policy Objects (GPO). For example, you can store information about user accounts within an AD such as Name, Password, Job title and Permissions.
When to use
Having an AD connector will allow you to access information that is stored there within your Kianda subscription. You will be able to use User related AD functions which will allow you to use the connector when manipulating users within your AD. For example creating users, updating their permissions, moving them between groups or removing them from the directory. To use the AD functions, you can use the Data rules that are predefined within Kianda.
Before you get started
Before you can create a connection with your Active Directory and your Kianda subscription, you need to download Kianda Cloud Connect. Kianda Cloud Connect is a piece of software that establishes a connection between your local machine and your Kianda subscription. This lightweight app will sit on your PC or server where files reside that you need to use in Kianda processes. It allows the data to travel from your local machine to the Kianda Cloud Connect service, and then the Kianda Cloud Connect service sends data to your Kianda subscription. This data transfer works both ways depending on what operation you are performing for example Deleting a file or Creating one.
To learn more about how to download and create a connection between your Kianda subscription and Kianda Cloud Connect go to Kianda Cloud Connect.
How to get started
From the Kianda home page, click on Administration > Data sources.
Click on + Add new button and choose Active Directory from the list of data sources provided.
You will be automatically brought to the Active Directory details page, where you can start setting up the connection.
Choose from the edit options:
Display name - type in the name for your PowerShell connector. The display name is used to identify your connector.
Directory path - enter in the path to the directory. The path must be LDAP or GC.
AD User - enter in the domain and user that you want to connect to. To specify the domain and user correctly use the following format: <domain>/<username>
Password - enter in the password used to login for the desired user.
Use Kianda Cloud Connect - by default this option is enabled, the cloud connect is used to create a connection between the Active Directory connector and Kianda itself. To learn more about Kianda Cloud Connect and how to create a connection between Kianda and your PC, go to Kianda Cloud Connect.
Connectors - displays all available connector PC’s that have a connection established with your Kianda subscription. This option is used to select the PC connection that is running the Active Directory server.
Status - represents the current status of the connection.
incomplete - means that the details of the connector were not fully completed.
test failed - means that the details of the connector are incorrect and the connection has failed.
ready - means that the connector has successfully connected and its ready to be used.
When you have added PowerShell details, you are ready to test your connection and add security. At the bottom of the PowerShell Connector page, click on Test connection button and if the service has been correctly configured, then you should receive a notification saying Connection test succeeded.
Click on Save to save the connection and you will receive a notification saying Details saved successfully.
Click on Close to close the details page and return to the data source management main view.
Active Directory functions
Active Directory functions are Users related and to use them you have to use the Data rules that are predefined within Kianda. The functions that are available are:
FindUsers - allows you to look for a user within your directory by defining a user attribute as a means of searching for them.
IsMemberOf - allows you to see if a user is a member of a group. You need to specify both a user and a group.
CreateUser - allows you to create a user within your directory. You need to specify a username, first name, last name, email and password to create a user successfully.
UpdateUser - allows you to update user attributes. You need to specify what user to update by providing their sAMAccountName and distinguishedName (DN).
AddUserToGroup - allows you to add a user to a group by providing the group name and both the distinguishedName and sAMAccountName of the user.
RemoveUserFromGroup - allows you to remove a user from a group by providing the group name and both the distinguishedName and sAMAccountName of the user.
Enable User - allows you to enable or disable a user by providing the enable parameter and both the distinguishedName and sAMAccountName of the user. The enable parameter is either true or false.
MoveUser - allows you to move a user to a specific path in your directory by providing the destination path and both the distinguishedName and sAMAccountName of the user.
Lets take the CreateUser function as an example to show how these functions work. As mentioned earlier, we need to use the Data rules to use these functions and for this example we use the Create item rule which is available from the Data rules.
When creating a user in Active Directory, there are some required properties that we need to provide. Those properties are a username, givenName (first name), surname (last name), email and password. There are also extra properties that can be provided by expanding a properties tab within the function:
We need to create at least five fields that will be used to provide a value as the required properties. We will use a text box field for each one:
Use the create item rule to use the function. We need to map the text box fields to the appropriate properties as follow:
You can apply the create item rule to a button, for example, the submit button. This will result in a user being created in your AD whenever the submit button will be clicked.
What’s next
Your Active Directory connector is now set up and ready to be used in your processes. To find out more about how to design processes go to Designer.
1.4 - Active Directory Connectors - Permissions
Kianda Active Directory Connector - permissions
One of the data connectors within Kianda that you can connect to is Active Directory (AD) also known as Active Directory Domain Services (AD DS). AD is a logical and hierarchical structured data store of objects which are mostly accounts. Accounts such as Users, Computers, Groups and other objects such as Printers or Group Policy Objects (GPO). For example, you can store information about user accounts within an AD such as Name, Password, Job title and Permissions.
When to use
Having an AD connector will allow you to access information that is stored there within your Kianda subscription. You will be able to use User related AD functions which will allow you to use the connector when manipulating users within your AD. For example creating users, updating their permissions, moving them between groups or removing them from the directory. To use the AD functions, you can use the Data rules that are predefined within Kianda.
Before you get started
Before you can create a connection with your Active Directory and your Kianda subscription, you need to download Kianda Cloud Connect. Kianda Cloud Connect is a piece of software that establishes a connection between your local machine and your Kianda subscription. This lightweight app will sit on your PC or server where files reside that you need to use in Kianda processes. It allows the data to travel from your local machine to the Kianda Cloud Connect service, and then the Kianda Cloud Connect service sends data to your Kianda subscription. This data transfer works both ways depending on what operation you are performing for example Deleting a file or Creating one.
To learn more about how to download and create a connection between your Kianda subscription and Kianda Cloud Connect go to Kianda Cloud Connect.
How to get started
From the Kianda home page, click on Administration > Data sources.
Click on + Add new button and choose Active Directory from the list of data sources provided.
You will be automatically brought to the Active Directory details page, where you can start setting up the connection.
Choose from the edit options:
Display name - type in the name for your PowerShell connector. The display name is used to identify your connector.
Directory path - enter in the path to the directory. The path must be LDAP or GC.
AD User - enter in the domain and user that you want to connect to. To specify the domain and user correctly use the following format: <domain>/<username>
Password - enter in the password used to login for the desired user.
Use Kianda Cloud Connect - by default this option is enabled, the cloud connect is used to create a connection between the Active Directory connector and Kianda itself. To learn more about Kianda Cloud Connect and how to create a connection between Kianda and your PC, go to Kianda Cloud Connect.
Connectors - displays all available connector PC’s that have a connection established with your Kianda subscription. This option is used to select the PC connection that is running the Active Directory server.
Status - represents the current status of the connection.
incomplete - means that the details of the connector were not fully completed.
test failed - means that the details of the connector are incorrect and the connection has failed.
ready - means that the connector has successfully connected and its ready to be used.
When you have added PowerShell details, you are ready to test your connection and add security. At the bottom of the PowerShell Connector page, click on Test connection button and if the service has been correctly configured, then you should receive a notification saying Connection test succeeded.
Click on Save to save the connection and you will receive a notification saying Details saved successfully.
Click on Close to close the details page and return to the data source management main view.
Active Directory functions
Active Directory functions are Users related and to use them you have to use the Data rules that are predefined within Kianda. The functions that are available are:
FindUsers - allows you to look for a user within your directory by defining a user attribute as a means of searching for them.
IsMemberOf - allows you to see if a user is a member of a group. You need to specify both a user and a group.
CreateUser - allows you to create a user within your directory. You need to specify a username, first name, last name, email and password to create a user successfully.
UpdateUser - allows you to update user attributes. You need to specify what user to update by providing their sAMAccountName and distinguishedName (DN).
AddUserToGroup - allows you to add a user to a group by providing the group name and both the distinguishedName and sAMAccountName of the user.
RemoveUserFromGroup - allows you to remove a user from a group by providing the group name and both the distinguishedName and sAMAccountName of the user.
Enable User - allows you to enable or disable a user by providing the enable parameter and both the distinguishedName and sAMAccountName of the user. The enable parameter is either true or false.
MoveUser - allows you to move a user to a specific path in your directory by providing the destination path and both the distinguishedName and sAMAccountName of the user.
Lets take the CreateUser function as an example to show how these functions work. As mentioned earlier, we need to use the Data rules to use these functions and for this example we use the Create item rule which is available from the Data rules.
When creating a user in Active Directory, there are some required properties that we need to provide. Those properties are a username, givenName (first name), surname (last name), email and password. There are also extra properties that can be provided by expanding a properties tab within the function:
We need to create at least five fields that will be used to provide a value as the required properties. We will use a text box field for each one:
Use the create item rule to use the function. We need to map the text box fields to the appropriate properties as follow:
You can apply the create item rule to a button, for example, the submit button. This will result in a user being created in your AD whenever the submit button will be clicked.
What’s next
Your Active Directory connector is now set up and ready to be used in your processes. To find out more about how to design processes go to Designer.
2 - Coins Connector
A data connector available within Kianda is the Coins connector. Coins provide general construction management solutions from budgeting and time management, to communications logs and operations management. This data connector allows you to seamlessly integrate your Coins data within your Kianda process, to increase workflow productivity from one central Kianda workspace.
Before you get started
In advance of using the Coins data connector, you must have an account with Coins which is used to obtain information for a successful connection.
How to get started
From the Kianda home page, click on Administration > Data sources.
Click on + Add new button and choose Coins from the list of data sources provided.
You will be automatically brought to the Coins details page, where you can start setting up the connection.
PICTURE HERE
Choose from the edit options:
Display name - type in the name for your Coins connector. This is used to distinguish between different data connectors on your platform.
Coins parameters
When you use the Coins datasource, there are default parameters invoked from the files that you can access. For example when you create a list filed in a Kianda form and use Coins as its datasource, these Coins parameters will appear in Display field, Value field and Sort by field in the Edit field dialog box, see Name for example in the image below:
PICTURE HERE
What’s next
Your Coins service is now set up and ready to be used in your processes. To find out more about how to design processes go to Designer.
3 - DocuSign
One of the data connectors within Kianda that you can connect to is DocuSign. DocuSign enables organisations to manage electronic agreements by offering electronic signatures also know as eSignatures. eSignatures are a way to sign different types of documents electronically on many different devices.
When to use
You can use the DocuSign data connector when a process you have created requires you to send individual documents or envelopes to get them signed electronically. With the connector, you can access different types of templates that you have created within your DocuSign account, download documents, and access already existing envelopes to see their status or summary.
Before you get started
In advance of using the DocuSign data connector, you must have an account with DocuSign. This account is used to authorise a connection between your Kianda subscription and your DocuSign account itself, so that the DocuSign Application Programming Interface (API) can be used. There are two types of accounts that you can create in DocuSign. An ordinary account and a developer account. Take note which account you have created as this information will be used to create a different connection within Kianda.
How to get started
From the Kianda home page, click on Administration > Data sources.
Click on + Add new button and choose DocuSign from the list of data sources provided.
You will be automatically brought to the DocuSign details page, where you can start setting up the connection.
Choose from the edit options:
Display name - type in the name for your DocuSign connector. This is used to distinguish between different data connectors on your platform.
DocuSign Environment - indicates which environment you have your account created in. There are two types of accounts that you can create in DocuSign. A developer account and an ordinary account. If you have an ordinary account and you are trying to connect to DocuSign, you need to select the Live option, and if your account is a developer account, then select the Demo option. This is important as the authentication of the account is different for those two types of account.
Demo - indicates that your DocuSign account is a developer account.
Live - indicates that your DocuSign account is an ordinary account.
Authorize - allows you to authorize the connection with your DocuSign account and Kianda. When you click this button, a DocuSign window will open allowing you to log in into your DocuSign to authenticate your account.
When you have added File system details, you are ready to test your connection and add security. At the bottom of the File system details page, click on Test connection button and if the service has been correctly configured, then you should receive a notification saying Connection test succeeded.
Click on Save to save the connection and you will receive a notification saying Details saved successfully.
Click on Close to close the details page and return to the data source management main view.
DocuSign functions
When you use the DocuSign data connector within Kianda, there are default functions that are invoked from DocuSign’s API. These functions enable you to access a number of DocuSign’s functionalities. You can use each DocuSign function by using the Data set of rules, to learn more about Data rules go to Data rules. With each DocuSign function you use, data needs to be passed into the function know as payload and data is also returned, known as response. When using the Data rules, you are presented with Input mapping which is equivalent to the payload. This is used to pass data into the function, for example when you need a document signed, you need to pass in a document file to be signed, in other words, the document file you pass in is the payload. The Results mapping is equivalent to the response, this is used to populate your form fields when a DocuSign function returns data, for example status of an envelope.
Here is a list of all functions available when using the DocuSign data connector. To learn more about the payload and response for the available functions go to the DocuSign API Reference.
sendDocument - allows you to send one or more documents to a recipient to get them signed.
sendEnvelope - allows you to send a document to a recipient using one of your DocuSign templates.
listTemplates - retrieves the templateID and templateName of all templates from your DocuSign account.
getEnvelope - retrieves information from an envelope using an envelopeID.
getEnvelopeSummary - retrieves a summary of an envelope using an envelopeID.
listEnvelopeDocuments - retrieves any documents that are contained within an envelope using an envelopeID.
downloadDocument - allows you to download a specific document using a documentID from an envelope using an envelopeID.
listTemplateSigners - retrieves the name, role and recipientID of all signers from a template using a templateID.
getSigningUrl - retrieves a URL to a signature made on an envelope using an envelopeID.
Example use case of DocuSign function
Take the function listTemplates as an example. The listTemplates function returns (response) an ID and the Name of all templates that you have created in your DocuSign account. To use this function effectively, you can use the Find items rule in combination with the table input. The Find items rule will access all templates and map the results into the table. For each template in your DocuSign account, the Find items rule will add a table row with the appropriate Template IDs and Template Names of each template.
To showcase the functionality explained above, we will apply the Find items rule to a button; however, it can be applied to a form field, a form or a process (the rule will be executed when the process loads). Each time we press this button, a table will be populated with a list of Template IDs and Template Names from our DocuSign account.
Create a button in your process, to learn how to create a button go to Button control.
Create a table with two columns and call them ID and Name. To learn how to create a table and add columns go to Table control.
Apply the Find items rule to the button by following the steps from Find items rule. When following the steps of the Find items rule, make sure to do the following:
Select the Map results to table option and select the table you created. This way the Find items rule will create as many rows as there are templates in your DocuSign account.
The listTemplates function does not require any payload (Input mapping), so delete all fields from the input mapping section.
Select listTemplates as your data source from your DocuSign connector.
Select the appropriate column field from your table and results field from your data source in the Results mapping section.
What’s next
Your DocuSign service is now set up and ready to be used in your processes. To find out more about how to design processes go to Designer.
4 - Dropbox
A Dropbox data system connector allows you to the Dropbox cloud file system as a data source for your Kianda forms or dashboards. Dropbox is a personal cloud based file system with many subscriptions including team subscriptions. This allows you to store files online and share them with your team or use it as a backup. This means that as your processes are running they will use the information from the cloud file system or depending on the process, update or delete information at the Dropbox cloud file system.
When to use
You can use the Dropbox connector when you want a process within your Kianda subscription to have access to your Dropbox cloud file directory. You can extract files from Dropbox into Kianda by using a List field control. Set the datasource of the List field to be your Dropbox connector allowing you to access files from you Dropbox account, to learn more about the List field go to List control. You can also use the Dropbox data connector within the Data set of rules, these rules allow you to perform Create, Read, Update and Delete (CRUD) operations. To learn more about the Data rules, go to Data rules.
Before getting started
In advance of using the Dropbox data connector, you must have an account with Dropbox. The account is used to authorise a connection between your Kianda subscription and your Dropbox account.
How to get started
From the Kianda home page, click on Administration > Data sources.
Click on + Add new button and choose Dropbox from the list of data sources provided.
You will be automatically brought to the Dropbox data connector page, where you can start setting up the connection.
Choose from the edit options:
Display name - type in the name for your Dropbox connector. This is used to distinguish between different data connectors on your platform.
Authorize - allows you to authorize the connection with your Dropbox account and Kianda. When you click this button, a Dropbox window will open allowing you to log in into your Dropbox to authenticate your account.
Status - represents the current status of the connection.
incomplete - means that the details of the connector were not fully completed
test failed - means that the details of the connector are incorrect and the connection has failed.
ready - means that the connector has successfully connected and its ready to be used.
A Dropbox authentication window will open. Enter your login details to authenticate the connection.
When you have added the Dropbox details, you are ready to test your connection and add security. At the bottom of the Dropbox details page, click on Test connection button and if the service has been correctly configured, then you should receive a notification saying Connection test succeeded.
Click on Save to save the connection and you will receive a notification saying Details saved successfully.
Click on Close to close the details page and return to the data source management main view.
Dropbox parameters
When you use the Dropbox datasource, there are default parameters invoked from the files that you can access. For example when you create a list filed in a Kianda form and use Dropbox as its datasource, these Dropbox parameters will appear in Display field, Value field and Sort by field in the Edit field dialog box, see Name for example in the image below:
The Dropbox parameters that appear in those three dropdown fields are:
Name - name of the file including the extension.
NameNoExtension - name of the file without the extension.
Path - displays the full path to the file.
Extension - displays just the extension of the file.
Modified - displays the date and time when the file was last modified.
Created - displays the date and time when the file was created.
ParentFolderName - name of the folder that contains the file.
ParentFolderPath - path of the folder that contains the file.
What’s next
Your Dropbox connector is now set up and ready to be used in your processes. To find out more about how to design processes go to Designer.
5 - Email connector
In your company’s Kianda platform you can connect an emailing service such as Outlook or Gmail. This allows you to send automated emails from a specified email account such as support@ or info@. The email connector feature It is mostly used when applying the Send email rule, which allows you to set a From field. For example setting up a payroll Email connector would be used to send automated emails to employees with their payslips attached. To learn more about send email rule go to Send email.
How to get started
From the Kianda home page, click on Administration > Data sources.
Click on + Add new button and choose Email from the list of data sources provided.
You will be automatically brought to the Email connection details page where we can start setting up the email connector.
Choose a Display name for your email connector. This is used to distinguish between different email connectors on your platform.
In the following example we will use an outlook office 365 IMAP to set up the connector. Fill in the following details:
IMAP server - the IMAP server address of your provider. outlook.office365.com in this example
IMAP server port - the IMAP port your provider listens to. Port number is 993 in this example.
Use SSL - IMAP security of your provider. Outlook uses SSL therefore we need to enable it.
Username / email - the email provider credentials. In this example we are creating a support@ connector.
Password - the password to access your email account.
Enable mail send from - allows you to fill in details used to send emails.
To learn more about IMAP settings and how to obtain them, go to IMAP settings.
If you select Yes in the Enable mail send from, you are prested with SMTP details. Fill out the following:
SMTP server - the SMTP server address of your provider. In this example it is smtp.office365.com.
SMTP server port - the SMTP port your provider listens to. In this example it’s port 587.
Use SSL - IMAP security of your provider. Outlook uses SSL therefore we need to enable it.
Email Address - Used to send test email to ensure emails are delivered.
Use same credentials as above
Yes - selecting this will ensure to use the same credentials as stated in the above IMAP settings.
No - selecting this will enable you to use different credentials for the SMTP server.
To learn more about IMAP settings and how to obtain them, go to SMTP settings.
When you have added Email details, you are ready to test your connection and add security. At the bottom of the Email details page, click on Test connection button and if the service has been correctly configured, then you should receive a notification saying Connection test succeeded.
Click on Saveto save the connection and you will receive a notification saying Details saved successfully.
Click on Close to close the details page and return to the datasource management main view.
IMAP settings
Internet Message Access Protocol, or IMAP, is a standard email retrieval (incoming) protocol. It stores email messages on a mail server and enables the recipient to view and manipulate them as though they were stored locally on their device(s). These settings are needed to connect to your emailing service and authentication of ownership. In order to activate your email connector we need to fill out the following:
Note: some email providers need IMAP settings enabled as they are disabled by default.
IMAP server - IMAP server is an address for a given mailing service, it usually comes in the form of imap.yourdomain.com. For example Google’s IMAP is imap.gmail.com. To access your IMAP address, contact your email provider or email server.
IMAP server port - Indicates which port your IMAP server listens to. The IMAP server typically listen to a well known port 143 or 993 with SSL/TSL functionality. The port information can be found by contacting your email provider.
Use SSL - Secure Socket Layer (SSL) is a standard technology for keeping the internet connection secure and safeguarding. Contact your email provider to find out if SSL is required when accessing IMAP server.
Username/ email - The credentials used to access your emailing account. Indicates which email will be used to send mail.
Password - The credentials used to access your emailing account.
Enable mail send from - With this option you can choose the ability to send email OUT to others using the connected emailing service. If you choose Yes, you need to fill in SMTP details. To find out more got to SMTP detail.
SMTP details
Simple Mail Transfer Protocol or SMTP, is a standard email outgoing (sending) protocol. It is used for sending email messages from one email account to another via the internet. The SMTP server checks whether the two emails are valid and proceeds with sending of the email. To be able sending of email using your email provider, the following details need to be filled out:
SMTP server - SMTP server is an address for a given mailing service, it usually comes in the form of smtp.yourdomain.com. For example Google’s SMTP is smtp.gmail.com. To access your IMAP address, contact your email provider or email server.
SMTP server port - Indicates which port your SMTP server listens to. The SMTP servers typically listen to port 25 if unencrypted or 465 with SSL encryption. The port information can be found by contacting your email provider.
Email address - Used to send test email to ensure emails are delivered.
Use same credentials as above - By choosing Yes, you will be using the same credentials to log into your SMTP server as you are to the IMAP server. If your SMTP server credentials are different, select No to be presented with:
SMTP Username - The credentials used to access your SMTP provider.
Password - The credentials used to access your SMTP provider.
Setting up a Global SMTP mail connector
As mentioned above, you can create multiple Email connectors and use them to send emails using different email accounts such as support@ or info@. You can also choose to ignore all email connectors as well as the no-reply@kianda.com emails by enabling one Global SMTP connector which forces all sent email to come from one single connector. To set a Global SMTP connector, you need Administrator rights in your Kianda platform.
Note: to set up a global SMTP mail connector, you need to have an Email connector set up, see the steps under How to get started on how to set up an email connector.
From the Kianda home page, click on Administration > Subscription > Subscription Details.
Under General settings, select Yes on the Enable Global SMTP Main Connector option.
A SMTP Email connector dropdown box appears. Select your desired email connector.
In the Enable save to “Sent Items” option select Yes if you want your email to save all emails sent and select No to not save. If you select Yes, the emails will be saved in the Sent Items folder in your email.
6 - File system
A File system data connector allows you to use your local file system as a data source for your Kianda forms or dashboards. This means that as your processes are running, they will use the information from the local file system or depending on the process, update or delete information at the local file system location. Kianda has the ability to extract files, navigate subfolders and write new files into the directory, this includes local file and internet file systems.
Using this type of datasource is useful when you want Kianda to have access to your directory, to extract and read files as well as writing files to the directory.
How to get started
From the Kianda home page, click on Administration > Data sources.
Click on + Add new button and choose File system from the list of data sources provided.
You will be automatically brought to the File system details page, where you can start setting up the connection.
Choose from the edit options:
Display name - type in the name for your file system connector. This is used to distinguish between different data connectors on your platform.
Root folder path - type in manually the file path to the folder of your connector, for example C:\Documents\GreenITR. The connector will be able to access data only in this folder and folders within.
File search pattern - this options can be used to limit the type of files for interaction, by using file extensions. For example typing in *.txt will only output the .txt files within the folder path, it will ignore all other path endings and will not display them. To set pattern you need to type in * followed by .extenstion for example *.txt , *.docx or *.pdf
Search options - this only allows you to search the files of the top directory that is set in the Root folder path or all other files of other directories within.
For example selecting if Top Directory Only is selected, you will be able to see only the files that are in Root folder path while ignoring folders, meaning that no subdirectories can be navigated.
If All Directories is selected, you will be able to see files that are in Root folder path and all files from within each folder, or subfolders.
Use Kianda Cloud Connect - by default this option is enabled and cannot be changed, the cloud connect is needed to create a connection between the local file system and Kianda itself. This lightweight app will sit on the PC or server where the files reside. To learn more about Kianda Cloud Connect and how to create a connection between Kianda and your PC, go to Kianda Cloud Connect.
Connectors - displays all available connector PC’s that have a connection established with your Kianda website. You must choose the correct PC connection which contains the folder specified in the Root folder path, otherwise the connection will fail.
When you have added File system details, you are ready to test your connection and add security. At the bottom of the File system details page, click on Test connection button and if the service has been correctly configured, then you should receive a notification saying Connection test succeeded.
Click on Save to save the connection and you will receive a notification saying Details saved successfully.
Click on Close to close the details page and return to the data source management main view.
File system parameters
When you use a File system datasource, there are default parameters invoked from the files. For example when you create a list in a Kianda form using a File system datasource, these File system parameters will appear in Display field, Value field and Sort by field in the Edit field dialog box, see Name for example in the image below.
The File system parameters that appear in those three dropdown fields are:
Name - name of the file including the extension.
NameNoExtension - name of the file without the extension.
Path - displays the full path to the file.
Extension - displays just the extension of the file.
Modified - displays the date and time when the file was last modified.
Created - displays the date and time when the file was created.
ParentFolderName - name of the folder that contains the file.
ParentFolderPath - path of the folder that contains the file.
What’s next
Your File system service is now set up and ready to be used in your processes. To find out more about how to design processes go to Designer.
7 - FTP
One of the data connectors that you can connect to is File Transfer Protocol (FTP). FTP is a standard communication protocol used for the transfer of computer files from one system to another over the internet.
The FTP data connector allows you to use an online file system as a data source for your Kianda forms or dashboards. This means that as your processes are running they will use the information from the online file system or depending on the process, update or delete information at in the online file system location. Kianda has the ability to extract files, navigate subfolders and write new files into the online directory. Any operation performed using the FTP data connector will directly change files within the online file system.
When to use
You can use the FTP connector when you want access or modify data or files within any folder in your FTP server. You can perform Create, Read, Update and Delete (CRUD) operations on any files within the FTP server that you have access to.
How to get started
From the Kianda home page, click on Administration > Data sources.
Click on + Add new button and choose FTP from the list of data sources provided.
You will be automatically brought to the FTP details page, where you can start setting up the connection.
Choose from the edit options:
Display name - type in the name for your FTP connector. This is used to distinguish between different data connectors on your platform.
FTP Server - the server name of the server you want to access or the IP address where the server is hosted. When you are running a local server on your machine you can use your own IP address as the server.
FTP root folder - name of the root folder that is specified in your server. Note that the root folder that you specify here must be exactly the same as on the FTP server. For example If your root folder on the FTP server is /Files, you must also specify that the FTP root folder is /Files. It is possible to successfully connect the FTP connector if you specify a different FTP root folder than on the server but you will not be able to access the files properly.
FTP port - enter the port on which your server listens on.
Use SSL - check this box if your FTP server has SSL security.
FTP username - enter the username you use to connect to your FTP server.
FTP password - enter the password you use to connect to your FTP server.
Use Kianda Cloud Connect - by default this option is disabled, the cloud connect is used to create a connection between a locally run FTP server and Kianda itself. To learn more about Kianda Cloud Connect and how to create a connection between Kianda and your PC, go to Kianda Cloud Connect. Check this option if you want to connect to a server that is running on your local machine. When Use Kianda Cloud Connect is enabled, a Connectors option appears.
Connectors - displays all available connector PC’s that have a connection established with your Kianda subscription. This option is used to select the PC connection that runs the local FTP server that you want to connect to.
When you have added File system details, you are ready to test your connection and add security. At the bottom of the File system details page, click on Test connection button and if the service has been correctly configured, then you should receive a notification saying Connection test succeeded.
Click on Save to save the connection and you will receive a notification saying Details saved successfully.
Click on Close to close the details page and return to the data source management main view.
FTP parameters
When you use a FTP datasource, there are default parameters invoked from the files. For example when you create a list in a Kianda form using a FTP datasource, these FTP parameters will appear in Display field, Value field and Sort by field in the Edit field dialog box, see Name for example in the image below.
The FTP parameters that appear in those three dropdown fields are:
Name - name of the file including the extension.
NameNoExtension - name of the file without the extension.
Path - displays the full path to the file.
Extension - displays just the extension of the file.
Modified - displays the date and time when the file was last modified.
Created - displays the date and time when the file was created.
ParentFolderName - name of the folder that contains the file.
ParentFolderPath - path of the folder that contains the file.
What’s next
Your FTP service is now set up and ready to be used in your processes. To find out more about how to design processes go to Designer.
8 - Google Drive
A Google Drive data system connector allows you to have access to the Google Drive cloud file system as a data source for your Kianda forms or dashboards. Google Drive is a personal cloud based file system with many subscriptions including team subscriptions. This allows you to store files online and share them with your team or use it as a backup. This means that as your processes are running they will use the information from the cloud file system or depending on the process, update or delete information at the Google Drive cloud file system.
When to use
You can use the Google Drive connector when you want a process within your Kianda subscription to have access to your Google Drive cloud file directory. You can extract files from Google Drive into Kianda by using a List field control. Set the datasource of the List field to be your Google Drive connector allowing you to access files from you Google Drive account, to learn more about the List field go to List control. You can also use the Google Drive data connector within the Data set of rules, these rules allow you to perform Create, Read, Update and Delete (CRUD) operations. To learn more about the Data rules, go to Data rules.
Before getting started
In advance of using the Google Drive data connector, you must have an account with Google. The account is used to authorise a connection between your Kianda subscription and your Google Drive account.
How to get started
From the Kianda home page, click on Administration > Data sources.
Click on + Add new button and choose Google Drive from the list of data sources provided.
You will be automatically brought to the Google Drive data connector page, where you can start setting up the connection.
Choose from the edit options:
Display name - type in the name for your Google Drive connector. The display name is used to identify your connector.
Click on the Authorize button.
A Google Drive authentication window will open. Select the account you want to use when authenticating the connection.
Google Drives security will block the access to Kianda when trying to authenticate and you will be presented with similar window as shown below. In the window, click on Advanced.
In the advanced options, click on Go to kianda.com(unsafe).
This will now bring you to a web page in which you will be able to allow the connection. Click on Allow.
When you have successfully authenticated your Google Drive account, the system will test your connection automatically. If that has not been done, at the bottom of the Google Drive details page, click on Test connection button and you should receive a notification saying Connection test succeeded.
Click on Save to save the connection and you will receive a notification saying Details saved successfully.
Click on Close to close the details page and return to the data source management main view.
Google Drive parameters
When you use the Google Drive datasource, there are default parameters invoked from the files that you can access. For example when you create a list filed in a Kianda form and use Google Drive as its datasource, these Google Drive parameters will appear in Display field, Value field and Sort by field in the Edit field dialog box, see Name for example in the image below:
The Google Drive parameters that appear in those three dropdown fields are:
Name - name of the file including the extension.
NameNoExtension - name of the file without the extension.
Path - displays the full path to the file.
Extension - displays just the extension of the file.
Modified - displays the date and time when the file was last modified.
Created - displays the date and time when the file was created.
ParentFolderName - name of the folder that contains the file.
ParentFolderPath - path of the folder that contains the file.
What’s next
Your Dropbox connector is now set up and ready to be used in your processes. To find out more about how to design processes go to Designer.
9 - Kianda Cloud Connect
Kianda Cloud Connect is a piece of software that establishes a connection between your local machine and your Kianda subscription. This lightweight app will sit on your PC or server where files reside that you need to use in Kianda processes. It allows the data to travel from your local machine to the Kianda Cloud Connect service, and then the Kianda Cloud Connect service sends data to your Kianda subscription. This data transfer works both ways depending on what operation you are performing for example Deleting a file or Creating one.
Kianda Cloud Connect authenticates with a user created in Kianda, see User management for more details on users, and sends information to and from Kianda using port 80. See details below on how to set up the connection.
Downloading Kianda Cloud Connect
You can download Kianda Cloud Connect software in any details page of data source that might use it, for example in a File system data connector:
From the Kianda home page, click on Administration > Data sources.
Click on + Add new button and choose File system from the list of data sources provided.
You will be automatically brought to the File system details page, where you can click on Download Kianda Cloud Connect at the bottom of the screen.
Clicking on Download Kianda Cloud Connect will automatically download a zipped folder. Extract the contents of the folder and open the Kianda Cloud Connect Windows Installer Package. You will need administrative privileges on your device in order to install the application.
Click on the Windows Installer Package CloudConnect.msi file.
Security on the device may prevent you from installing the app. If the below window appears click on the More Info link and then click Run Anyway.
In the Welcome to Kianda Cloud Connect Setup Wizard, follow the installation wizard to install the application. Click Next.
In the Select Installation Folder window, pick a folder where you want to install the software. Click Next.
In the Confirm Installation window, click Next.
Click on Yes in the administrator dialog box to give Kianda Cloud Connect access to your PC.
In the Installation Complete window click on Close. Once installed the application will be available on your desktop as an app.
Double-click the icon to open the application, then follow the steps below to connect your PC to Kianda Cloud Connect.
Connecting your PC to Kianda Cloud Connect
To establish a connection between your Kianda subscription and your local machine, you need to login using a Kiandausername (email) and password. Note that the user you are trying to establish a connection with must be an administrator and needs to be a unique username (email). The username you want to establish the connection with cannot be used in more than one Kianda subscriptions as Kianda Cloud Connect will not be able to tell which subscription you want to connect to.
To open Kianda Cloud Connect on your PC, open the Kianda Cloud Connect app installed on your PC, and the dialog box below will open. Note the version of Cloud Connect is visible in this dialog box, in this example 2.11.5.
To establish a connection fill out the following:
Machine Identity - automatically sets the identity using the name of your local PC or server that the application has been installed on. This field is an un-editable value that cannot be changed.
Kianda Username - type in the username/email of the user from your Kianda subscription you want to establish a connection with. This username must be unique across all Kianda subscriptions and must be an administrator. For example you cannot establish a connection with a connector@domain.comif this email is used in more than one subscription, as Kianda Cloud Connect will not be able to determine which subscription to make a connection with. For more information on users go to Users and groups.
Kianda Password - type in the password used to login, for the user in the Kianda Username field.
Status - the colour shown denotes if the connection is active, as a green colour, or inactive as a red colour.
Enable Local Server - this allows Kianda to pass through the current server and connect to a local server or offline server/PC. Click the checkbox to enable this, followed by the ellipsis button to continue. Then add in the Local URL and click on OK.
Once the username and password have been entered, click on the Login button to establish a connection. It is recommended to have a specific user account that is used solely for the purpose of connecting the data connector to the Kianda subscription.
If the connection succeeded, in the Cloud Connection dialog box, click OK to complete the connection. Once the connection has been made the log in the dialog box will be populated with messages confirming the login has occurred. A dialog box will open confirming that the connection has been successfully established. When the connection has been established successfully, Kianda Cloud Connect will automatically connect to your subscription when the PC is turned on therefore you do not need to login when the PC is turned on.
Click on Clear to clear the connection log in the body of the dialog box.
All established connections will be visible in the Kianda Cloud Connect Connector section in any of the datasource connectors that use it, for example File system or SQL Server.
The connector is now established and can be used when designing processes.
One of the datasources available in Kianda is a MySQL Server datasource. MySQL is a relational database management system (RDBMS) used to manage structured collections of data. This data can consist of anything from a simple to do list to a more complex organisation network. Using the MySQL server as your datasource, you can perform any Create, Read, Update and Delete (CRUD) operations using the Data rules provided in the Kianda platform, to learn more about data rules go to Data rules. Using the MySQL server connector, you have access to all tables within your database from your server, keep in mind that you can perform CRUD operations on data within a table of the database, but you cannot create or delete tables themselves.
When to use
You can use the MySQL Server connector when you want access or modify data within a table in your MySQL server. You can connect the MySQL server connector to a List field as its datasource, meaning you can access information from a table and display the information that is stored in the table. For example if your MySQL server contains tables such as Employees, Purchases and Standing Orders, you will be able to connect the list field to one of those tables giving you CRUD access to its data.
Take a table Employees as an example, if this employee table contains data about the employees in your company such as name, phone number, email address and home address. You can create a new employee by providing necessary information, you can read (display) employee data, update employees information for example when a home address has changed and you can delete an employee from the table. Those are the CRUD operations you can perform on MySQL server through a process within Kianda.
Before getting started
When establishing a connection using MySQL data connector, you are creating a connection with a Database from a server, not the server itself. Before continuing make sure that your MySQL server has a database you can connect to. A database can represent any type of data you want to access, and within this database, you need to create a table representing the actual data you will have CRUD access to. For example creating a database of your company name such as GreenITR, and within this database you can create tables to represent your Employees, Purchases and Standing Orders.
How to get started
From the Kianda home page, click on Administration > Data sources.
Click on + Add new button and choose MySQL from the list of datasources provided.
Fill out fields in the MySQL Server details screen.
Choose from the edit options:
Display name - type in the name for your MySQL server connector. This is used to distinguish between different data connectors on your platform.
Server - the name of the server you want to access or the IP address where the server is hosted. When you are running a local server on your machine you can use localhost as the server name. If you are connecting to a public server, enter in the name of the server.
Database - the name of the database from your server that you want to connect to.
User - username used to log into the server.
Password - password used to log into the server.
Use Kianda Cloud Connect - by default this option is disabled, the cloud connect is used to create a connection between a locally run MySQL server and Kianda itself. To learn more about Kianda Cloud Connect and how to create a connection between Kianda and your PC, go to Kianda Cloud Connect. Check this option if you want to connect to a server that is running on your local machine. When Use Kianda Cloud Connect is enabled, a Connectors option appears.
Connectors - displays all available connector PC’s that have a connection established with your Kianda subscription. This option is used to select the PC connection that runs the local MySQL server that you want to connect to.
Status - represents the current status of the connection.
incomplete - means that the details of the connector were not fully completed
test failed - means that the details of the connector are incorrect and the connection has failed.
ready - means that the connector has successfully connected and its ready to be used.
When you have added the MySQL server details, you are ready to test your connection and add security. At the bottom of the MySQL Server details page, click on Test connection button and if the service has been correctly configured, then you should receive a notification saying Connection test succeeded.
Click on Save to save the connection and you will receive a notification saying Details saved successfully.
Click on Close to close the details page and return to the data source management main view.
What’s next
Your MySQL Server connector is now set up and ready to be used in your processes. To find out more about how to design processes go to Designer.
11 - Office 365
One of the datasources available in Kianda is a connector to Office 365. Kianda has the ability to read users’ profiles, extract data, update users and groups and enable Single Sign-On (SSO). The Office 365 datasource can be used for example to automatically import users using a scheduled task within Kianda or with individual Kianda processes to update the configuration of users and groups within Office 365.
When to use
If you have an Office 365 subscription, you can create an Office 365 data connector so that Kianda can access data and manipulate data at that data source.
Note: To create this datasource you need to have an Administrator or Manage datasources role in Kianda. You also need to be an administrator in Office 365.
How to get started
An Office 365 data connector can be configured by users with the role Administrator or Manage datasources. These users can access the datasource management function, found under Administration > Data sources.
From the Kianda home page, click on Administration > Data sources.
In the main view you will see any existing data sources that have been created. From this view, you can click on the name of a data source to see details or delete a data source by clicking on the Bin/Trash button .
Click on + Add new button and a range of data source connectors will appear.
Click on Office 365.
The Office 365 data connector screen opens.
Fill in the first set of fields:
Display name – this is the name of the data source. Use an appropriate name, as this will be used within your process(es).
Read all users’ full profiles – by default, this is enabled and cannot be disabled. This allows Kianda processes to read all user profiles that exist in Office 365.
Read and write users & groups - by checking this option it will allow Kianda the rights to read users and group information and update information, performing ‘write operations’ in Office 365, such as assigning a user license and adding users to groups.
Enable Azure OpenID Connect Single-Sign-On - checking this checkbox enables a user to sign into Kianda using their Office 365 login. For more details see the SSO page.
After these details have been completed, you will need to Authorize the connection as the datasource will have a status of incomplete until authorised. When authorized for use, the status will be ready.
Authorize the connection
Before the datasource can be used it will need to be authorised. Click on the Authorize button .
A pop up appears asking you to sign in to your Office365 account. You must be an administrator in Office 365 to complete authorization.
Enter your email and click on Next.
Then enter your password and click on Sign in.
Click on Yes to Stay signed in.
If your details are correct and you are an administrator, then you should receive a notification saying Connection test succeeded and the status changes to ready.
The Authorize button changes to Re-Authorize. If authorization is removed from within Office 365, the datasource will need to be re-authorized from within Kianda. In addition, Microsoft security policy requires the connection to Office 365 to be re-authorized every 6 months. To re-authorize, click on the Re-Authorize button and repeat steps 2 to 5 above.
Click on Saveto save the connection and you will receive a notification saying Details saved successfully.
Click on Close to close the details page and return to the datasource management main view.
Office 365 parameters
When you use an Office 365 datasource, there are default options that can be passed as parameters, for example when using conditions with Office 365 data connectors. These are:
User List
Group List
Find Users
Find Groups
Create Group
Add User to Group
Remove User From Group
Licence Plan List
Assign Licence to User
Remove Licence from User
What’s next
Your Office 365 connector is now set up and ready to be used in your processes. To find out more about how to design processes go to Designer.
12 - Oracle database
One of the datasources available in Kianda is an Oracle datasource. Oracle is a relational database management system (RDBMS) used to manage structured collections of data. This data can consist of a collection of data from a simple to do list to a more complex organisation network. The Oracle database is a structured format consisting of rows and columns. Using the Oracle connector as your datasource, you can perform any Create, Read, Update and Delete (CRUD) operations using the Data rules provided in the Kianda platform, to learn more about data rules go to Data rules. Using the Oracle connector, you have access to all tables within your database from your server, keep in mind that you can perform CRUD operations on the data from a table of the database, but you cannot create or delete tables themselves.
How to get started
From the Kianda home page, click on Administration > Data sources.
Click on + Add new button and choose Oracle from the list of datasources provided.
Fill out fields in the Oracle details screen.
Choose from the edit options:
Display name - type in the name for your Oracle server connector. This is used to distinguish between different data connectors on your platform.
Data Source - this field is used to provide the name of your host that you want to connect to. When accessing a public Oracle server, the host name must follow a URL style format, for example https:/{host}:{port}. When connecting to a server that is run on your local machine, you can use localhost as well as the Kianda Cloud Connect .
Schema - the name of the database from your server that you want to connect to.
User - username used to log into the server.
Password - password used to log into the server.
Use Kianda Cloud Connect - by default this option is disabled, the cloud connect is used to create a connection between a locally run Oracle server and Kianda itself. To learn more about Kianda Cloud Connect and how to create a connection between Kianda and your PC, go to Kianda Cloud Connect. Check this option if you want to connect to a server that is running on your local machine. When Use Kianda Cloud Connect is enabled, a Connectors option appears.
Connectors - displays all available connector PC’s that have a connection established with your Kianda subscription. This option is used to select the PC connection that runs the local Oracle server that you want to connect to.
Status - represents the current status of the connection.
incomplete - means that the details of the connector were not fully completed
test failed - means that the details of the connector are incorrect and the connection has failed.
ready - means that the connector has successfully connected and it is ready to be used.
When you have added the Oracle details, you are ready to test your connection and add security. At the bottom of the Oracle details page, click on Test connection button and if the service has been correctly configured, then you should receive a notification saying Connection test succeeded.
Click on Save to save the connection and you will receive a notification saying Details saved successfully.
Click on Close to close the details page and return to the data source management main view.
What’s next
Your Oracle database connector is now set up and ready to be used in your processes. To find out more about how to design processes go to Designer.
13 - PowerShell
One of the data connectors within Kianda that you can connect to is PowerShell. PowerShell is a command-line interface (CLI) based tool that allows to automate tasks and configurations using code. With PowerShell you are able to create scripts and functionality to automate tasks within your organisation and the PowerShell connector allows you to call those PowerShell scripts from within Kianda. You can call your scripts with the Data rules that are available, use input mapping to pass parameters to your PowerShell script and receive the outcome of the script using results mapping. To learn more about input and result mapping visit one of the Data rules, for example Create Item.
When to use
You can use the PowerShell connector when you want run a PowerShell script from within your Kianda subscription. Any data that you to be passed into a script can be passed in using the input mapping functionality from Data rules. This allows you to have dynamic usage of your PowerShell scripts as you can have different value each time you call a script from Kianda.
Before you get started
In advance of using the PowerShell data connector, there are a couple of prerequisites to establish a working connection between your PowerShell scripts and Kianda.
Kianda Cloud Connect is a piece of software that establishes a connection between your local machine and your Kianda subscription. This lightweight app will sit on your PC or server where files reside that you need to use in Kianda processes. It allows the data to travel from your local machine to the Kianda Cloud Connect service, and then the Kianda Cloud Connect service sends data to your Kianda subscription. This data transfer works both ways depending on what operation you are performing for example Deleting a file or Creating one.
To learn more about how to download and create a connection between your Kianda subscription and Kianda Cloud Connect go to Kianda Cloud Connect.
Creating a new local PowerShell user
We need to create a local user on your computer and designate it when running the Kianda Cloud Connect app on your computer. On the newly created local user, we will enable the ability to run PowerShell scripts and use this user as a link between Kianda Cloud Connect and your PowerShell scripts. Follow the steps bellow:
Go to start, search and open Computer Management.
Go to System Tools > Local Users and Groups > Users
In the Users screen, right click your mouse and select New User…
Fill out the New User dialog box. Uncheck User must change password at next login and check Password never expires.
Click Create and then Close. The new user should be added to the list.
Changing user rights assignment
In order for PowerShell and Kianda Cloud Connect to work successfully, we need to add our new user to the Rights Assignment list.
Go to Start on your computer, search and open Window Administrative Tools.
In the Window Administrative Tools, search and open Local Security Policy.
In the left-hand pane go to Local Policies > User Rights Assignment.
In the right-hand pane of User Rights Assignment, search and double left-click Log on as a service.
In the Log on as a service Properties dialog box, click on Add User or Group…
In the Select Users or Groups dialog box, under the Enter the object names to select text box, enter your new user and click on Check Names.
Click on OK.
In the Log on as a service Properties dialog box, click Apply and then OK.
Changing Execution Policy for the new user
With our new user created, we also need to allow PowerShell scripts to be executed by it and therefore we need to change Execution Policy for our newly created user. This will allow Kianda Cloud Connect to run scripts using the user that was created.
Log in to your computer as your new PowerShell user.
Go to Start and search for Windows PowerShell.
Right-click on Windows PowerShell and select run as administrator.
In the PowerShell window run the following command: Set-ExecutionPolicy -ExecutionPolicy RemoteSigned -Scope CurrentUser
Answer yes to change of policy question by entering y into the PowerShell console.
You can now close the PowerShell console and log back into your original user.
Running Kianda Cloud Connect as PowerShell user
Now when we have our user created, the rights and policy have been changed, we need to set up our Kianda Cloud Connect service to run as our newly created user. Log into your original user and follow the steps below:
Go to Start, search and open Services.
Look for Kianda Cloud Connect.
Right click on the Kianda Cloud Connect service and open the properties.
In the Kianda Cloud Connect Properties (Local Computer) dialog box, go to Log on tab.
Select This account radio button.
Click on Browse.
In the Select User dialog box, in the Enter the object names to select text box, enter the name of your user and click Check Names.
Click on OK.
In the Kianda Cloud Connect Properties (Local Computer) dialog box, enter the password for your user, click Apply and then OK.
Your Kianda Cloud Connect should be logged on as your new user. You can see this in the Log on as tab in the Services window. In the Services window, stop and start Kianda Cloud Connect.
How to get started
From the Kianda home page, click on Administration > Data sources.
Click on + Add new button and choose PowerShell from the list of data sources provided.
You will be automatically brought to the PowerShell details page, where you can start setting up the connection.
Choose from the edit options:
Display name - type in the name for your PowerShell connector. The display name is used to identify your connector.
Use Kianda Cloud Connect - by default this option is enabled, the cloud connect is used to create a connection between the PowerShell connector and Kianda itself. To learn more about Kianda Cloud Connect and how to create a connection between Kianda and your PC, go to Kianda Cloud Connect.
Connectors - displays all available connector PC’s that have a connection established with your Kianda subscription. This option is used to select the PC connection that contains your PowerShell scripts and config.json file
Status - represents the current status of the connection.
incomplete - means that the details of the connector were not fully completed.
test failed - means that the details of the connector are incorrect and the connection has failed.
ready - means that the connector has successfully connected and its ready to be used.
When you have added PowerShell details, you are ready to test your connection and add security. At the bottom of the PowerShell Connector page, click on Test connection button and if the service has been correctly configured, then you should receive a notification saying Connection test succeeded.
Click on Save to save the connection and you will receive a notification saying Details saved successfully.
Click on Close to close the details page and return to the data source management main view.
Adding new PowerShell scripts to your connector
When installing Kianda Cloud Connect, a folder called PowerShellScripts should be located at:
C:/Program Files (x86)/Kianda Technologies
This folder will be used to store your a config.json. The config.json file is used to define new PowerShell scripts in the Scripts array. Import to note is to put the correct path to your script in the Path parameter of your script object and to set the Enabled parameter to true. In the image below, you can see an example of a config.json file that contains one Script Object in the Scripts array. To define more scripts in the array, simply add another Script Object to your array by separating them with a , (comma).
config.json file:
{"Notes":"This is the PowerShell manifest file. System administrators can define new PowerShell scripts under the 'Scripts' array","Scripts":[{"Description":"Sample PowerShell module used to add days to now date","Name":"AddDaysToNow","Path":"C:\\Program Files (x86)\\Kianda Technologies\\PowerShellScripts/AddDaysToNow.ps1","Enabled":true,"Parameters":[{"Description":"","Name":"Days","Type":"NUMBER","Value":2}]}]}
The Parameters array is used to define dynamic parameters for example to pass in values from Kianda into your PowerShell script. Taking the above config.json file and the below AddDaysToNow.ps1 file as an example:
In our Script Object of our config.json file we have a parameter called Days. We also define a Days parameter in our AddDaysToNow.ps1 file. This allows us to then access the Days parameter from a Kianda process. We will use a Create Item rule and its input and results mapping to assign a value to the Days parameter and return an Outcome of the script.
Here we have a simple Kianda process that uses the PowerShell connector and uses the config.json file and AddDaysToNow.ps1 script from above to add a number of days to todays date.
In the form we have Date field to specify todays date, a Number field to specify how many days we want to add to todays date, and a Text box field to see the Outcome of the script, see the video below:
14 - Procore Connector
A data connector available within Kianda is the Procore connector. Procore provide a widely used construction management software to streamline project communication, documentation and analysis. Procore also has project management and financial features, as well as tender management and builder information modelling (BIM) designers. Kianda allows you to connect to Procore as a data connector, providing an easy and seamless way of integrating all your Procore data gathered from these features into your Kianda process. For more information, see Procore Developer Documentation.
Before you get started
In advance of using the Procore data connector, you must have an account with Procore which is used to obtain information for a successful connection.
When to use
You can use the Procore connector when you want a process within your Kianda subscription to have access to your Procore data. You can perform Create, Read, Update and Delete (CRUD) operations on your Procore data once the connection has been established and configured.
How to get started
From the Kianda home page, click on Administration > Data sources.
Click on + Add new button and choose Procore from the list of data sources provided.
You will be automatically brought to the Procore details page, where you can start setting up the connection.
Choose from the edit options:
Datasource Name - type in the name for your Procore connector. This is used to distinguish between different data connectors on your platform.
Procore Company Id - type in the Company ID that is assigned to your Procore account. When you enter your Procore Company ID, the Authorize button will appear. This allows you to authorize the connection with your Procore account and Kianda. When you click this button, a Procore window will open allowing you to log in into your Procore to authenticate your account.
Procore Environment - select one of the three radio buttons to choose your desired Procore Environment. The options are:
Live - live feed of Procore data.
Monthly Sandbox - refreshed with current production data on a regularly scheduled basis once each month. Data you create, update, or manipulate within a Monthly Sandbox environment will never affect the original production data and will exist solely in the context of that environment.
Developer Sandbox - automatically generated for third-party developers in their Developer Portal account and includes seed project data that can be used for testing purposes. The Development Sandbox environment does not refresh with production data at any time.
Use Kianda Cloud Connect - by default this option is disabled, the cloud connect is used to create a connection between your local device and Kianda itself. To learn more about Kianda Cloud Connect and how to create a connection between Kianda and your PC, go to Kianda Cloud Connect. When Use Kianda Cloud Connect is enabled, a Connectors option appears.
Connectors - displays all available connector PC’s that have a connection established with your Kianda subscription. This option is used to select the PC connection that runs the Procore account that you want to connect to.
Status - represents the current status of the connection.
incomplete - means that the details of the connector were not fully completed.
test failed - means that the details of the connector are incorrect and the connection has failed.
ready - means that the connector has successfully connected and its ready to be used.
When you have added the Procore account details, you are ready to test your connection and add security. At the bottom of the Procore datasource details page, click on the Test connection button and if the service has been correctly configured, then you should receive a notification saying Connection test succeeded.
Click on Save to save the connection and you will receive a notification saying Details saved successfully.
Click on Close to close the details page and return to the data source management main view.
Procore parameters
When you use the Procore datasource, there are default parameters invoked from the files that you can access. For example when you create a list filed in a Kianda form and use Procore as its datasource, these Procore parameters will appear in Display field, Value field and Sort by field in the Edit field dialog box, see Name for example in the image below:
PICTURE HERE - NEED PROCORE CONNECTION TO BE ESTABLISHED TO CAPTURE THIS IMAGE
What’s next
Your Procore service is now set up and ready to be used in your processes. To find out more about how to design processes go to Designer.
15 - Salesforce
One of the data connectors that you can connect to is Salesforce. Salesforce provides customer relationship management software and applications focused on sales, customer service, marketing automation, and analytics. The Salesforce data connector allows you to access information from your Salesforce account which can then be used within your Kianda subscription.
Before you get started
In advance of using the Salesforce data connector, you must have an account with Salesforce which is used to obtain information for a successful connection. If you have an account with Salesforce, all you need to create within the Salesforce application is a Connected App. These connected apps within Salesforce enable external applications to integrate together using its APIs. The connected app will provide you with a Consumer Key and a Consumer Secret. These consumer information are used to establish the connection between your Connected app in Sales force and your Kianda subscription, to learn how to acquire the Consumer Key and Consumer Secret go to Acquiring Consumer Key and Consumer Secret. In order to successfully connect your Connected App and Kianda, the settings of the Connected App in your salesforce account need to be configured, to learn how to configure your Connected App in Salesforce go to Configuring Salesforce Connected App.
When to use
You can use a connected app to integrate external applications with the Salesforce API, such as a process that pulls in order status data from your Salesforce organisation into your Kianda subscription.
How to get started
From the Kianda home page, click on Administration > Data sources.
Click on + Add new button and choose Salesforce from the list of data sources provided.
You will be automatically brought to the Salesforce details page, where you can start setting up the connection.
Choose from the edit options:
Display name - type in the name for your Salesforce connector. This is used to distinguish between different data connectors on your platform.
Client Id - used to identify the Connected App created in your salesforce account. In salesforce this Client ID is called Consumer Key and can be found in your Connected App settings. To learn more about on how to find the Consumer Key in sales force go to Finding Consumer Key and Consumer Secret.
Client Secret - used to identify the Connected App created in your salesforce account. In salesforce this Client ID is called Consumer Secret and can be found in your Connected App settings. To learn more about on how to find the Consumer Secret in Salesforce go to Finding Consumer Key and Consumer Secret.
Salesforce Environment - indicates which environment you have your account created in. There are two types of accounts that you can create in Salesforce. A developer account and an ordinary account. If you have an ordinary account and your trying to connect a salesforce app, you need to select the Live option and if your account is a developer account, then select the Sandbox option.
Live - indicates that your Salesforce account is an ordinary account.
Sandbox - indicates that your salesforce account is a developer account.
Authorize - allows you to authorize the connection with your Connected App and Kianda. When you click this button, a Salesforce window will open allowing you to log in into Salesforce to authenticate your account.
When you have added Salesforce details, you are ready to test your connection and add security. At the bottom of the Salesforce details page, click on Test connection button and if the service has been correctly configured, then you should receive a notification saying Connection test succeeded.
Click on Save to save the connection and you will receive a notification saying Details saved successfully.
Click on Close to close the details page and return to the data source management main view.
Acquiring Consumer Key and Consumer Secret
Log into your Salesforce account.
On the top right-hand side of the screen, click on the cogwheel and select Setup.
In the left-hand pane go to Apps > App Manager.
From the list of apps, find your Connected App that you want to connect with Kianda and click on the drop-down list on the right-hand side. Select View.
Under API (Enable OAuth Settings), click on Manage Consumer Details. A Verify Your Identity window opens.
Enter in the Verification code that was sent to your email that you used to sign up to Salesforce.
Click on Verify.
Once verified, your will be brought to a page where you can find the Consumer Key and Consumer Secret.
Configuring Salesforce Connected App
Before starting going through the steps below you must ensure that you have a Connected App created in your Salesforce account, to learn how to do that go to Create a Connected App.
Log into your Salesforce account.
On the top right-hand side of the screen, click on the cogwheel and select Setup.
In the left-hand pane go to Apps > App Manager.
From the list of apps, find your Connected App that you want to connect with Kianda and click on the drop-down list located on the right-hand side. Select View.
From your Connected App screen, click on Edit.
Scroll down to API (Enable OAuth Settings). Check the Enable OAuth Settings checkbox.
In the Callback URL text box enter https://app.kianda.com/index.html.
On a second line of the Callback URL text box enter https://{company}.kianda.com/index.html where company is the name of your company’s subscription, for example https://green-itr.kianda.com/index.html. The Callback URL should look as follows when the company’s name is green-itr:
In the Selected OAuth Scopes section, move all of the scopes from Available OAuth Scopes to Selected OAuth Scopes window by selecting them and clicking Add. Here you can add scopes that you want your Connected App to have access to from within Kianda.
From your Connected App screen, click on Manage.
From the manage connected app screen, click on Edit Policies.
In the OAuth Policies section, go to Permitted Users and select All users may self-authorize.
In the IP Relaxation select the Relax IP restrictions option.
Click on Save.
What’s next
Your Salesforce service is now set up and ready to be used in your processes. To find out more about how to design processes go to Designer.
16 - SAP connector
One of the datasources available in Kianda is a SAP datasource. SAP is an enterprise resource planning software which allows you centralises data between all areas of your business and manage them in one SAP system.
Data in the SAP system are represented with schemas and tables. Each schema represents an area of your business and tables represent data within that business area. Using SAP as your datasource, you can perform Create, Read, Update and Delete (CRUD) operations on tables within your SAP system using the Data rules provided in the Kianda platform. When using the SAP connector, keep in mind that you can perform CRUD operations on data within a tables of the system, but you cannot perform CRUD operations on tables themselves, this mean are unable to create or delete tables.
SAP connector also has the ability to use Business Application Programming Interface (BAPI) functions through Kianda. This allows you to perform particular business tasks in your SAP system by calling BAPI functions using the Data rules provided.
When to use
You can use the SAP connector when you want access or modify data within a standard SAP or custom table in your SAP system. You can connect the SAP connector to a List field as its datasource, meaning you can access information from a table and display the information that is stored in the table. Take a standard SAP table MARA as an example, using this table you can display information on your Kianda forms using the data within the MARA table. You can also display information of your custom made tables within your SAP system.
Before getting started
You need to create a Kianda Cloud Connect connection with your device which will be used in the settings when filling out the SAP connector settings. To learn how to create a connection with you device using Kianda Cloud Connect, visit Kianda Cloud Connect.
How to get started
From the Kianda home page, click on Administration > Data sources.
Click on + Add new button and choose SAP from the list of datasources provided.
Fill out fields in the SAP system details screen.
Choose from the edit options:
Application server - enter in the IP address that your SAP system is run on.
Instance number - enter in the Instance number that you want to connect to from your SAP server.
System ID - enter in the ID of your SAP system. A system ID has three characters.
Client - enter in the Client your want to connect to from your SAP system.
Username - enter a username used to connect to your SAP system.
Password - enter in the password used to connect to your SAP system.
SAP BAPIs - enter in BAPI functions that you want access too when performing BAPI functionalities on your SAP system. Each BAPI must be on a separate line with no spaces, see image below:
SAP Tables - enter in SAP tables you want to have access to when performing CRUD operations from your SAP system. Each table must be on a separate line with no spaces, see image below:
Use Kianda Cloud Connect - by default this option is disabled, the cloud connect is used to create a connection between your local device and Kianda itself. To learn more about Kianda Cloud Connect and how to create a connection between Kianda and your PC, go to Kianda Cloud Connect. This option must be enabled to successfully establish a connection between a SAP system and Kianda.
Connectors - displays all available connector PC’s that have a connection established with your Kianda subscription.
Status - represents the current status of the connection.
incomplete - means that the details of the connector were not fully completed
test failed - means that the details of the connector are incorrect and the connection has failed.
ready - means that the connector has successfully connected and its ready to be used.
When you have added the SAP system details, you are ready to test your connection and add security. At the bottom of the SAP system details page, click on Test connection button and if the service has been correctly configured, then you should receive a notification saying Connection test succeeded.
Click on Save to save the connection and you will receive a notification saying Details saved successfully.
Click on Close to close the details page and return to the data source management main view.
SAP Table parameters
When you use a SAP datasource, unlike some of the other data connectors in Kianda, SAP does not have default parameters. When you connect a SAP connector as your datasource, you can choose which Table or BAPI you want to use when performing CRUD operations. For example when connecting a SQL datasource to a List field and selecting a table you want to use, the parameters will depend on what data are present in the tables. Take standard SAP Table MARA as an example. We have an Employee table which we select when connecting a datasource to a List field, to learn how to a datasource to a list field go to List control, see image below:
The list of parameters displayed in the the Display field, Value field and Sort by field will match the columns that we have in the Employee table, see image below:
SAP BAPI functions
In order to use BAPI functions from your SAP system effectively, the Data rules within Kianda can be used. Data rules allow you to send data as well as receive it. For example if your BAPI function needs data when calling it, you can use any of the Data rules for example Create item rule to send data using the input mapping section or when receiving data you can use the on success mapping.
Take a BAPI function which retrieves a list from your SAP system as an example. You can use the on success mapping to store the list in a Kianda field. If for example this BAPI function takes an argument where you want to specify how many items from the list it retrieves, you can input that information in to the input mapping section of the data rules. To learn more about on success mapping go to On Success Mapping.
What’s next
Your SAP system connector is now set up and ready to be used in your processes. To find out more about how to design processes go to Designer.
17 - SharePoint connector
A SharePoint data connector allows you to use SharePoint data sources as part of your Kianda forms or dashboards. This means that as your processes are running they will use the information at the data source or depending on the process, update information at a data source location.
How to get started
From the Kianda home page, click on Administration > Data sources.
Click on + Add new button and choose SharePoint from the list of datasources provided.
Fill out fields in the SharePoint details screen.
Choose from the edit options:
Display name - the name of the data source, for example SharePoint HR
Site URL - this is the link to your SharePoint data
SharePoint version - choose from a) SharePoint Online (also known as SharePoint in Microsoft 365) b) SharePoint 2016 or c) SharePoint 2013
Scope - choose from a) Site for example a particular SharePoint website or b) Site Collection, a collection of SharePoint sites
Authentication mode - options are a) SharePoint Online Authorisation and b) System User Credentials
If you choose a) SharePoint Online Authorisation then click on Authorize button in this instance you will need SharePoint administration rights
If you choose b) System User Credentials then fill out your username and password. In this instance you do not need SharePoint administration rights.
When you have added SharePoint details, you are ready to test your connection and add security. At the bottom of the SharePoint details page, click on Test connection button and if the service has been correctly configured, then you should receive a notification saying Connection test succeeded.
Click on Saveto save the connection and you will receive a notification saying Details saved successfully.
Click on Close to close the details page and return to the datasource management main view.
SharePoint parameters
When you use a SharePoint datasource, there are default parameters invoked from SharePoint. For example when you create a list in a Kianda form using a SharePoint datasource, these SharePoint parameters will appear in Display field, Value field and Sort by field in the Edit list dialog box, see Title for example in the image below.
The SharePoint parameters that appear in those three dropdown fields are:
ID
Content Type
Title
Modified
Created
Created By
Modified By
Version
Server Relative URL
Item Child Count
Folder Child Count
Label setting
Retention label
Retention label Applied
Label applied by
App created By
App modified By
Compliance Asset ID
Telephone Code
All custom columns in the datasource will also appear at the bottom of this list. For example in a SharePoint list, a column named Location will also be listed in the Display, Value and Sort by fields.
This customised name ‘Location’ appears in the dropdown list, for example the Display field for the list.
What’s next
Your SharePoint service is now set up and ready to be used in your processes. To find out more about how to design processes go to Designer.
To see how SharePoint parameters are used in a form, for example with a list field, go to List control.
18 - SOAP
One of the datasources available in Kianda is a connector to Simple Object Access Protocol (SOAP) messaging services. Kianda has the ability to execute a command within the service whatever the function may be.
When to use
You will want to create a SOAP Service datasource when you want Kianda to have access to your SOAP Service operations and execute them.
How to get started
A SOAP Service data connector can be configured by users with the role Administrator or Manage datasources. These users can access the datasource management function, found under Administration > Data sources.
From the Kianda home page, click on Administration > Data sources.
In the main view you will see any existing data sources that have been created. From this view, you can click on the name of a data source to see details or delete a data source by clicking on the Bin/Trash button .
Click on + Add new button and a range of data source connectors will appear.
Click on SOAP Service.
Fill out the details in the SOAP Service details page:
Note: The status of the datasource will be incomplete until it has been fully configured. When set up it will be ready.
Display name - this is the name of the data source. Use an appropriate name, as this will be used within your process(es).
Service URL - this will be the URL of the service.
Service WSDL URL - this will be the URL of the service including the Web Services Description Language (WSDL). WSDL describes the structure, contents and limitations of the elements of XML passed between the web service and client.
Authentication Mode - there are three options available:
Anonymous - the message initiator is anonymous and the responder is authenticated, no credentials needed.
Basic - provides basic authentication and requires credentials to be entered.
Windows - provides authentication using Windows login and requires credentials to be entered.
When you have added SOAP service details, you are ready to test your connection and add security. At the bottom of the SOAP service details page, click on Test connection button and if the service has been correctly configured, then you should receive a notification saying Connection test succeeded.
Click on Saveto save the connection and you will receive a notification saying Details saved successfully.
Click on Close to close the details page and return to the datasource management main view.
What’s next
Your SOAP Service is now set up and ready to be used in your processes. To find out more about how to design processes go to Designer.
19 - SQL Server connector
One of the datasources available in Kianda is a Structured Query Language (SQL) Server datasource. Using the SQL server as your datasource, you can perform any Create, Read, Update and Delete (CRUD) operations using the Data rules provided in the Kianda platform, to learn more about data rules go to Data rules. Using the SQL server connector, you have access to all tables within your database from your server. Keep in mind that you can perform CRUD operations on data within a table of the database, but you cannot create or delete tables themselves.
When to use
You can use the SQL Server connector when you want access, modify or retrieve data within a table in your SQL server. When connecting a SQL server datasource to a List field, you can only connect and display information from a table, not the information of the server itself. For example if your SQL server contains tables such as Employees, Purchases and Standing Orders, you will be able to connect the list field to only one of those tables giving you CRUD access.
Before getting started
When establishing a connection using the SQL data connector, you are creating a connection with a Database from a server, not the server itself. Before continuing make sure that your SQL server has a database you can connect to.
In order to successfully establish this connection with your server, a user is needed to access the server by logging in. This user that you use to connect to the server must be a sysadmin.
How to get started
From the Kianda home page, click on Administration > Data sources.
Click on + Add new button and choose SQL Server from the list of datasources provided.
Fill out fields in the SQL Server details screen.
Choose from the edit options:
Display name - type in a name for your SQL server connector. This is used to distinguish between different data connectors on your platform.
Server - the name of the server you want to access or the IP address where the server is hosted. When you are running a local server on your machine you can use localhost as the server name.
Database - the name of the database from your server that you want to connect to.
Trusted connection - enable windows trusted connection. Only available when using with Kianda cloud connector, enabling this will automatically enable the Use Kianda Cloud Connect option. This option will use the connector service credentials to connect to the destination datasource. Having this option enabled will automatically hide the User and Password fields.
User - username used to log into the server. Note that in order to log into a server with a username and password, the user must be a system admin for the connection to be successful.
Password - password used to log into the server.
Use Kianda Cloud Connect - by default this option is disabled, the cloud connect is used to create a connection between a locally run SQL server and Kianda itself. To learn more about Kianda Cloud Connect and how to create a connection between Kianda and your PC, go to Kianda Cloud Connect. Check this option if you want to connect to a server that is running on your local machine. When Use Kianda Cloud Connect is enabled, a Connectors option appears.
Connectors - displays all available connector PC’s that have a connection established with your Kianda subscription. This option is used to select the PC connection that runs the local SQL server that you want to connect to.
When you have added the SQL server details, you are ready to test your connection and add security. At the bottom of the SQL Server details page, click on Test connection button and if the service has been correctly configured, then you should receive a notification saying Connection test succeeded.
Click on Save to save the connection and you will receive a notification saying Details saved successfully.
Click on Close to close the details page and return to the data source management main view.
Connecting to a local server
Here we will go step by step on how to create a connection between your locally run SQL Server and your Kianda subscription. Follow the steps below to create this connection:
Connect to a SQL server using localhost as the name of the server.
Open the SQL details page by following steps 1 and 2 from How to get started.
Choose a Display name.
In the Server text box type in localhost.
In the Database text box type in the name of your database you want to connect from your server. For this example we will connect to a GreenITR database from our server.
Enable the Trusted connection checkbox.
Enable the Use Kianda Cloud Connect checkbox.
In the Connectors radio checklist, select the PC that you are running the local server on. For this example we are using PC31. To establish a connection between your Kianda subscription and your PC go to Kianda Cloud Connect.
Click on Test connection.
A notification Connection test succeeded shows up. Now you are ready to use the SQL connector that is run on your local machine.
SQL Server parameters
When you use a SQL Server datasource, unlike some of the other data connectors in Kianda, SQL Server does not have default parameters. When you connect a SQL server as your datasource, you can choose which table you want to use when performing CRUD operations. For example when connecting a SQL datasource to a List field and selecting a table you want to use, the parameters will depend on what columns are present in the table. Take GreenITR database from the Connecting to a local server example. We have an Employee table which we select when connecting a datasource to a List field, to learn how to a datasource to a list field go to List control, see image below:
The list of parameters displayed in the the Display field, Value field and Sort by field will match the columns that we have in the Employee table, see image below:
What’s next
Your SQL Server connector is now set up and ready to be used in your processes. To find out more about how to design processes go to Designer.
20 - REST Web Service
One of the datasources available in Kianda is a connector to a REST API. Kianda has the ability to perform GET, POST, PUT and DELETE operations if they are supported by the webservice. The REST API datasource can support multiple REST methods, all of which can be called independently. Data from the webservice can be pulled into your Kianda workspace and manipulated, or data from Kianda can be pushed to the webservice to be used by other systems.
When to use
You can create a REST API datasource when you want your Kianda processes and forms to have access to a REST API.
How to get started
A REST API data connector can be configured by users with the role Administrator or Manage datasources. These users can access the datasource management function, found under Administration > Data sources.
In the left-hand side menu, go to Administration > Data sources.
In the main view you will see any existing data sources that have been created. From this view, you can click on the name of a data source to see details or delete a data source by clicking on the Bin/Trash button .
To create a new data source, click on the Add new in the main view. A range of data source connectors will appear.
To add a REST Service data source click on REST Service.
The REST Service details screen opens.
Fill in the first set of fields:
Display name – This is the name of the data source. Use an appropriate name, as this will be used within your process(es).
Rest server base URL – This is the base URL of the REST API. Ensure there are no trailing characters, for example “(https:)//api.mywebsite.com”
Enable Certificate Authentication – By default this option is set to No. By Selecting Yes this will display two new fields:
Certificate (.pfx) – This is a file field which you can use to upload your authentication certificate.
Certificate password – Enter the password of the certificate here so the Kianda platform will be able to use it.
Under the Service details section, is a the REST Methods section. If there are any existing methods created, for example to find and retrieve particular information using HTTP GET, the method will be listed here. Go to REST Methods to find out more about how to add a method. To find out more about Kianda REST APIs, go to APIs.
Under the REST Methods on the REST Service details page, there is a check box to Use Kianda Cloud Connect? If you check this checkbox it gives you an option to Download Kianda Cloud Connect. Click on Download Kianda Cloud Connect to download a zip file.
When you have added REST Service details, you are ready to test your connection and add security. At the bottom of the REST Service details page, click on Test connection button and if the service has been correctly configured, then you should receive a notification saying Connection test succeeded.
In the event of an error, you will receive a message that relates to the error, for example a null or incorrect URL as shown in the example below:
Click on Saveto save the connection and you will receive a notification saying Details saved successfully.
Here is an example of a data connector for a REST Service called ‘Cat facts’. We will use this example to create a REST method, see section below.
REST Methods
A list of current REST Methods that have been created in Kianda will appear, listed by Name, Path and HTTP Method, where:
Name - is the name of the method, for example to get a list of course attendees, which could be called ‘Course Attendees’
Path - is the address that allows you to access the API, also called endpoints, for example /instances or /processes are endpoints for Kianda REST APIs that allow you to perform methods on process instances and process designs respectively.
HTTP Method - is the type of operation that can be performed on the data, namely POST (create), GET (read). PUT (update). PATCH (partial update) and DELETE (delete).
These details are shown in the example below, a data connector called ‘REST Service for HR’.
You can edit details of the existing REST Methods by clicking on the Edit/Pen button or delete a method by clicking on the Bin/Trash button .
How to add a new REST Method
Click on the +Add REST Method button. The REST Method editor dialog box appears.
Fill out the fields:
Display Name – this is the name you want to attribute to the REST Method.
HTTP Method – this is the HTTP Method of the REST Method.
Url Path – this is the rest of the URL that will be concatenated with the Rest server base URL. For example /rest/GetUserDetails.
Request headers – Request headers can be manually added here that need to be sent as part of the request, for example, Authorization. These values can be hard coded or passed into the Request header from the process. Click on Add header to add a request header.
Request body – This section is for the Request body that will be used during the request. These values can be hard coded or passed into the Request body from the process.
Content type – Here you can define the Content type of the body. The options are JSON and Form Data.
Response headers – Here you can define any response headers you wish to capture in the response that you want to use in Kianda. Click on Add header to add a response header.
Response body – Here you can define the response body that the request will receive. Include or remove fields as needed.
When you are finished editing the dialog box click on OK to save your changes, or click on Close at any time to exit.
Take an example of https://catfact.ninja/fact a well-known API that provides an endpoint to retrieve random facts about cats.
If a simple GET method is used to retrieve facts using an API client, then parameters are returned showing the ‘fact’ and the ’length’ of the fact as shown below.
Click on +Add REST Method from the REST Service details page, and add in details using the REST Method editor where:
Display Name - this is the name of your method that will be called upon in a process, for example ‘Cat fact’
HTTP Method - GET is used to retrieve values
Url Path - the path that is attached to the base URL, for example /fact
Click on Add Header to add request headers, for example for authentication.
Request body - this is the part of the request that is sent to a function where a function processes the request and sends back the Response body. For our ‘catfact ninja’ example we will use the parameters ‘fact’ and ’length’ for mapping values to form fields in Kianda processes:
Click on OK to save the details and then click on Save in the REST Service details screen to save the connection.
The method will appear under REST Methods in the details screen.
The next section shows how data at the data source can be used in a Kianda process.
Using a REST Method in a Kianda process
To see how ‘catfacts’ are mapped into Kianda processes, create a new process, add fields and a rule that uses the REST Method created above.
To create a new process by going to the left-hand side menu > Administration > Designer and click on Add new and fill out details for the process, such as a Title and Description. Click on OK when complete.
Kianda Designer opens and in the first form, form1, add in a new text box by going to the left-hand pane and click on Controls > Input > Text box. This field will hold the value of the ‘fact’ from catfacts. To read more about Input controls go to Input controls.
Add a button to initiate the call from catfacts by going to the left-hand pane Controls > Actions > Button. Give the button a title for example ‘Get Cat Fact’, and choose No for Show in form body so the button appears at the bottom of the form. To read more about Action controls go to Actions.
To dynamically populate the textbox with a fact, we need a rule. Click on ‘Get cat fact’ button to add a rule. Then go to Rules > Data > Find items.
Give the rule a title, and under Action, click on Select data source to select the data source created using the steps in How to get started. Select the method ‘Cat fact’ created using the steps above in Example of REST Method use in Kianda.
Click on OK to close the dialog box.
If you want to add headers to the request use the Input mapping for example requests headers for authentication, otherwise click on the Bin/Trash button to delete the input mapping fields.
Under Results mapping select the textbox from your form for the Form field and under Data source field or text navigate to ‘fact’ from the responseBody as shown below.
Save the process by clicking on the Save button and preview the process by clicking on Preview. In the previewed instance, click on the ‘Get Cat Fact’ button to populate the textbox.
What’s next
Your REST Service is now set up and ready to be used in your processes. Check out the following article on how to implement a REST Service in order to refresh an Access token.
When creating a REST Service datasource that uses OAuth for authentication, you may want to create a ‘refresh functionality’ within Kianda. This is achieved by creating a process and scheduling the process to run before the Access Token expires.
How to get started
Create a datasource
First you will need to create the datasource to connect to the application, for example, creating a REST Service with two REST Methods. The method titled Get/Refresh Auth Token will be used to refresh the Access Token with the scheduled task. For more information on how to create REST Services go to the REST Service page.
There are five parameters to pass into the request body: grant_type, client_id, client_secret, redirect_url and refresh token, shown below as follows:
These parameters need to be ‘held’ in a process, see Create a process below.
Create a process
Once a datasource is created, a process is created which will contain fields for the parameters for the request body, and will hold fields from the response parameters.
As shown in the image above there are five parameters in the request body which need to be populated, and each of these parameters must correspond to a field in a process.
In the response body there are five parameters : access_token, token_type, expires_in, refresh_token and created_at, although only access_token, expires_in and created_at is needed. You can obtain the Access Token via the Developer console so details can be entered into Designer directly.
A form is created using Kianda Designer with textbox fields as well as a button called Refresh as follows:
Form rules are applied to fields in the form in the next section.
Form rules
Rules are applied to both the AccessToken textbox field and the Refresh button as follows:
On the Refresh button add a Data rule > Set Form Field which will be used to clear the AccessToken field. Give the rule a title for example ‘Clear Access Token’ and map a ‘blank’ value to the Access Token field by ‘pressing space bar key’ as shown below:
On the Refresh button add a Data rule > Create item which will be used to invoke the REST Service to get a new token and map the response back to the process.
Within the rule, click on Select data source and select the datasource created within Create a datasource, in the example on this page, ‘Sample Rest Service’.
Then select the ‘Get/Refresh Auth Token REST Method’ as shown below.
Under Input mapping map the values from the process into the request body. The left-hand column, Form field or text, represents the fields within the process or hard coded values. The right-hand column, Data source field, represents the values within the REST Service, be it the request header, request body, response header or response body**.** For example choose the form field such as grant_type and then in the data source field drill down to the value you want from the REST method.
In addition to the parameters defined with the REST Service the urlPath can be defined in the process and passed into the datasource. Map the form fields grant_type, client_id, client_secret, redirect_url and refresh token, into the form fields.
The On Success Mapping section is used to map the result from the API call back into the process. Map access_token, refresh_token, expires_in and created_at, to the relative form fields.
In addition to the parameters defined with the REST Service the urlPath can be defined in the process and passed into the datasource.
On the Refresh button add a Form action rule > Save form so that the details from the process are saved to the system database. The rule order then is as follows:
Finally; run the Process in preview mode, ensure the details you want to pass into the REST Service are correct and save the process. Take note of the Process ID as this will be needed for setting up the Scheduled Task
Create the Scheduled Task
The final step will be to create the scheduled task that will run before the refresh token expires. Navigate to the Scheduled tasks within the Administration section in the site. Click on the Schedule a task button and fill in the dialog box.
Enter a name for the task in the Task Name field.
Under Schedule select the Minutes option. In the EveryMinutes field enter a numerical value. For example, if the Access Token expires every 60 minutes, enter 55, meaning the schedule will run every 55 minutes.
Leave the Expire checkbox blank as this schedule should never stop.
Under Process Design select the name of the process that you created in the step above. This will expose a new field called Select the field or rule to trigger on schedule.
In Process ID enter the ID of the process that you created in preview mode.
In Select the field or rule to trigger on schedule select the Refresh button.
Click OK to save.
The Schedule is now set up and will refresh the access token as frequently as the time entered in the minutes field.
Next Steps
The Schedule is now set up and will refresh the access token as frequently as the time entered in the minutes field. This will run indefinitely until a user chooses to delete the schedule.
The datasource is now available to used and the Access Token is being kept current. The Access Token can be pulled into different Processes and used to send further REST APIs. Check out the articles below on how to build processes:
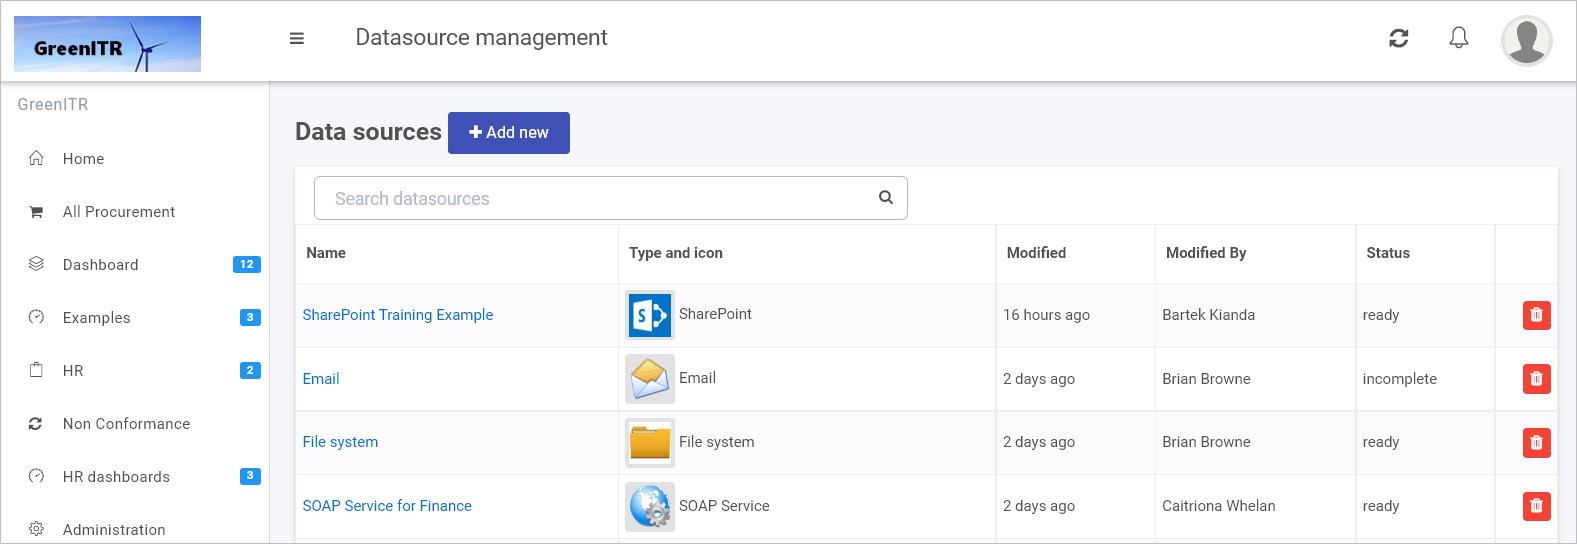
 beside the name of the datasource. You will receive a popup asking to you to confirm deletion by clicking OK, or you can exit the deletion by clicking on Cancel.
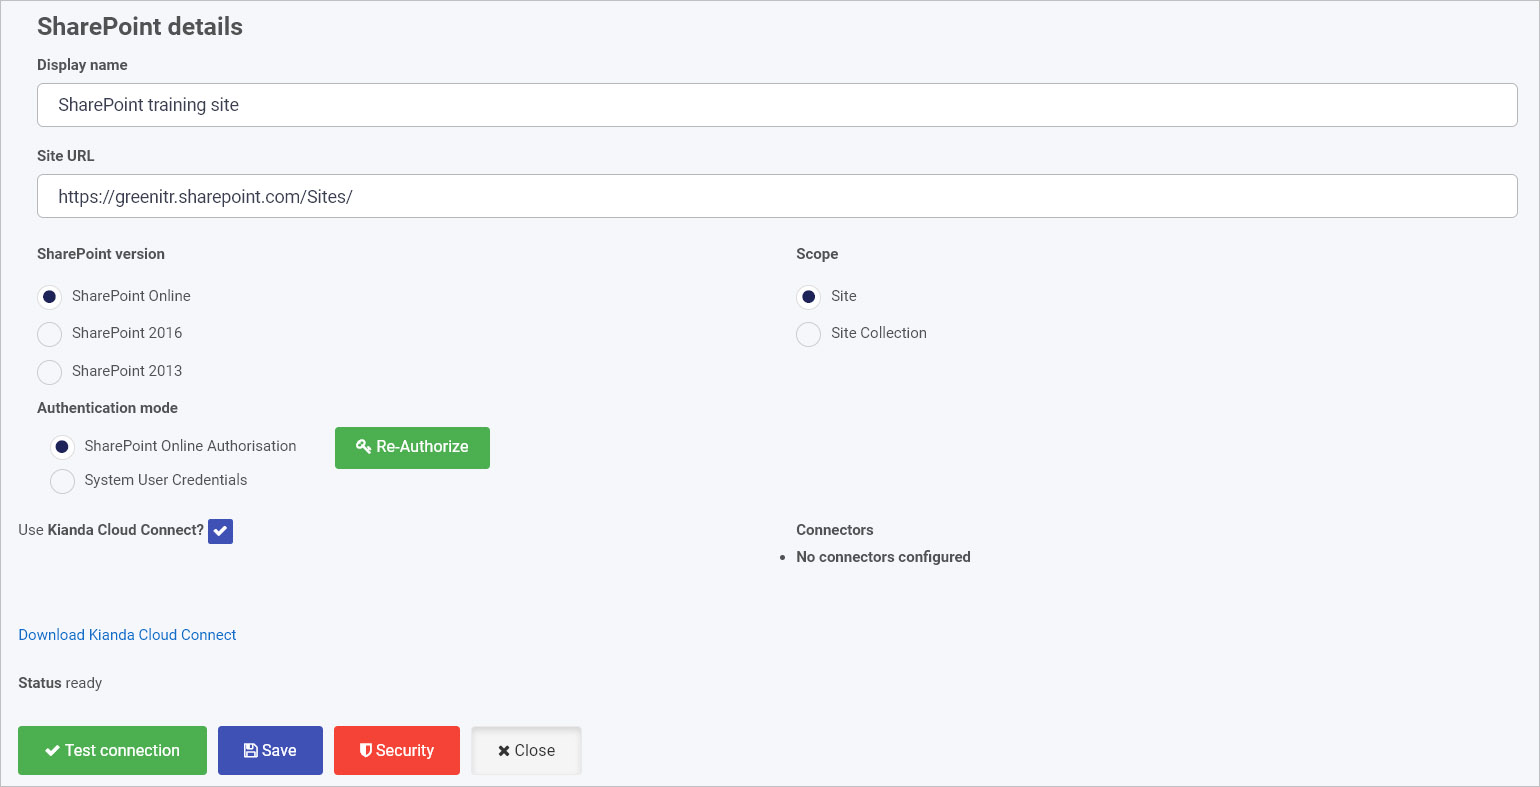
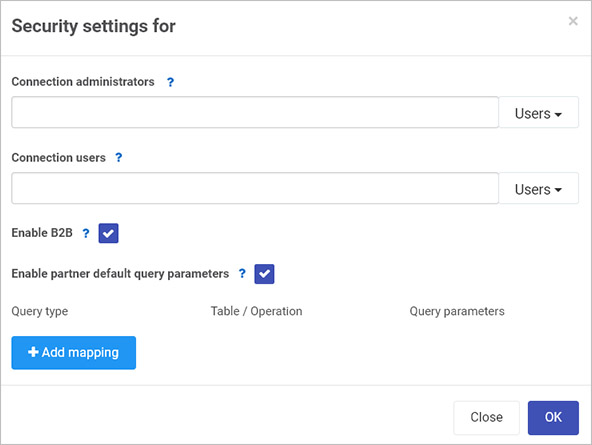
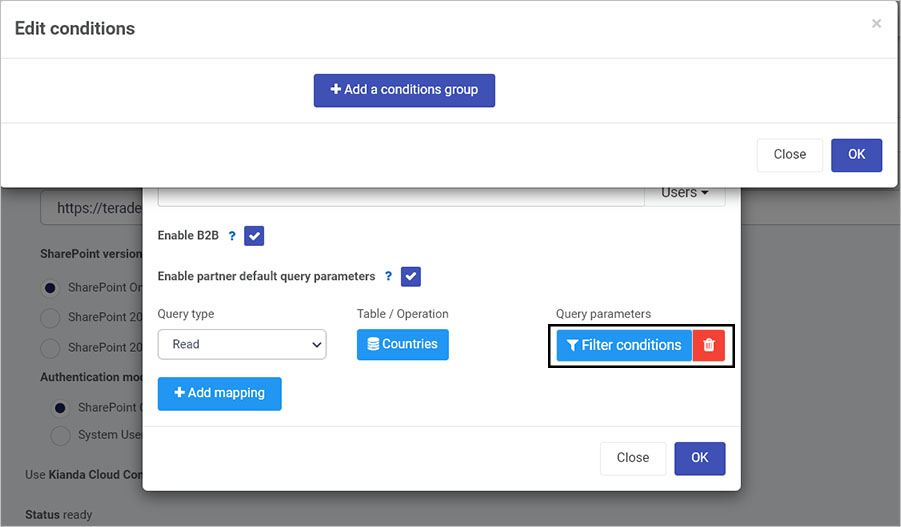
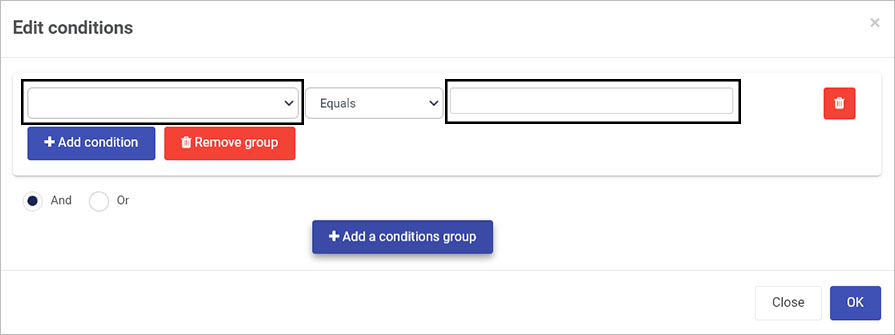
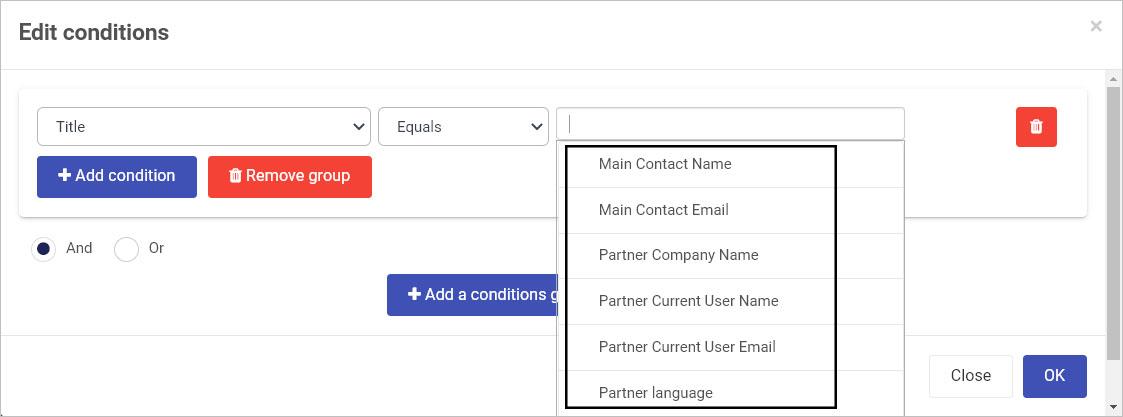

 and choose Active Directory from the list of data sources provided.
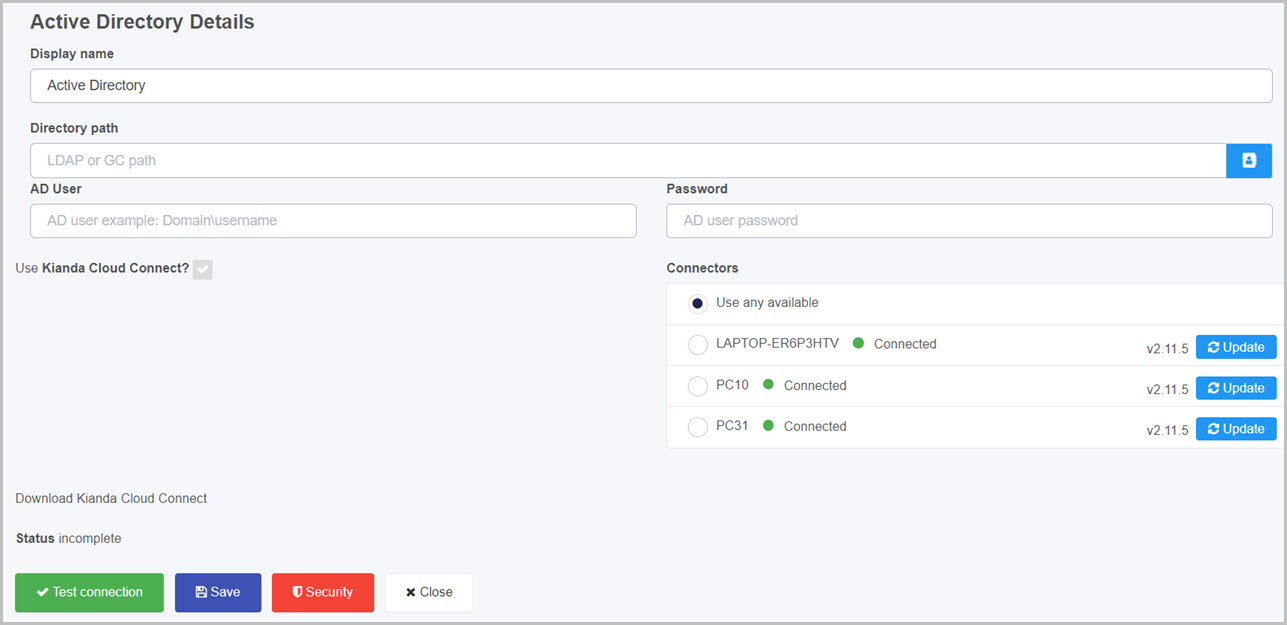
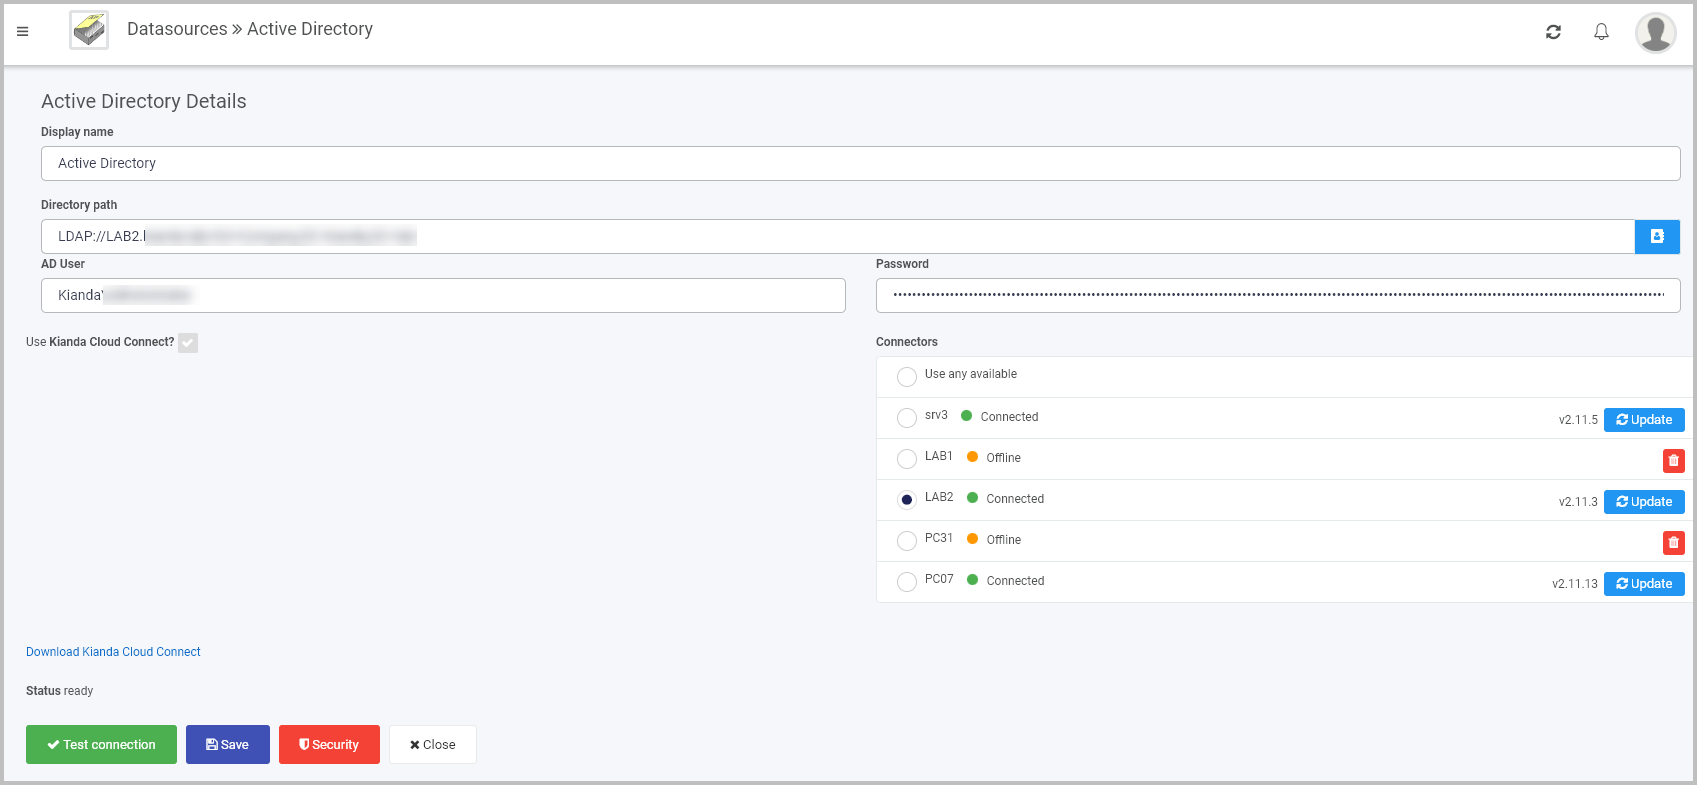
 and if the service has been correctly configured, then you should receive a notification saying Connection test succeeded.
 to save the connection and you will receive a notification saying Details saved successfully.
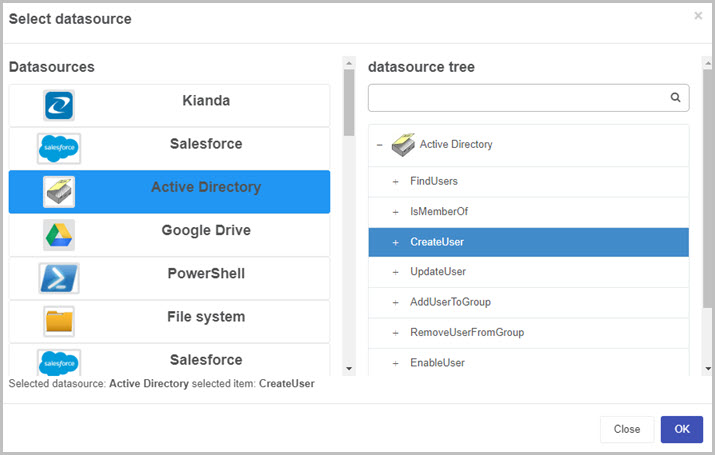
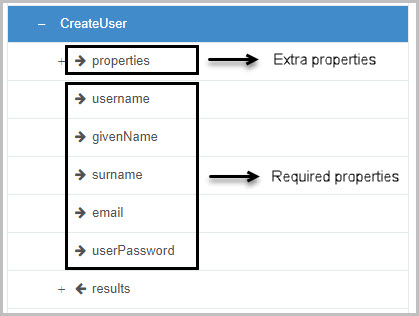

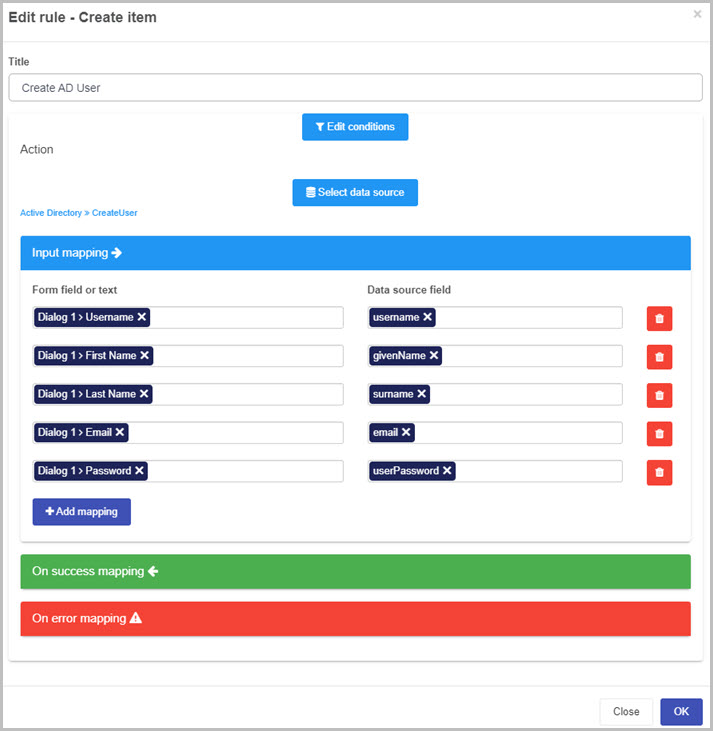
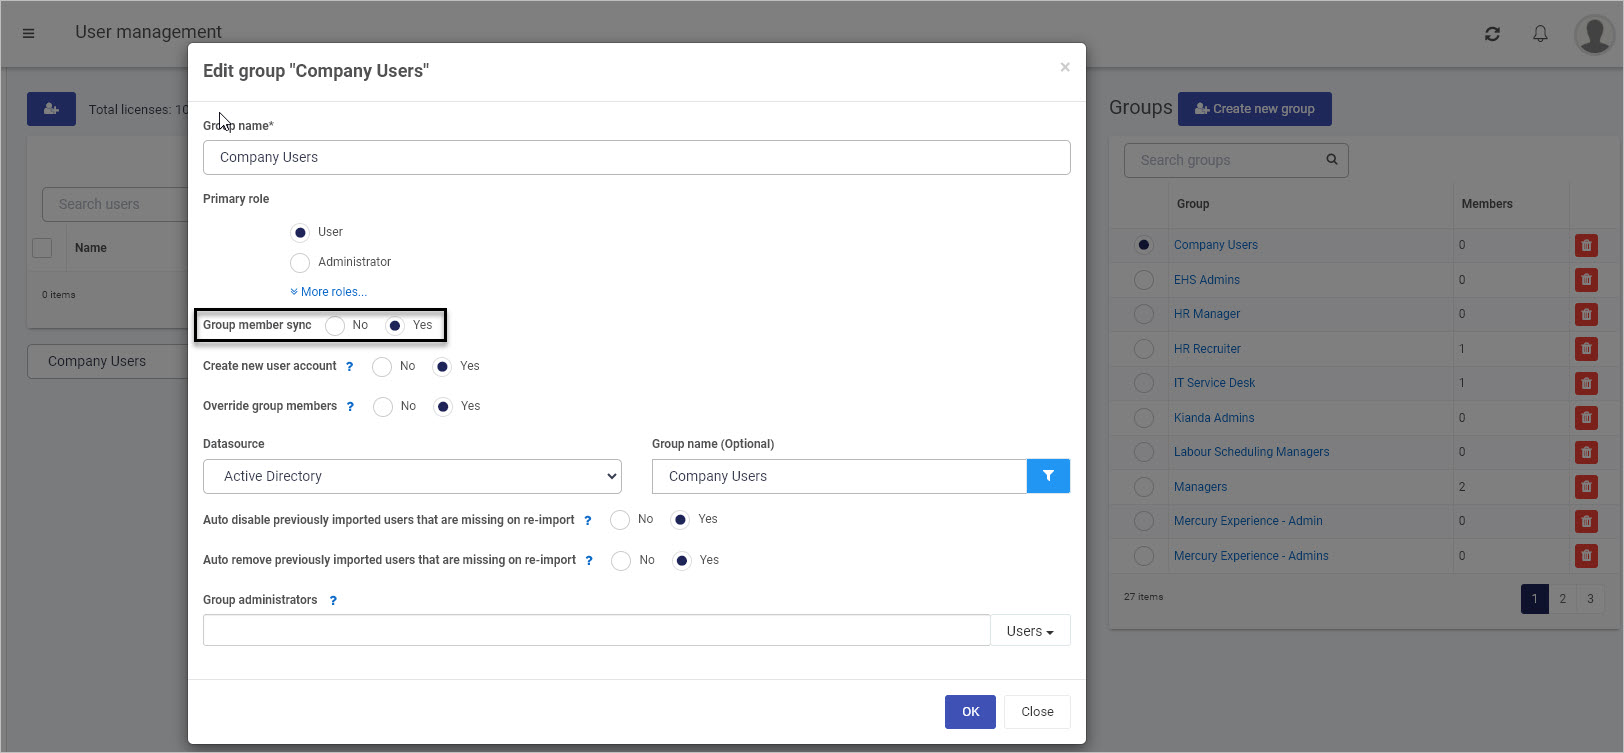
 within Groups, an LDAP Filter can be applied. The LDAP filter is an open format that allows you to perform queries with AD. For example the query below is used to query for users in the IT department with an account that is not disabled (=2).
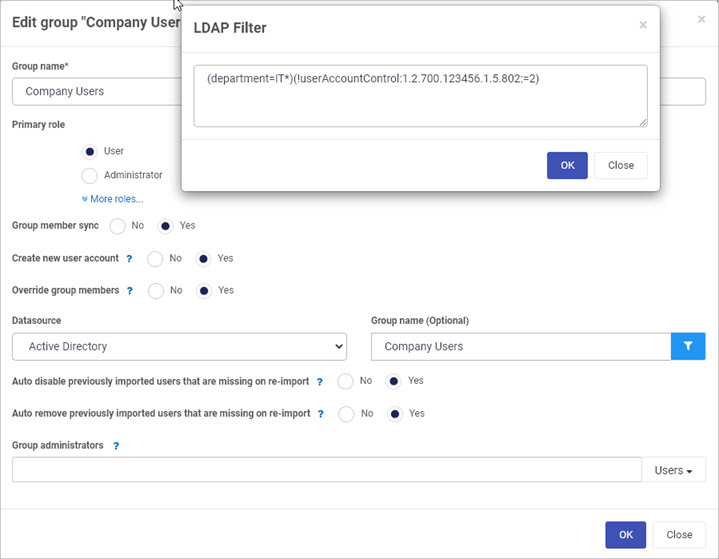
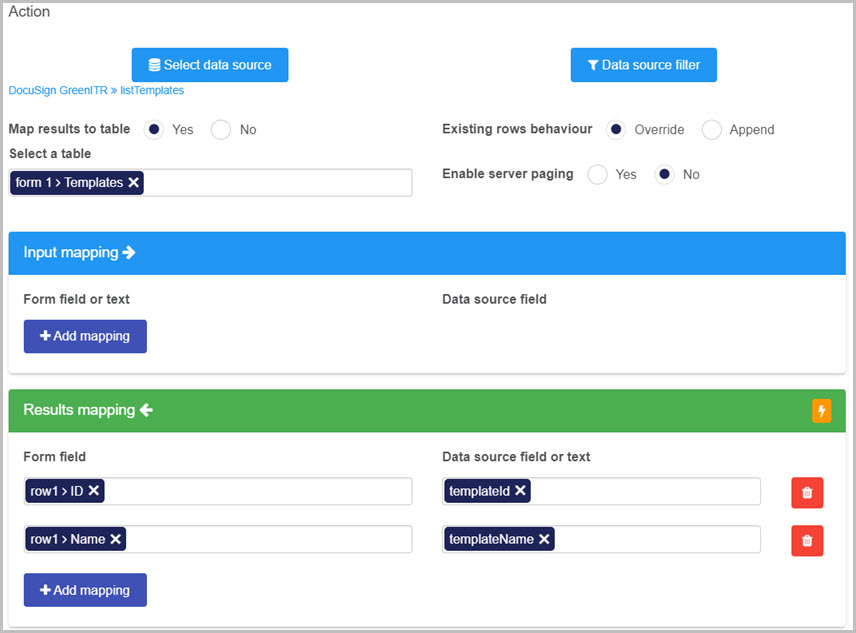
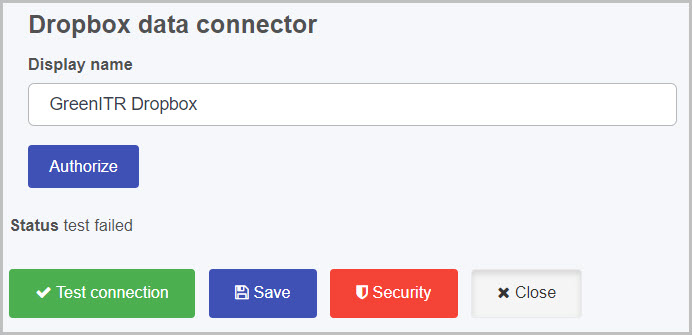

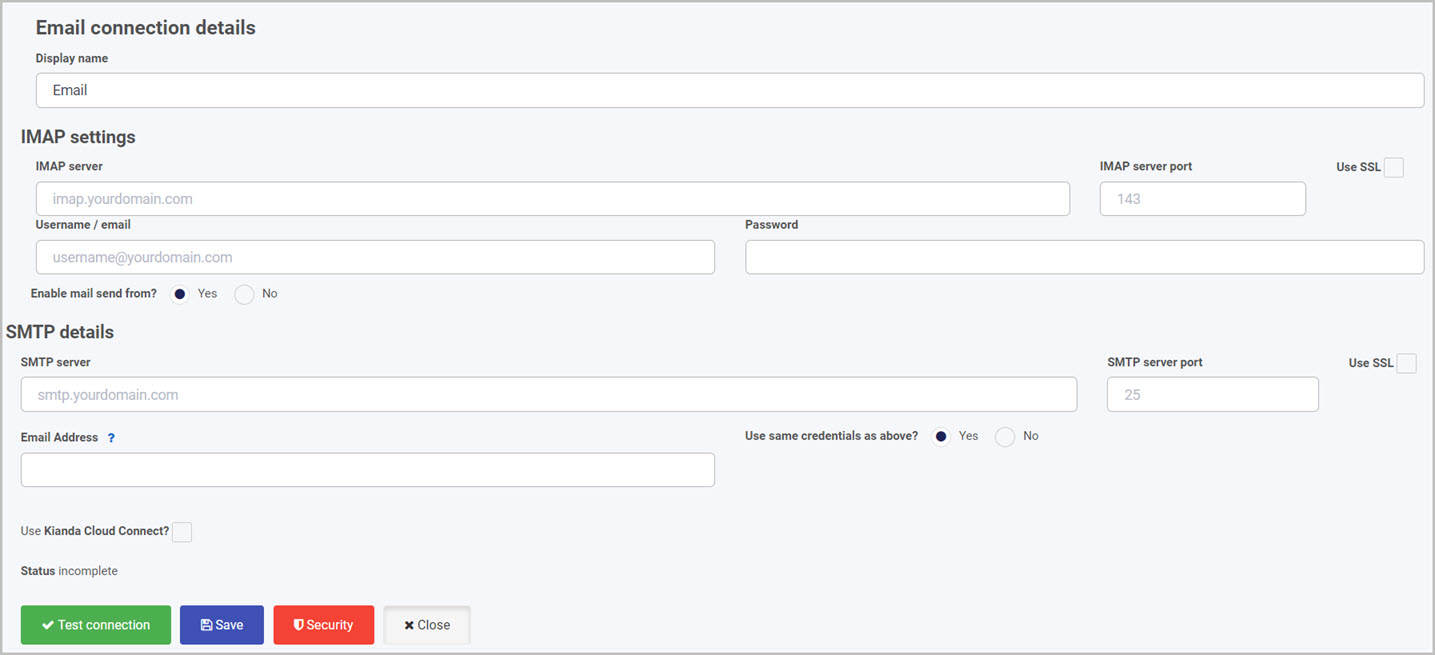

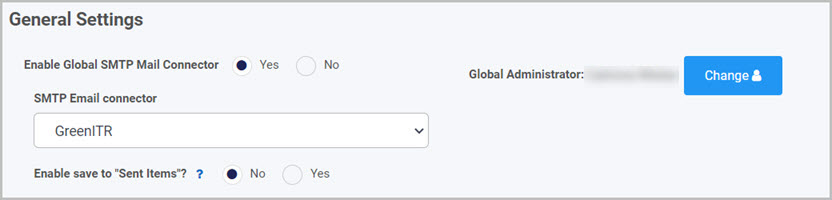
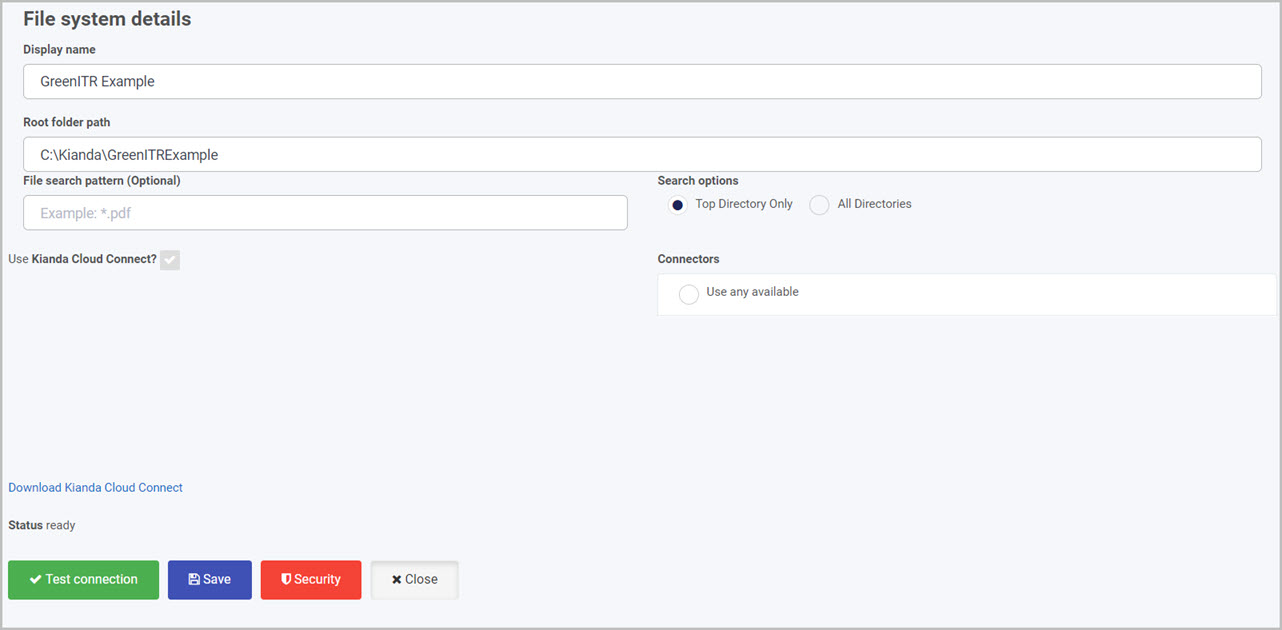
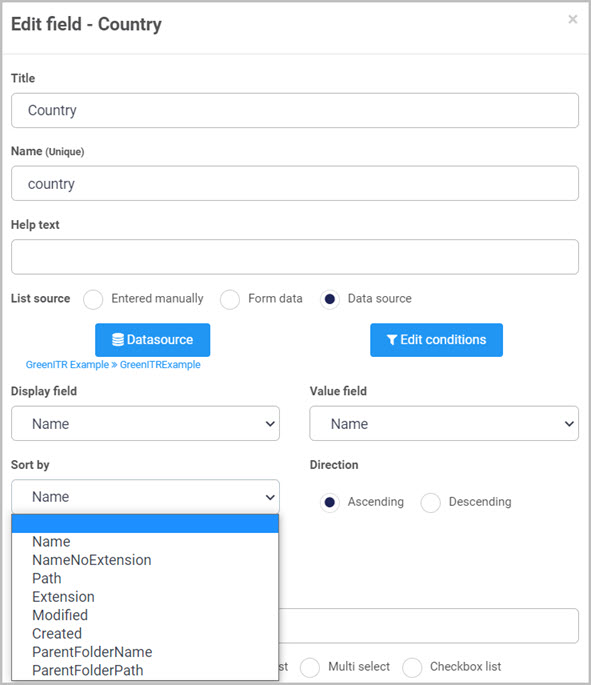
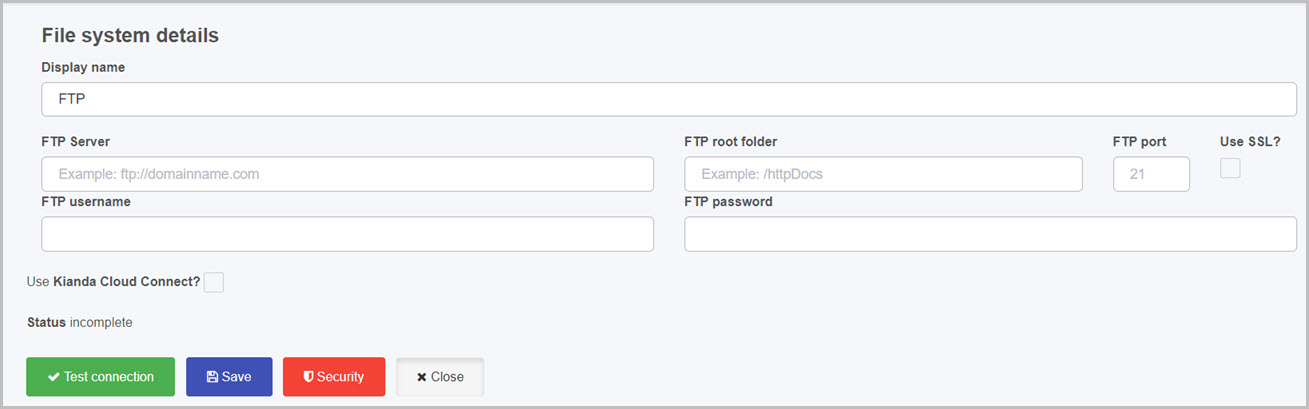
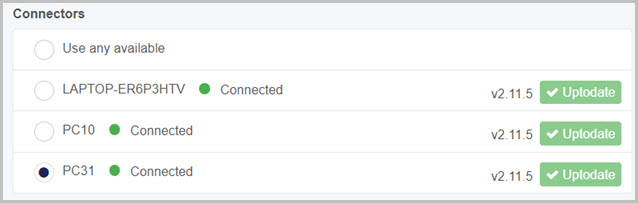
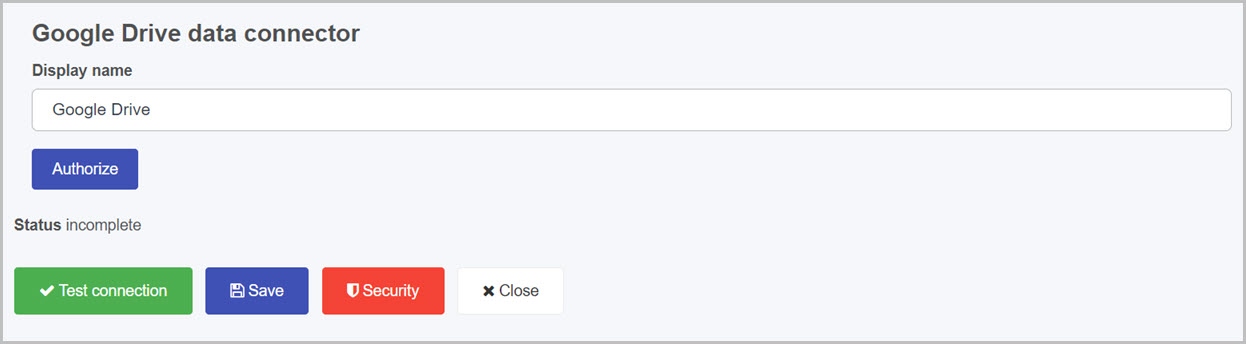
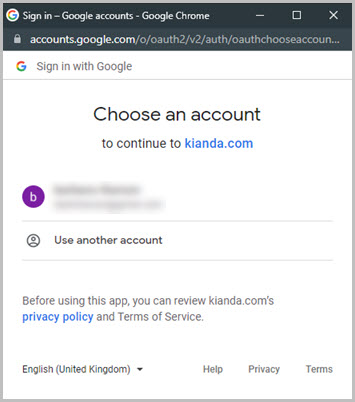
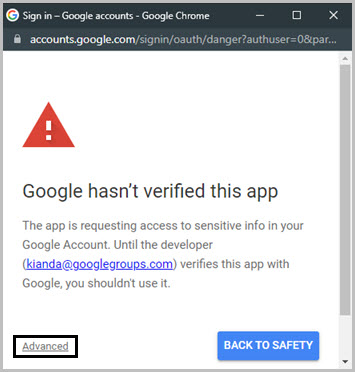
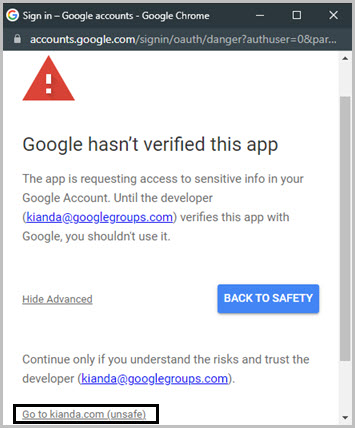
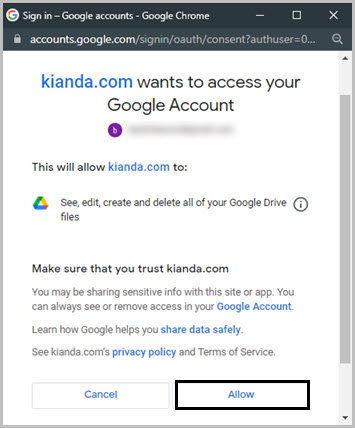
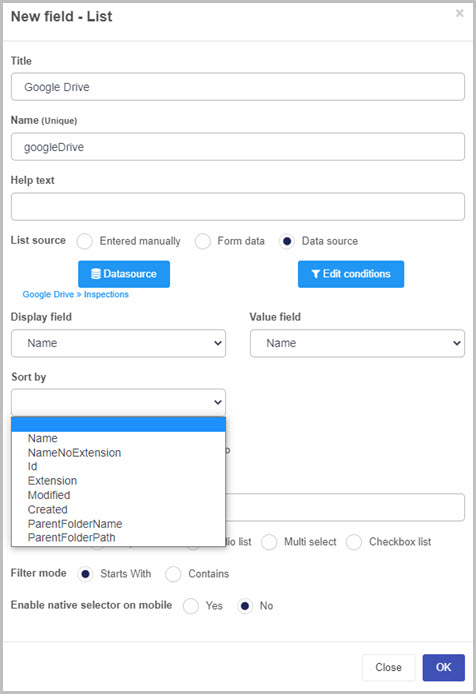
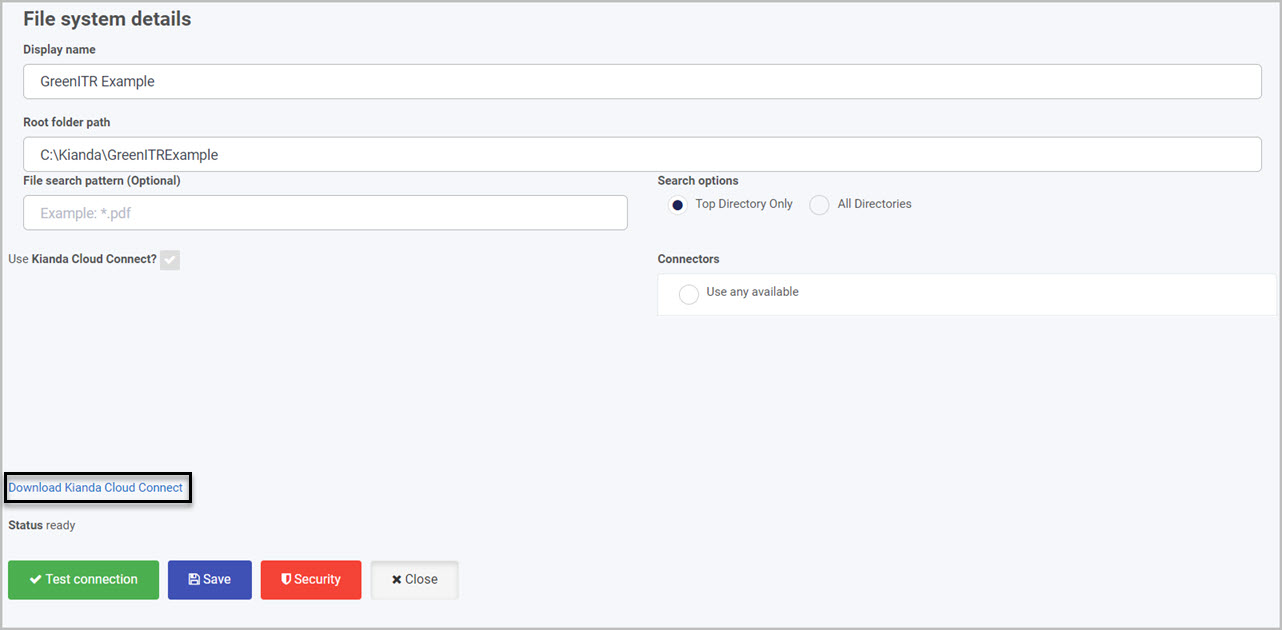

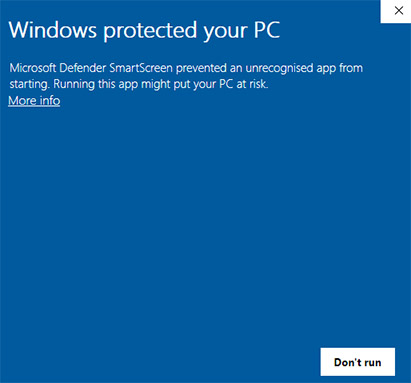

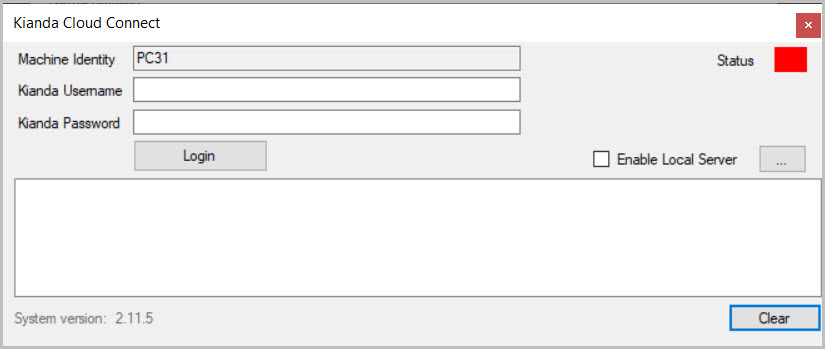


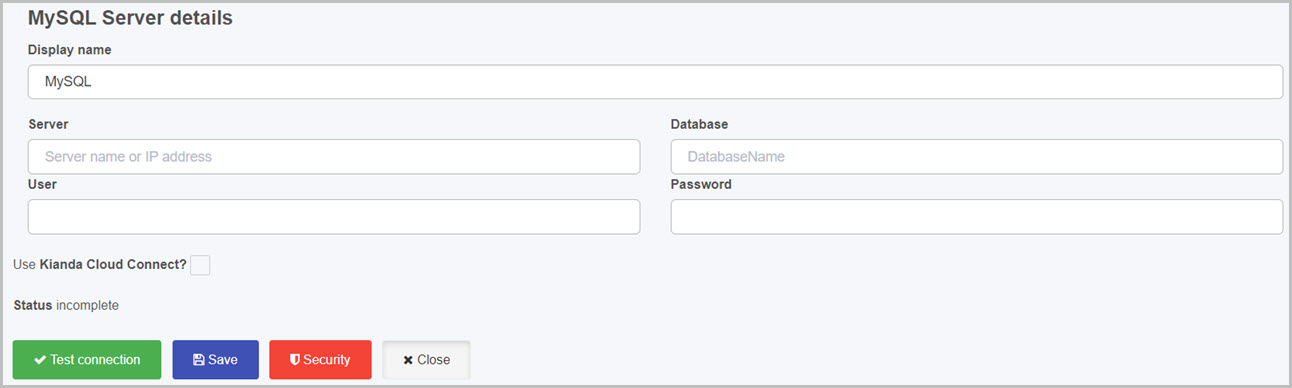
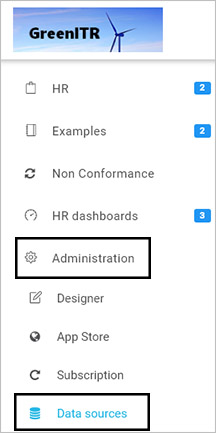
 .
.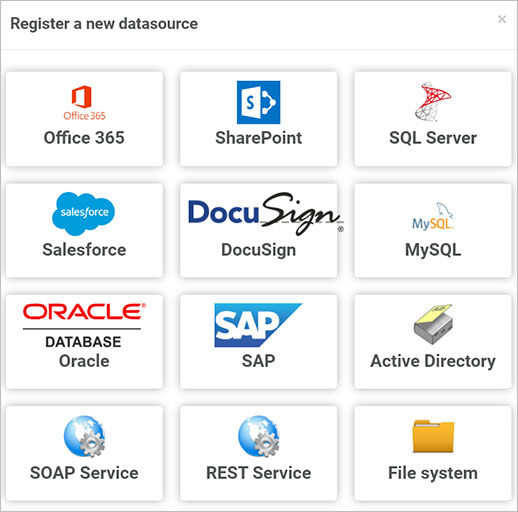
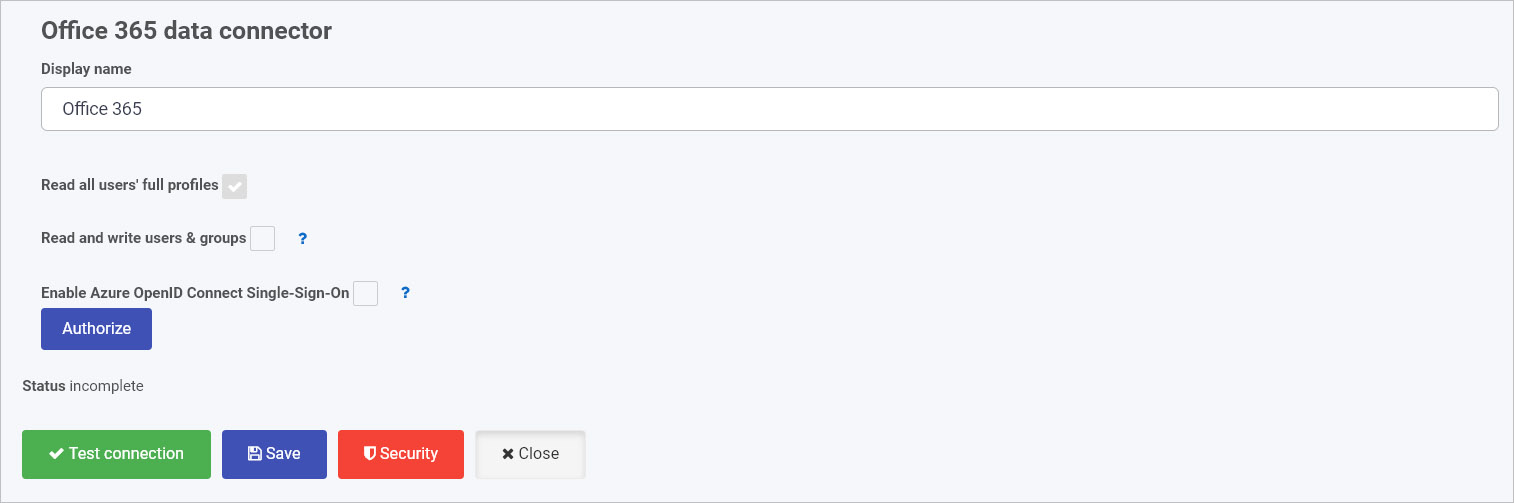
 .
.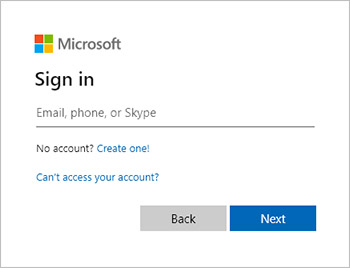
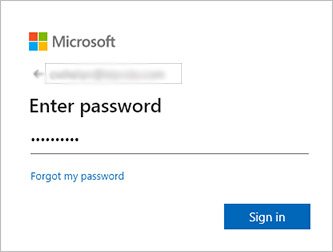
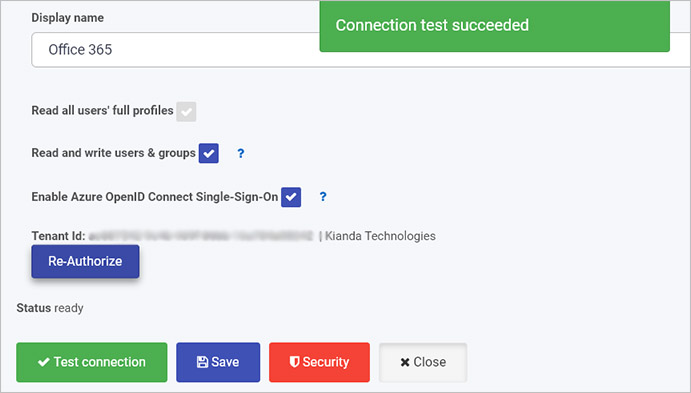
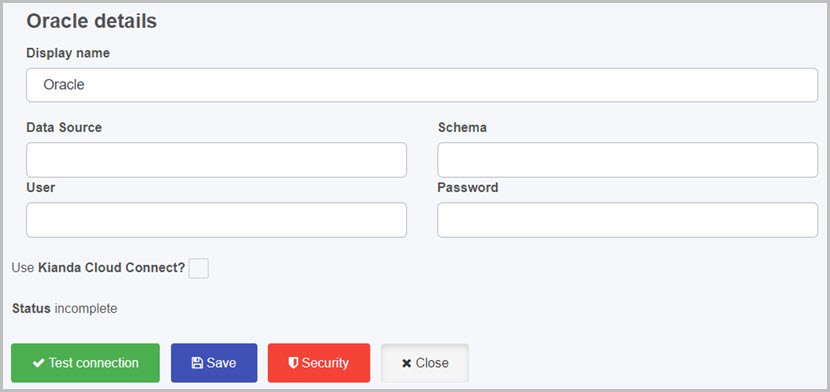
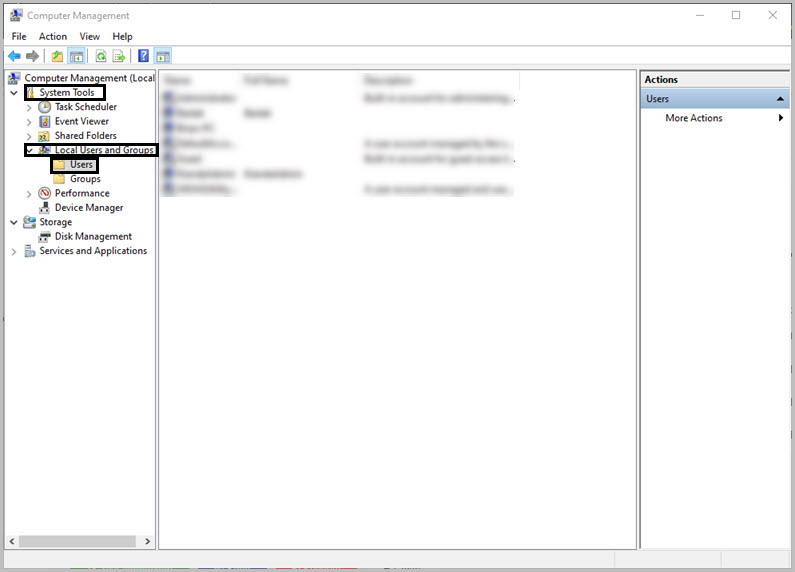
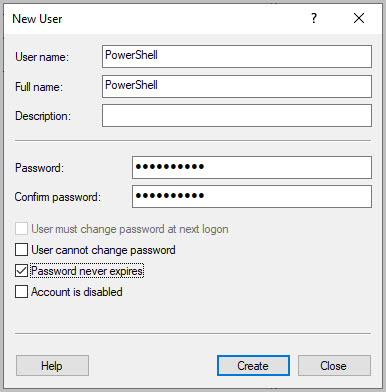
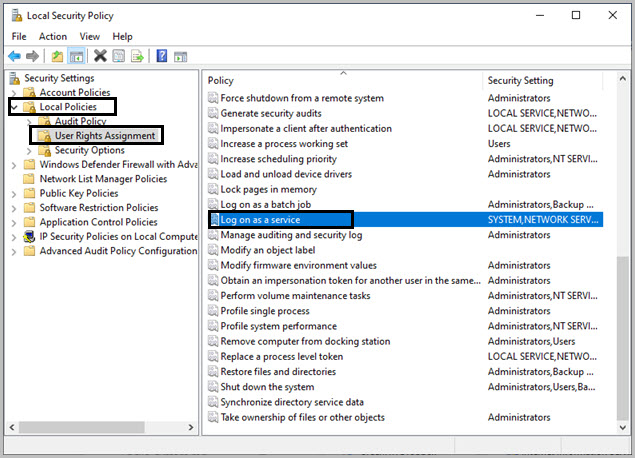
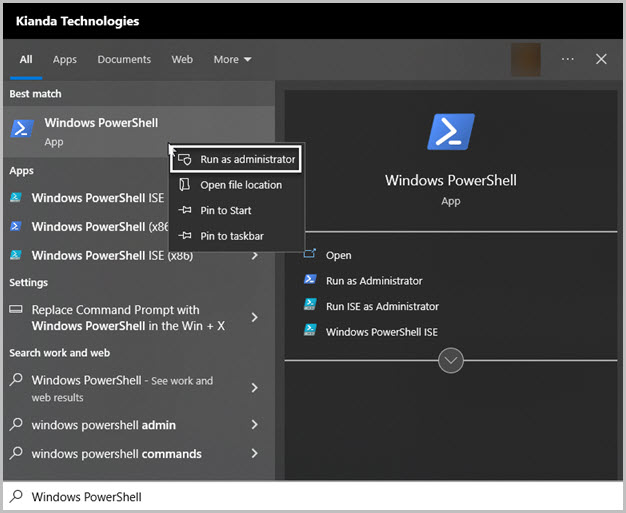
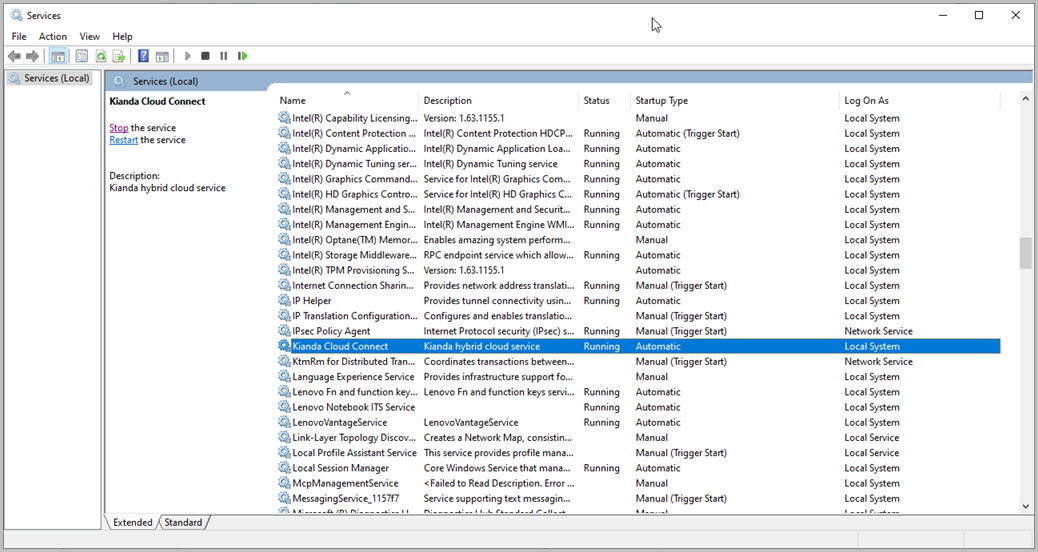
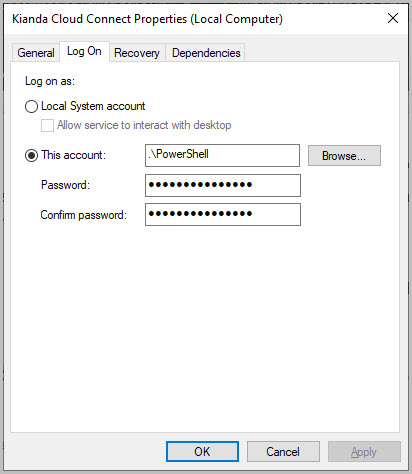
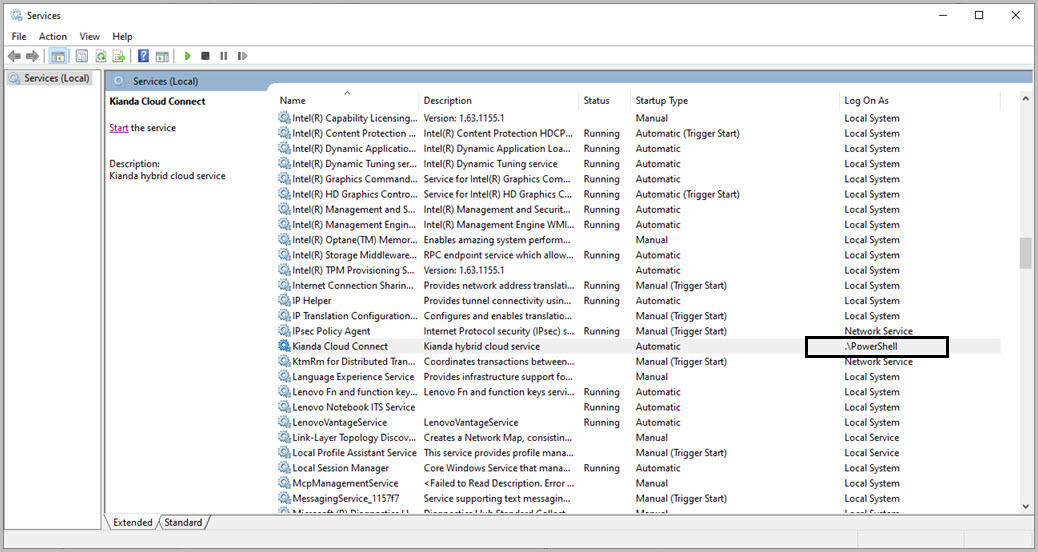
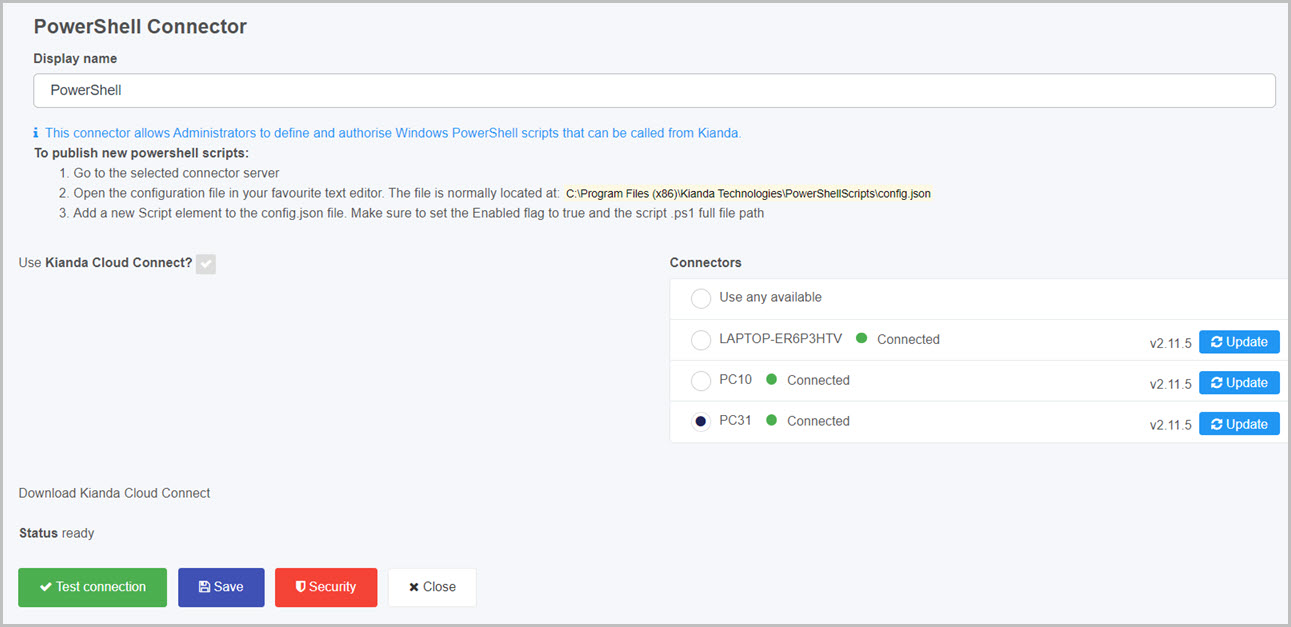
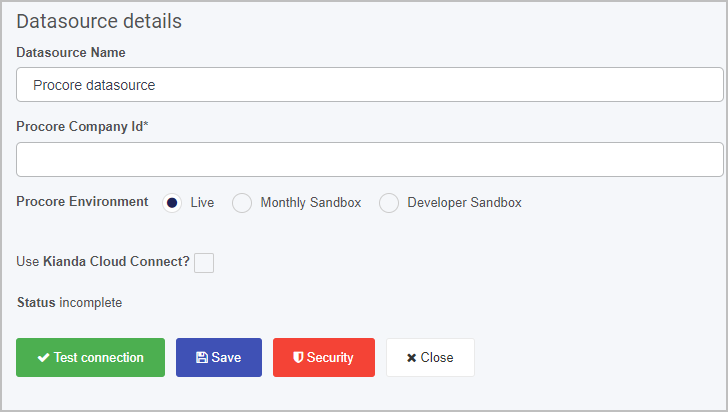
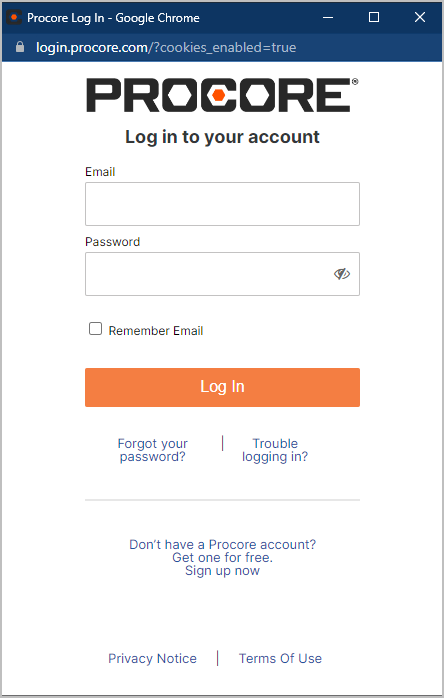
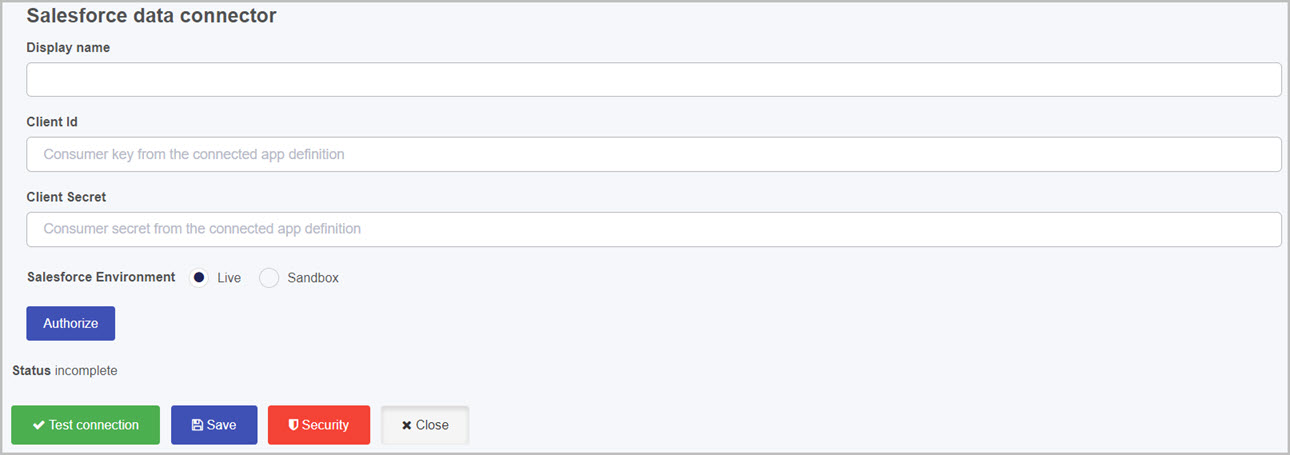

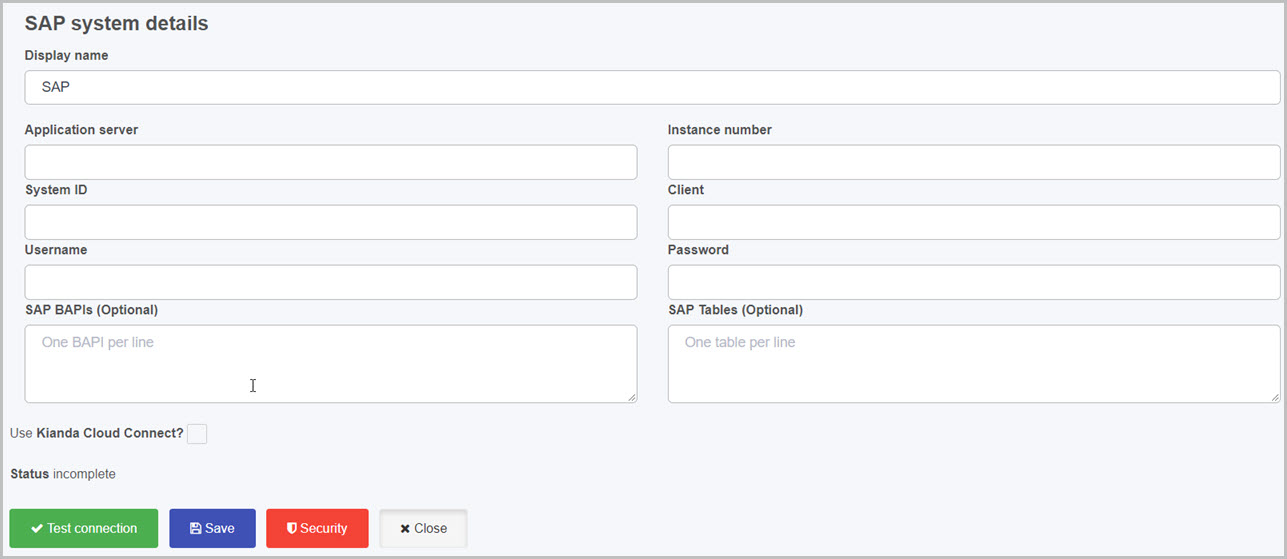

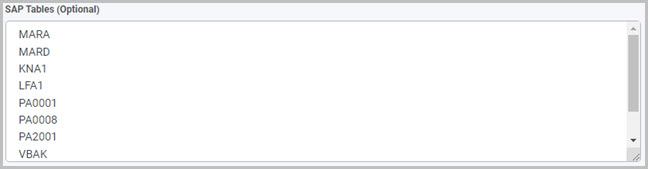
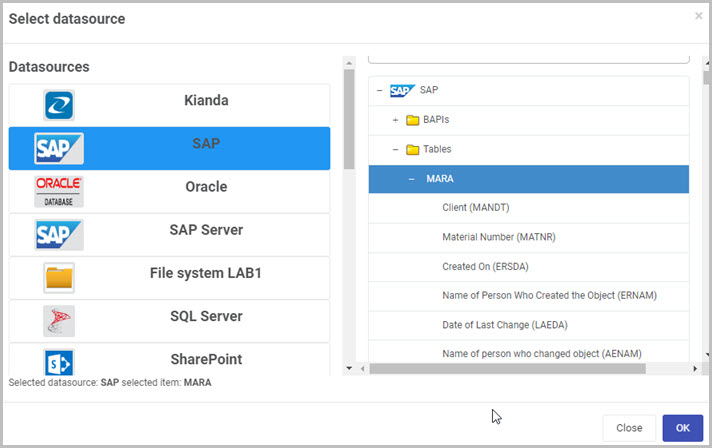
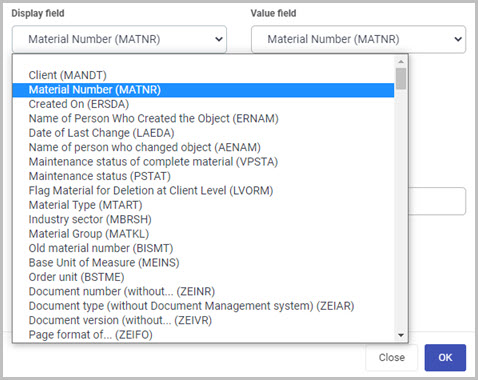
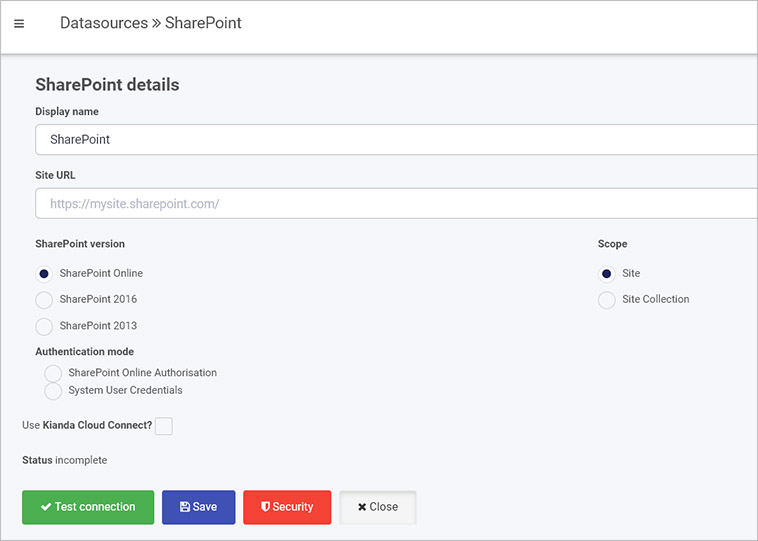
 in this instance you will need SharePoint administration rights
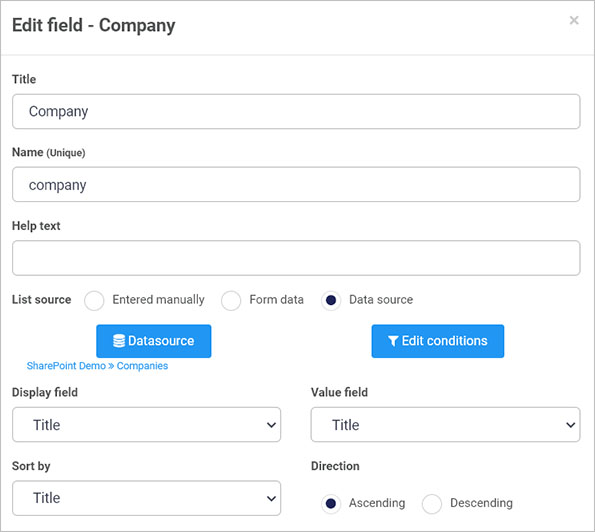
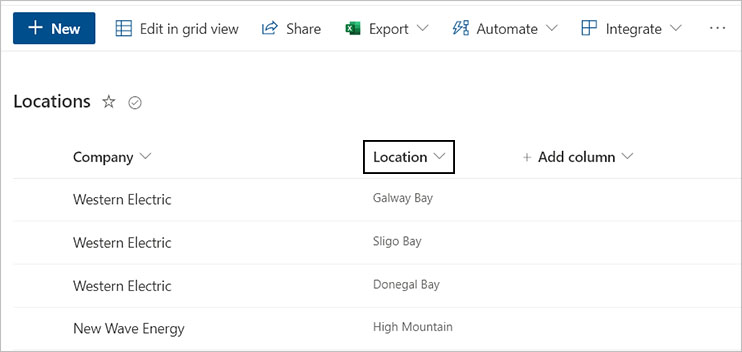
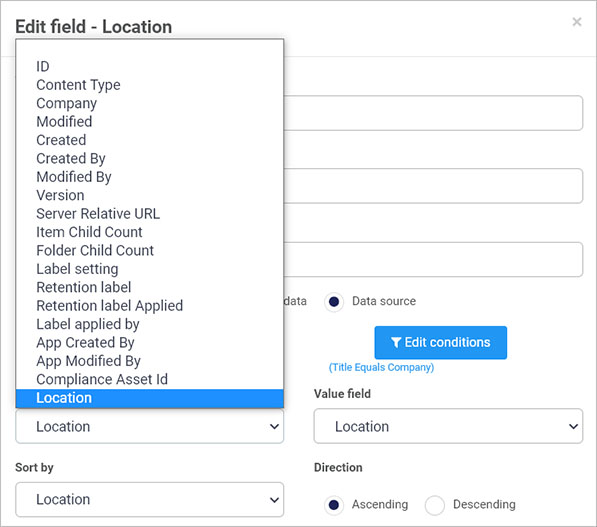
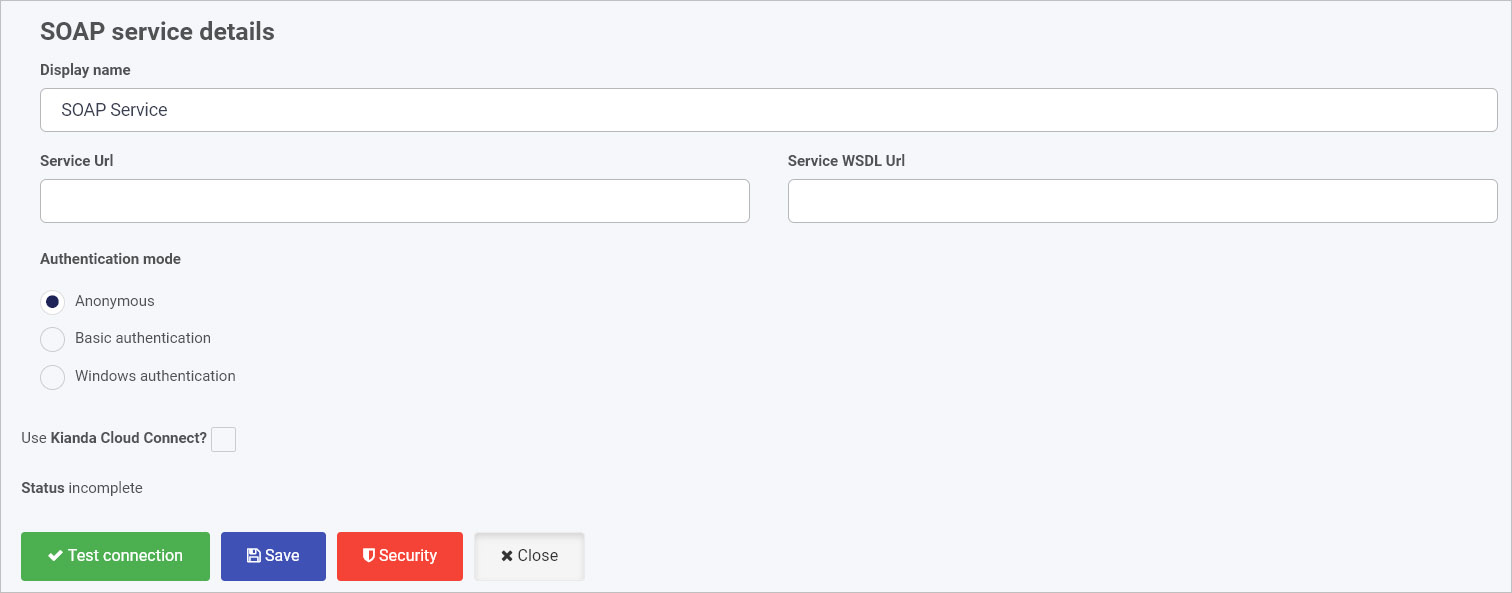

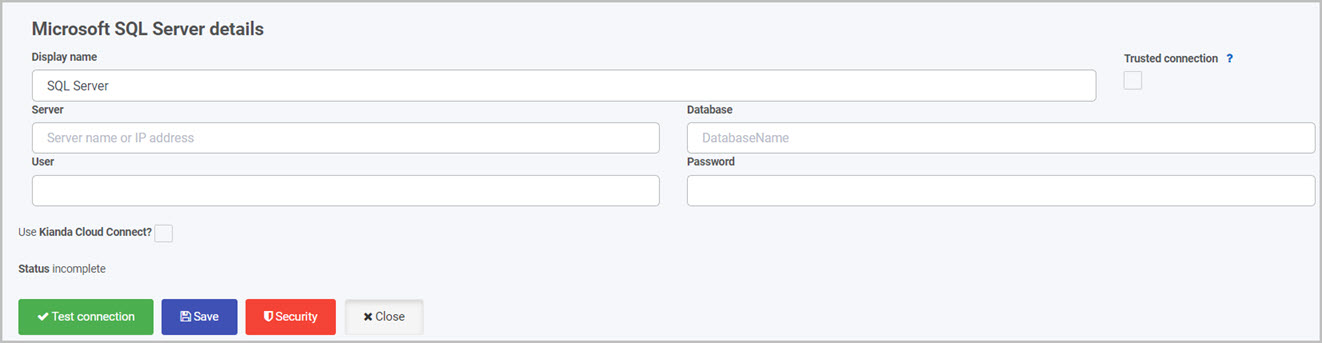
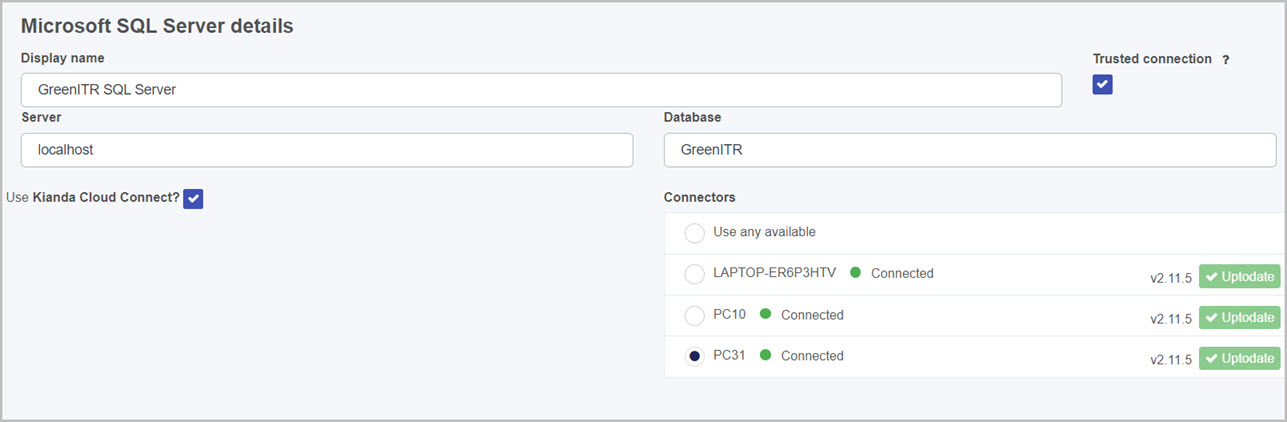
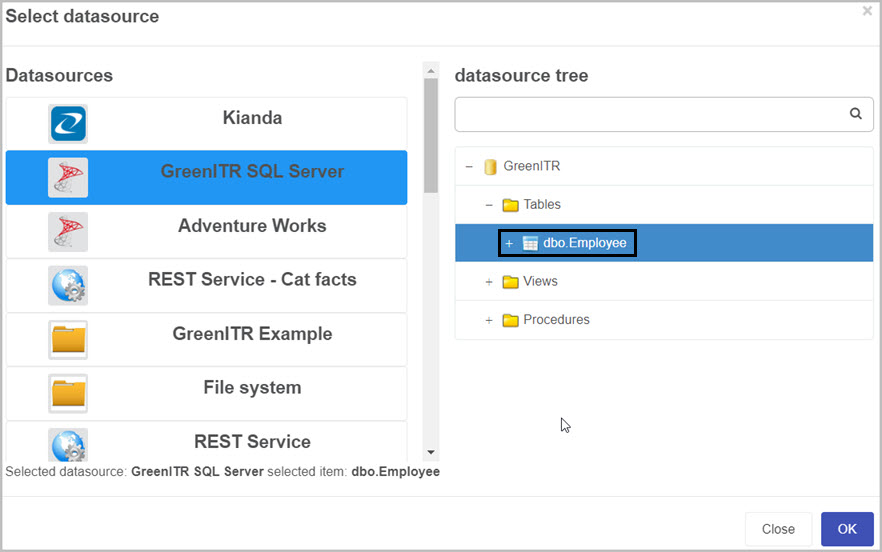
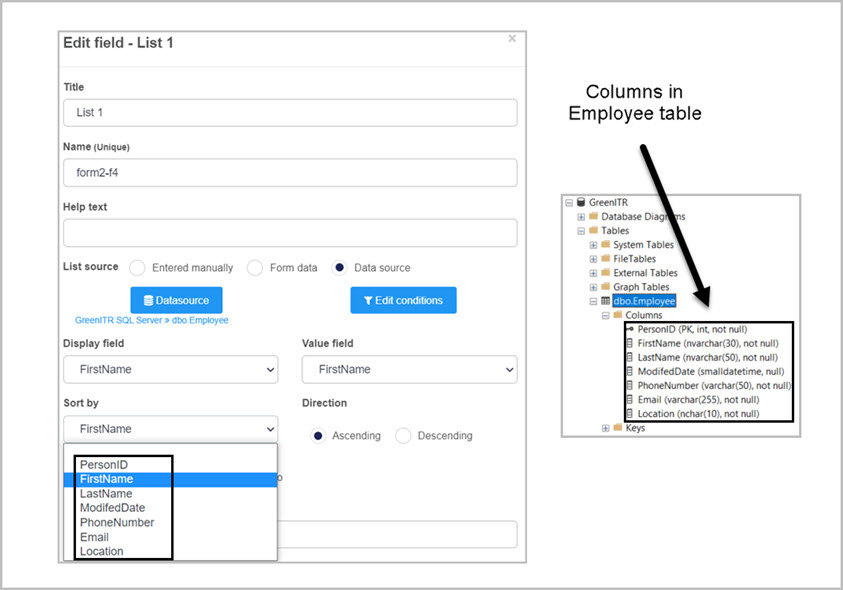
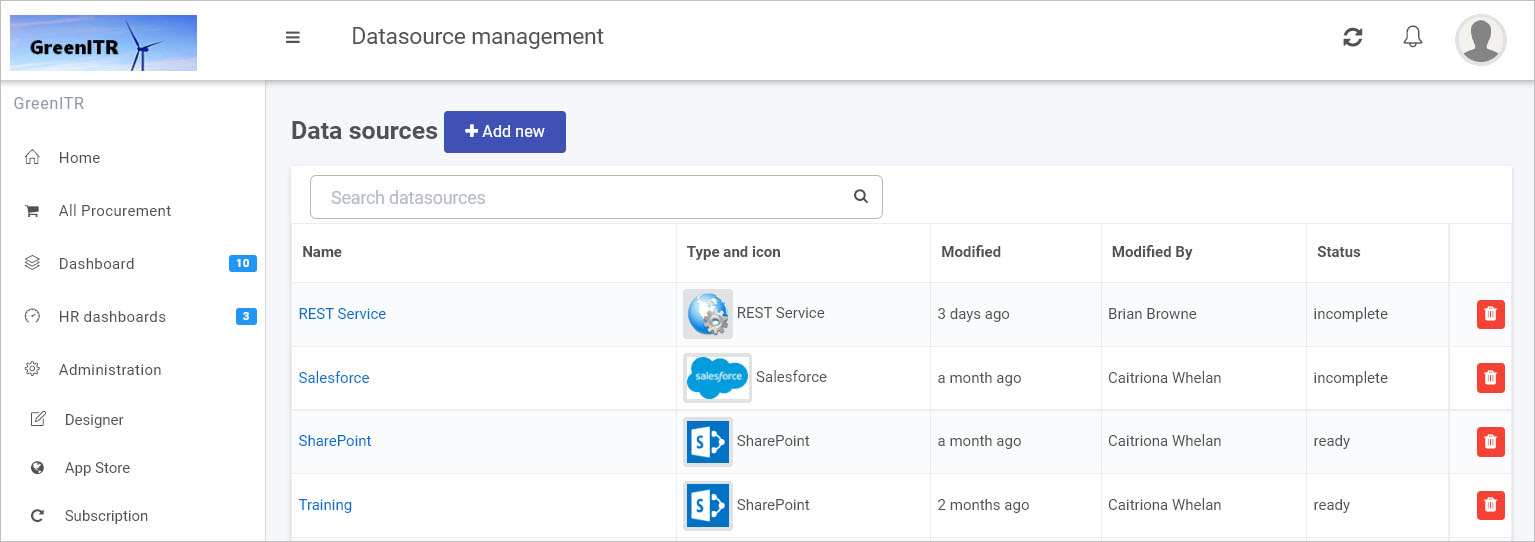
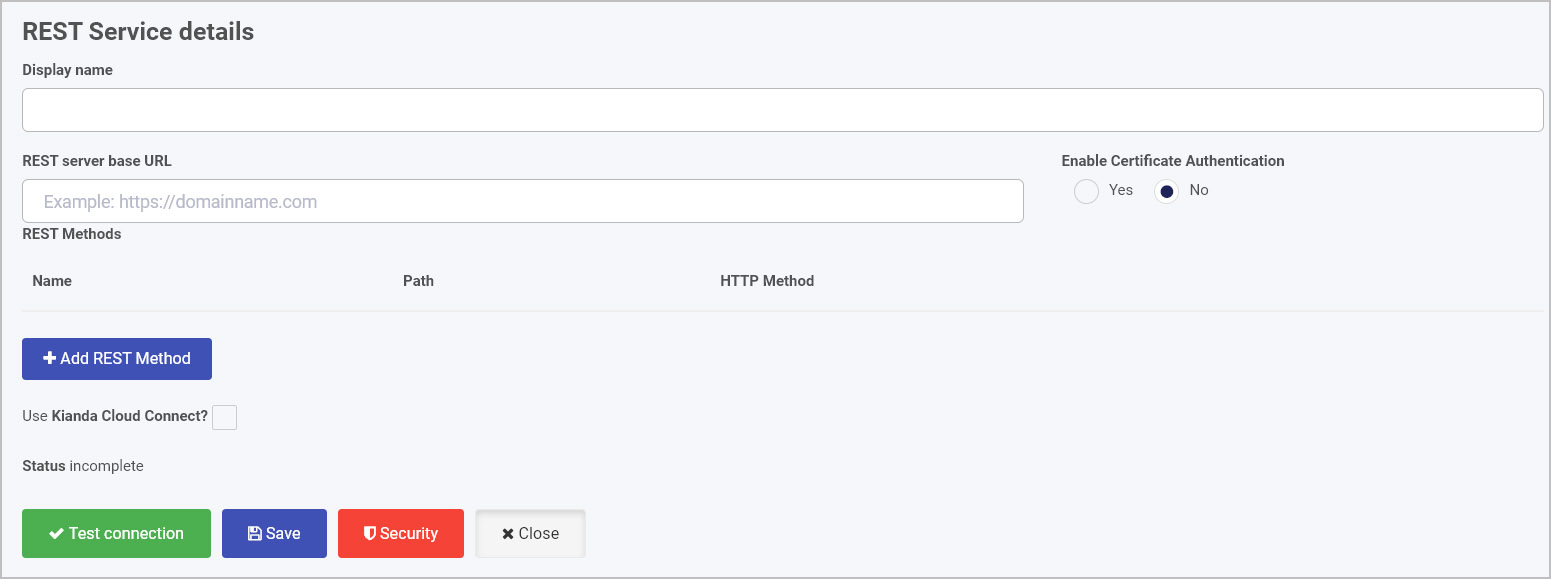
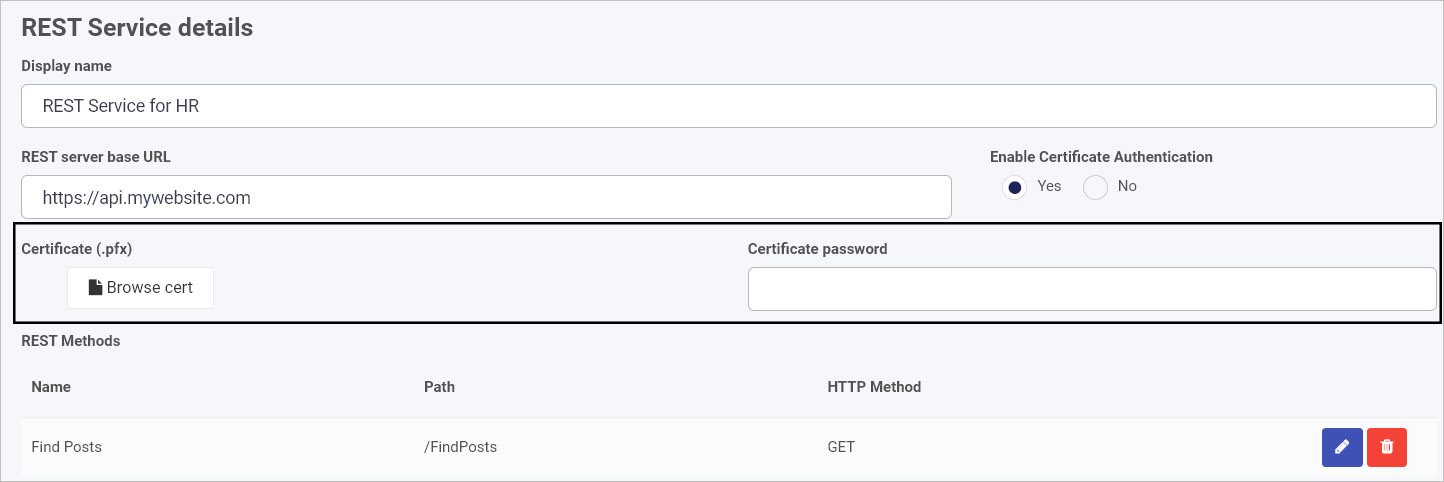
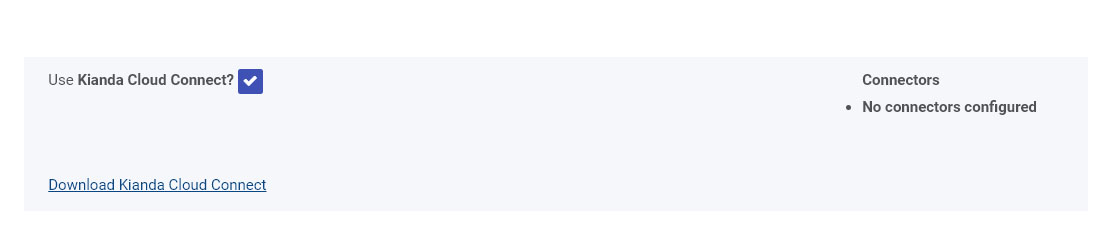


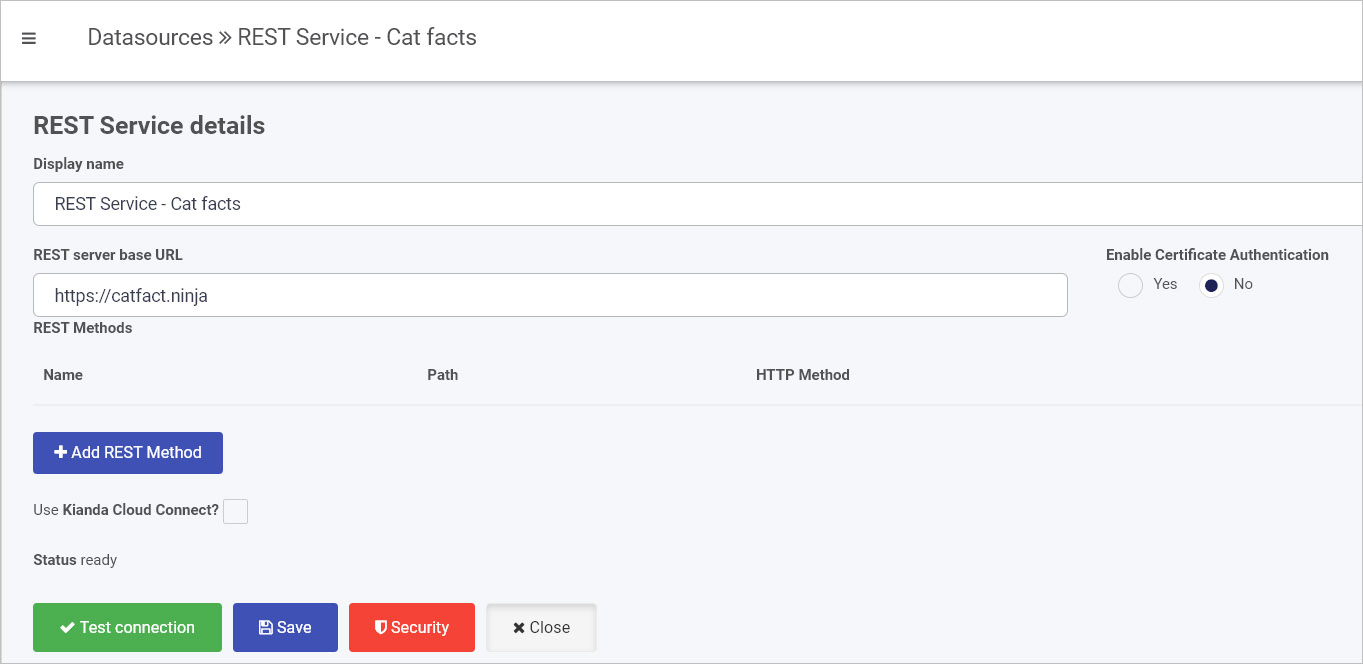
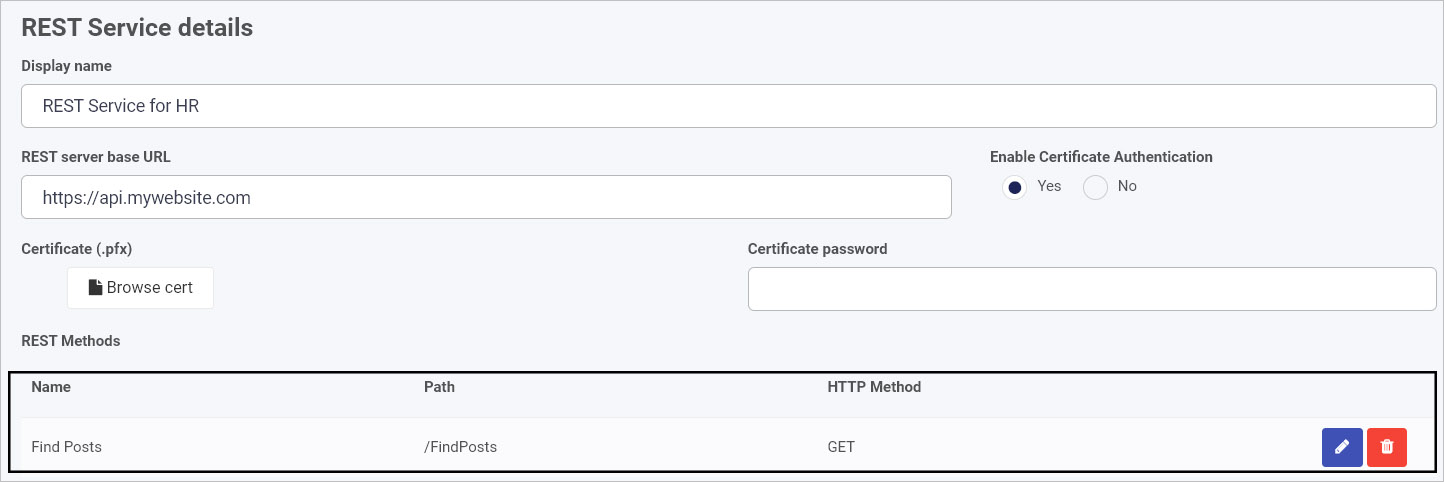
 or delete a method by clicking on the Bin/Trash button
  .
.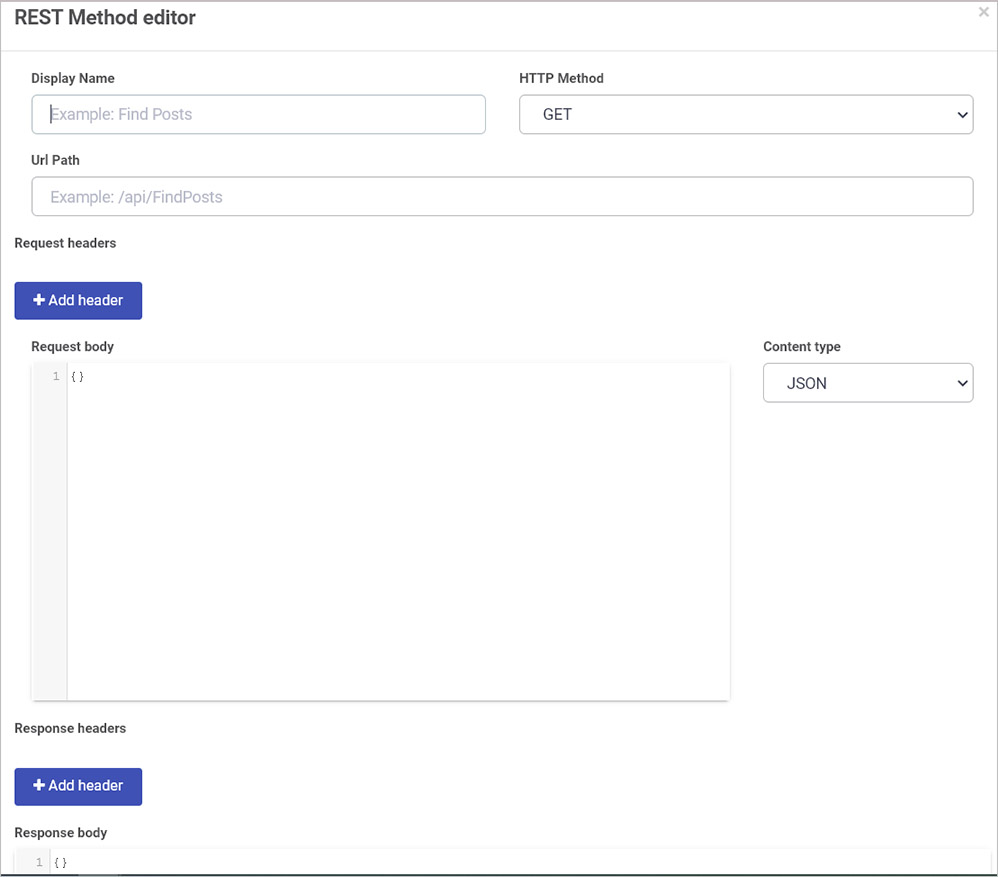
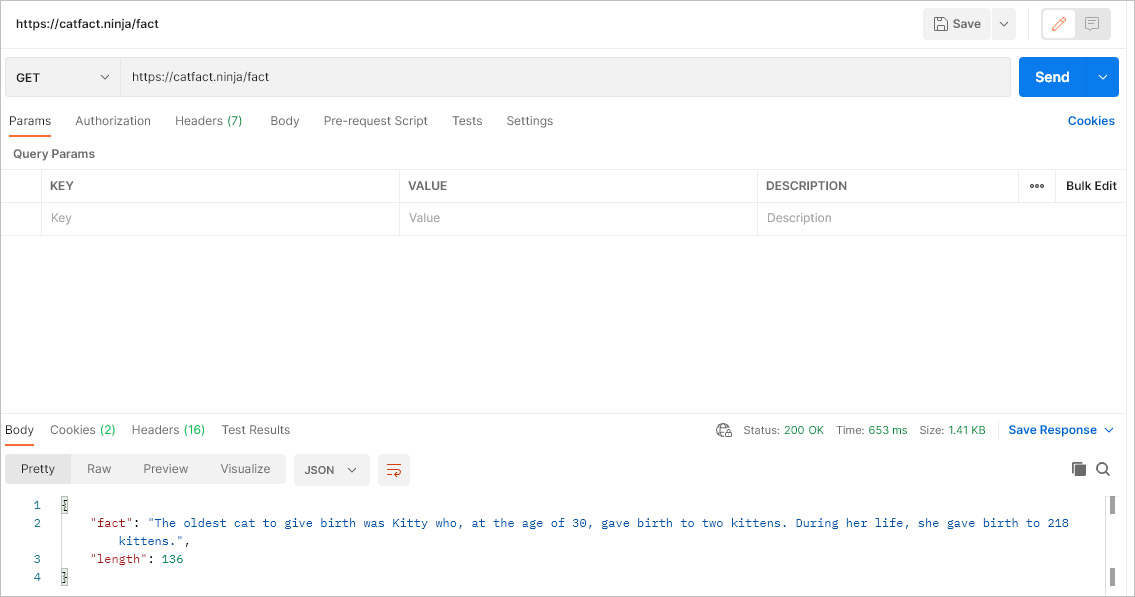
 from the REST Service details page, and add in details using the REST Method editor where:
 to add request headers, for example for authentication.
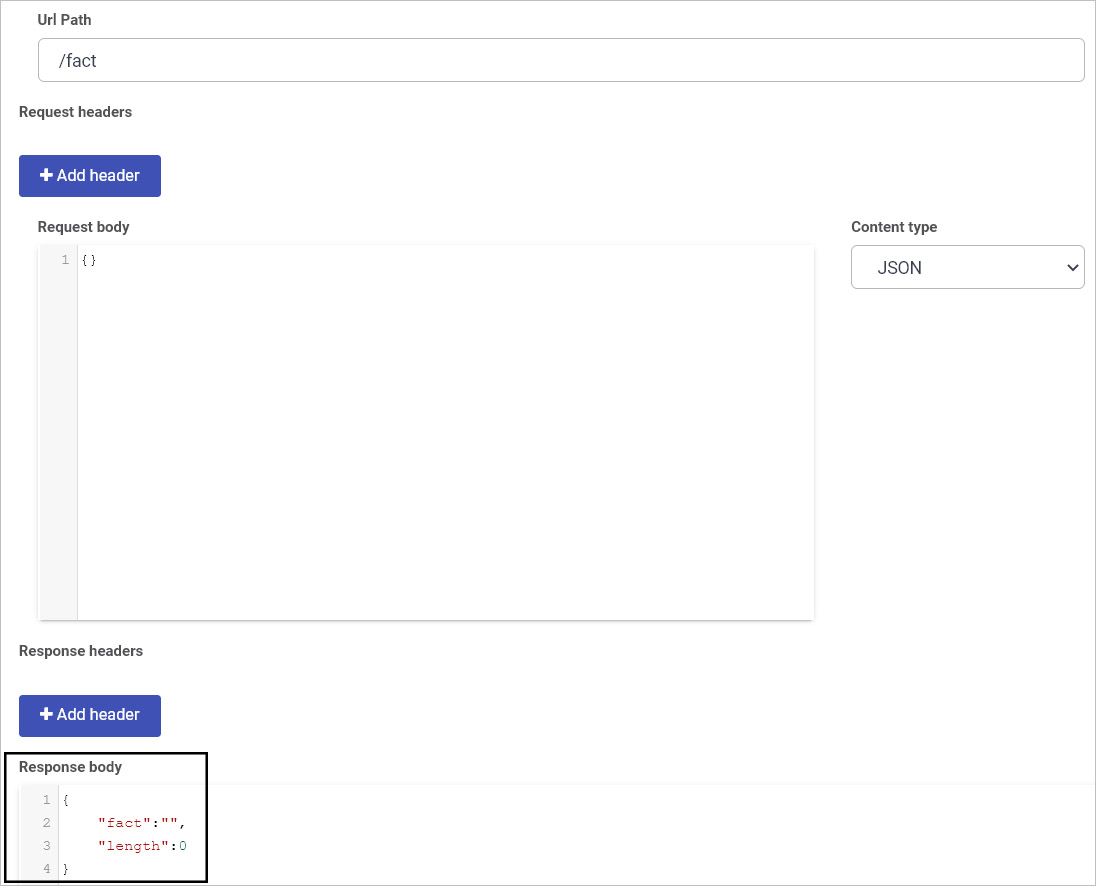
 in the REST Service details screen to save the connection.
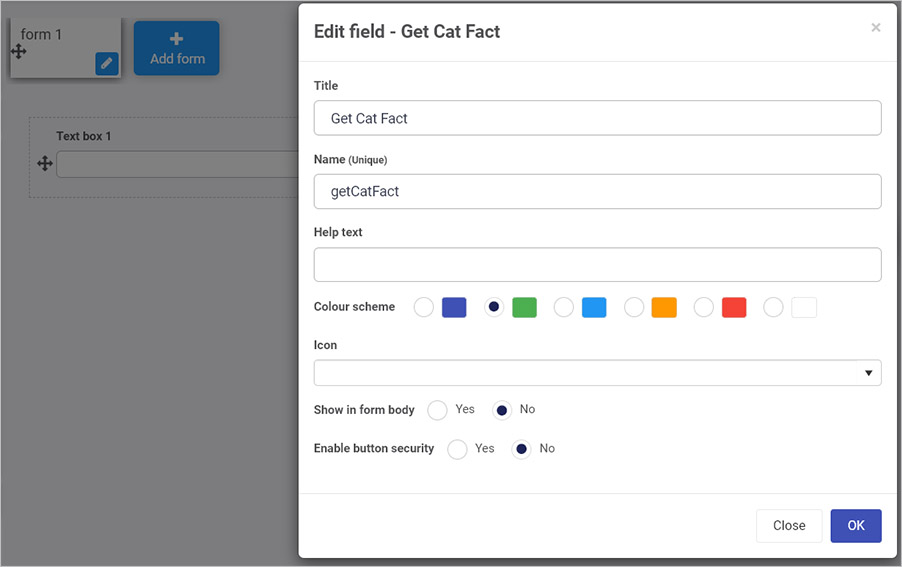
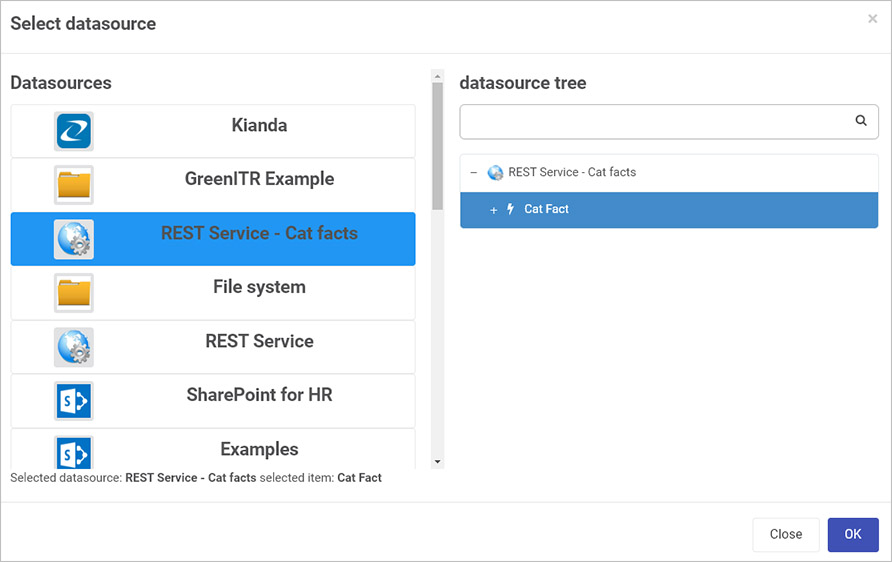
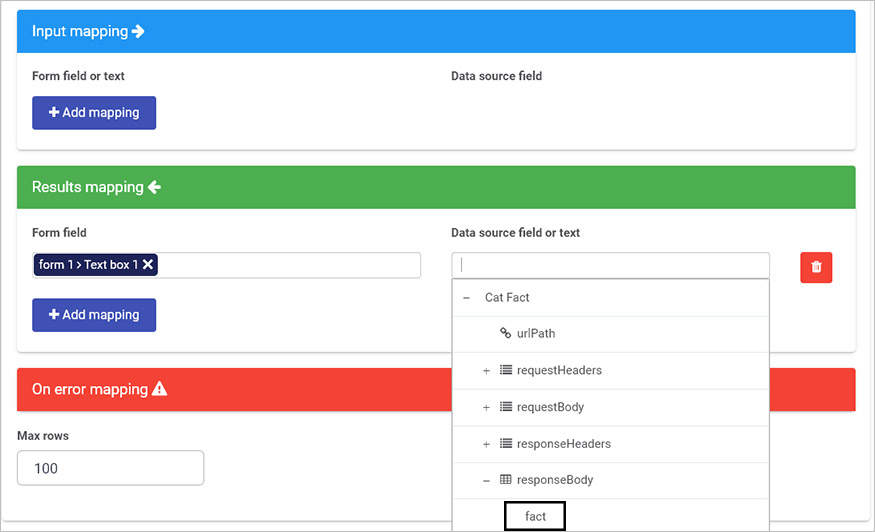
 . In the previewed instance, click on the ‘Get Cat Fact’ button to populate the textbox.