DocuSign
One of the data connectors within Kianda that you can connect to is DocuSign. DocuSign enables organisations to manage electronic agreements by offering electronic signatures also know as eSignatures. eSignatures are a way to sign different types of documents electronically on many different devices.
When to use
You can use the DocuSign data connector when a process you have created requires you to send individual documents or envelopes to get them signed electronically. With the connector, you can access different types of templates that you have created within your DocuSign account, download documents, and access already existing envelopes to see their status or summary.
Before you get started
In advance of using the DocuSign data connector, you must have an account with DocuSign. This account is used to authorise a connection between your Kianda subscription and your DocuSign account itself, so that the DocuSign Application Programming Interface (API) can be used. There are two types of accounts that you can create in DocuSign. An ordinary account and a developer account. Take note which account you have created as this information will be used to create a different connection within Kianda.
How to get started
-
From the Kianda home page, click on Administration > Data sources.
-
Click on + Add new button
 and choose DocuSign from the list of data sources provided.
 -
You will be automatically brought to the DocuSign details page, where you can start setting up the connection.
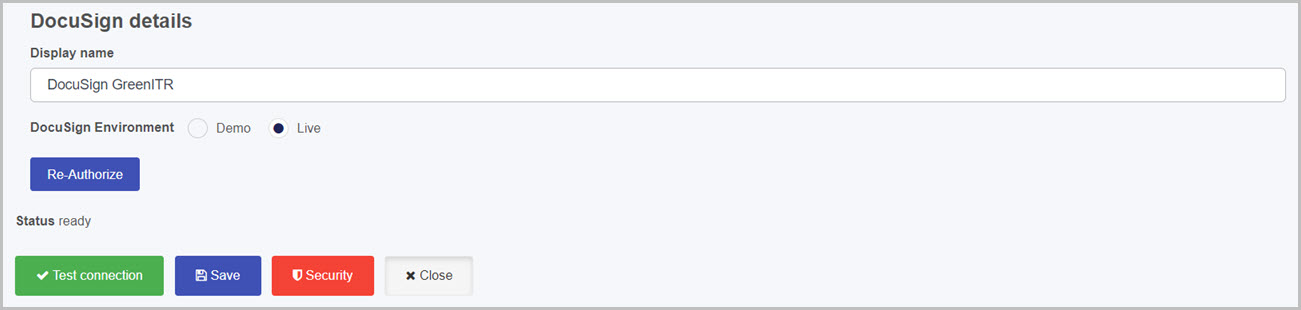
Choose from the edit options:
-
Display name - type in the name for your DocuSign connector. This is used to distinguish between different data connectors on your platform.
-
DocuSign Environment - indicates which environment you have your account created in. There are two types of accounts that you can create in DocuSign. A developer account and an ordinary account. If you have an ordinary account and you are trying to connect to DocuSign, you need to select the Live option, and if your account is a developer account, then select the Demo option. This is important as the authentication of the account is different for those two types of account.
-
Demo - indicates that your DocuSign account is a developer account.
-
Live - indicates that your DocuSign account is an ordinary account.
-
-
Authorize - allows you to authorize the connection with your DocuSign account and Kianda. When you click this button, a DocuSign window will open allowing you to log in into your DocuSign to authenticate your account.
-
-
When you have added File system details, you are ready to test your connection and add security. At the bottom of the File system details page, click on Test connection button
 and if the service has been correctly configured, then you should receive a notification saying Connection test succeeded.
 -
Click on Save
 to save the connection and you will receive a notification saying Details saved successfully.
 -
Add Security settings by clicking on the Security button, go to Setting security for data sources for more details.
-
Click on Close to close the details page and return to the data source management main view.
DocuSign functions
When you use the DocuSign data connector within Kianda, there are default functions that are invoked from DocuSign’s API. These functions enable you to access a number of DocuSign’s functionalities. You can use each DocuSign function by using the Data set of rules, to learn more about Data rules go to Data rules. With each DocuSign function you use, data needs to be passed into the function know as payload and data is also returned, known as response. When using the Data rules, you are presented with Input mapping which is equivalent to the payload. This is used to pass data into the function, for example when you need a document signed, you need to pass in a document file to be signed, in other words, the document file you pass in is the payload. The Results mapping is equivalent to the response, this is used to populate your form fields when a DocuSign function returns data, for example status of an envelope.
Here is a list of all functions available when using the DocuSign data connector. To learn more about the payload and response for the available functions go to the DocuSign API Reference.
- sendDocument - allows you to send one or more documents to a recipient to get them signed.
- sendEnvelope - allows you to send a document to a recipient using one of your DocuSign templates.
- listTemplates - retrieves the templateID and templateName of all templates from your DocuSign account.
- getEnvelope - retrieves information from an envelope using an envelopeID.
- getEnvelopeSummary - retrieves a summary of an envelope using an envelopeID.
- listEnvelopeDocuments - retrieves any documents that are contained within an envelope using an envelopeID.
- downloadDocument - allows you to download a specific document using a documentID from an envelope using an envelopeID.
- listTemplateSigners - retrieves the name, role and recipientID of all signers from a template using a templateID.
- getSigningUrl - retrieves a URL to a signature made on an envelope using an envelopeID.
Example use case of DocuSign function
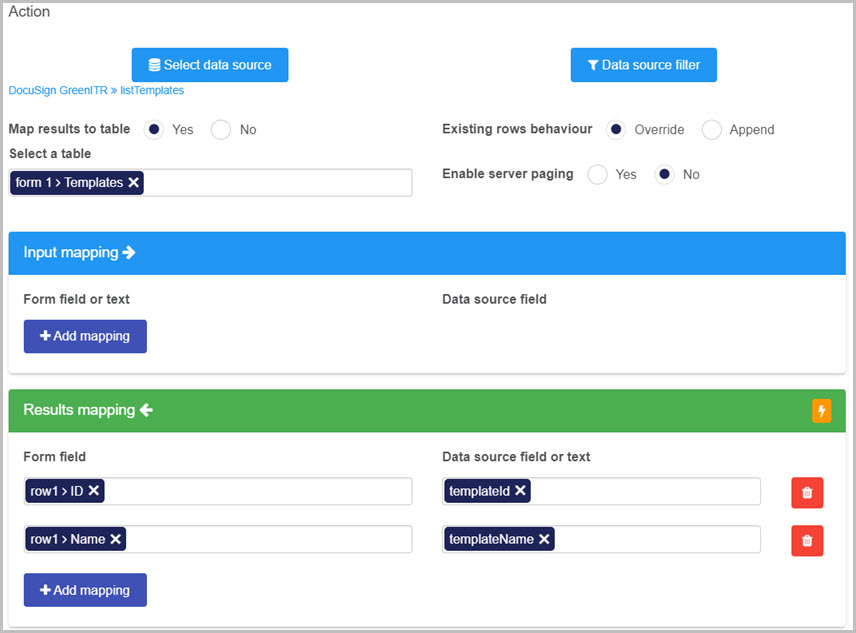
Take the function listTemplates as an example. The listTemplates function returns (response) an ID and the Name of all templates that you have created in your DocuSign account. To use this function effectively, you can use the Find items rule in combination with the table input. The Find items rule will access all templates and map the results into the table. For each template in your DocuSign account, the Find items rule will add a table row with the appropriate Template IDs and Template Names of each template.
To showcase the functionality explained above, we will apply the Find items rule to a button; however, it can be applied to a form field, a form or a process (the rule will be executed when the process loads). Each time we press this button, a table will be populated with a list of Template IDs and Template Names from our DocuSign account.
-
Create a button in your process, to learn how to create a button go to Button control.
-
Create a table with two columns and call them ID and Name. To learn how to create a table and add columns go to Table control.
-
Apply the Find items rule to the button by following the steps from Find items rule. When following the steps of the Find items rule, make sure to do the following:
- Select the Map results to table option and select the table you created. This way the Find items rule will create as many rows as there are templates in your DocuSign account.
- The listTemplates function does not require any payload (Input mapping), so delete all fields from the input mapping section.
- Select listTemplates as your data source from your DocuSign connector.
- Select the appropriate column field from your table and results field from your data source in the Results mapping section.
What’s next 
Your DocuSign service is now set up and ready to be used in your processes. To find out more about how to design processes go to Designer.
Feedback
Was this page helpful?
Glad to hear it! Please tell us how we can improve.
Sorry to hear that. Please tell us how we can improve.