Email connector
In your company’s Kianda platform you can connect an emailing service such as Outlook or Gmail. This allows you to send automated emails from a specified email account such as support@ or info@. The email connector feature It is mostly used when applying the Send email rule, which allows you to set a From field. For example setting up a payroll Email connector would be used to send automated emails to employees with their payslips attached. To learn more about send email rule go to Send email.
How to get started
-
From the Kianda home page, click on Administration > Data sources.
-
Click on + Add new button
 and choose Email from the list of data sources provided.
 -
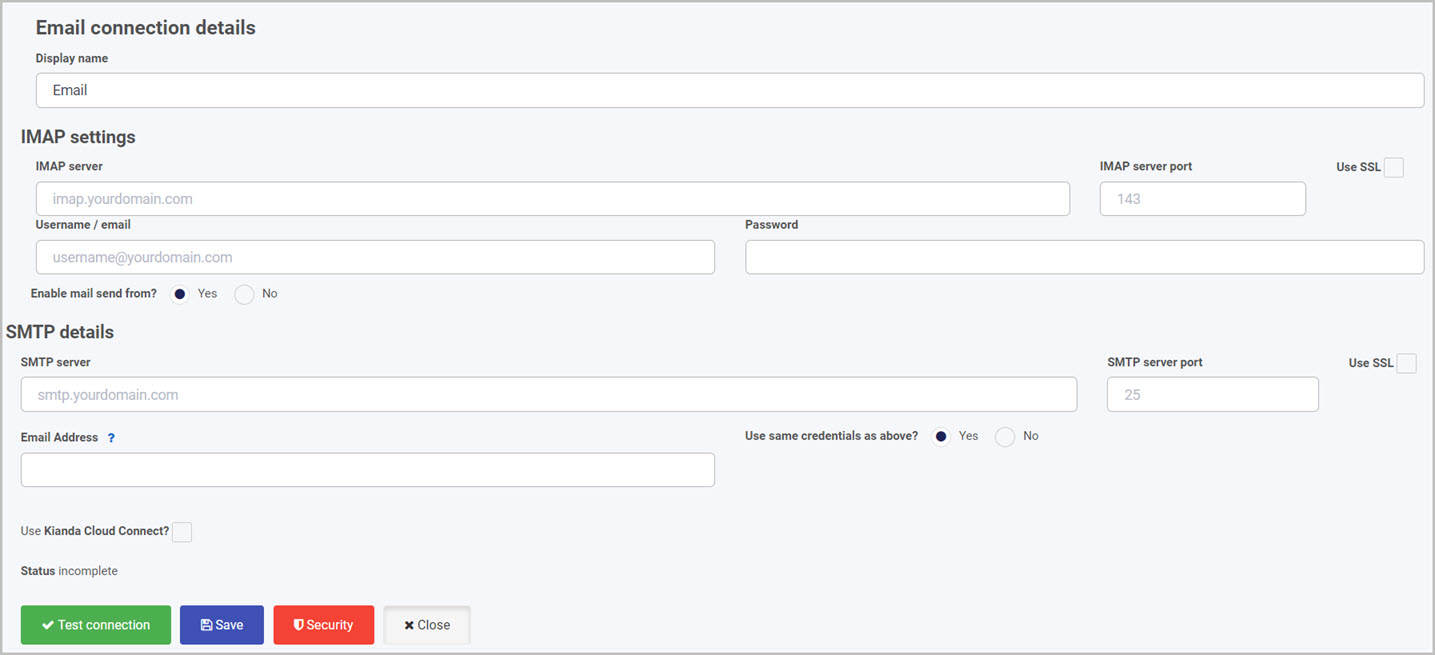
You will be automatically brought to the Email connection details page where we can start setting up the email connector.
-
Choose a Display name for your email connector. This is used to distinguish between different email connectors on your platform.
-
In the following example we will use an outlook office 365 IMAP to set up the connector. Fill in the following details:
- IMAP server - the IMAP server address of your provider. outlook.office365.com in this example
- IMAP server port - the IMAP port your provider listens to. Port number is 993 in this example.
- Use SSL - IMAP security of your provider. Outlook uses SSL therefore we need to enable it.
- Username / email - the email provider credentials. In this example we are creating a support@ connector.
- Password - the password to access your email account.
- Enable mail send from - allows you to fill in details used to send emails.
To learn more about IMAP settings and how to obtain them, go to IMAP settings.

-
If you select Yes in the Enable mail send from, you are prested with SMTP details. Fill out the following:
- SMTP server - the SMTP server address of your provider. In this example it is smtp.office365.com.
- SMTP server port - the SMTP port your provider listens to. In this example it’s port 587.
- Use SSL - IMAP security of your provider. Outlook uses SSL therefore we need to enable it.
- Email Address - Used to send test email to ensure emails are delivered.
- Use same credentials as above
- Yes - selecting this will ensure to use the same credentials as stated in the above IMAP settings.
- No - selecting this will enable you to use different credentials for the SMTP server.
To learn more about IMAP settings and how to obtain them, go to SMTP settings.
-
When you have added Email details, you are ready to test your connection and add security. At the bottom of the Email details page, click on Test connection button
 and if the service has been correctly configured, then you should receive a notification saying Connection test succeeded.
 -
Click on Save
 to save the connection and you will receive a notification saying Details saved successfully.
 -
Add Security settings by clicking on the Security button, go to Setting security for data sources for more details.
-
Click on Close to close the details page and return to the datasource management main view.
IMAP settings
Internet Message Access Protocol, or IMAP, is a standard email retrieval (incoming) protocol. It stores email messages on a mail server and enables the recipient to view and manipulate them as though they were stored locally on their device(s). These settings are needed to connect to your emailing service and authentication of ownership. In order to activate your email connector we need to fill out the following:
Note: some email providers need IMAP settings enabled as they are disabled by default.
- IMAP server - IMAP server is an address for a given mailing service, it usually comes in the form of imap.yourdomain.com. For example Google’s IMAP is imap.gmail.com. To access your IMAP address, contact your email provider or email server.
- IMAP server port - Indicates which port your IMAP server listens to. The IMAP server typically listen to a well known port 143 or 993 with SSL/TSL functionality. The port information can be found by contacting your email provider.
- Use SSL - Secure Socket Layer (SSL) is a standard technology for keeping the internet connection secure and safeguarding. Contact your email provider to find out if SSL is required when accessing IMAP server.
- Username/ email - The credentials used to access your emailing account. Indicates which email will be used to send mail.
- Password - The credentials used to access your emailing account.
- Enable mail send from - With this option you can choose the ability to send email OUT to others using the connected emailing service. If you choose Yes, you need to fill in SMTP details. To find out more got to SMTP detail.
SMTP details
Simple Mail Transfer Protocol or SMTP, is a standard email outgoing (sending) protocol. It is used for sending email messages from one email account to another via the internet. The SMTP server checks whether the two emails are valid and proceeds with sending of the email. To be able sending of email using your email provider, the following details need to be filled out:
- SMTP server - SMTP server is an address for a given mailing service, it usually comes in the form of smtp.yourdomain.com. For example Google’s SMTP is smtp.gmail.com. To access your IMAP address, contact your email provider or email server.
- SMTP server port - Indicates which port your SMTP server listens to. The SMTP servers typically listen to port 25 if unencrypted or 465 with SSL encryption. The port information can be found by contacting your email provider.
- Email address - Used to send test email to ensure emails are delivered.
- Use same credentials as above - By choosing Yes, you will be using the same credentials to log into your SMTP server as you are to the IMAP server. If your SMTP server credentials are different, select No to be presented with:
- SMTP Username - The credentials used to access your SMTP provider.
- Password - The credentials used to access your SMTP provider.
Setting up a Global SMTP mail connector
As mentioned above, you can create multiple Email connectors and use them to send emails using different email accounts such as support@ or info@. You can also choose to ignore all email connectors as well as the no-reply@kianda.com emails by enabling one Global SMTP connector which forces all sent email to come from one single connector. To set a Global SMTP connector, you need Administrator rights in your Kianda platform.
Note: to set up a global SMTP mail connector, you need to have an Email connector set up, see the steps under How to get started on how to set up an email connector.
-
From the Kianda home page, click on Administration > Subscription > Subscription Details.
-
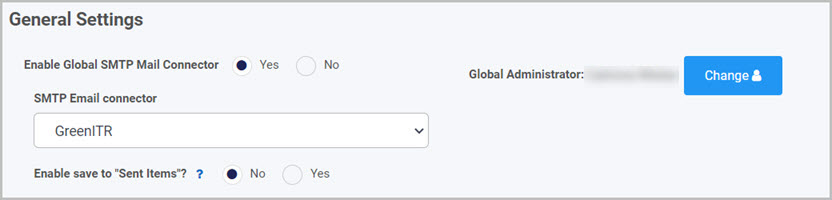
Under General settings, select Yes on the Enable Global SMTP Main Connector option.
-
A SMTP Email connector dropdown box appears. Select your desired email connector.
-
In the Enable save to “Sent Items” option select Yes if you want your email to save all emails sent and select No to not save. If you select Yes, the emails will be saved in the Sent Items folder in your email.
Feedback
Was this page helpful?
Glad to hear it! Please tell us how we can improve.
Sorry to hear that. Please tell us how we can improve.