Kianda Cloud Connect
Kianda Cloud Connect is a piece of software that establishes a connection between your local machine and your Kianda subscription. This lightweight app will sit on your PC or server where files reside that you need to use in Kianda processes. It allows the data to travel from your local machine to the Kianda Cloud Connect service, and then the Kianda Cloud Connect service sends data to your Kianda subscription. This data transfer works both ways depending on what operation you are performing for example Deleting a file or Creating one.
Kianda Cloud Connect authenticates with a user created in Kianda, see User management for more details on users, and sends information to and from Kianda using port 80. See details below on how to set up the connection.
Downloading Kianda Cloud Connect
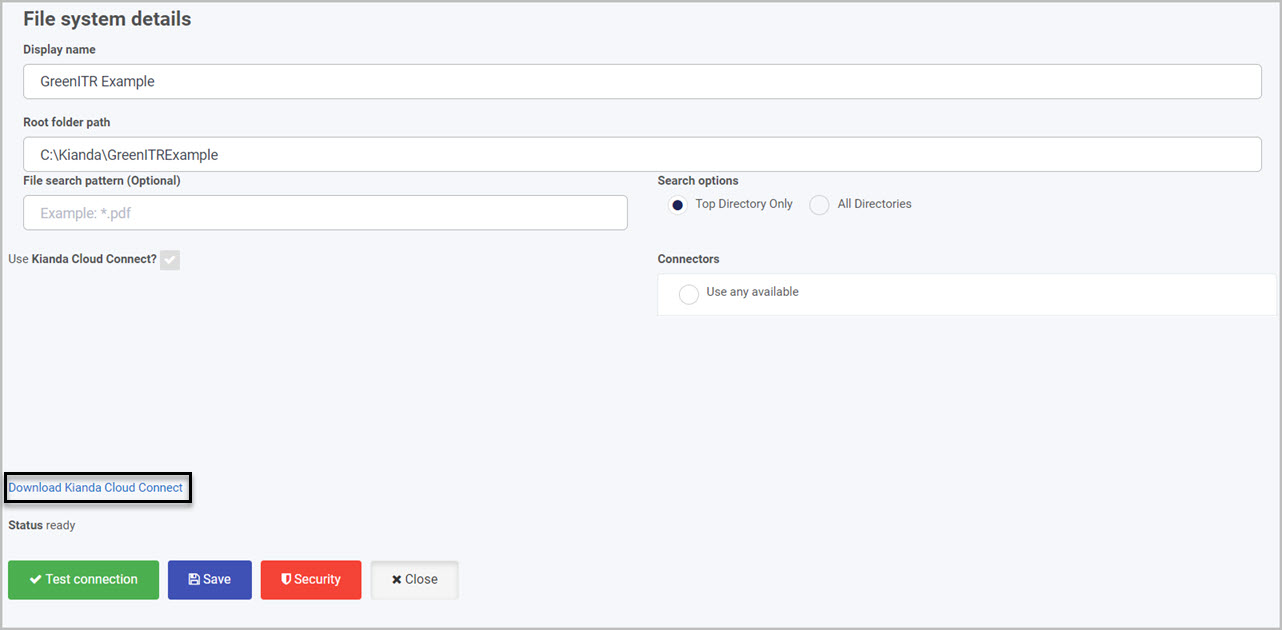
You can download Kianda Cloud Connect software in any details page of data source that might use it, for example in a File system data connector:
-
From the Kianda home page, click on Administration > Data sources.
-
Click on + Add new button
 and choose File system from the list of data sources provided.
 -
You will be automatically brought to the File system details page, where you can click on Download Kianda Cloud Connect at the bottom of the screen.
-
Clicking on Download Kianda Cloud Connect will automatically download a zipped folder. Extract the contents of the folder and open the Kianda Cloud Connect Windows Installer Package. You will need administrative privileges on your device in order to install the application.

-
Click on the Windows Installer Package CloudConnect.msi file.
-
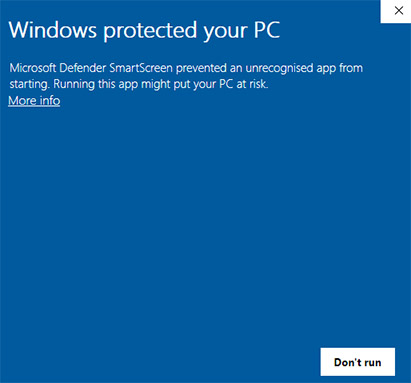
Security on the device may prevent you from installing the app. If the below window appears click on the More Info link and then click Run Anyway.
-
In the Welcome to Kianda Cloud Connect Setup Wizard, follow the installation wizard to install the application. Click Next.
-
In the Select Installation Folder window, pick a folder where you want to install the software. Click Next.
-
In the Confirm Installation window, click Next.
-
Click on Yes in the administrator dialog box to give Kianda Cloud Connect access to your PC.
-
In the Installation Complete window click on Close. Once installed the application will be available on your desktop as an app.

-
Double-click the icon to open the application, then follow the steps below to connect your PC to Kianda Cloud Connect.
Connecting your PC to Kianda Cloud Connect
To establish a connection between your Kianda subscription and your local machine, you need to login using a Kianda username (email) and password. Note that the user you are trying to establish a connection with must be an administrator and needs to be a unique username (email). The username you want to establish the connection with cannot be used in more than one Kianda subscriptions as Kianda Cloud Connect will not be able to tell which subscription you want to connect to.
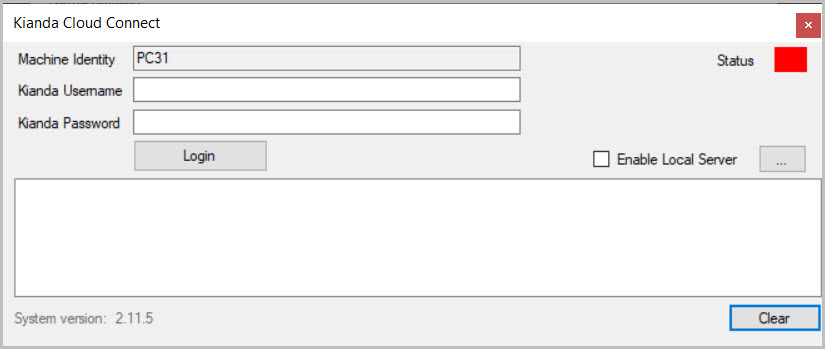
To open Kianda Cloud Connect on your PC, open the Kianda Cloud Connect app installed on your PC, and the dialog box below will open. Note the version of Cloud Connect is visible in this dialog box, in this example 2.11.5.
-
To establish a connection fill out the following:
- Machine Identity - automatically sets the identity using the name of your local PC or server that the application has been installed on. This field is an un-editable value that cannot be changed.
- Kianda Username - type in the username/email of the user from your Kianda subscription you want to establish a connection with. This username must be unique across all Kianda subscriptions and must be an administrator. For example you cannot establish a connection with a connector@domain.com if this email is used in more than one subscription, as Kianda Cloud Connect will not be able to determine which subscription to make a connection with. For more information on users go to Users and groups.
- Kianda Password - type in the password used to login, for the user in the Kianda Username field.
- Status - the colour shown denotes if the connection is active, as a green colour, or inactive as a red colour.
- Enable Local Server - this allows Kianda to pass through the current server and connect to a local server or offline server/PC. Click the checkbox to enable this, followed by the ellipsis button to continue. Then add in the Local URL and click on OK.
-
Once the username and password have been entered, click on the Login button to establish a connection. It is recommended to have a specific user account that is used solely for the purpose of connecting the data connector to the Kianda subscription.
-
If the connection succeeded, in the Cloud Connection dialog box, click OK to complete the connection. Once the connection has been made the log in the dialog box will be populated with messages confirming the login has occurred. A dialog box will open confirming that the connection has been successfully established. When the connection has been established successfully, Kianda Cloud Connect will automatically connect to your subscription when the PC is turned on therefore you do not need to login when the PC is turned on.

-
Click on Clear to clear the connection log in the body of the dialog box.
-
All established connections will be visible in the Kianda Cloud Connect Connector section in any of the datasource connectors that use it, for example File system or SQL Server.

The connector is now established and can be used when designing processes.
What’s next 
To find out more about how to build processes go to Application Designer.
Feedback
Was this page helpful?
Glad to hear it! Please tell us how we can improve.
Sorry to hear that. Please tell us how we can improve.