This is the multi-page printable view of this section.
Click here to print.
Return to the regular view of this page.
Your workspace
When you login to Kianda for the first time, you are presented with an easy-to-use interface, your Kianda workspace, that contains all the functions you need for your role.
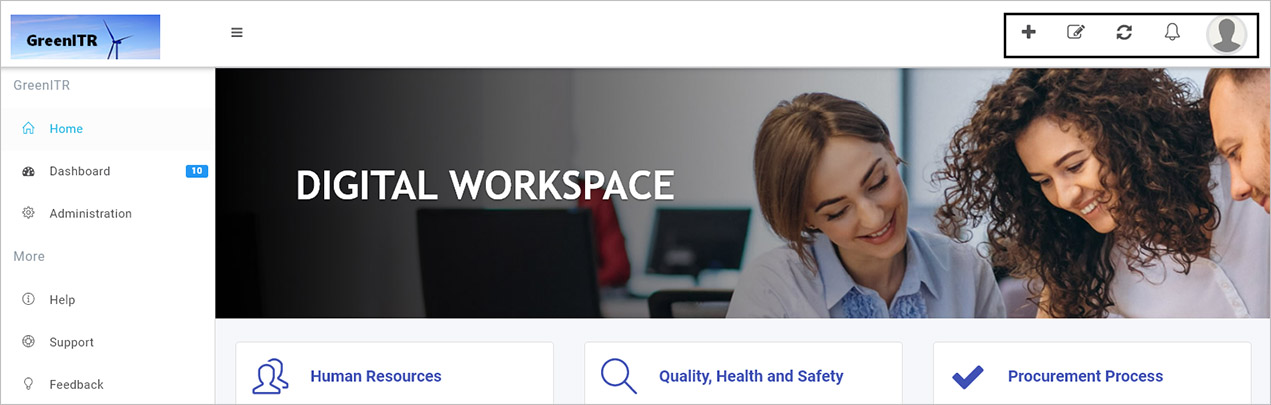
The main navigation is driven from the left-hand side menu. Here you will find shared dashboards linked to processes. Depending on your role you may have Administration functions like Designer that allows you to design processes, or Invite partner that allows you to manage B2B shared processes and dashboards for example with third party contractors.
How to get started
Kianda workspace
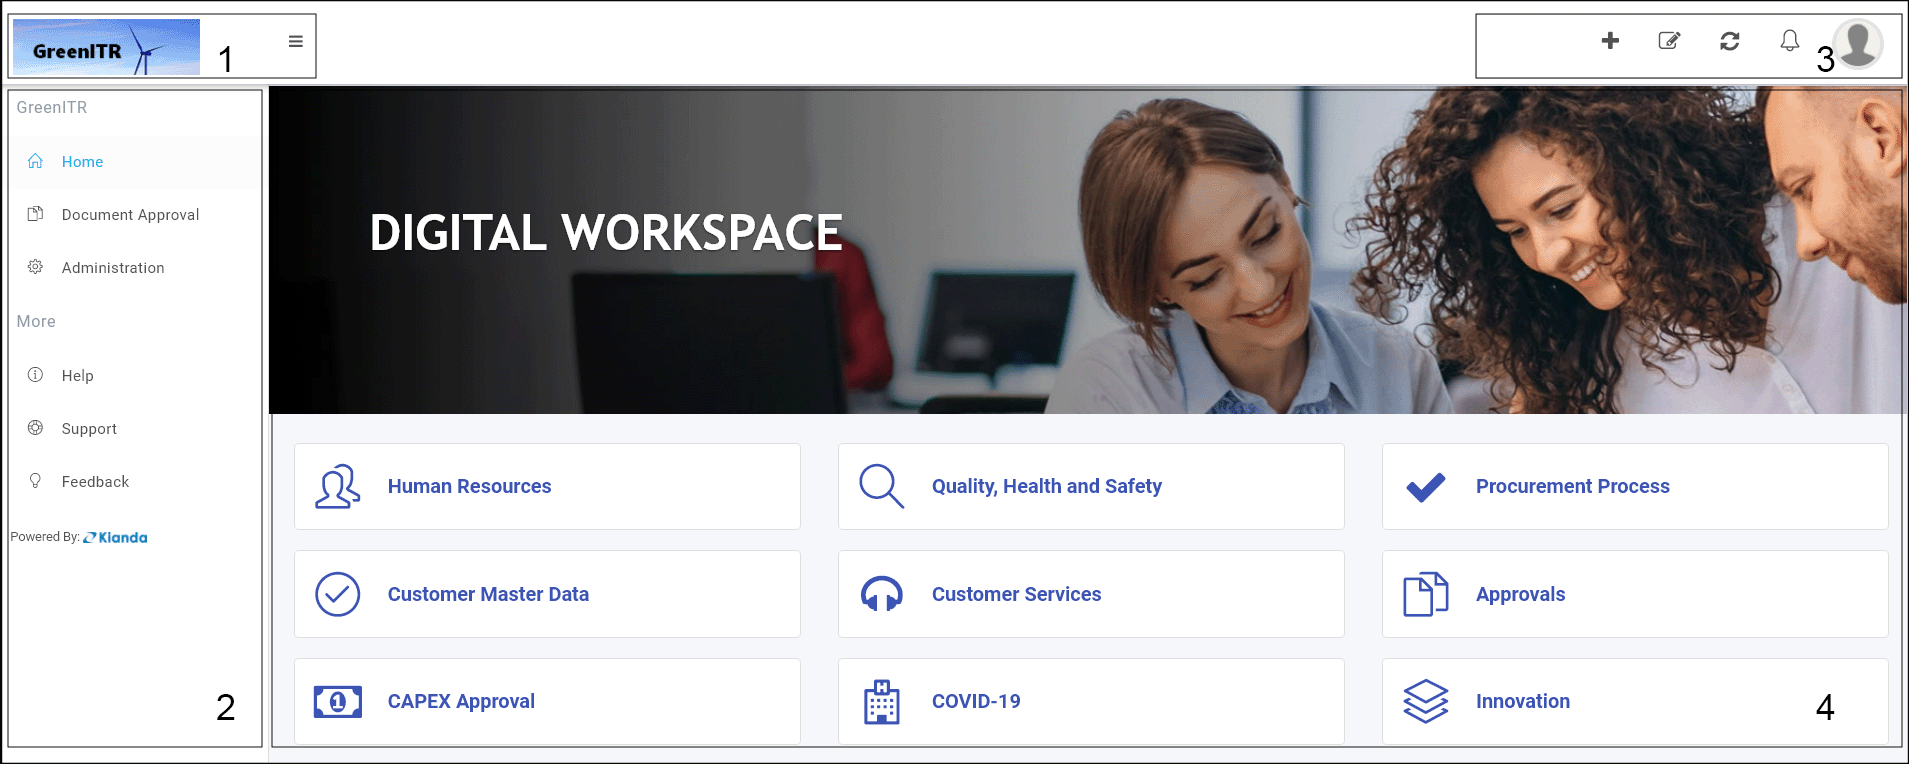
The layout of the Kianda workspace is as follows:
-
Company logo - the top left-hand corner is reserved for uploading company logos. If you click on the Collapse navigation button  you will see the collapsed version of the company logo and collapsed side menu, giving you more real estate in the central view panel to view processes and dashboards.
-
Side menu - Beneath the logo is the left-hand pane, the side menu, containing all of the key functions within Administration that you need to create and manage your business processes. Depending on your role, the Administration function and sub-functions may be visible. For example users with an Administrator role will see Administration and functions within this area such as User Management and Subscription. Other roles will only have one function visible within Administration, dependent on the role, for example the role Manage datasources, will see the Data sources function within Administration, allowing users with this role to connect Kianda to data held in organisational data sources like SAP or Salesforce. From this menu for example you can start creating processes using Designer if you have the role Administration or Design business process.
In this left side menu, under More, there are links to get Help, Support, and give Feedback. Click on each of the links for more details.
-
Quick Action menu - the top right-hand menu bar contains shortcuts to keep you updated, for example user notifications and the ability to add dashboard pages. Here you can also add a profile picture for your account and manage other details for your account, such as changing password and working offline like in-flight mode, allowing you to peruse the platform without requiring internet access. See Quick action menu for more details.
-
Main view - the central view panel is the main view for any of the functions chosen from the side menu. For example in the main view you can view and edit processes and dashboards, as well as managing users and groups, depending on your role.
What’s next 
Go to Personalise your workspace to find out how to change the look and feel of your workspace and to set regional settings.
To read more about how to create processes and forms, go to Application Designer.
To find out about other ways to get help and support, click on the links below:
1 - Help
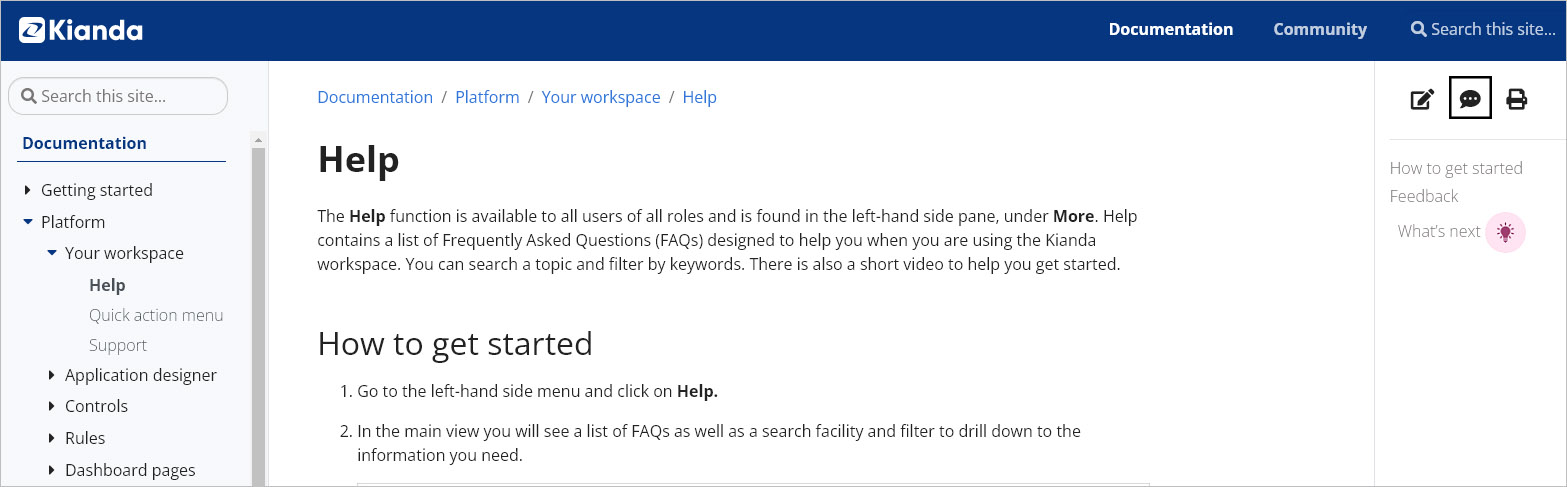
The Help function is available to all users of all roles and is found in the left-hand side pane, under More. Help contains a list of Frequently Asked Questions (FAQs) designed to help you when you are using the Kianda workspace. You can search a topic and filter by keywords. There is also a short Get started video available to introduce the platform and how to create a simple process with forms and fields.
How to get started
-
Go to the left-hand side menu and click on Help.
-
In the main view you will see a list of FAQs as well as a search facility and filter to drill down to the information you need.
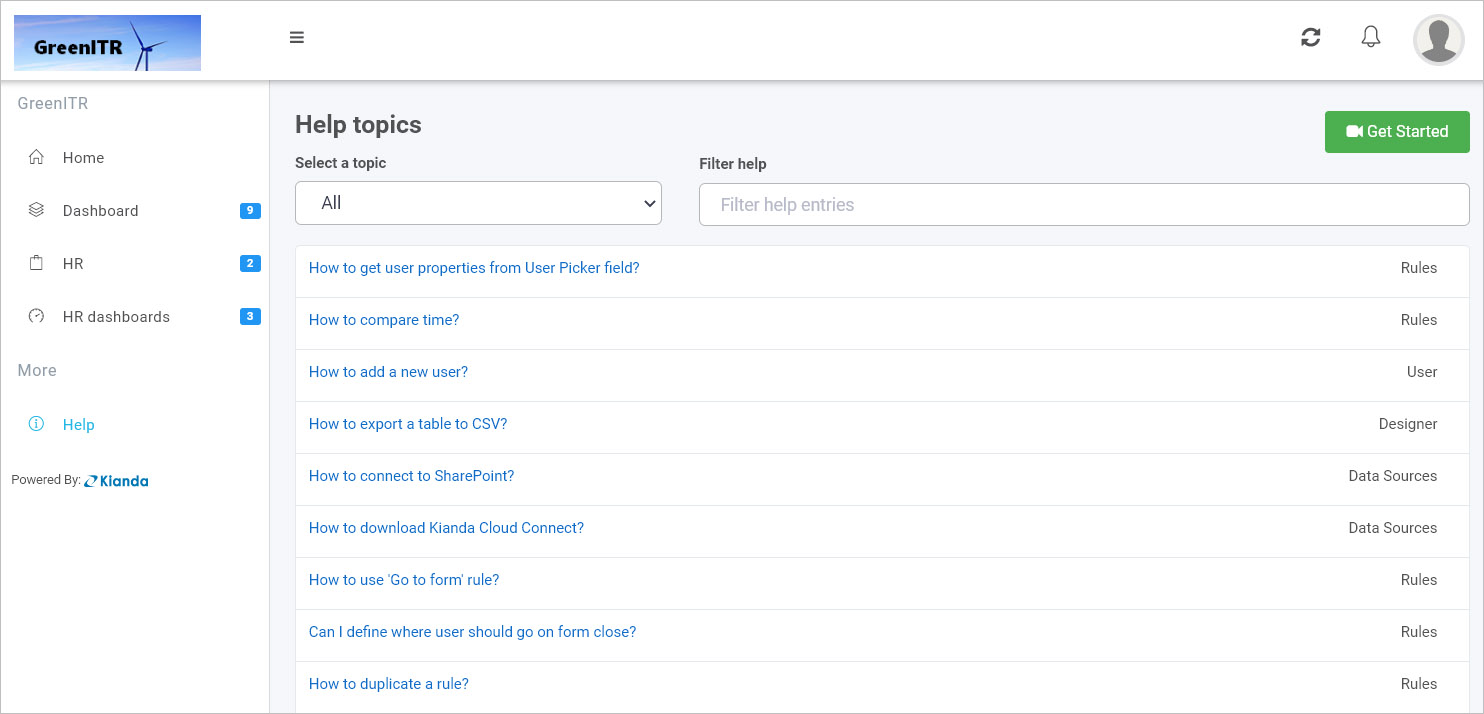
FAQs are listed by title and topic, for example a query on ‘How to connect to SharePoint?’ belongs to the ‘Data sources’ topic.
-
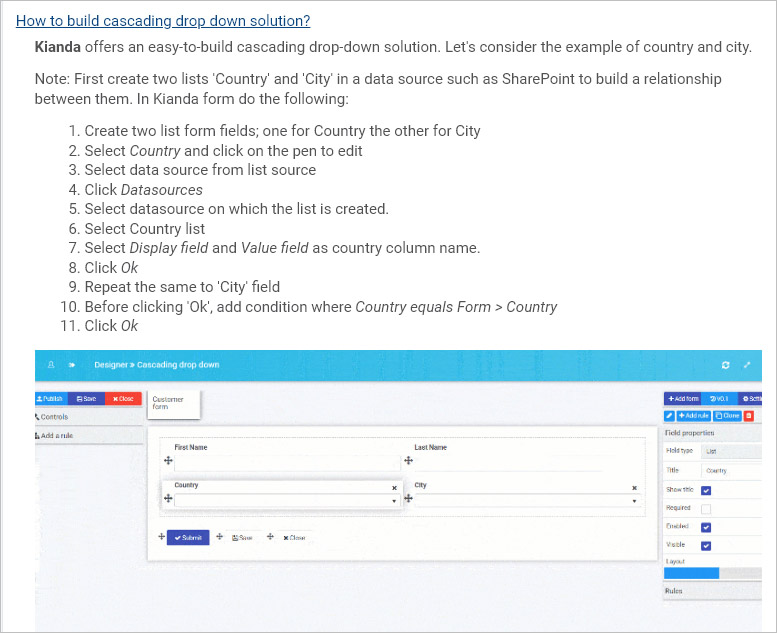
Click on any FAQ and you will find a set of instructions to help you and a short video that shows you what to do, for example steps to create a cascading drop-down list solution as shown below.
-
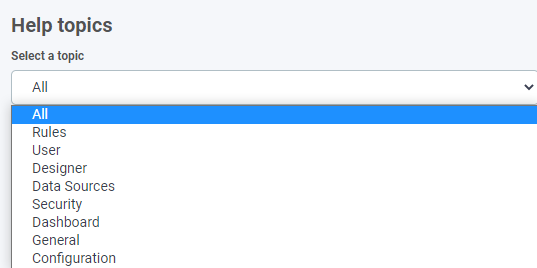
Alternatively, click on Select a topic and filter from a selection of topics: Rules, User, Designer, Data Sources, Security, Dashboard, General and Configuration as shown below.
All the FAQs related to that topic will be listed in the main view, for example Rules as shown below.
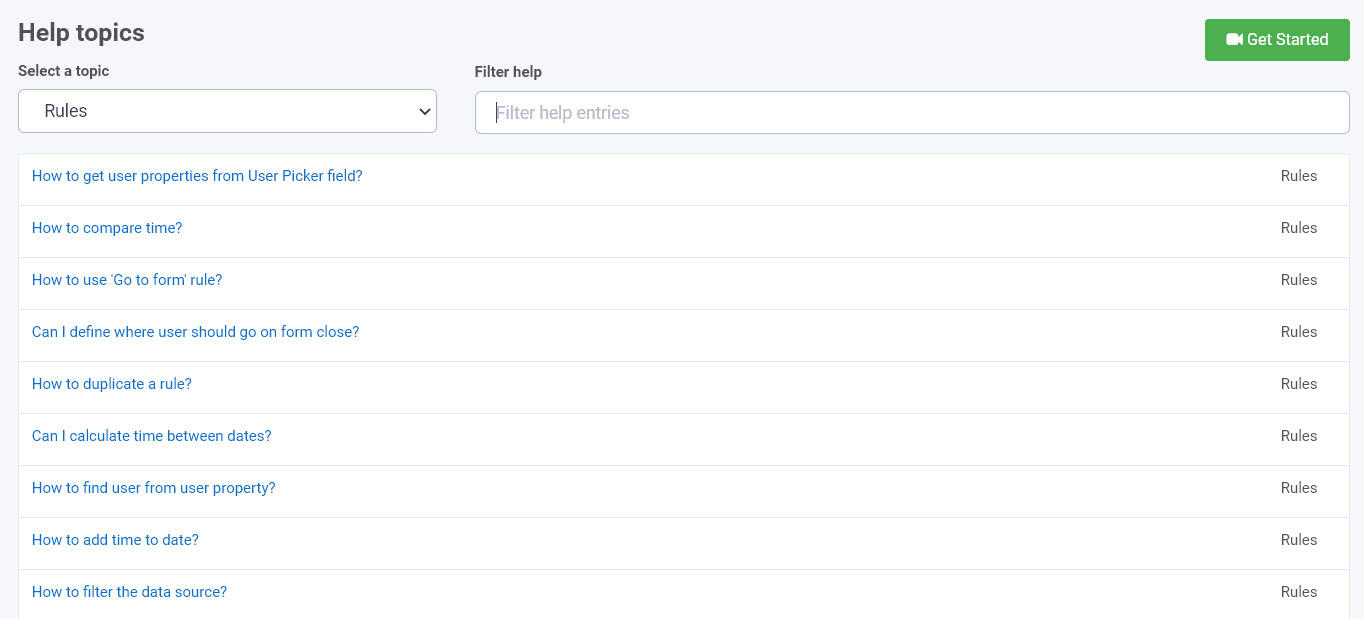
-
Create a further filter by typing your keywords in the Filter help box.
-
In addition to the FAQs, at any time you can play the Getting started video by clicking on the Get Started button  in the top right-hand corner.
Feedback
In addition to getting support, we welcome your feedback. Your thoughts and suggestions help us improve our platform and services. The feedback feature is available to users with a defined role, for example those who have the role Design business processes or Developer. This feature can also be used to submit new FAQs. To access feedback:
-
Go to More > Feedback in the left-hand pane.
-
Click on Submit new  and complete the feedback form, giving your feedback a title of choice and submitting feedback text.
-
Click on OK to submit your feedback or Close to close the dialog box.
Note: We also welcome feedback on this documentation. Please feel free to indicate if this or other pages are helpful by using the Yes and No buttons at the bottom of the page. Alternatively you can provide feedback/comments via GitHub by clicking on the documentation issue button  in the right-hand pane of this and other documentation pages.
What’s next
To read more about how to create processes and forms go to Application Designer.
To find out about other support, go to Support.
To find out about other platform features, go to Platform.
2 - Quick action menu
Introduction
The Quick action menu contains all the shortcuts that you need to manage your pages efficiently. The menu is found in the top right-hand corner of your Kianda workspace.
If you have an Administrator role you will see five buttons from your workspace home page, other roles will see three buttons listed below:
The buttons include:
- Create a new page
 Administrators can use this function to create a new dashboard page.
 - Edit current page
 Administrators can use this function to edit a dashboard page.
 - Online session refresh
 All users can use this function to refresh a session to allow offline use.
 - User notifications
 provides notifications to all users such as being assigned forms to edit or reassign.
 - User profile
 allows all users to change profile details, such as working offline or changing password.
Click on each link above to find out more about each button.
Create a new page
Administrators can create a new dashboard page that connects to a chosen process. Users can view this dashboard to monitor how processes are performing and gain business insights to improve the business.
-
Click on the Create new page button.
-
The Create dashboard page dialog box opens.
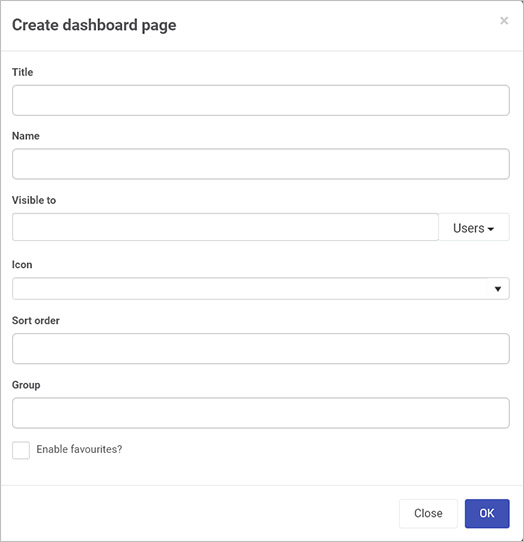
In this dialog box fill out the following fields:
-
Title - give the dashboard a title.
-
Name - this field is autofilled from the title field and creates a unique ID for the dashboard page.
-
Visible to - choose from Users and/or Groups of users who will see this dashboard. In this way you are setting the first level of security for the dashboard, see Dashboard security for more details.
-
Icon - choose from hundreds of icons to represent your dashboard in the left-hand pane.
-
Sort order - enter a numeric value to set the order of display in a dashboard group, for example a dashboard called Induction has a sort order value of ‘1’, while a dashboard called Annual leave has a value of ‘2’. The dashboards will display in chronological order according to the values associated with them.
-
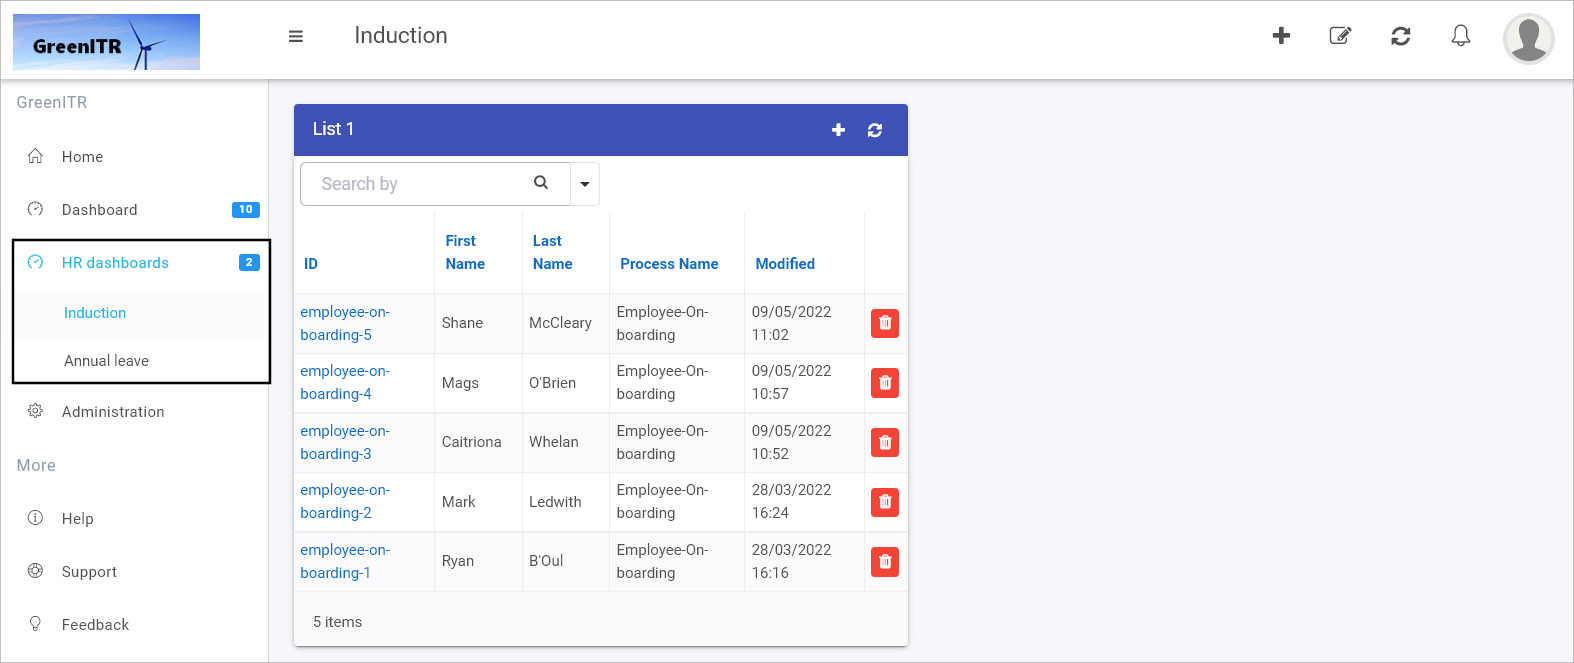
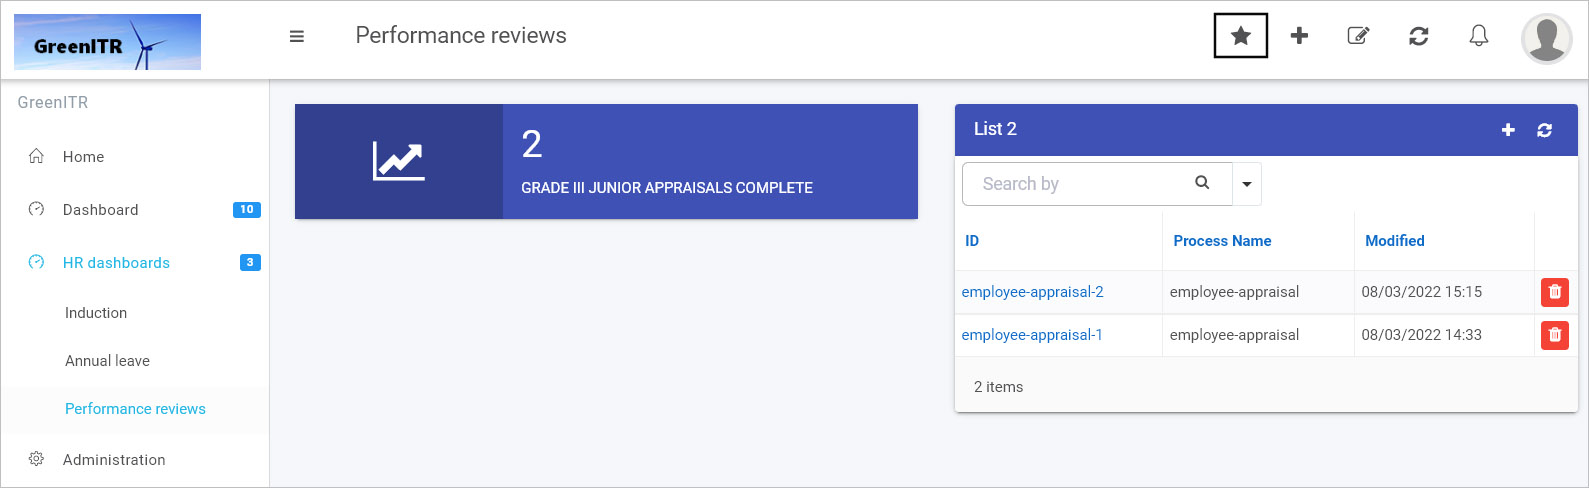
Group - choose an existing group or create a new group to add the dashboard to. As soon as two dashboard pages are added to a group, then the group will appear in the left-hand pane, for example see HR dashboards group below with 2 dashboards: Induction and Annual leave.
-
Enable favourites - allows you to set this dashboard as a ‘favourite’. If you check the checkbox, then users will see a Add to favourites button in the Quick actions menu, allowing them to add this dashboard to a ‘favourites’ catalog.
-
Click on OK when complete, or Close to exit the dialog box.
-
From there you are in the main dashboard view where you can add dashboard widgets to display lists or charts or edit the settings for the dashboard page. To find out more about dashboards, go to the Dashboards section of the documentation.
Edit current page
Administrators can edit an existing dashboard page by clicking on the dashboards button when on a selected page.
-
As an administrator, click on a dashboard page of choice displayed in the left-hand pane.
-
Click on the Edit current page button. You are then in Edit mode for the page recognisable by the widget menu, along with Settings for the dashboard and any widgets that exist.

-
In Edit mode you can add new dashboard widgets, edit Settings, or Delete the dashboard page. To read more about Edit mode go to Dashboards.
Online session refresh
You can use Kianda offline for example to view dashboards even without internet access. To synchronise dashboards with system data:
-
Click on the Online session button to synchronise data.
-
A Synchronising message appears, followed by a Ready for offline use notification.

-
You can view dashboards even without internet access.
Note: You can switch to offline mode by clicking on your profile and slide the work offline toggle to ‘on’ see User profile below.
User notifications
This icon alerts you when actions happen associated with processes, for example if a form has been assigned to you. Any new notifications will be seen as a number beside the user notification icon/bell symbol.

You will receive a configured message indicating the title of the notification and a short piece of text explaining what has happened, for example if a process design has been published and existing process instances have been updated, or the message could be as a result of a User alert rule as seen below. In this example, the user can click on the alert and they are brought to the form that they have to complete.

User profile
The information found under User profile includes your name, email, role for example Administrator, and options to update your information.
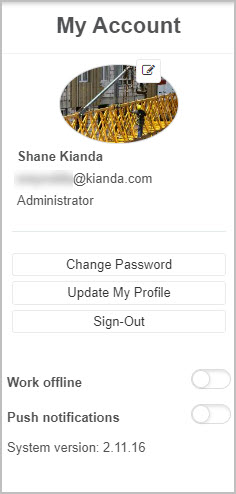
To update your information, you can:
-
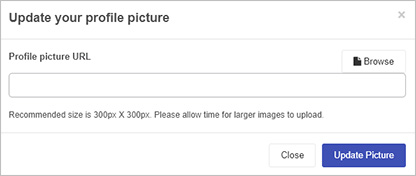
Add your photo by clicking on the Update profile picture button  then in the Update your profile picture dialog box browse for an image to add to the Profile picture URL by clicking on Browse. Note that the recommended size is 300px x 300px and larger images will take time to upload.
-
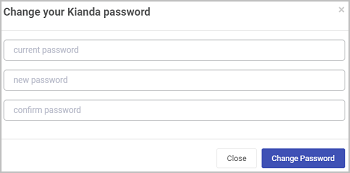
Change your password by clicking on Change Password. You need to type in your current password and then your new password twice and click on Change Password or click on Close to exit the dialog box.
-
Update your profile by clicking on Update My Profile. Type in your Job title, Department and Phone number and click on Update Profile or click on Close to exit the dialog box.
-
Logout of Kianda by clicking on Sign-Out. Then click on Ok to confirm that you want to logout or click on Cancel to exit the dialog box.
-
Work offline by clicking on the slider button, moving it across. When you do this you will get a message to say Offline mode is enabled.
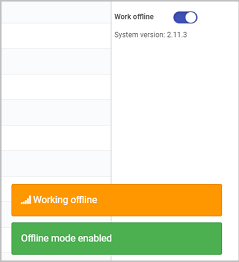
If you move the slider back then Offline mode is disabled.
-
View the system version of Kianda, for example System version 2.11.3 as shown in the image above.
-
Clicking on the Push notifications slider will enable push notifications to mobile devices and other devices where push notifications are applicable. For example, if you have a process that utilises an Alert rule, when push notifications are turned on, you will receive a notification similar to below.

-
Collapse account information by clicking on the User profile button again.
What’s next
To read more about how to create processes and forms go to Application Designer.
3 - Support
The Support function is available to users with a designated role, for example, Manage partners, Designer or Administrator and is found in the left-hand side pane, under More. This function allows you to log support tickets and view application logs.
How to get started
To use the Support function:
-
Click on More in the left-hand side pane and then click on Support.
-
You can view any current tickets or logs in the main view pane.
These are two main areas: Support tickets and Application logs. These areas are explained in more detail below.
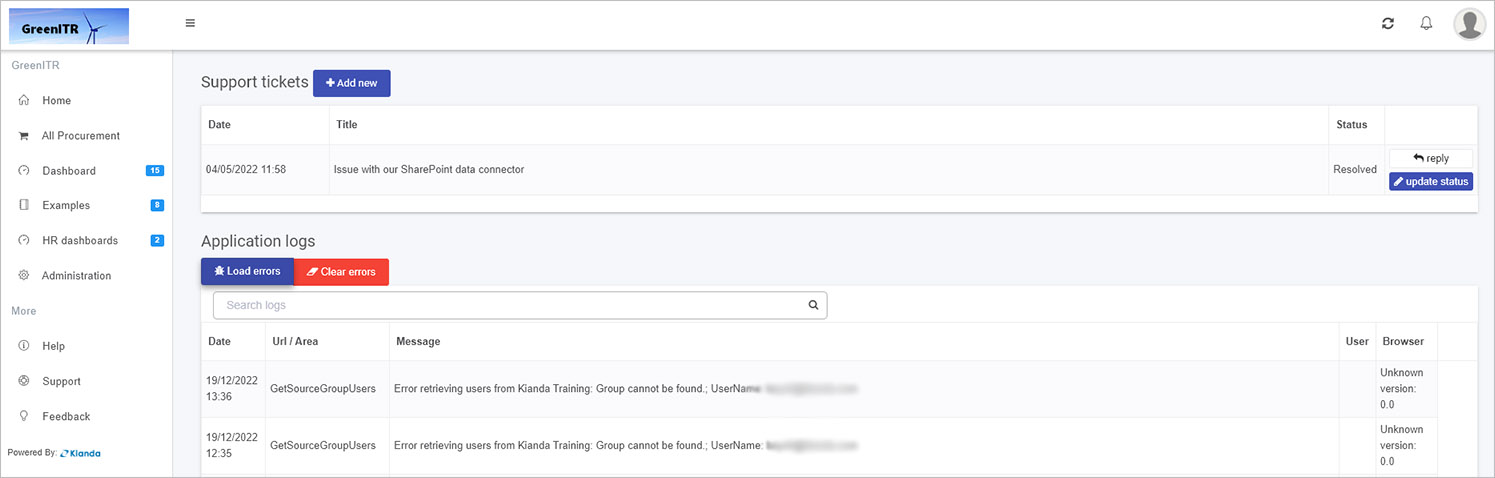
Support tickets
Support tickets can be raised and viewed through this area of the platform.
Existing support tickets appear within this section, showing the title of the ticket, date it was issued and status.
Existing tickets
-
Click on the name of a ticket to view ticket details, such as who raised the ticket and a description of the issue. The date and time that the ticket is raised is visible, along with the status of the ticket.

-
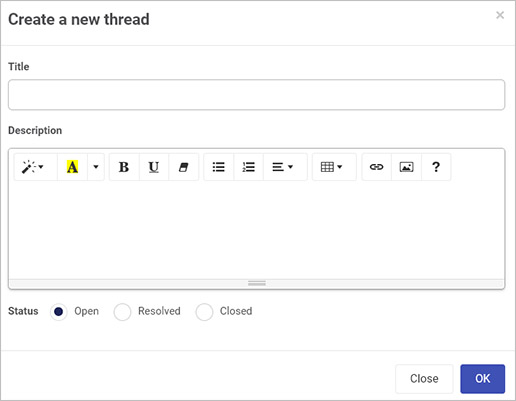
Click on update status to change the title of the field or update the status.
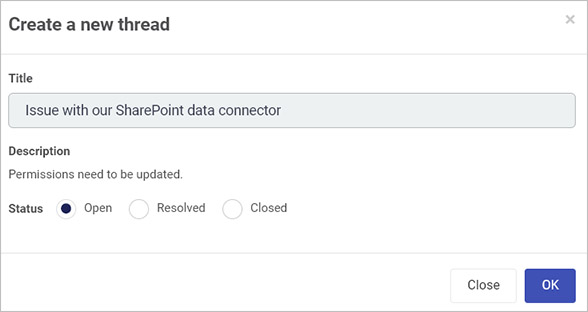
The Create a new thread dialog box showing the title and description. Here the status can be changed to become: Open, Resolved (resolved from the Kianda support side) or Closed (the customer is satisfied with the resolution and has closed the ticket). Click on Close to exit without saving or OK to submit changes.
-
Click on reply to add a comment to the ticket. The Post a reply dialog box opens.
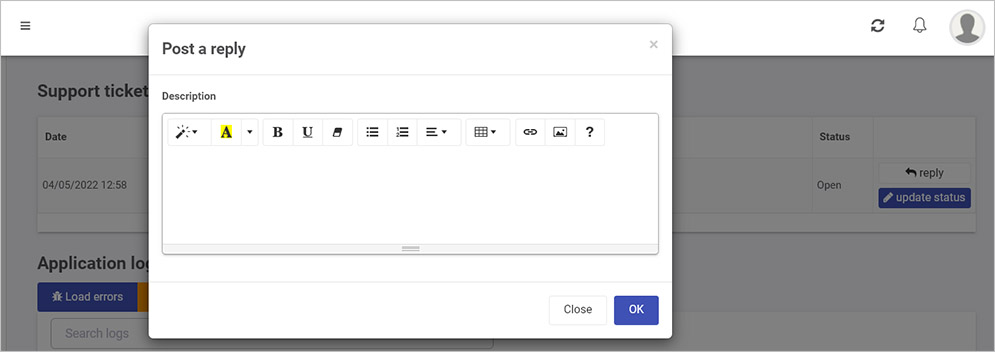
Here you can add a comment in the Description box which can be styled in various way, for example to change the font colour, paragraph layout, add tables, links or images. There is also a Help button  that gives you Keyboard shortcuts to change the style.
Click on Close to exit without saving or OK to submit changes.
To create a new ticket
-
Click on the Add new button.
-
In the Create a new thread dialog box, enter a Title, Description and set the ticket status, typically Open.
Application logs
System logs appear in this section when you click on Load errors. Logs are listed by date, url/area, for example a User update, a system generated Message, User and Browser involved in the log entry.
-
Click in the search box and enter text to search for logs based on key word entry.
-
If there are several pages of logs, click on the page number to see entries for that page.
-
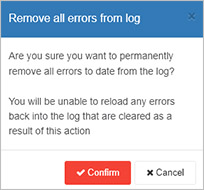
Click on Clear errors to clear all existing logs from the system. Any changes after this time will be added to the logs again and visible to users. To clear existing logs click on Confirm in the Remove all errors from log dialog box, or else click on Cancel to cancel the deletion.
What’s next
To read more about how to create processes and forms go to Application Designer.
To find out about other ways to get help and support, go to Help.