Rules
Business rules are what makes Kianda forms come alive. They represent the actual actions users intend to perform when they interact with form components. There are 60 rules you can apply to forms, see Rules list.
There are two key principles to consider when working with forms:
-
Rule design - you can decide what type of rule you are going to apply and where, as a rule can be applied at field/control level, form level and process level. For the latter the rule will execute ‘onload’ that is when the process instance is initiated.
-
Rule order - if there are several rules attached to an item like a button, then the order of execution is important and can be modified to suit your needs.
These principles are explained in more in the next section on How to get started.
How to get started
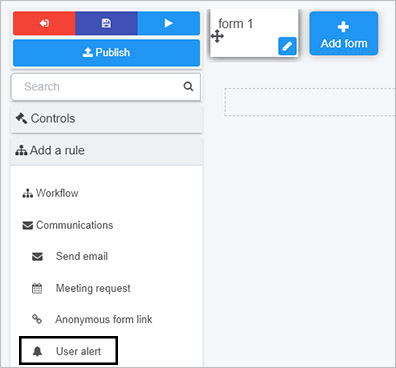
If you have the role Administrator or Design business process, go to Administration > Designer and click on a process or create a new process, the predefined rules are found in the left-hand pane under Add a rule.
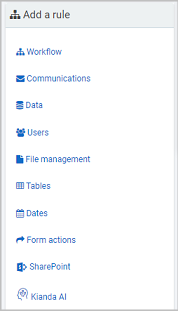
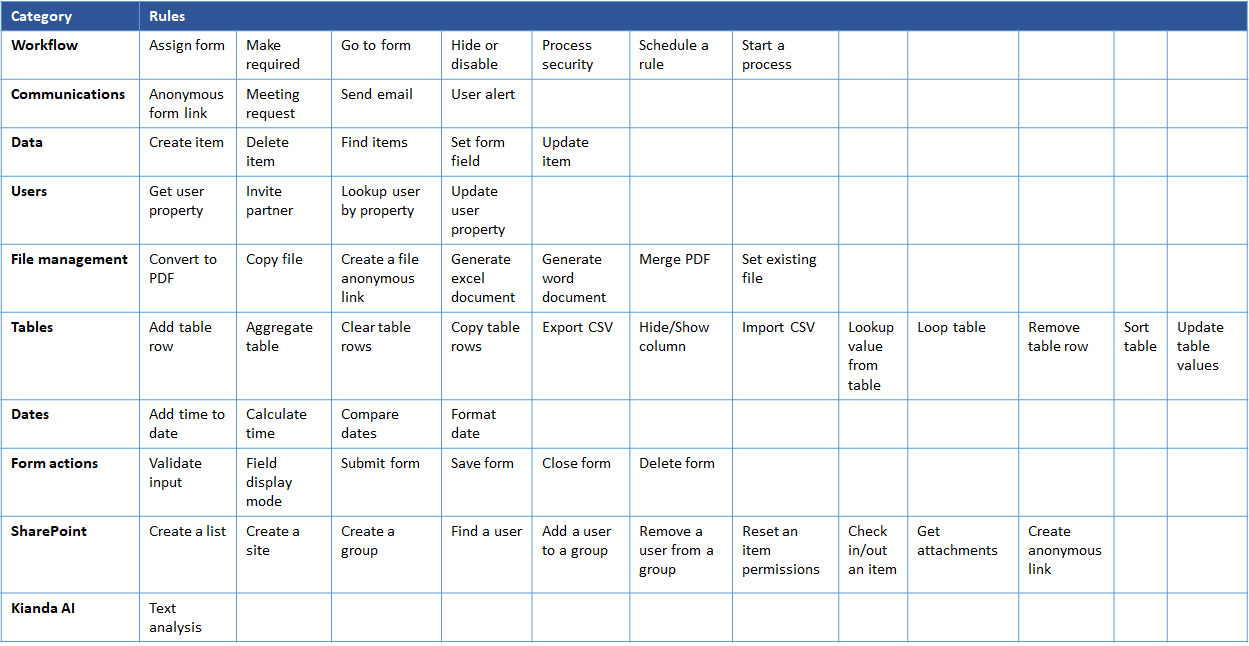
There are 10 categories of rules:
- Workflow - rules that represent the actions a user intends to perform when they interact with form components. These rules enable you to execute actions that can change the flow of information within a process. There are 7 workflow rules, see Workflow for more information.
- Communications - rules associated with user communication for example sending an email, meeting request or triggering a user alert. There are 4 communication rules, see Communications for more information.
- Data - rules associated with database operations such as Create, Read, Update and Delete (CRUD) allowing these actions to occur on configured data sources. There are 5 data rules, see Data for more information.
- Users - rules associated with user properties, allowing user lookup based on a user attribute or retrieve a user property. There are 4 user rules, see Users for more information.
- File management - rules concerned with generating documents such as Word, Excel or converting to PDF. There are 7 file management rules, see File Management for more information.
- Tables - rules associated with table operations such as sorting, copying table rows to another table, adding and removing table rows. There are 12 table rules, see Tables for more information.
- Dates - date rules to calculate time and format dates with advanced filter options like omitting weekends or special dates. There are 4 date rules, see Dates for more information.
- Form actions - rules linked to actions that are part of forms, for example submit, close or save. There are 6 form rules, see Form actions for more information.
- SharePoint - SharePoint associated rules such as adding, finding or removing users, defining permissions and check-in/checkout of an item. There are 10 SharePoint rules, see SharePoint for more information.
- Kianda AI - there is 1 Kianda AI rule related to text analysis, see Kianda AI for more information.
Rule design
You can apply rules at button, field, and form level. At form level, rule(s) execute ‘on load’, that is when a process instance is initiated or kicked off for example as a result of a user creating a new instance from a dashboard, or automated through a scheduled task, then the rules are triggered into action when the form(s) within that process becomes the active form(s).
To get started with rule design:
-
Click on an existing process or create a new process by going to Administration in the left-hand side menu and then click on Designer.
-
For existing processes and forms, decide which process, form or field you will apply the rule to by clicking on that item so that it is in edit mode so you can see the Pen button, Pen button
 for example a form Training Approval or Submit button. For new processes, add in forms and fields and select an element to add a rule to.
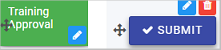
-
Click on Add a rule in the left-hand pane and click on a category of choice, such as Communications and then a rule, for example User alert.
-
When you have chosen your rule, an Edit rule dialog box opens allowing you to configure the rule to execute a particular action, which can be according to conditions if you wish.
The links at the end of this page will bring you to the different rule categories and from there you can navigate to rule pages to learn what each parameter is in the Edit rule dialog box for each rule. The next section highlights where rules can be applied.
Where to apply rules
As introduced in the section above, rules can be added at process, form and control/field level, and are typically used as follows, bearing in mind that Conditions can be applied to rules to control how the rules are executed:
-
A rule applied at process level executes ‘onload’ meaning that when a new process instance is initiated, the rule will automatically execute, for example when someone opens a form, a ‘Send email’ rule could be used to send an email to someone notifying them that a form has been opened.
-
A rule applied at form level executes when the form is submitted.
-
A rule applied at control level executes when the chosen field is clicked on, or involved in user or system interaction.
As with all rules, Conditions within the rule determine how the rule is triggered, for example a rule applied to a control like a date field, may be executed only if a certain value is input into another field within a form.
Edit rule dialog box
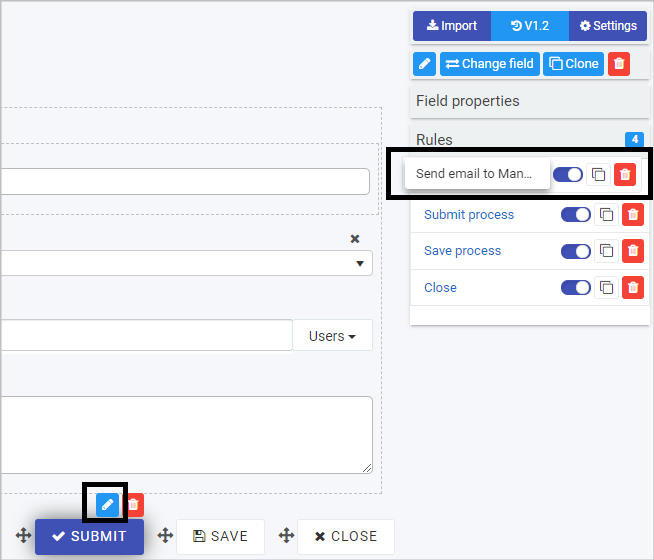
Whenever a rule is added, the Edit rule dialog box will remind you where and at what level the rule is being applied, for example in the image below a Send email rule is being added to a button/control called Submit.
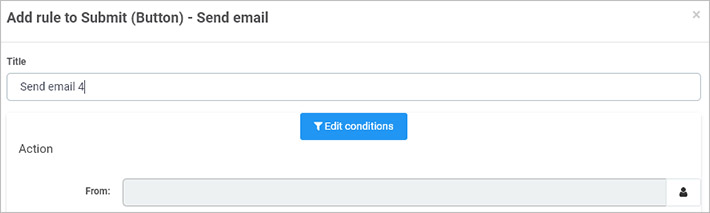
Note: Make sure that you save the process after adding forms and/or controls and before adding rules so that the names of the processes, forms or controls are committed to the Kianda database. Then the dialog box above can then retrieve the name(s) for use as shown above.
Rule order
If there is more than one rule for an item like a field or process, then the order of execution must be considered.
For example for a Submit button on a form, you may want a Send email rule to be executed first before any other rule is executed, that is an automated email will be sent before anything else. To ensure this happens, click on the Submit button to make sure you are in Edit mode, and under Rules in the right-hand pane, drag the Send email rule to the top of the list by clicking on the rule and dragging it to the top of the list of rules.
Go to Multiple rules to read more about using multiple rules on a field or other item.
Rules list
A full list of rules is available in the table below.
What’s next 
We have briefly introduced the concept of Rules. To read more about rules including each category of rules, click on the links below:
Feedback
Was this page helpful?
Glad to hear it! Please tell us how we can improve.
Sorry to hear that. Please tell us how we can improve.