Business rules are what makes Kianda forms come alive. They represent the actual actions users intend to perform when they interact with form components. There are 60 rules you can apply to forms, see Rules list.
There are two key principles to consider when working with forms:
Rule design - you can decide what type of rule you are going to apply and where, as a rule can be applied at field/control level, form level and process level. For the latter the rule will execute ‘onload’ that is when the process instance is initiated.
Rule order - if there are several rules attached to an item like a button, then the order of execution is important and can be modified to suit your needs.
These principles are explained in more in the next section on How to get started.
How to get started
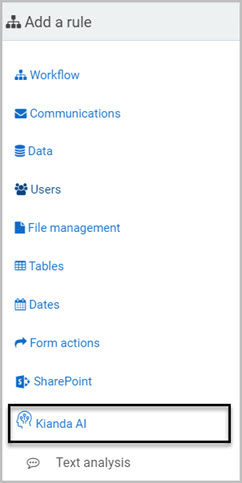
If you have the role Administrator or Design business process, go to Administration > Designer and click on a process or create a new process, the predefined rules are found in the left-hand pane under Add a rule.
There are 10 categories of rules:
Workflow - rules that represent the actions a user intends to perform when they interact with form components. These rules enable you to execute actions that can change the flow of information within a process. There are 7 workflow rules, see Workflow for more information.
Communications - rules associated with user communication for example sending an email, meeting request or triggering a user alert. There are 4 communication rules, see Communications for more information.
Data - rules associated with database operations such as Create, Read, Update and Delete (CRUD) allowing these actions to occur on configured data sources. There are 5 data rules, see Data for more information.
Users - rules associated with user properties, allowing user lookup based on a user attribute or retrieve a user property. There are 4 user rules, see Users for more information.
File management - rules concerned with generating documents such as Word, Excel or converting to PDF. There are 7 file management rules, see File Management for more information.
Tables - rules associated with table operations such as sorting, copying table rows to another table, adding and removing table rows. There are 12 table rules, see Tables for more information.
Dates - date rules to calculate time and format dates with advanced filter options like omitting weekends or special dates. There are 4 date rules, see Dates for more information.
Form actions - rules linked to actions that are part of forms, for example submit, close or save. There are 6 form rules, see Form actions for more information.
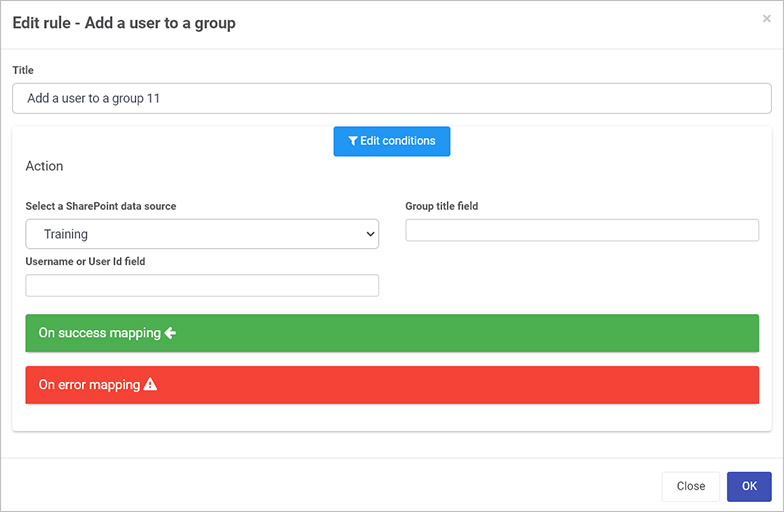
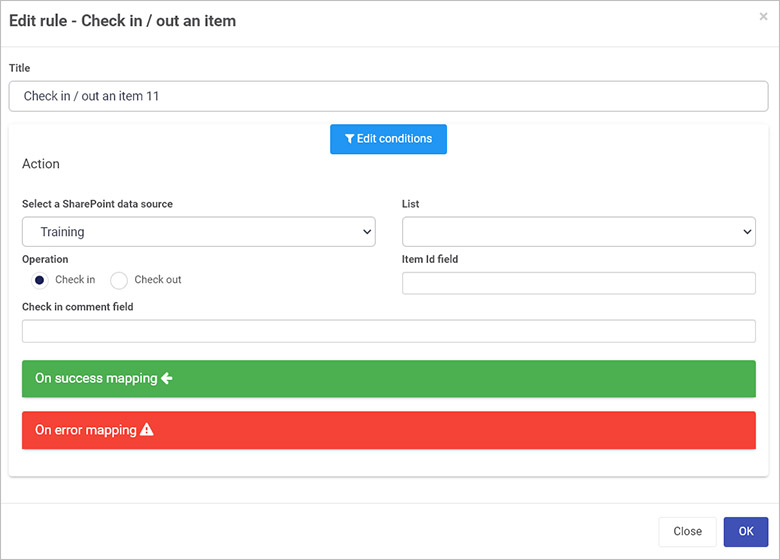
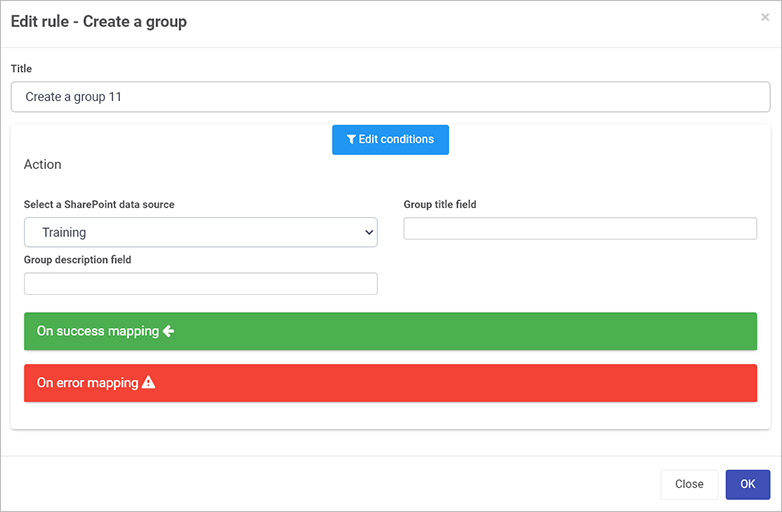
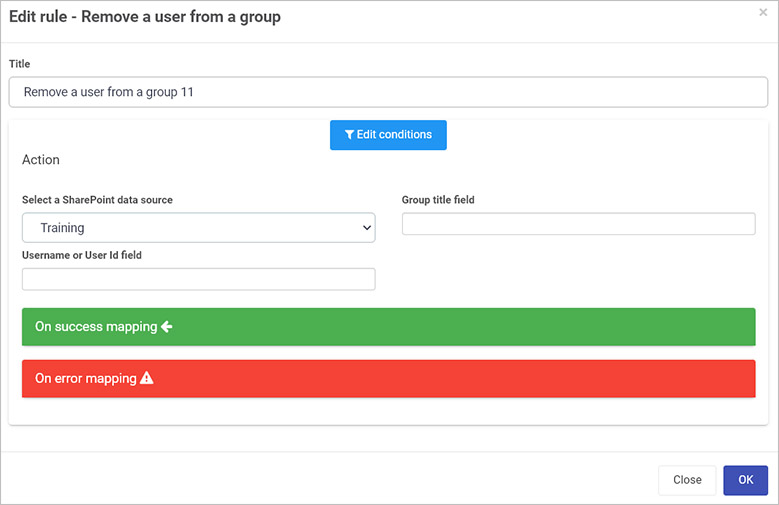
SharePoint - SharePoint associated rules such as adding, finding or removing users, defining permissions and check-in/checkout of an item. There are 10 SharePoint rules, see SharePoint for more information.
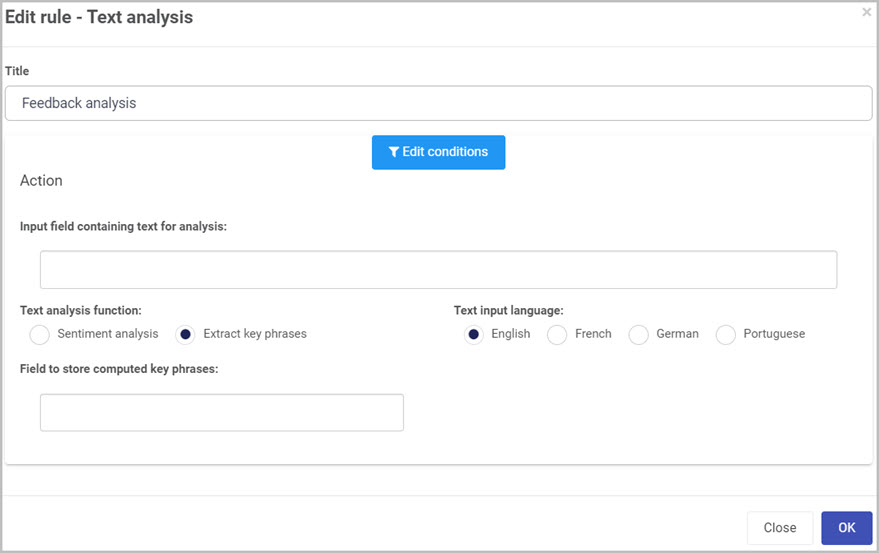
Kianda AI - there is 1 Kianda AI rule related to text analysis, see Kianda AI for more information.
Rule design
You can apply rules at button, field, and form level. At form level, rule(s) execute ‘on load’, that is when a process instance is initiated or kicked off for example as a result of a user creating a new instance from a dashboard, or automated through a scheduled task, then the rules are triggered into action when the form(s) within that process becomes the active form(s).
To get started with rule design:
Click on an existing process or create a new process by going to Administration in the left-hand side menu and then click on Designer.
For existing processes and forms, decide which process, form or field you will apply the rule to by clicking on that item so that it is in edit mode so you can see the Pen button, Pen button for example a form Training Approval or Submit button. For new processes, add in forms and fields and select an element to add a rule to.
Click on Add a rule in the left-hand pane and click on a category of choice, such as Communications and then a rule, for example User alert.
When you have chosen your rule, an Edit rule dialog box opens allowing you to configure the rule to execute a particular action, which can be according to conditions if you wish.
The links at the end of this page will bring you to the different rule categories and from there you can navigate to rule pages to learn what each parameter is in the Edit rule dialog box for each rule. The next section highlights where rules can be applied.
Where to apply rules
As introduced in the section above, rules can be added at process, form and control/field level, and are typically used as follows, bearing in mind that Conditions can be applied to rules to control how the rules are executed:
A rule applied at process level executes ‘onload’ meaning that when a new process instance is initiated, the rule will automatically execute, for example when someone opens a form, a ‘Send email’ rule could be used to send an email to someone notifying them that a form has been opened.
A rule applied at form level executes when the form is submitted.
A rule applied at control level executes when the chosen field is clicked on, or involved in user or system interaction.
As with all rules, Conditions within the rule determine how the rule is triggered, for example a rule applied to a control like a date field, may be executed only if a certain value is input into another field within a form.
Edit rule dialog box
Whenever a rule is added, the Edit rule dialog box will remind you where and at what level the rule is being applied, for example in the image below a Send email rule is being added to a button/control called Submit.
Note: Make sure that you save the process after adding forms and/or controls and before adding rules so that the names of the processes, forms or controls are committed to the Kianda database. Then the dialog box above can then retrieve the name(s) for use as shown above.
Rule order
If there is more than one rule for an item like a field or process, then the order of execution must be considered.
For example for a Submit button on a form, you may want a Send email rule to be executed first before any other rule is executed, that is an automated email will be sent before anything else. To ensure this happens, click on the Submit button to make sure you are in Edit mode, and under Rules in the right-hand pane, drag the Send email rule to the top of the list by clicking on the rule and dragging it to the top of the list of rules.
Go to Multiple rules to read more about using multiple rules on a field or other item.
Rules list
A full list of rules is available in the table below.
What’s next
We have briefly introduced the concept of Rules. To read more about rules including each category of rules, click on the links below:
1 - General rule concepts
Rules are an important component of any process as they can be used to trigger automated actions, requiring minimal user management once created. There are 60 predefined rules in Kianda covering workflow applications, communications and file management to name a few.
Categories of rules
Workflow - Enables you to execute actions that might change the flow of the information within a process.
Communications - Enables sending emails or meeting requests or even user (push) notifications.
Data - This is an important and flexible rule group because it allows you to configure CRUD (Create, Read, Update and Delete) actions to configured data sources.
Users - This enables you to retrieve a user property, updating user properties or lookup for a user based on a user attribute.
File management - Allows operations such as the generation of a word document and conversion to PDF and more.
Tables - Provides specialised rules to enable working with tables like sorting, copying table rows to another table and more.
Dates - Enables convenient date calculation with advanced options like ignoring weekends or special dates.
Form actions - Allows operations like submit, save, close and delete forms.
SharePoint - Provides a variety of operations to be performed on the SharePoint connection. These rules include operations like create a list, find a user, define permission to an item, check-in / out an item or adding a user to a SharePoint group.
Working with rules
The following headings step through how to view, add, copy, edit and disable rules in processes. It is also important to keep in mind how rules should be listed when multiple rules are used on the same field.
When to add a rule
to a field
to a form
to a process (the rule will run on load)
How to view a rule
If rules have already been created
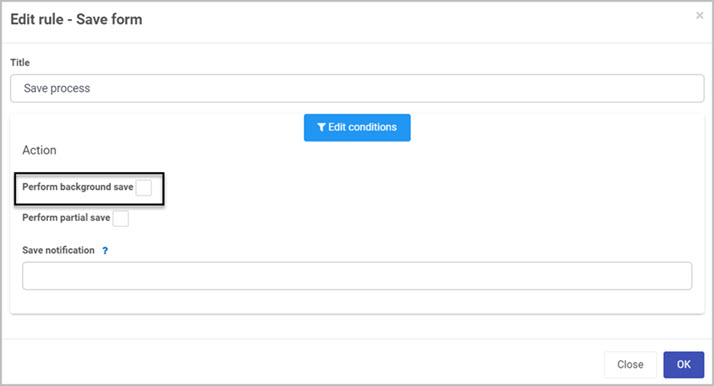
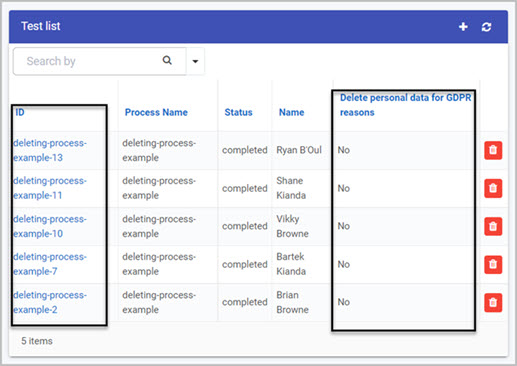
Select the field or form that contains a rule, for example a button at the end of a form. If a field within a form has rules attached to it, this will be indicated within the form, as shown in the example below where the column Instances has 1 rule attached.
Under Rules in the right-hand pane, click on the given rule name to view the rule details, for example a ‘Set form’ rule called ‘Set link’ as shown below.
Details of the rule are available in the Edit rule dialog box, for example the Set form field rule is shown below.
You can view rule conditions by clicking on Edit conditions and actions to be performed as part of the rule are under Action. Other features to note in the dialog box are:
Expression button used to add expressions to rules so that dynamic values can be returned based on calculations or form IDs, see Expressions for more details.
Mapping - mapping is used within rule actions, for example in the Set form field rule shown in the image above, the rule updates a form field based on a given value or expression. In many other fields mapping can be used to determine success or error during rule execution, see Success and error mapping for more details.
How to add a rule
To add a rule to a specific component:
Select the field you want.
Under Add a rule, select a category of rules, and then select the rule you want.
Edit the rule dialog box and click ‘OK’. The rule will be displayed on the right-hand side of the page.
How to copy a rule
Duplicating rules can be very useful where you have similar rules that are associated with different fields. To duplicate a rule:
Select the field with the desired rule.
Under Rules in the right-hand pane, click on the Duplicate rule button next to the rule name.
Choose Copy to another field if you wish to copy to another field and select the field you want to copy to. Select OK when complete.
Alternatively select OK without copying to another field or click on Close at any time to exit the dialog box.
Create or edit conditions for the rule by clicking on the Edit conditions button.
Change how the rule performs by changing details under Action. Actions will differ depending on the rule in use.
How to disable a rule
Disabling a rule means that the rule is not active but is still visible in the Rules pane. The rule can be activated at any time again by clicking on the toggle button.
Select the field that contains a rule, for example a button at the end of a form, or a field within a form that has rules attached.
Under Rules in the right-hand pane, beside the given rule name slide the toggle button from ‘on’ to ‘off’ to view the rule details, for example a ‘Set form’ rule called ‘Set link’ as shown below.
To enable the rule at any time again follow the steps above and slide the toggle button into the ‘on’ position.
Where to place a rule in a list of rules
The rule order refers to the order of execution of multiple rules. To change the rule order:
Select the field with the rules attached.
Under Rules in the right-hand pane, drag and drop the rules in the order you want them.
The top-most rule is the first rule to be executed. By default buttons at the end of a form will automatically have Submit, Save, and Close rules. If you create rules you may wish to have these rules placed above these shutdown rules so that your rules are executed first before form shutdown.
Note: Rule order becomes important when the output of one rule impacts the execution of another, for example if a process remains ‘open’ because a user must perform a particular action, then it is useful to have an automated email reminder sent to the user while the process is open. For example
the order of rules on a Submit button could be: Set Status, Send Email, Submit, Save, Close, whereby the status of the process instance is set first, before an automated email and then the form shutdown rules of Submit, Save and Close occur.
To read more about multiple rules, go to Multiple rules.
Conditions
Flexible and dynamic conditions form an important component to make forms fully dynamic. This feature enables you to create natural language conditions when rules should be triggered.
To configure a rule to conditionally execute an action:
Select the field or form that the rule will be attached to.
Under Add a rule in the left-hand pane, click on a category of rules, for example Workflow and then a rule itself, for example Process security.
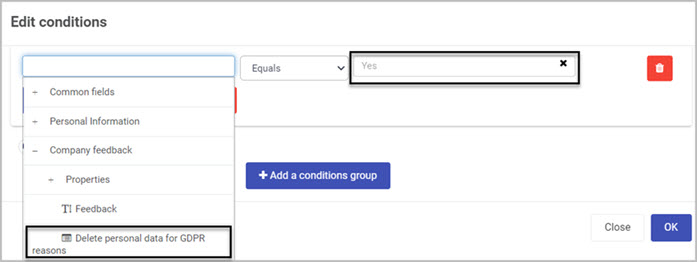
Click on Edit conditions button within the rule.
Add the conditions that satisfy your scenario. Multiple conditions can be grouped with condition groups.
For more information on Conditions, go to the Conditions page.
Custom rules
Under custom rules, you will find any custom-developed rules available under your developer section. Custom rules provide access to rules that are built for extensibility of Kianda capabilities. This is particularly used in situations when existing rules do not provide the required functionality.
Custom rules have the purpose of providing a user interface for the end-users. If you need to build a rule then you should use a custom rule widget.
It allows a developer to quickly build a reusable component that would then be used by process designers in real processes.
Check-out the development section for more details on how to build custom widgets in Kianda.
What’s next
We have briefly introduced the key concepts of rules. Click on the links below to read more about rule concepts in detail:
1.1 - Adding Conditions
Conditions are a key component of Kianda rules. They are the triggers that result in fully dynamic forms. Conditions enable you to create natural language conditions when rules should be triggered.
The Conditions button is found within all rules as well as dashboard widgets. Conditions can also be set when setting data source security levels for B2B portals.
Conditions add an important level of interactivity, creating dynamic pathways within a process. These pathways could result from user interaction or from other events that happen.
Conditions work on the ‘if…then’ principle: ‘if’ the condition exists ‘then’ an action happens, and where applicable, if the condition does not exist, then another action can happen. You can use these principles as steps to implementing conditions:
Create the condition(s)
Create the action(s) that will be applied as a result of the first condition being in place.
Where applicable, create the otherwise action(s) based on other conditions being in place.
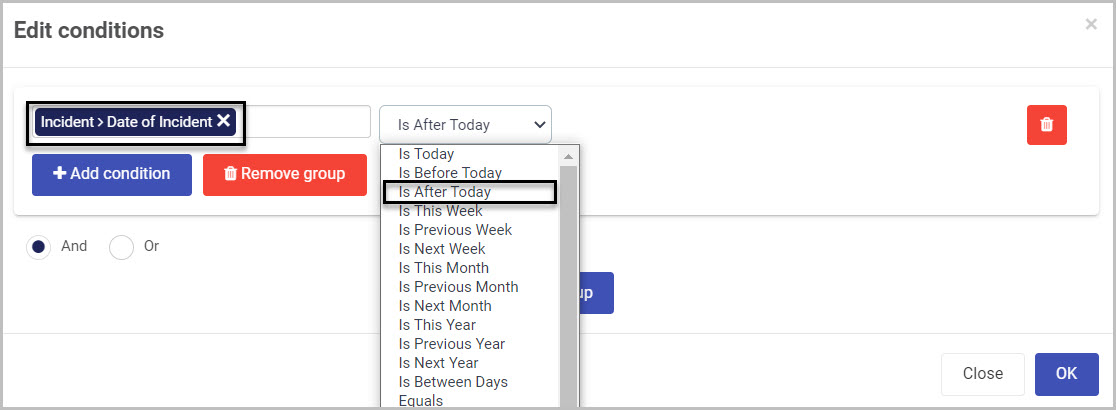
Create the condition
To create conditions, first choose the process element you want the condition to apply to – such as a form, set of forms, a field/control or set of fields. This could also be a set of common fields associated with all process instances, such as Process ID, Status or Modified by, see image below.
Next, depending on whether the rule is applied to text-based fields, date fields or user picker fields, choose from 13 text operators, 25 date operators and one additional user picker operator, as shown in the image below.
Then choose a value, this could be typed in text, number(s), date(s), form(s) or field(s).
Condition elements
In the case of multiple conditions, you can use And or Or to create a group of compound conditions:
The result is a flexible process workflow that will result in desired actions based on any number of conditions.
Rule action(s) – example Hide or Disable rule
To create actions and where applicable, otherwise actions, the action will depend on the rule that is chosen. All Kianda rules use a natural language structure to make it is easy to apply actions. For example, for the Workflow rule, Hide or Disable, you can choose forms and fields from your process and then apply seven possible actions (as shown below).
Action elements for Hide or Disable
The actions within Hide or disable are:
Hide will hide a process element (forms or fields) from view.
Show will show the element.
Disable blocks a user from editing an element.
Enable allows a user to add a value to an element.
Toggle visible will toggle between showing an element or not, based on subsequent clicks of a field that the rule is applied to.
Toggle enable will toggle between allowing an element to be edited or not, based on subsequent clicks of a field that the rule is applied to.
Hide and clear will allow you to hide a process element and clear the details. For example, if a toggle button has this rule applied, with an otherwise action of show on a textbox, then if one value is chosen on the toggle button, the user is allowed enter details into the textbox. The otherwise action is that the field is hidden and cleared of data, so that no data can be retrieved. This might be useful, for example, when sensitive information is used, like a social security number on a form.
Note: You can use rules to create actionswithout conditions too. In this case the rule will simply execute, for example when a form or field is clicked on.
What’s next
Depending on how the rule is applied, for example to a Submit button, the rule order is important to consider, see Multiple rules.
To find out more about rule implementation, go to the main Rules page and then click on the links to the different rule categories.
1.2 - Multiple rules
Introduction
When working with rules in forms, a key principle to consider is rule order. Rule order is important if there are multiple rules attached to an item like a button or form field to determine the sequence of rule execution. As a form designer, you can change the order of execution to suit your specific process design.
Remember you can assign rules at:
Process level - onload rules that execute when a new process instance is initiated.
Form level - onload rules that execute when a form is submitted.
Button/field level - rules attached to buttons or fields within forms, or at the end of a form, for example a Submit button. An example of rule order is given at this level in the section below Rule order example.
Rules are typically synchronously executed in Kianda, so for example when using a Start a process rule, when the rule is executed first any mappings from a secondary/target process are mapped into a primary process, and from there if there are any rules to trigger on the secondary/target process those are executed, but a rule will only execute when the previous rule has completed. This is different to asynchronous execution where the system will execute rules without waiting for the previous rule execution to finish. Within time defined rules, like Start a process and Schedule a rule there is an option to choose between synchronous/in-series or asynchronous/in-parallel where the latter may be useful for rules without dependency.
Rule order example
For example, you may want a process to send automated emails to a safety manager, where the email includes submitted form data. In this case a Send email rule could be attached to a form Submit button so an email is sent once the button is clicked. This will result in an automated email to a designated person. To generate a report of the completed form, you can use the Generate worddocumentrule triggered again when the Submit button is clicked. In this example the Generate word document rule has to be executed before the Send email rule, so that the Word document can be generated and then attached to the email.
The rule order consideration is therefore particularly important when rules are dependent on each other - where the output of one rule is the input of another rule.
Changing the rule order of multiple rules
In the example below we will look at changing the rule order of a Send email rule attached to a Submit button. The Submit, Save and Close buttons by default already have Submit, Save and Close process rules attached, in order to allow form shutdown.
To change rule order, when the rule is created:
Click on the item that has multiple rules attached, for example a Submit button. Remember by default Submit buttons in forms will have ‘form shutdown’ rules, namely Submit, Save and Close.
Click on Rules in the right-hand pane, drag the Send email rule to the top of the list by clicking on the rule and drag it to the top of the list, before Submit, Save and Close rules.
The video below shows an example of a Send email rule being created and saved. The rule is attached to the Submit button. Once the rule is created, by default the new rule goes to the bottom of the list of rules. To move the rule, simply click on it and drag it to where you wish to place it. In this example we want the email sent before any of the shutdown processes like Submit or Save, but after a Generate Inspection rule, so the output from that rule can be used in the Send email rule.
What’s next
To find out more about rule implementation, go to the main Rules page and then click on the links to the different rule categories.
1.3 - Expression builder
Introduction
Expressions allow you to put together form identifiers (form field IDs) and constants with operators and functions to return a dynamic value that can be used in various places – for example, in a form or field rule to automate processes.
Expressions
For example, expressions could be used in the body of an automated email sent using the Send email rule, as shown here:
Expression example
In the example above, [RequesterName] and [category] are identifiers, that are unique IDs for form fields. ProcessLink() is a function that will return a link to that process instance. Using the expressions above in an email will mean that every time an instance of the process runs, the values will be presented in an automated email, creating greater efficiencies and personalising the email for the recipient.
Getting started with expressions – example Email body text
Expressions are recognisable in Kianda from the Expressions button found in Edit rule dialog boxes and other menu items, such as enabling quick actions for processes and number fields.
Within rules, expressions can be created using the Expression builder where you can Add field to an expression or use the handy Reference guide to get a list of commonly used functions.
Expression builder
Let’s look at an example of using an expression in the Body section of an email being sent using the Send email rule:
First, add a Send email rule to a form or forms, field or fields by selecting Add a rule > Communications> Send email from the left-side pane.
Type in any text that you want in the email Body and position your cursor where you want to add the expression.
On the right of the Body section of the email, click on the Expressions button .
The Expression builder dialog box appears.
Click on the blank box under Add field to expression and find the field you want to reference in your email, for example, a text box with a name ‘EmployeeName’.
Click Add to expression. The result is that the field appears in the Expression box.
Click OK to add the expression to the email body text, or click on Close to exit the dialog box without making changes.
To add additional field expressions, click on the Expressions button again, under Add field to expression, click on X beside the field name to clear the expression box and then search for the desired field from a form.
To add a function, click on Reference and copy the function into the body of the email. A list of references are available below.
Expression functions
All JavaScript expressions and functions can be used in the Expression builder to create the impact you want, see Javascript expressions for more details.
In addition to defining your own expressions there is a set list of expressions found under References, see table below for meaning.
Expression
Function
+, -, /, *
Performs one of the basic mathematical operations: add, subtract, divide or multiply.
Sum(arg1, arg2, …)
Returns the sum of the arguments listed between the parentheses.
Date(arg1)
Converts the argument into a date.
DateAdd(dateArg, day, month, year, hour, min)
Adds time to a given date. The date is stored in dateArg and the time to be added is stored in the day, month, year, hour and min arguments.
Status()
Returns the status of the current process.
ProcessID()
Returns the ID of the current process.
FormOwner(formName)
Returns the form owner(s) for the given form.
FormCompleted(formName)
Returns the date completed for the given form.
Pad(value, size, symbol)
Adds left padding to the value with the symbol provided.
QueryString(parameter)
Returns the URL query string for the given parameter (or an empty string if undefined).
IsOnline()
Returns “yes” or “no” depending on the status of the online connection.
ProcessLink()
Returns the HTML link to the current process The link text can be added between the parantheses e.g. ProcessLink(“click here”). This expression is for use in emails and rich text fields.
Digest()
Returns a summary of changes to fields in the current process. A table will be given with the original and new values.
Digest(‘fieldName1’,‘fieldName2’)
Returns a summary of the changes for the given fields. See note below.
GetFieldText(‘fieldName’)
Returns the text in the given field. See note below.
GetFieldValue(‘fieldName’)
Returns the value in the given field. See note below.
Note: In the case of the last three expressions, you should select a field which contains data. If you give the name of a button field for example, then no data will be returned.
What’s next
To find out more about rule implementation, go to the main Rules page and then click on the links to the different rule categories.
To see how expressions are used in controls such as Number fields, go to Number control.
To learn more about how to use JavaScript expressions in expression builder go to Javascript expressions for more details.
1.4 - Success/Error Mapping
Introduction
Success and Error mapping is used to denote the success or failure of certain rules being executed where data is being transferred or a rule is connected to a data connector. As a user with an administrator or designer role, you can use Kianda Designer to populate fields within the Kianda form, using the Edit rule dialog box to set parameters for success and error mapping.
When to use
Success and Error mapping should be with rule execution, displaying values that you want for rule execution success or failure.
You can use mapping with the following rules:
Data rules > Find items
Data rules > Create item
Data rules > Update item
Data rules > Delete item
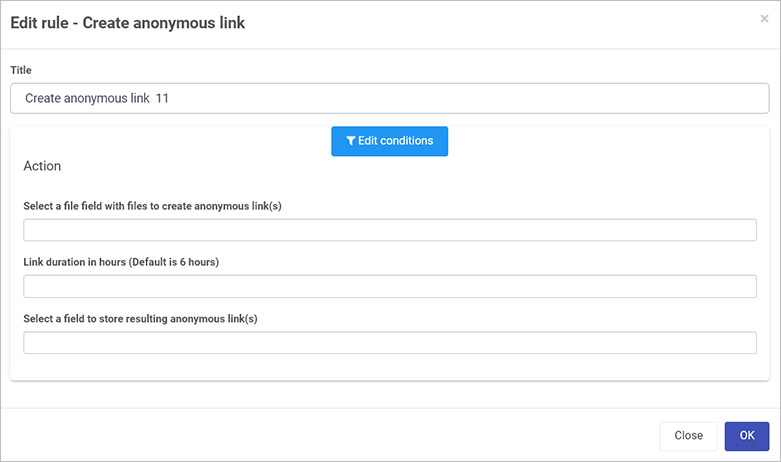
All SharePoint rules, except Get attachments and Create anonymous link
How to use
Select the field that will have the rule attached, for example a button at the end of a form, or a field within a form.
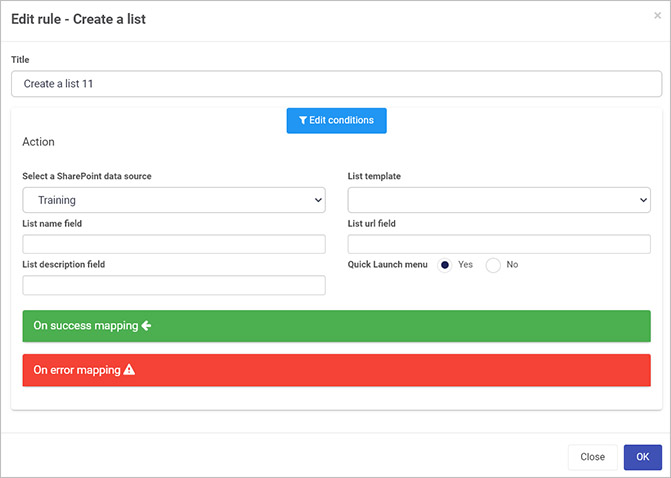
Click on Add a rule in the left-hand pane and select one of the rules that uses mapping as shown in the When to use list above, for example the SharePoint rule called Create list, used to create a list in SharePoint dynamically using Kianda form data.
In the Edit rule dialog box, give the rule a Title.
If you want to add conditions for the rule, click on the Edit conditions button to create conditions for the rule, see Conditions for more details.
Under Action, click on the field Select a SharePoint data source from the drop-down list.
Fill out any additional fields as necessary, for example to create a list the following fields must be completed:
List template - choose from a list of SharePoint list types
List name field - choose a form field that will be used the create a name for the list in SharePoint
List url field - choose a form field that will be used in the creation of a URL within SharePoint
List description field - choose a form field that describes what the list is about
Quick Launch menu - options are Yes or No. Choosing Yes allows the created list to be displayed in the Quick Launch menu, containing a link to the list.
To add success mapping, click on On success mapping and click on the Add mapping button. See On Success Mapping for more details.
For On error mapping and click on the Add mapping button. See On Error Mapping for more details.
you simply need to select the field within the form which will store the error message
When you are finished editing the dialog box, click on OK or click on Close at any time to exit the dialog box.
On Success Mapping
Success mapping is a concept of populating your form fields with data that is retrieved from a datasource using a data connector, to learn more about data connectors go to Data connectors. This retrieved data from the datasource is known as a response. Using this response data, you can populate a field within your form, for example you can retrieve a file which is stored in your SharePoint or Dropbox datasource and populate the retrieved file into a File field. This will give you the ability to access the retrieved file in your process.
All data connectors within Kianda may have different response data that can be used to populate fields in a form. You can use the Success mapping in the rules mentioned in the When to use section. Take one of the SharePoint rules Create a site as an example. When all information is filled out in the rule, in the On success mapping section you can assess the data object (response) called Site properties. From the Site properties data object you can access three different pieces of data; Site Name, Site Id and Site URL. You can map (populate) those piece of data into fields in your form by selecting a field in the Form field section:
Form field - this field allows you to select a field in your form to store the value from the datasource.
Data source field or text - this field allows you to select which piece of data your want to retrieve from the datasource, and store it in a form field.
Add mapping - Click on the Add mapping to add more fields for mapping results from the datasource to form fields.
Bin/Trash - Click on the Bin/Trash button to delete a mapping.
On Error Mapping
Error mapping is a concept of populating a form field in your Kianda process when using the rules from the When to use section. When using those rules, you get presented with the ability to map an error when there is an issue as the rule is executing, for example incorrectly filling out a parameter. It is useful to know the details of the error message that comes from the datasource your are connecting with. To see the error message, you need to create a separate Text box field in your form and map the error to that field. Open the On error mapping section and add a mapping by clicking on Add mapping button:
In the Form field, select a form field which will store the error message in your Kianda form.
In the Error message or text field, enter an error message that you want to appear in the event of errors or click on the text box and select the Error message option to use a system generated error indicating what has gone wrong when the rule executed.
Click on the Add mapping button to add further mappings.
Click on the Bin/Trash button to delete a mapping.
What’s next
To find out more about rule implementation, go to the main Rules page and then click on the links to the different rule categories.
2 - Workflow rules
Workflow rules is one category of rules that relates to user interactions with form components. Using Workflow rules will allow you to change the flow of information within a process. For example in a simple Training Process that is made up of three forms by default, the first form in a process is the current form.
In the example above, the workflow for this process would be completion of the forms in this order: Training Request > Training Approval > Training Attendance, however using Workflow rules, you could use Go to form to force the Training Attendance form to be the current form after the Training Request form has been completed.
You could also use the Assign form rule to assign editing rights to particular users so they can edit forms. See more about Go to form and Assign form below.
Using rules in this way changes the flow of the process, and additional levels of security and user interaction can be added using Process security and Hide or disable see below.
Getting started with Workflow rules
If you have the role Administrator or Design business process, go to Administration in the left-hand side menu and then Designer and click on an existing process or create a new process. Then decide on a form or field to add the rule to by clicking on that item and click on Add a rule.
The Workflow rules are found in the left-hand pane when you click on Workflow.
There are seven types of Workflow rules as follows:
Hide or disable
This rule is used to hide, disable, show or enable one or more fields, one or more sections or entire forms. This rule has special meaning in terms of workflow allowing the application to direct user action and flow by hiding or showing entire sections of the application.
Make required
Use this rule to make individual fields required or entire forms. Unlike the field property ‘Required’, this rule will dynamically allocate a mandatory status on chosen forms or fields, that users must complete and submit.
Go to form
Go to form rule navigates the user from the current form to the destination form. This rule could also set the destination form’s display mode.
Assign form
This rule enables dynamic form ownership and form security assignment of a form owner by assigning a user or a group to a form. You could also choose to override or append the form owner. By default only form owners can see the form in edit
Process security
This rule defines the security of the entire process instance (record). Using this rule, you could add any user or group with the right permissions to view/update any instances.
Start a (sub) process
Start a process rule helps you create a new instance of the same process or a different process. You could also map the inputs from the current instance to a new instance.
Schedule a rule
This rule helps you schedule a rule/rules to be triggered one time, with a recurring schedule or immediately. For example, this rule could be used to schedule a daily reminder email to a user if the task is not complete.
What’s next
We have briefly introduced each of the six types of Workflow rules. Now let’s look at each of these types of rules in more detail:
2.1 - Show, hide or disable
Introduction
Use the Hide or Disable rule to hide, disable, show or enable a field or a component in a Kianda form. This rule is very useful if you want different parts of a form, a complete form or multiple forms, to appear or hide based on how the form user completes the form.
There are seven possible actions within this rule that can be applied to fields or forms:
Hide from the user (not visible)
Show to the user (visible)
Disable for the user (not enabled)
Enable for the user (enabled)
Toggle visible: toggle between visible and not visible
Toggle enable: toggle between enabled and not enabled
Hide and clear: hide from the user (not visible) and clear the contents
When to use
You can add this rule:
to a field
to a form
to a process (the rule will run on load)
How to get started
The following steps illustrate a scenario to hide and show fields. The same steps can be applied to enable, disable, toggle enable and so on. To dynamically hide a field:
If you have the role Administrator or Design business process, go to Administration > Designer, open an existing process or create a new process and decide which form or field you will apply the rule to, by clicking on that item so that it is in edit mode so you can see the Edit/pen button, Pen button .
Click on Add a rule > Workflow > Hide or Disable.
In the Edit rule - Hide or Disable dialog box, give the rule a title in the Title field.
If you want to add conditions for the rule, click on the Edit conditions button to create conditions for the rule, see Conditions for more details.
Under Action create one or more actions for the rule by clicking on the empty field to add a form or form field, and then choose an option from the action drop-down list, choosing from Hide, Show, Disable, Enable, Toggle visible, Toggle enable, or Hide and clear, see Introduction for an explanation of each action.
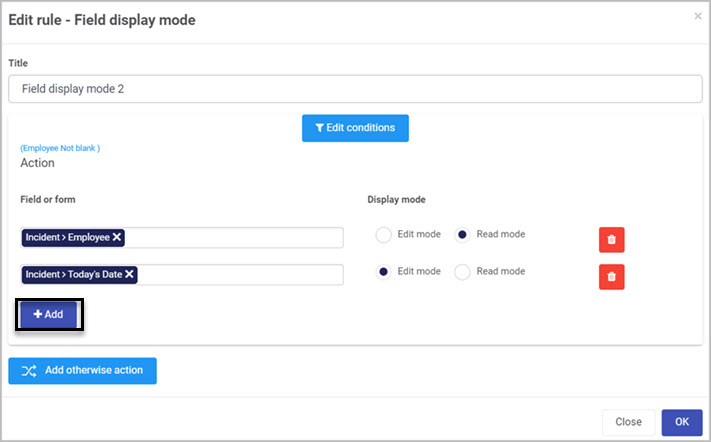
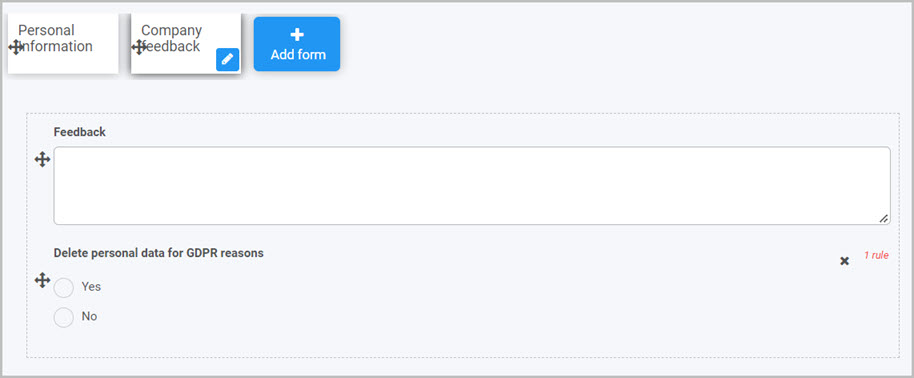
For example in the image above, a Feedback field will be hidden, using Hide, based on a condition, when a field Management decision equals a value ‘Yes’.
To add more actions, click on Add. At any time remove an action by clicking on the Bin/Trash icon beside the name of the action.
Just like an ‘if..else’ statement, you can add alternative/elsewise actions, based on different conditions by clicking on Add otherwise action.
In the example above, Signature and Training materials field will show and a Feedback field will hide, while a Management decision field has a value of Yes, otherwise the shown fields will hide, while the Feedback field shows No. The result is a dynamic form that will reveal particular fields based on user input for the Management decision field.
To remove the otherwise action(s), click on the Remove otherwise action fields.
When you are finished editing the dialog box, click on OK or click on Close at any time to exit the dialog box.
If the rule is attached to a field within a form, a rule notification will appear within the form design, for example a rule is applied to the field Management decision as shown in the image below.
When you click on the field or form that has the rule attached, the rule will appear in the right-hand pane under Rules.
The next section will cover how to use the buttons visible in the right-hand pane to manipulate the rule.
Editing, deleting or duplicating rules
When you have clicked on an existing rule, and the rule is visible in the right-hand pane under Rules, there are a number of options available to you.
To disable a rule, click the slider across beside the rule name.
To copy a rule, click on the Duplicate button beside the rule name.
To delete a rule, click on the Bin/Trash button .
To view a rule, click on the rule name to open the Edit rule dialog box.
User tip
Note, it is not necessary to add a condition to the rule. In this case the rule will be triggered automatically:
if the rule is applied to a field, then the rule will be triggered when the user enters a value in that field.
if the rule is applied to a button, then the rule will be triggered when the user clicks the button.
if the rule is applied to a form, then the rule will be triggered when the form is submitted.
if the rule is applied to a process, then the rule will be triggered on load, that is when the process is initiated.
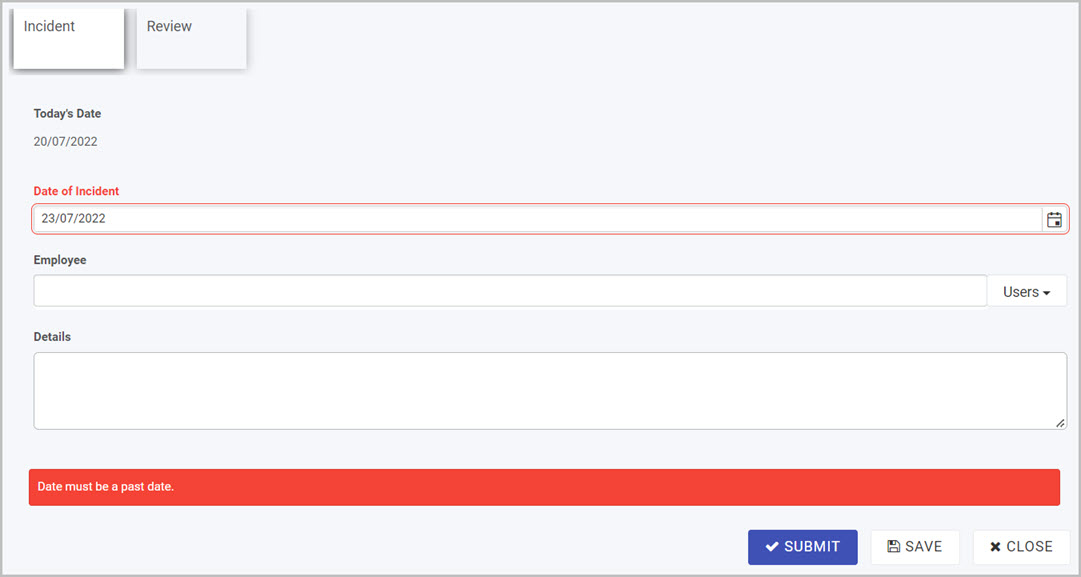
If a rule causes a mandatory field to be hidden or disabled, this will not stop the form from being submitted.
What’s next
To find out more about other workflow rules go to Workflow.
The Make required rule is used to dynamically make form elements required or mandatory for users to fill in, or not required or to toggle between both states.
It is possible to make fields statically mandatory for users to fill in by checking the Required property for the field. However using this rule gives a greater degree of flexibility to cause an action based on user input using a Condition.
Take the example of a feedback form, where there is an option for a customer to fill in their name or not. If they do fill in their name however, then a Customer Account Number field becomes mandatory.
As soon as Maddie fills out her name in the example above, then and only then the Customer Account Number becomes required, indicated by an asterix. This rule could be combined with Hide or Disable rule to make fields appear/hidden based on user input.
When to use
You can add this rule:
to a field
The rule can be added at other levels (process, form), but it is most commonly used in the method outlined in the Introduction.
How to get started
To dynamically make a field required:
Click on an existing process by going to Administration > Designer and decide which form, or field you will apply the rule to, by clicking on that item so that it is in edit mode so you can see the Edit/pen button, Pen button .
Click on Add a rule > Workflow > Make required.
In the Edit rule - Make required dialog box, give the rule a title in the Title field.
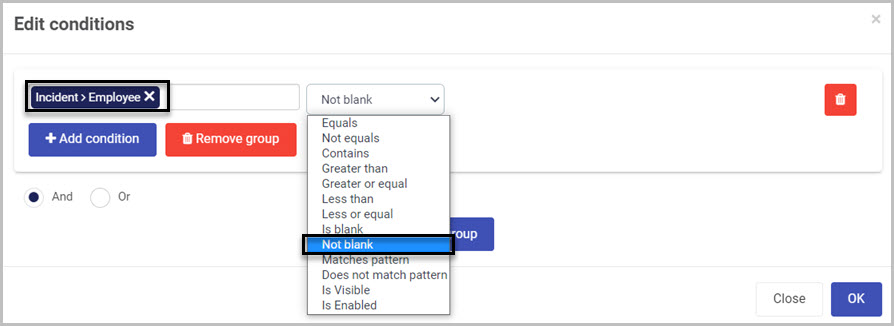
To add conditions for the rule, click on the Edit conditions button to create conditions for the rule, see Conditions for more details.
For example to make one field required based on another field being completed, the condition would look like this:
As shown on the Conditions page there are a multitude of options to choose from where Not blank is just one option shown above.
Under Action create one or more actions for the rule by clicking on the empty field to add a form or form field, and then choose an option from the action drop-down list, choosing from Required, Not required or Toggle required.
Using the example from the Introduction, where a condition is used that if one field is not blank, then another becomes required would look like this:
To add more actions, click on Add. At any time remove an action by clicking on the Bin/Trash icon beside the name of the action.
When you are finished editing the dialog box, click on OK or click on Close at any time to exit the dialog box.
If the rule is attached to a field within a form, a notification will appear within the form design, for example the field Customer name as shown in the image below.
When you click on the field or form that has the rule attached, the rule will appear in the right-hand pane under Rules.
The next section will cover how to use the buttons visible in the right-hand pane to manipulate the rule.
Editing, deleting or duplicating rules
When you have clicked on an existing rule, and the rule is visible in the right-hand pane under Rules, there are a number of options available to you.
To disable a rule click the slider across beside the rule name.
To copy a rule, click on the Duplicate button beside the rule name.
To delete a rule, click on the Bin/Trash button .
To view a rule, click on the rule name to open the Edit rule dialog box.
What’s next
To find out more about other workflow rules go to Workflow.
The Go to form rule is used to control how a user moves between forms. As mentioned in Form basics, by default the first form in a process is the current form. Once submitted, control passes to the next form and the user is not allowed to go back to the previous form. The Go to form rule allows you to redirect the user to any form. The user can then navigate back and forth between those forms.
When to use
This rule can only be added to a button.
Warning!
The Close form and Go to form rules cannot be applied to the same button as both rules control which form comes next.
The Save form rule must be used and must appear before the Go to form rule in the list of rules.
How to get started
To dynamically redirect a user to a form:
Click on an existing process by going to Administration > Designer and decide which form, or field you will apply the rule to, by clicking on that item so that it is in edit mode so you can see the Edit/pen button, Pen button .
Click on Add a rule > Workflow > Go to form.
In the Edit rule - Go to form dialog box, give the rule a title in the Title field.
If you want to add conditions for the rule, click on the Edit conditions button to create conditions for the rule, see Conditions for more details.
Under Action, create one or more actions for the rule by filling out the following:
Select form - click on the field and select a form from the process.
Display mode - choose from:
Auto - the display mode will be either edit or read as determined by the system. If the destination form is the next form in the process workflow, and if the user is an owner of the form, and the form is not completed, then the form will be displayed in edit mode. Otherwise the form will appear in read mode.
Edit mode - the user will be able to edit the destination form.
Read mode - the user will be able to read, but not edit, the destination form.
Set as current form - choose from the radio buttons Yes or No. If you choose Yes this will change the process flow, forcing the selected form to become the current, active form.
For example in the image above of an IT Support process, there are a number of forms, one of which is User Review. In Kianda Designer, the Go to form rule is assigned to a Resolved button in the 1st Level Support form, meaning that the User Review form becomes the next active form, not the 2nd Level Support form although it is the next form in the process workflow.
When you are finished editing the dialog box, click on OK or click on Close at any time to exit the dialog box.
Remember this rule can only be attached to a button. When you click on the button, the rule will appear in the right-hand pane under Rules.
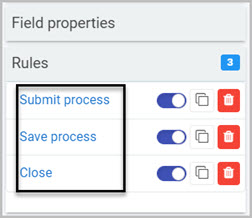
See example above, for a Go to form rule, called ‘Go to User Review’ for a resolved button. Note there are 11 rules attached to that button so the order of execution is important, go to Multiple rules to learn more about how to change rule order.
The next section will cover how to use the buttons visible in the right-hand pane to manipulate the rule.
Editing, deleting or duplicating rules
When you have clicked on an existing rule, and the rule is visible in the right-hand pane under Rules, there are a number of options available to you.
To disable a rule, click the slider across beside the rule name.
To copy a rule, click on the Duplicate button beside the rule name.
To delete a rule, click on the Bin/Trash button .
To view a rule, click on the rule name to open the Edit rule dialog box.
What’s next
To find out more about other workflow rules go to Workflow.
The Assign form rule is used to assign a form to a user or to a group of users, making them the form owners. This means that when a process instance is created, a form owner can edit the form in the process instance, for example a manager who needs to add comments on an appraisal form that has been submitted by an employee.
You can use this rule to override the existing form owners, or to add users or groups to the list of existing form owners. When assigning forms you can choose from:
Any user - choose from any user, groups or partners defined in the system
Current user - make the current form user, the form owner
Defined in a user field - use a selected user/group/partner chosen in a user picker field
Form owner(s) - existing form owners as defined in the form configuration
When to use
You can add this rule:
to a field
to a form
to a process (the rule will run on load)
How to get started
To dynamically assign a form to a user:
Click on an existing process by going to Administration > Designer and decide which form, or field you will apply the rule to, by clicking on that item so that it is in edit mode so you can see the Edit/pen button, Pen button .
Click on Add a rule > Workflow > Assign form.
In the Edit rule - Assign form dialog box, give the rule a title in the Title field.
If you want to add conditions for the rule, click on the Edit conditions button to create conditions for the rule, see Conditions for more details.
Under Action, create one or more actions for the rule by filling out the following:
Select form - click on the field and select a form from the process. Click on the Plus/Add button to add more forms to assign. If you change your mind and want to delete a form, click on the Bin/Trash button .
Assign to - choose from the radio buttons:
Any user - choose from Users, Groups and/or Partners in the drop-down list. All users and groups must be predefined in the system, see Users and Groups for more details. Partners must also be predefined within the Invite partners section under Administration.
Current user - make the current user of the form, whoever is submitting or saving information, as the person that the form(s) is/are assigned to.
Defined in a user field - choose a user picker field from the process, where the selected users, groups or partners will have the forms assigned to them.
Form owner(s) - selecting this option means that the form owner(s) defined during form creation/editing will have the form(s) assigned to them, see Form owners for more details on what form ownership is and how to create form owners.
Depending on the option chosen for Assign to, different fields will display. For example if Any user is chosen, then a Select user(s) field appears as shown in the image above. If Defined in a user field or Form owner(s) is chosen then a Select form field appears prompting you to select a user picker field for the former, and a form with form owners for the latter. For example, in the image below a user from a field called Requester will become the form owner of a form called User Feedback.
Existing user(s) - choose from:
Override - this means that this rule will override form ownership, making those referenced in the Edit rule dialog box, the form owners.
Append - this means that for a current list of form owners, for example those defined during form creation, that list will be appended with any users referenced in the Edit rule dialog box.
When you are finished editing the dialog box, click on OK or click on Close at any time to exit the dialog box.
If the rule is attached to field within a form, a notification will appear within the form design, for example the field Management decision as shown in the image below.
When you click on the field or form that has the rule attached, the rule will appear in the right-hand pane under Rules.
The next section will cover how to use the buttons visible in the right-hand pane to manipulate the rule.
Editing, deleting or duplicating rules
When you have clicked on an existing rule, and the rule is visible in the right-hand pane under Rules, there are a number of options available to you.
To disable a rule, click the slider across beside the rule name.
To copy a rule, click on the Duplicate button beside the rule name.
To delete a rule, click on the Bin/Trash button .
To view a rule, click on the rule name to open the Edit rule dialog box.
User tip
This rule can be used multiple times in sequence. A typical use case is that the first rule overrides the existing users and the following rule(s) appends users.
To view the default owners for the form, click on the form itself within the process in Designer and in the Edit form dialog box, see named owners in the Default owner(s) field. See Form owners for more details.
Note: a form displays in edit mode if:
The user is the owner of the form, and
The selected form is the current form, and
The form is not submitted or in a completed state, that is being worked on. The Go to form rule can reset the submitted state of a form, see Go to form for details.
What’s next
To find out more about other workflow rules go to Workflow.
The Process security rule dynamically changes the security settings of a process instance.
Security settings for a process can be set statically by going to Settings for the process in Kianda Designer. If you check the checkbox for Enable process security, you can then select users, groups, and/or partners and set their access level, see Process settings for more details.
This setting is static and applies to every instance of the process. However the Process security rule is dynamic and changes the security settings for a particular instance. For example if there is a Finance process with a Payroll request form containing personal data like employee salary, this request form should only be visible to an assigned person. An Assign form rule could be used to give form ownership to an assigned person, allowing them to edit the form in a process instance, and if the rule is combined with the Process security rule then only the assigned person can view the request form for the process instance.
If there are multiple process instances listed in a dashboard, then process security will allow only those who have the designated access, to view those process instances.
When to use
You can add this rule:
to a field
to a form
to a process (the rule will run on load)
How to get started
To dynamically set security for process instances:
Click on an existing process by going to Administration > Designer and decide which form, or field you will apply the rule to, by clicking on that item so that it is in edit mode so you can see the Edit/pen button, Pen button .
Click on Add a rule > Workflow > Process security.
In the Edit rule - Process security dialog box, give the rule a title in the Title field.
If you want to add conditions for the rule, click on the Edit conditions button to create conditions for the rule, see Conditions for more details.
Under Action, create one or more actions for the rule by filling out the following:
Add to process security users - choose from the radio buttons:
Any user - choose from Users, Groups and/or Partners in the drop-down list. All users and groups must be predefined in the system, see Users and Groups for more details. Partners must also be predefined within the Invite partners section under Administration.
Current user - make the current user of the form, whoever is submitting or saving information, as the person that is added to the form process security.
Defined in a user field - choose a user picker field from the process, where the selected users, groups or partners will be added to the form process security.
Form owner(s) - selecting this option means that the form owner(s) defined during form creation/editing will be added to the form process security, see Form owners for more details on what form ownership is and how to create form owners.
Depending on the option chosen for Add to process security users, different fields will display:
For example if Any user is chosen, then a Select user(s) field appears as shown in the image above. Choose from Users, Groups and/or Partners.
If Defined in a user field or Form owner(s) is chosen then a Select form field appears prompting you to select a user picker field for the former, and a form with form owners for the latter.
Existing user(s) - choose from:
Override - this means that this rule will override form ownership, making those referenced in the Edit rule dialog box the form owners.
Append - this means that for a current list of form owners, for example those defined during form creation, that list will be appended with any users referenced in the Edit rule dialog box.
Override security settings - choose from Yes or No.
If you choose Yes then a checkbox appears allowing you to Enable security.
If you check the checkbox, then you can choose the Process security mode which lists the following options:
Security users can create, assign to, can update, everyone else can view - this is the lowest level of security, allowing the assigned user(s) the ability to view, edit and assign process instances, while others can view the process instances.
Security users can create, assign to, can view and update - this allows the assigned user(s) the ability to view, edit and assign process instances.
Security users only can create, view and update - this is the highest level of security where only the named users, that is those defined as Line Manager in a user picker field, will be able to view and edit process instances. No other users will have access to the process instances.
When you are finished editing the dialog box, click on OK or click on Close at any time to exit the dialog box.
When you click on the field or form that has the rule attached, the rule will appear in the right-hand pane under Rules.
The next section will cover how to use the buttons visible in the right-hand pane to manipulate the rule.
Editing, deleting or duplicating rules
When you have clicked on an existing rule, and the rule is visible in the right-hand pane under Rules, there are a number of options available to you.
To disable a rule, click the slider across beside the rule name.
To copy a rule, click on the Duplicate button beside the rule name.
To delete a rule, click on the Bin/Trash button .
To view a rule, click on the rule name to open the Edit rule dialog box.
User tip
This rule can be used multiple times in sequence. You can use the first rule to override the existing users and the following rule(s) to append users.
You can override the process security settings by setting Override security settings to Yes. Tick Enable security to see the options for setting the security level. These options are identical to those in the static Process settings as mentioned in the Introduction.
Warning!
Setting Override security settings to Yes with Enable security not ticked will disable all security settings.
What’s next
To find out more about other workflow rules go to Workflow.
The Start a process rule allows you to dynamically start a new instance of a different process, or a new instance of the same process, or updates an existing process instance from a chosen process.
For example if we have an ‘Onboarding’ process, our primary process that involves many different tasks like generating documentation, and sending out emails to managers, HR and new trainers, we could have a secondary process called ‘Send email process’ which sends out these automated emails for a new user once the ‘Onboarding process’ starts. You can transfer field data from the Onboarding process to the new process instance for ‘Send email process’. You can also update the secondary process instance, once you have the ID for the process instance, see step 5 below in [How to get started].
When to use
You can add this rule:
to a field
to a form
to a process (the rule will run on load)
Before getting started
In advance of using the this rule, in your process you need to have created at least one or more forms as well as creating:
Two processes, one process that acts as your primary process, that then triggers a secondary process also called your target process.
A text box field which can be hidden, to hold your target process ID if you wish to update an existing process. To learn more about text box field go to Text box control.
Predefined partners must be set up in the Invite partners section of Kianda if you wish to execute rules related to partner processes. Process security must be enabled in the target process to allow your process to interact with it. Go to Process security to see where this checkbox is.
How to get started
To dynamically start a new process:
Click on an existing process by going to Administration > Designer and decide which form, or field you will apply the rule to, by clicking on that item for example the Submit button so that it is in edit mode so you can see the Edit/pen button, Pen button .
Click on Add a rule > Workflow > Start a process.
In the Edit rule - Start process dialog box, give the rule a title in the Title field.
If you want to add conditions for the rule, click on the Edit conditions button to create conditions for the rule, see Conditions for more details.
Under Action create one or more actions for the rule starting with choosing the Process source for the secondary/target process. Choose from Own process or Partner process.
If you choose Own process then choose from a list of processes already created in the system under Select a process design using the drop-down list, or start to type in the name of a process and the list will autofill as shown below.
If you choose Partner process then choose from a list of predefined partners under Select a process design. Click on the drop-down list to add Partners. To read more about how to define partners in Kianda go to Invite partners section of Kianda. Note, the partner organisation must have enabled process security to allow your process to interact with the target process, go to Process security to see where this checkbox is.
When the design is chosen, other options will appear in the Edit rule dialog box, the Lookup existing process option appears, where you can choose Yes or No.
If you choose No then that means you are creating a new process instance from that process design.
If you choose Yes then that means you are updating an existing process instance and you must provide a field containing the target process name. You will also need to provide for the existing process instance. This can be done using the On success mapping section, see below.
An Input mapping section allows you to map values for fields from the primary process to the secondary/target process fields, read more below.
A Table mapping section allows you to map values from a table(s) in the primary process to the secondary/target process table(s), see below.
Use On success mapping to retrieve values from the secondary process, showing success in process execution. Click on the link to read more.
The remaining options in the Edit rule dialog box are explained below.
Click OK when you are finished editing the dialog box, or Close at any time to exit the dialog box.
Input mapping
For Input mapping you can map field values from one process to another. For example in an ‘Onboarding HR process’, if a user fills out their name in a Name field, then that name/value will be mapped to a field in a form in the secondary/target process ‘Send email process’ called New request Name as shown in the example below. Your forms must already have precreated fields to capture the values from process or user input.
To use Input mapping, click on the blue bar for Input mapping:
The process names will automatically appear in the left and right columns once a process design is selected from the drop-down list, see step 5 in How to get started above. Within each field, choose a form and then a field that you would like to map the values from one process to another. Alternatively, you can type in text to pass from the primary process to a field in the secondary process.
Click on the Bin/Trash button to delete a mapping.
Click on the Add mapping button to add further mappings from the secondary/target process to the primary process. Ensure that form fields are already precreated to hold these values.
Table mapping
If you use a table in your process you can map fields from a table in one process to another in a similar way to the fields in Input mapping, but this section includes additional parameters to give you a range of options.
To use table mapping, you must already have tables created in your primary and secondary processes. Then click on the blue bar for Table mapping:
The process names will automatically appear in the left and right columns once a process design is selected from the drop-down list, see step 5 in How to get started above.
Click on Add table mapping to and add input and output tables for each process. Click on a form and then a table of choice.
Click on the ellipsis button to open the Table mappings dialog box.
Options within this dialog box are:
Operation - choose from:
Copy rows which allows you to copy row data from one process to another. You can also add conditions to the copying process by clicking on Copy row conditions to allow you to have conditions on which rows are copied over to the target process. We can add fields or text to the conditions. Click on Conditions to read more about conditions in Kianda.
If you click on the Action button then column titles from the primary and secondary processes are automatically listed under Column mapping as shown below, where Need and Reason are column headings in the table in the primary process and Customer need and Reason given are column headings in the table in the secondary/target process. In the example below, a condition has been set so that if Need equals the text ‘Broadband connection’ then the values input into the columns listed will be copied over.
Update rows - if you choose Update rows then contents of the target process table will be updated. Similar to copy rows, an Update row conditions button appears allowing you to set conditions for what content is updated. As with Copy row conditions you can set conditions to control how values are mapped from one process to another.
An Action button is available beside Column mapping to allow you to autofill field names from processes under Field or text and To table fields.
Click on the Bin/Trash button to delete a mapping.
Click on the Add table mapping button to add more tables.
On success mapping
If you wish to update an existing process instance you can use mapping within the On success mapping section to retrieve the Process ID of that process instance, and then trigger rules in the target process instance. A text box field within the form can be created to hold the Process ID value, see Before getting started. The ID for the existing process instance, is one of the Common fields that can be pulled from the system.
To use On success mapping:
Click on the green bar of On success mapping to reveal primary and secondary/target process form fields. For example in the image below, the primary process is called Onboarding HR and the secondary process is called Send email process. Both of these appear automatically below when the green bar is clicked on.
From here you can choose to add in form fields, for example a text box field called Sales Onboarding Process ID that will hold a common field Process ID from the target process.
Click on the Bin/Trash button to delete a mapping.
Click on the Add mapping button to add further mappings from the secondary/target process to the primary process. Ensure that form fields are already precreated to hold these values.
Further options exist under this section, starting with Trigger rules in target instance allowing you to kick off business rules enabling actions in the target process. Options are:
No where triggering rules is disabled, and no further options appear.
Yes where triggering rules is enabled, and further options appear:
Select a field or rule to trigger on target process - clicking on this field allows you to choose a form from the target process and from there you can drill down to a field to trigger all the rules attached to that field, or drill down to a particular rule so that only that rule will be triggered as shown in the example below.
If you want to save values passed under Input mapping then trigger the Save button (that contains the Save process and Close rules) found by default in all Kianda forms.
Enable real-time rule execution? - options are Yes or No. If you choose Yes, rules in the secondary/target process instance will trigger without any delay in the server. If you choose No then a second option becomes available to allow you to choose to Execute in series?
Execute in series? - options are Yes or No. If you choose No then the server side execution of rules will happen in series or in sequence, instead of in parallel. In series or in sequence refers to synchronous execution, where a rule will only execute when the previous rule has completed. In parallel refers to asynchronous execution whereby rules execute without waiting for the previous rule to finish. This type of execution is useful when rules are not dependent on each other, for example the output of one rule is not used as input for another.
When you are finished editing the dialog box click on OK or click on Close at any time to exit the dialog box.
For more details on using On success mapping with other rules click on On success mapping.
Editing, deleting or duplicating rules
When you have clicked on an existing rule, and the rule is visible in the right-hand pane under Rules, there are a number of options available to you.
To disable a rule, click the slider across beside the rule name.
To copy a rule, click on the Duplicate button beside the rule name.
To delete a rule, click on the Bin/Trash button .
To view a rule, click on the rule name to open the Edit rule dialog box.
User tip
Remember the target process can be a Partner process and in this case, the partner organisation must have enabled process security (in the Process settings for the target process) to allow your process to interact with the target process.
Use the Lookup existing process flag to find a particular instance of the target process at runtime. If you select Yes, then you can select a field in the current process which contains the id of the target instance.
Use Trigger rules in target instance to select a field or rule to trigger in the target process. Set Execute in series to Yes to ensure server side execution is performed in series instead of in parallel.
Another feature of this rule is that you can read data from another process instance. In this case it is advisable to give the title of the rule a title such as ‘Read data from Process X’. Click on the green bar of On success mapping and use this area to copy data from the target process to the current process.
What’s next
To find out more about other workflow rules go to Workflow.
Schedule a rule allows you to schedule a rule or a field to be triggered immediately, at some point in the future or recurring. If a form field has multiple rules attached to it, that include the Schedule a rule rule, rules can execute sequentially and you can change the order of the rule execution, see Multiple rules for details. You can also select a specific rule to execute. For example in the image below, the text box field First Name is expanded to show two rules. You can select all or just one rule to be triggered. You can select all rules by selecting the First Name text box itself or to select just one rule you can expand the field and selecting the desired rule you want to schedule:
When to use
You can add this rule:
to a field
to a form
to a process (the rule will run on load)
How to get started
The following step illustrates a scenario to schedule a reminder email using the Send email rule when a form is submitted:
Click on an existing process by going to Administration > Designer and decide which form, or field you will apply the rule to, by clicking on that item so that it is in edit mode so you can see the Edit/pen button, Pen button .
Click on Add a rule > Workflow > Schedule a rule.
In the Edit rule - Schedule a rule dialog box, give the rule a title in the Title field.
If you want to add conditions for the rule, click on the Edit conditions button to create conditions for the rule, see Conditions for more details.
Under Action fill out the following:
Select the field or rule to trigger on schedule - allows you to select a field or rule you want to trigger. If a field has multiple rules, they will be triggered sequentially and you can change the order of the rule execution, see Multiple rules for details. You can also select a specific rule from a field with multiple rules by drilling down and selecting the desired rule. In this example we want to select a rule called Send email which is attached to the Submit button.
Schedule - allows you to choose a time of schedule. For this example we will select to send the email Weekly at 10 am every 2 weeks.
You can select a different type of schedule that is suited to your rule, here are the options:
One time - Select Time mode as Absolute or Relative from now. If Absolute, you can select the time using the clock icon and the date using the calendar icon or you can select a form field (where the date is stored) by clicking on the icon with black discs . If Relative from now, enter the days, hours and minutes directly.
Minutes - select the number of minutes you want the scheduled rule to reoccur.
Hourly - select the number of minutes and hours you want the scheduled rule to reoccur.
Daily - select the time of day and the number of days you want the scheduled rule to reoccur. You can select that the rule will trigger only on week days by enabling the Week days only checkbox.
Weekly - select a day of the week, time of the day and the number of weeks that you want the scheduled rule to reoccur.
Monthly - select the date of the month or First, Second, Third, Fourth, Last weekday of the month. You can also select a specific time that you want the scheduled rule to reoccur.
Immediately - the rule will trigger immediately.
Expire - It is possible to set the schedule rule to expire by enabling Expire checkbox. For this example we will use the When option and apply a condition. The goal of the reminder is to send it every two weeks until the status of the process is completed. In the condition of the When option, select Status from the Common fields and make it equals to completed as shown in the image below:
There are three options when to expire the scheduled rule:
By - the rule will expire by the date and time given. Either select the time using the clock icon and the date using the calendar icon OR select a form field (where the date is stored) by clicking on the icon with black discs.
After - the rule will expire after a set number of occurrences. Select the number of occurrences in the blank field or click on the icon with black discs to choose a field where the number of occurrences is stored.
When - add a condition which will cause the rule to expire when it is true.
You are also presented with two more options when selecting any of the Schedule options except Immediately, the options are:
Make task unique - enable this option to prevent a second identical task being created for this instance of the process
Execute in series - select Yes if you want the server-side execution to be in series rather than in parallel.
When you are finished editing the dialog box, click on OK or click on Close at any time to exit the dialog box.
Editing, deleting or duplicating rules
When you have clicked on an existing rule, and the rule is visible in the right-hand pane under Rules, there are a number of options available to you.
To disable a rule, click the slider across beside the rule name.
To copy a rule, click on the Duplicate button beside the rule name.
To delete a rule, click on the Bin/Trash button .
To view a rule, click on the rule name to open the Edit rule dialog box.
What’s next
To find out more about other workflow rules go to Workflow.
Communication rules is one category of rules to enable automated communications with process users, for example sending meeting requests or even user push notifications.
Take an example of a User alert rule. Implementing this rule will result in a new item in the user notification in the Quick action menu, for example a rule that alerts a user to complete a form. The user notification icon will look like this when the alert comes in, indicating there is one new notification:
Clicking on the notification icon, opens up a pop-up box with the notification, for example:
Clicking on the Reminder itself will bring the user to that form within the process instance, for the user to complete.
Depending on how you configure the alert, you can create an alert message which appears as a warning in a user’s workspace as shown in the image below.
Getting started with Communication rules
If you go to Administration > Designer and click on a process or create a new process, then click on Add a rule the Communication rules are found in the left-hand pane when you click on Communications.
There are four types of Communication rules as follows:
Send email - This rule allows you to send automated emails that contain images, text, process and other links and attachments. Email templates are defined within the rule, allowing you to style emails the way you want and use Expressions to automate the process. You can map fields and content from within the process, for example using a userpicker field so that user input in a form determines who an email is sent to. Emails can be sent out using a predefined SMTP connector, see Setting up a Global SMTP mail Connector for more details.
Meeting request - This rule is similar to the Send email rule and allows you to send automated specially formatted emails that contain a meeting request.
Anonymous form link - This rule creates an anonymous link to a form which can be sent to external users who do not need Kianda login details or accounts to access the form(s), for example contractors or third party providers. The receivers of the link can then simply click on the link and submit data back to a process instance in Kianda.
User alert - This rule sends an alert to a user which appears in the user notifications in the top right-hand quick actions menu bar. See Quick action menu for an introduction to the shortcuts available to users including notifications. You can configure the alert to appear the way you want for example to allow warning messages to appear as shown in the image in the Introduction or to link to a form for a user to complete.
What’s next
To read more about each of the rule types go to the links below:
3.1 - Send email
This rule sends an email according to a predefined template. Each element of the email is configurable. The body of the email can include text, images and attachments. Data stored in fields in the current form can be copied in dynamically.
When to use the Send email rule
You can add this rule:
to a field
to a form
to a process (the rule will run on load)
Before you get started
In advance of using this rule, you need to have created one or more forms, complete with control fields. For example a text box control with an employee’s ‘Name’ may be part of a form ‘Annual Leave Request’. Then this ‘Name’ field can be used as an expression in the email to send personalised emails, so these aspects must be set up in advance.
Decide how the rule will be implemented, for example will an email be sent once a form is saved or submitted. In the example of form submit, then click on that form in the process > Submit button > Add a rule > Send email.
Decide who the automated email will be sent from, for example a no-reply type email. If you leave the From field empty, the email will be sent from noreply@kianda.com. If you want your email to come from a different sender, then go to Email connector for more details on how to set that up.
Any email addresses to send To, From, CC or BCC must be set up in advance. This could be a textbox in a form called ‘Email address’ with a unique Name like ’emailAddress’, or it could be a user picker field associated with particular users, groups or partners.
If you want to track the emails, then you must set up a field in your form to store email tracking.
If you want to attach any files to an email, files must first be stored in a File field in one of the forms.
How to get started
Click on an existing process by going to Administration > Designer and decide which form, or field you will apply the rule to, by clicking on that item so that it is in edit mode so you can see the Edit/pen button, Pen button . For example selecting the Submit as shown below.
In the left-hand side pane, click on Add a rule > Communications > Send email.
Choose from the edit options:
Title - of the email for example ‘Send email to Training Managers’
Edit conditions - click on Edit conditions to set conditions for sending an email, for example while a process has a ‘status’ of ‘open’, send reminder emails. To learn more about conditions go to Conditions.
From - who the email is from, click on Person button and choose from the appropriate Selection mode, see Selection mode below.
Warning
If you add an email address to the From field, you must specify an Email connector, see Email connector. If a connector is not specified, the emails will come from noreply@kianda.com. If a Global SMTP connector is configured, all emails will be sent from the global connector.
To - who the email is to, click on Person button and choose from the appropriate Selection mode, see Selection mode below.
CC - who will be copied on the email, as with To field.
BCC - who will be blind copied on the email, as with To field.
Subject - type in your email subject and click on the Ellipsis button to add an expression, go to Expression builder for more information. The Subject cannot be left empty.
Body - choose from an array of styles and formats to create your email including Style,Colour, Font size, Remove font style, Font family, Unordered list, Ordered list, Paragraph, Table, Link, Picture, Attach a File and Code view. For example if you click on Code view button you can copy HTML code directly into the body text.
If you click on the Picture button you will be redirected to the File storage area where you can search for existing images stored in the Kianda file system, create a folder, or upload a file.
To find out more about how to attach a file, see Attachments for more details.
To add a message to your email, click on the Body text box. You can personalise automated emails using fields from the process by clicking on the Ellipsis button to add an expression, see Expression builder for more details.
Send via connector - options are a) No or b) Yes
If you choose Yes then you must choose an Email connector and decide if you want to Save Sent Items (Yes or No) which means sent emails are saved in a sent items folder in your email account. For more information go to Email connector
Note that this option is only available if Send via connector is set to No and the email is being sent from noreply@kianda.com.
If you choose Yes then you must click into the field under Field to store tracking event (Open, Click, Bounce, Spam) and choose a field from a form to store the event.
This option allows you to track the email after it is sent. All of these events, Open, Click, Bounce and Spam will be tracked.
Click on OK button when you are finished editing to save your changes or click on Close to exit the dialog box without saving.
Note when your rule is complete you may want to change the order of rules for the particular field or form that it has been applied to. Drag the new Send email rule to where you want, so the order of execution of rules is correct.
For example for a Submit button on a form I may want my Send email rule to be executed first before any other rule is executed. To do this click on the Submit button to make sure you are in Edit mode, and under Rules in the right-hand pane, drag the Send email rule to the top of the list by clicking on the rule and dragging it.
The Email connector is a mailing tool that allows you to send emails with a specified email account, for example support@ or info@. An email connector must be set up in advance, to learn how to set up an Email connector go to Email connector.
If you leave the From field empty, the email will be sent from noreply@kianda.com. If you want your email to come from a different sender, follow these steps when you are editing the Send email rule:
Set Send via connector to Yes.
Click into the field under Email connector and select a connector.
Click on OK button when you are finished editing to save your changes or click on Close to exit the dialog box without saving.
Note that if Global SMTP Mail connector has been configured, all emails sent will use the Global connector settings instead of what is specified in the send email rule. Go to Administration > Subscription > Subscription Details to check for a global setting or to find out more, go to Setting up a Global SMTP mail connector.
Selection mode
When you are filling out the To, From, CC or BCC fields and click on the Person button you have the following selection mode options to choose from:
Any user or partner
User(s) defined in a user field
Form owner(s)
Email address in a field.
Note; You can reset user/ field you selected by clicking Clear on the dropdown field in the Select email users dialog box.
Any user or partner - With this Selection mode selected. On the right-hand side of the Select users dropdown list, you can choose to select from Users, Groups and Partners. This allows you to distinguish which users are picked for this field. For example a single user, or a group of users.
User(s) defined in a user field - if you choose this option, it means the user name is already defined in a form. By clicking into the Select a user field, you can select a field from the process you are working in.
Click on the desired User field in your process to add to the Select a user field box.
Click on to add more selection fields.
Remove a field clicking on the Bin/Trash button
Form owner(s) - With this option selected, by clicking into the field under Form owner of selected form and choose from the forms within that process. This automatically uses the form owner(s) email address. To learn more about forms and form owners go to Form basics.
Email address in a field - With this option selected, by clicking into the field under Type the address or select from a field, you can either type in an email address or choose from a field within the process you are working in.
In all cases when you have made your selection, click on OK button to save your changes or click on Close to exit the dialog box without saving.
Expression builder
The expression builder is a useful and efficient way to use existing form fields as part of automated emails that you want to send out.
For example if you have a form Annual Leave request that contains a text box field ‘Employee Name’ you can use this field in an automated email to let a manager know that an employee has submitted a request.
Before you begin have your message inserted into the Body of the email and position your cursor where you want to add an expression, for example an Employee Name after ‘Your employee’ as shown below.
Click on the Ellipsis button on the right-hand side of the email Body. An Expressionbuilder dialog box opens.
Click into the field under Add field to expression. Forms and fields that are part of your process appear where you can expand elements to drill down to find the field that you want, for example ‘Employee Name’. Click on the field to add field to the expression.
Click on the Add to expression button to add the field as an expression. Note that the expression is the Name(unique) of that field.
Click on OK button when you are finished editing to save your changes or click on Close to exit the dialog box without saving.
The result is the expression is now part of the automated email.
To add more expressions, firstly position your cursor in your body text where you want to add the expression, then click on the Ellipsis button and under Add field to expression clear any existing fields by clicking on the Clear button. This appears when you hover over the Add field box.
Then search for other fields, for example lists or links, and use the Expression reference functions, see step 7.
Click on Reference to find out how to use particular functions in your email. For example ProcessLink() returns the html link to the current process. Copy this function into the Expression box and click on OK to add the function. Then in the Body type in the text you want associated with this link for example “click here” into the brackets of the function:
In this way you can build personalised automated emails that provide a link back to a process instance, for example that a manager can view, update or approve. For more information on References and Expressions see Expressions for more information.
Attachments
To attach a file into the Send email rule, you must first contain a file field in your process. To learn more about file control go to File upload control.
To attach a file to an email, click on the Attach a file button . The Attach file to email dialog box opens.
Select a File field from your process to attach the file, for example an Image filed as shown in the image below.
Click in the File field, find and select the desired field.
Click on Insert attachment. There is an option to attach a link to the file rather than the file itself.
In the Attachments section of the Send email dialog box, the name of the File field will appear indicating that attachments will come from the specified field. You can delete the specified File field by clicking the red bin/trash icon.
The Meeting request rule sends an email according to a predefined template. It works exactly like the Send email rule with three additional fields to which are used to set up the date and time of the meeting. The three additional fields are as follow:
Start time - indicating the starting date and time of the meeting.
End time - indicating the ending date and time of the meeting.
Location - indicating the location of the meeting.
If you are using an email connector, a meeting request will appear in the calendar of the receiver(s). Otherwise the meeting request will appear as a calendar file (.ics file type) attached to an email. to learn more about email connector go to Email connector.
When to use
You can add this rule:
to a field
to a form
to a process (the rule will run on load)
Before you get started
In advance of using this rule, you need to have created one or more forms, complete with control fields. For example a Text box control with an employee’s ‘Name’ may be part of a form ‘Meeting request’. Then this ‘Name’ field can be used as an expression in the email to send personalised emails, so these aspects must be set up in advance. The Meeting request rule must also contain three specific fields which are the Date control for both the Start and End time fields, as well as textbox control or a List control a field for the Location.
Decide how the rule will be implemented, for example will an email be sent once a form is saved or submitted. In the example of form submit, then click on that form in the process > Submit button > Add a rule > Send email.
Decide who the automated email will be sent from, for example a no-reply type email. If you leave the From field empty, the email will be sent from noreply@kianda.com. If you want your email to come from a different sender, then go to Email connector for more details on how to set that up.
Any email addresses to send To, From, CC or BCC must be set up in advance. This could be a textbox in a form called ‘Email address’ with a unique Name like ’emailAddress’, or it could be a user picker field associated with particular users, groups or partners.
If you want to track the emails, then you must set up a field in your form to store email tracking.
If you want to attach any files to an email, files must first be stored in a File field in one of the forms.
Note; the start and end time fields are both required on the request meeting rule therefore you should make the start and end fields required on your form too. To learn more about required fields go to Control properties.
How to get started
Click on an existing process by going to Administration > Designer and decide which form, or field you will apply the rule to, by clicking on that item so that it is in edit mode so you can see the Edit/pen button . For example selecting the Submit as shown below.
In the left-hand side pane, click on Add a rule > Communications > Meeting request rule.
In the Edit rule - Meeting request dialog box, fill out the following details:
Title - of the email for example ‘Send meeting request’
Edit conditions - click on Edit conditions to set conditions for sending an email, for example while a process has a ‘status’ of ‘open’, send reminder emails. To learn more about conditions go to Conditions.
Start time - select a pre-defined date field from your form. This is a required field.
End time - select a pre-defined date field from your form. This is a required field.
From - who the email is from, click on Person button and choose from the appropriate Selection mode, see Selection mode below.
Warning
If you add an email address to the From field, you must specify an Email connector, see Email connector. If a connector is not specified, the emails will come from noreply@kianda.com. If a Global SMTP connector is configured, all emails will be sent from the global connector.
To - who the email is to, click on Person button and choose from the appropriate Selection mode, see Selection mode below. This is a **required **field.
BCC - who will be blind copied on the email, as with To field.
Subject - type in your email subject and click on the Ellipsis button to add an expression, go to Expression builder for more information. This is a **required **field.
Body - choose from an array of styles and formats to create your email including Style,Colour, Font size, Remove font style, Font family, Unordered list, Ordered list, Paragraph, Table, Link, Picture, Attach a File and Code view. For example if you click on Code view button you can copy HTML code directly into the body text. This is a required field.
To find out more about how to attach a file, see Attachments for more details.
To add a message to your email, click on the Body text box. You can personalise automated emails using fields from the process by clicking on the Ellipsis button to add an expression, see Expression builder for more details.
Send via connector - options are a) No or b) Yes
If you choose Yes then you must choose an Email connector and decide if you want to Save Sent Items (Yes or No) which means sent emails are saved in a sent items folder in your email account. For more information go to Email connector
Note that this option is only available if Send via connector is set to No and the email is being sent from noreply@kianda.com.
If you choose Yes then you must click into the field under Field to store tracking event (Open, Click, Bounce, Spam) and choose a field from a form to store the event.
This option allows you to track the email after it is sent. All of these events, Open, Click, Bounce and Spam will be tracked.
Click on OK button when you are finished editing to save your changes or click on Close to exit the dialog box without saving.
Note when your rule is complete you may want to change the order of rules for the particular field or form that it has been applied to. Drag the new Meeting request rule to where you want, so the order of execution of rules is correct.
For example for a Submit button on a form I may want my Meeting request rule to be executed first before any other rule is executed. To do this click on the Submit button to make sure you are in Edit mode so that the Edit/pen button appears, and under Rules in the right-hand pane, drag the Meeting request rule to the top of the list by clicking on the rule and dragging it. For more information on rules, see Rules.
Email connector
The Email connector is a mailing tool that allows you to send emails with a specified email account, for example support@ or info@. An email connector must be set up in advance, to learn how to do that go to Email connector.
If you leave the From field empty, the email will be sent from noreply@kianda.com. If you want your email to come from a different sender, follow these steps when you are editing the Meeting request rule:
Set Send via connector to Yes.
Click into the field under Email connector and select a connector.
Click on OK button when you are finished editing to save your changes or click on Close to exit the dialog box without saving.
Note that if Global SMTP Mail connector has been configured, all emails sent will use the Global connector settings instead of what is specified in the send email rule. Go to Administration > Subscription > Subscription Details to check for a global setting or to find out more, go to Setting up a Global SMTP mail connector.
Selection mode
When you are filling out the To, From, or BCC fields and click on the Person button you have the following selection mode options to choose from:
Any user or partner
User(s) defined in a user field
Form owner(s)
Email address in a field.
Note; You can reset user/ field you selected by clicking Clear on the dropdown field in the Select email users dialog box.
Any user or partner - choose from Users, Groups and/or Partners in the drop-down list. All users must be predefined in the system, see Users and Groups for more details.
User(s) defined in a user field - choose a user picker field from the process, where the selected users, groups or partners will be assigned to the To, From or BCC respectively.
Click on the desired User field in your process to add to the Select a user field box.
Click on to add more selection fields.
Remove a field clicking on the Bin/Trash button
Form owner(s) - selecting this option allows you to click into the field under Form owner of selected form and choose from the forms within that process. This automatically uses the form owner(s) email address. To learn more about forms and form owners go to Form basics.
Email address in a field - With this option selected, by clicking into the field under Type the address or select from a field, you can either type in an email address manually or choose from a field within the process you are working in.
In all cases when you have made your selection, click on OK button to save your changes or click on Close to exit the dialog box without saving.
Expression builder
The expression builder is a useful and efficient way to use existing form fields as part of automated emails that you want to send out.
For example if you have a form Annual Leave request that contains a text box field ‘Employee Name’ you can use this field in an automated email to let a manager know that an employee has submitted a request.
Before you begin have your message inserted into the Body of the email and position your cursor where you want to add an expression, for example an Employee Name after ‘Your employee’ as shown below.
Click on the Ellipsis button on the right-hand side of the email Body. An Expressionbuilder dialog box opens.
Click into the field under Add field to expression. Forms and fields that are part of your process appear where you can expand elements to drill down to find the field that you want, for example ‘Employee Name’. Click on the field to add field to the expression.
Click on the Add to expression button to add the field as an expression. Note that the expression is the Name(unique) of that field.
Click on OK button when you are finished editing to save your changes or click on Close to exit the dialog box without saving.
The result is the expression is now part of the automated email.
To add more expressions, firstly position your cursor in your body text where you want to add the expression, then click on the Ellipsis button and under Add field to expression clear any existing fields by clicking on the Clear button. This appears when you hover over the Add field box.
Then search for other fields, for example lists or links, and use the Expression reference functions, see step 7.
Click on Reference to find out how to use particular functions in your email. For example ProcessLink() returns the html link to the current process. Copy this function into the Expression box and click on OK to add the function. Then in the Body type in the text you want associated with this link for example “click here” into the brackets of the function:
In this way you can build personalised automated emails that provide a link back to a process instance, for example that a manager can view, update or approve. For more information on References and Expressions see Expressions for more information.
Attachments
To attach a file into the Send email rule, you must first contain a file field in your process. To learn more about file control go to File upload control.
To attach a file to an email, click on the Attach a file button . The Attach file to email dialog box opens.
Select a File field from your process to attach the file, for example an Image filed as shown in the image below.
Click in the File field, find and select the desired field.
Click on Insert attachment. There is an option to attach a link to the file rather than the file itself.
In the Attachments section of the Send email dialog box, the name of the File field will appear indicating that attachments will come from the specified field. You can delete the specified File field by clicking the red bin/trash icon.
The Anonymous form rule creates a link to a selected form from the process which can be sent to an external user. The user can open the form without the need for authentication into the Kianda platform.
When to use
To use the Anonymous form rule effectively, you would typically apply it to a Submit button along side Send email rule so that you can attach the link into an email and share the specified form with an external user.
You can add this rule:
to a field
to a form
to a process (the rule will run on load)
Before you get started
In advance of using the Anonymous form link, in your process you need to have created at least one or more forms. This rule also requires a link to be stored inside of a field, for example text box control. To learn more about text box control go to Text box control.
How to get started
To send an anonymous form link to an external user:
Click on an existing process by going to Administration > Designer and decide which form, or field you will apply the rule to, by clicking on that item so that it is in edit mode so you can see the Edit/pen button, Pen button .
Click on Add a rule > Communications > Anonymous form link.
In the Edit rule - Anonymous form link dialog box, give the rule a title in the Title field.
If you want to add conditions for the rule, click on the Edit conditions button to create conditions for the rule, see Conditions for more details.
In the Select a form dropdown, select the desired form to create a link to.
Link expire settings contains three options:
Never expires - Indicating that the link will never expire and will always be active.
Expire after a number of uses - the link will expire after the specified number of uses in the Expire link after number of uses text box.
Expire in time - the link will expire after the specified Days, Hours and Minutes from the time it was created.
In the Field to store the generated anonymous link dropdown, select a field in which you want the link to be stored in.
In the Message to display after anonymous submission text box, type in a message your want users to see after they submit the form.
Selecting the Hide form topbar will hide all form tiles from the users view.
Force logout:
Yes - users will be logged out after submitting the form.
No - users will stay logged in after submitting the form.
Create a Send email rule and apply the link expression to the body of the email. To learn more about Send email rule and how to add expressions go to Send email.
User tip
The field used to store the Anonymous Link can be made invisible to the user of the current form. Go to the field properties and set the field to not visible.
Each record or instance of a process can have only one active link. If a second anonymous link is created for an instance of a process, the first link will not exist anymore. Users clicking on the first link will get an error message.
The User alert rule sends an alert to a user who can click on the alert to open the process instance, for example to a form that needs to be completed by a given user. A user can view all alerts by clicking on the notifications or bell icon on the top right-hand corner of their screen.
For example in the image below there is one new notification.
When the user clicks on the icon, the alert created using the User alert rule appears.
In this example clicking on the alert itself, will bring the user to a form that they need to fill out.
When to use
There are a lot of uses for the user alert rule. For example, the rule can be used as a reminder to complete a form or when a form is submitted and the form needs to be reviewed, a manger can receive the alert to review the information in the form.
You can add this rule:
to a field
to a form
to a process (the rule will run on load)
How to get started
Click on an existing process by going to Administration > Designer and decide which form, or field you will apply the rule to, by clicking on that item so that it is in edit mode so you can see the Edit/pen button, Pen button .
Click on Add a rule > Communications > Anonymous form link.
In the Edit rule - User alert dialog box, give the rule a title in the Title field.
If you want to add conditions for the rule, click on the Edit conditions button to create conditions for the rule, see Conditions for more details.
Send alert to - choose from the radio buttons:
Any user - choose from Users, Groups and/or Partners in the drop-down list. All users must be predefined in the system, see Users and Groups for more details.
Current user - make the current user of the form, whoever is submitting or saving information, as the person that the alert is being sent to.
Defined in a user field - choose a user picker field from the process, where the selected users, groups or partners will have an alert sent to.
Form owner(s) - selecting this option means that the form owner(s) defined during form creation/editing will have the alert sent to, see Form owners for more details on what form ownership is and how to create form owners.
Alert title - select a field from the process to be the title or type one in.
Alert message - select a field from the process for the message of the alert or type one in. Note: Maximum of 200 characters allowed in message.
Alert Status - choose from four different colours to be applied to the tile of the alert.
Alert icon - choose an icon from the drop-down list.
The resulting alert design looks like this:
Process ID - when the user receives an alert and clicks on it, he will open the process instance defined in the Process ID field.
If left blank, this field will contain the current Process ID.
A different process ID can be added by typing or copying in the ID (or if the Process ID is stored in a field, then that field can be selected).
Data rules is the category of rules that enables the flow of data between data connectors and form elements, for example reading or writing data from a database table or performing data manipulation.
Take an example of one of the rules in the Data rules category, the Find items rule. This rule can be used to extract data from a data source and use this information in a Kianda form. Take an example of an Employee Onboarding or New hire process, where a user chooses a country for a ‘Country’ field from a drop-down list.
The drop-down list is populated using a SharePoint list in this example, and the ‘Country’ field in turn uses a Find item rule to populate the table below it in the form.
The section below introduces each of the Data rules.
Getting started with Data rules
If you go to Administration > Designer and click on a process or create a new process, then click on Add a rule the Data rules are found in the left-hand pane when you click on Data.
There are five types of Data rules as follows:
Create item - The create item rule is used to create an item on your data connection. This is a straightforward rule which allows you to connect to your data source and map inputs. You can also map a data source field or text back to Kianda on success or store an error message on failure.
Delete item - To delete an item from your data connection, you could use a data source filter and map data source field or text from a data connection to Kianda form field.
Update item - This rule works in the same way as the Delete item rule. At any point, if you would like to update any item on your data connection, use this rule. To find an item to update, you could use a data source filter and map the input fields or text.
Find items - Use this rule together with a datasource to perform a query and return data for use with the form. To find an item, you could use a data source filter which acts as a conditional bridge between Kianda and data-connections. If the condition is true, you could map the data source field or text to the Kianda form field.
Set form field - This rule is used to update the value of fields in a form. The field value could be simple text or based on a custom expression with the ability to define JavaScript expressions. Use this rule to copy content between fields or to apply a custom expression to set the value of a given field.
What’s next
We have briefly introduced each of the five types of Data rules. Click on the links below to find out more about each rule in detail.
4.1 - Set form field rule
Introduction
Using the Set form field rule you have the ability to select a field within your process and assign it a value using manually typed text or an expression. With the Set form field rule you can set multiple fields at once by adding more fields to the value mapping within the rule.
This rule is useful when automating processes with previously provided information from other forms. You can apply this rule to a form which will activate the rule when the form is loaded. You can pass query strings and apply the Set form field rule assign values to fields when opening form for the first time. To learn more about query strings go to Query strings.
When to use
You can add this rule:
to a field
to a form
to a process (the rule will run on load)
How to get started
Click on an existing process by going to Administration > Designer and decide which form, or field you will apply the rule to, by clicking on that item so that it is in edit mode so you can see the Edit/pen button, Pen button .
Click on Add a rule > Data > Set form field.
In the Edit rule - Set form field dialog box, give the rule a title in the Title field.
If you want to add conditions for the rule, click on the Edit conditions button see Conditions for more details.
In the Field value mapping section, you can select which fields to set and what values to give them. You can do that with the following fields:
Form field to set - this dropdown list is used to select a field from within your process that you want to set.
Value or expression - in this field you are able to type in text manually to set the value for a desired field. To make this rule dynamic and use other fields as values, you can use expressions. To learn more about expressions go to Expression builder.
Add mapping - you can choose to set multiple fields in your process by clicking on Add mapping button. You can also remove fields by clicking on the Bin/Trash icon .
Editing, deleting or duplicating rules
When you have clicked on an existing rule, and the rule is visible in the right-hand pane under Rules, there are a number of options available to you.
To disable a rule click the slider across beside the rule name.
To copy a rule, click on the Duplicate button beside the rule name.
To delete a rule, click on the Bin/Trash button .
To view a rule, click on the rule name to open the Edit rule dialog box.
What’s next
To find out more about other Data rules go to Data rules.
This rule implements the Read function which is one of the four CRUD (Create, Read, Update and Database) functions. The rule will read one or more items of data from a chosen data source, for example SharePoint, SAP or Oracle databases, see Data connectors for more details.
This rule is used to find an item from your data connections. To find an item, you could use a data source filter which acts as a conditional bridge between Kianda and data connections. If the condition is true, you could map the data source field or text to the Kianda form field.
This rule is used to perform a query and return data for use in the form. The data may be stored locally or in one of the data sources
The Data source filter is useful when you want to query data from a specific user using a unique identifier like an Id, name or email.
When to use
You can add this rule:
to a field
to a form
to a process (the rule will run on load)
How to get started
Click on an existing process by going to Administration > Designer and decide which form, or field you will apply the rule to, by clicking on that item so that it is in edit mode so you can see the Edit/pen button, Pen button .
Click on Add a rule > Data > Find items.
In the Edit rule - Find items dialog box, give the rule a title in the Title field.
If you want to add conditions for the rule, click on the Edit conditions button to create conditions for the rule, see Conditions for more details.
Click on Select data source button to select the desired data source. When you select your data source, new mappings options are presented.
Data source filter - this is used to filter data within your datasource. It works on condition bases which allows you to pull wanted and unwanted data back into the process. To learn more about conditions go to Conditions.
Map results to table:
Yes - selecting this option will allow you to map results to a table and opens the following options below:
Select a table - allows you to select a table from within your process which will be populated by mapping. This is useful when you want to display a lot of data from the datasource.
Existing rows behaviour:
Override - will override any duplicate date therefore will keep the last duplicate inside of the table.
Append - will add any duplicate data to the table and therefore all occurrence of data will be displayed in the table.
Enable server paging - enables the server paging configurations. For example if your data source has 10 row per page, enabling this option will force the table to have 10 rows per page.
No - selecting this option will only pull the first occurrence from your data source.
Results mapping - is used to set fields within your form from the datasource itself. To learn more about results mapping go to On Success Mapping.
On error mapping - you can expand this option by clicking on it, then add fields where you can display any error message that may have occurred during the mapping process. To learn more about error mapping go to On Error Mapping.
Max rows - will allow you to set a number of fields to be displayed within a table.
Sort By - allows you to sort the results of your datasource within the mapped rows of the table.
Editing, deleting or duplicating rules
When you have clicked on an existing rule, and the rule is visible in the right-hand pane under Rules, there are a number of options available to you.
To disable a rule click the slider across beside the rule name.
To copy a rule, click on the Duplicate button beside the rule name.
To delete a rule, click on the Bin/Trash button .
To view a rule, click on the rule name to open the Edit rule dialog box.
What’s next
To find out more about other Data rules go to Data rules.
This rule implements the Create function which is one of the four CRUD (Create, Read, Update and Database) functions. The rule will create one or more items of data from a chosen data source, for example SharePoint, SAP or Oracle databases, see Data connectors for more details.
The Create item rule allows you to create an item of any type in the specified data connector. When applying this rule, you must select a data source in which you want to create the item. When the data source is connecter, you can map inputs from your form fields into your source. Also, you could map a data source field or text back to Kianda on success or store an error message on failure.
When to use
You can add this rule:
to a field
to a form
to a process (the rule will run on load)
How to get started
Click on an existing process by going to Administration > Designer and decide which form, or field you will apply the rule to, by clicking on that item so that it is in edit mode so you can see the Edit/pen button, Pen button .
Click on Add a rule > Data > Create item.
In the Edit rule - Create item dialog box, give the rule a title in the Title field.
If you want to add conditions for the rule, click on the Edit conditions button , see Conditions for more details.
Click on Select data source button to select the data source you want to create a new item in. When you select your data source, new mapping options are presented.
Input mapping - used to create an item inside of the data source that you selected.
Form field or text - you can select a field within your form or type in text manually to represent the value you want to your new item to contain.
Data source field - select a field in your data source to hold the new value.
Add mapping - you can choose to create multiple items in your data source by clicking on Add mapping button. You can also remove fields by clicking on the Bin/Trash icon .
On success mapping - select the field(s) in the form which will store information and populate the data source field or text field with the respective data source value. To learn more about success mapping go to On Success Mapping.
On error mapping - select the field(s) in the form which will store error messages. Then type in a value or use Error message, to create a system generated error message if an error occurs during rule execution. To learn more about error mapping go to On Error Mapping.
Editing, deleting or duplicating rules
When you have clicked on an existing rule, and the rule is visible in the right-hand pane under Rules, there are a number of options available to you.
To disable a rule click the slider across beside the rule name.
To copy a rule, click on the Duplicate button beside the rule name.
To delete a rule, click on the Bin/Trash button .
To view a rule, click on the rule name to open the Edit rule dialog box.
What’s next
To find out more about other Data rules go to Data rules.
This rule implements the Update function which is one of the four CRUD (Create, Read, Update and Database) functions. The rule will read one or more items of data from a chosen data source, for example SharePoint, SAP or Oracle databases, see Data connectors for more details.
The Data source filter in this rule is used for targeting specific data item in your data connection. The item you want to update within your data source is targeted by filtering it out using a field within your form. It is a good idea to connect a dummy field to your data source first and then use that field to filter for the item you want to update. The actual value used to update the item in your data source can also use a field or text filled out in your mapping section (see below for more detail). To make your Update item rule extremely dynamic, it is recommended to create field for filtering an item and a separate field for the new value you want your item to hold.
When to use
The Update item rule should be used whenever you want to update an existing item within a data source of your choice.
You can add this rule:
to a field
to a form
to a process (the rule will run on load)
How to get started
Click on an existing process by going to Administration > Designer and decide which form, or field you will apply the rule to, by clicking on that item so that it is in edit mode so you can see the Edit/pen button .
Click on Add a rule > Data > Update item.
In the Edit rule - Update item dialog box, give the rule a title in the Title field.
If you want to add conditions for the rule, click on the Edit conditions button , see Conditions for more details.
Click on Select data source button to select the data source you want to update an item in. When you select your data source, new mapping options are presented.
Data source filter - works on condition bases where by you can filter the specific item that you want to update within your data source. The condition uses a field from within your form and therefore it is good practice to create a field and connect it to your data source to have the ability of selecting an item that you want to update. To learn more about conditions go to Conditions.
Input mapping - used to update an item inside of the datasource that you selected. Within this section the following fields are visible:
Form field or text - you can select a field within your form or type in text manually to represent the value you want your updated item to contain.
Data source field - select a field in your data source to hold the new value.
Add mapping - you can choose to create multiple items in your data source by clicking on Add mapping button. You can also remove fields by clicking on the Bin/Trash icon .
On success mapping - select the field(s) in the form which will store information and populate the data source field or text field with the respective data source value. To learn more about success mapping go to On Success Mapping.
On error mapping - select the field(s) in the form which will store error messages. Then type in a value or use Error message, to create a system generated error message if an error occurs during rule execution. To learn more about error mapping go to On Error Mapping.
Ignore mapping for blank fields - used to check if there are any blank field that need to be updated on the datasource. For example, if there are two fields to be updated and the user wants to update only one, and leaves the other blank, then the filled out field is updated and the other field is left unchanged.
Editing, deleting or duplicating rules
When you have clicked on an existing rule, and the rule is visible in the right-hand pane under Rules, there are a number of options available to you.
To disable a rule click the slider across beside the rule name.
To copy a rule, click on the Duplicate button beside the rule name.
To delete a rule, click on the Bin/Trash button .
To view a rule, click on the rule name to open the Edit rule dialog box.
What’s next
To find out more about other Data rules go to Data rules.
This rule implements the Delete function which is one of the CRUD (Create, Read, Update and Database) functions. The rule will delete an item data from a chosen data source, for example SharePoint, SAP or Oracle databases, see Data connectors for more details.
The Data source filter in this rule is used for targeting specific data item in your data connection. The item you want to delete within your data source is targeted by filtering it out using a field within your form. It is a good idea to connect a dummy field to your data source first and then use that field to filter for the item you want to delete.
When to use
The Delete item rule should be used whenever you want to delete an existing item within a data source of your choice.
You can add this rule:
to a field
to a form
to a process (the rule will run on load)
How to get started
Click on an existing process by going to Administration > Designer and decide which form, or field you will apply the rule to, by clicking on that item so that it is in edit mode so you can see the Edit/pen button, Pen button .
Click on Add a rule > Data > Delete item.
In the Edit rule - Delete item dialog box, give the rule a title in the Title field.
If you want to add conditions for the rule, click on the Edit conditions button see Conditions for more details.
Click on Select data source button to select the data source you want to update an item in. When you select your data source, new mapping options are presented.
Data source filter - works on condition bases where by you can filter the specific item that you want to delete from your data source. The condition uses a field from within your form and therefore it is good practice to create a field and connect it to your data source to have the ability of selecting an item that you want to delete. To learn more about conditions go to Conditions.
On success mapping - select the field(s) in the form which will store information and populate the data source field or text field with the respective data source value. To learn more about success mapping go to On Success Mapping.
On error mapping - select the field(s) in the form which will store error messages. Then type in a value or use Error message, to create a system generated error message if an error occurs during rule execution. To learn more about error mapping go to On Error Mapping.
Editing, deleting or duplicating rules
When you have clicked on an existing rule, and the rule is visible in the right-hand pane under Rules, there are a number of options available to you.
To disable a rule click the slider across beside the rule name.
To copy a rule, click on the Duplicate button beside the rule name.
To delete a rule, click on the Bin/Trash button .
To view a rule, click on the rule name to open the Edit rule dialog box.
What’s next
To find out more about other Data rules go to Data rules.
User rules is one of the category of rules available in Kianda, that enables user-based operations associated with user properties, for example updating a user property, retrieving a user property and finding a user based on a property. The user rules also allow you to invite partners and share a particular process with them. These rules are very useful when you want to do any property actions on a user like find a user or update a property of a specific user.
Take an example of a Look up user by property rule. Implementing this rule will allow you to store a user in a User picker field by providing a property of a user, for example user role or email address. See image below when a location is being chosen, a trainer is found that is assigned to the location:
In this example the Location of training is a List control is connected to a SQL Server connector. The Display field, Value field and Sort by of the List control is set to Location. With the list control set up that way, we are provided with a list based on our Location column in the database. For more information on how to create a List control and set its datasource go to List control. See image below to see how the Location of training field is set up:
With all of our users, we have set up a Location property and each user is assigned a different locations based on where they operate and provide training. The lookup user by property is set to Location which we provide to the rule by selecting our Location of training field. The outcome of this combination will set our Trainer field with the user that the Location property matches the value specified in the Location of training field. To learn more about how to create your own user properties and attributes go to Modifying profile attributes. See image below of the Lookup user by property rule:
For example when a user selects Galway from the Location of training, the lookup rule will search for a user that has the location property set to Galway and the result is Mark Lycette. See image below to see the SQL database and that Mark Lycette matches with the Galway location.
Getting started with User rules
If you go to Administration > Designer and click on a process or create a new process, then click on Add a rule the User rules are found in the left-hand pane when you click on Users.
There are four types of User rules as follows:
Get user property - this rule allows you to retrieve user profile properties like email, department and so on for a current user, or a user defined via a user picker field, and map these properties for use in form logic.
Lookup user by property - this rule allows you to find users, groups or partner accounts based on input filters.
Invite partner - this rule sends an invitation to a contact in a partner organization for them to access a shared process.
Update user property - this rule allows you to update user profile properties, for example if a user moves department, where the update happens in a dynamic way.
What’s next
To read more about each of the rule types go to the links below:
5.1 - Get user profile property
Introduction
The Get user property rule allows you to retrieve a property of a user that has been selected. You can select a user by defining one in a user picker field or selecting the current user, meaning that the user currently filling out the form will be selected when retrieving a profile property of a profile attribute. For example you can retrieve properties such as First Name, Last Name, Email or Phone number of a current user, those property values can be used fill in fields associated with a user.
When to use
Use this rule when you need to retrieve a profile property or a profile attribute from a current user or a user defined in a user picker field.
You can add this rule:
to a field
to a form
to a process (the rule will run on load)
Before getting started
In advance of using the Get user property rule, in your process you need to have created at least one or more forms. The rule also requires you to select a user profile source, the source can be the current user of the form or a user chosen within a User picker field. When selecting the current user option, you will target the property of the user that is currently using the form. When you pick the user picker field, you need to create a User picker field which is used to select a user to target when retrieving a property. The rule also requires a text box field which is used as a container to store the retrieved value of the property.
User picker (required) - field used to select a user for which you want to update a property. To learn more about user picker field go to User picker control.
Text box (required) - field used as a container to store the value of the property. To learn more about text box field go to Text box control.
How to get started
Click on an existing process by going to Administration > Designer and decide which form, or field you will apply the rule to, by clicking on that item so that it is in edit mode so you can see the Edit/pen button, Pen button .
Click on Add a rule > Users > Update user property.
In the Edit rule - Update user property dialog box, give the rule a title in the Title field.
If you want to add conditions for the rule, click on the Edit conditions button see Conditions for more details.
Under the Action section fill out the following:
User profile source - select which type of source you want to use as the user to update the property for, choose from:
Current user - selecting this option will result in targeting the user that is currently using the form.
Defined in a user picker field - selecting this option will result in a Pick a user field option to appear allowing you to select a user picker field from your process. This will then specify which user you are targeting when wanting to retrieve a property, see image below:
Field to store user profile property - you can select a field within your process to store the value of the retrieved property.
User profile property - list of profile properties and profile attributes that you can retrieve. Note that you can create your own profile attributes which also appear in the list, to learn more about profile attributes go to Profile attributes.
You can choose to retrieve more than one property of a user, to do so click on the button. This will result in adding more Field to store user profile property and User profile property fields. You can also delete unwanted fields by clicking on the red Bin/trash icon.
When you are finished editing the dialog box, click on OK or click on Close at any time to exit the dialog box.
Editing, deleting or duplicating rules
When you have clicked on an existing rule, and the rule is visible in the right-hand pane under Rules, there are a number of options available to you.
To disable a rule click the slider across beside the rule name.
To copy a rule, click on the Duplicate button beside the rule name.
To delete a rule, click on the Bin/Trash button .
To view a rule, click on the rule name to open the Edit rule dialog box.
User tip
Use this rule to automate processes when a form requires information from a users profile. For example when a form contains field such as name, phone number or email address, you can use this rule to automatically set those fields by retrieving the users name, phone number and email address properties.
What’s next
To find out more about other User rules go to User rules.
The Lookup user by property rule allows you to look up a user from your subscription using one of the properties in their profile for example first name, last name, email or department. Using this rule you can also look up groups or partners by specifying one of the properties available. When looking up a user, group or a partner you can use the following properties:
First Name
Last name
Display name
Email
Phone number
Partner company name
Partner main contact email
Partner language
Partner region
UserId
Customprofile attributes, to learn more about profile attributes go to Profile attributes.
When to use
Use this rule when your process requires to filter a user using a profile property, for example, when a user fills out his email address, a user picker field is assigned with the user that matches the entered email address. This rule is used to automate a user picker field when property input is provided.
You can add this rule:
to a field
to a form
to a process (the rule will run on load)
Before getting started
In advance of using the Lookup user by property rule, in your process you need to have created at least one or more forms. The lookup user by property rule also requires a User picker field which is used to store the user that matches the property you have entered. For best practice, you can also create a text box field which holds the value of the property that you want to look by, for example the email address of a user.
User picker (required) - field to store the user when the look up is performed. To learn more about user picker field, go to User picker control.
Text box (optional) - value of the property you want to look by. To learn more about text box field, go to Text box control.
How to get started
Click on an existing process by going to Administration > Designer and decide which form, or field you will apply the rule to, by clicking on that item so that it is in edit mode so you can see the Edit/pen button, Pen button .
Click on Add a rule > Users > Lookup user by property.
In the Edit rule - Lookup user by property dialog box, give the rule a title in the Title field.
If you want to add conditions for the rule, click on the Edit conditions button see Conditions for more details.
Under the Action section fill out the following:
Type of user - select the type of user you want to look for, the choices are:
Person - individual user from your subscription.
Group - user group that you have created in your subscription.
Partner - user that is part of your subscription with partner rights.
User property to locate user by - list of profile properties and profile attributes that you want the user to be looked up by. Note that you can create your own profile attributes which also appear in the list, to learn more about profile attributes go to Profile attributes.
Field value or text - you can select a field within your form or type in text manually to represent the value of the property you want to look up by.
User field to store lookup result - field to store the user that the property you searched by matches.
When you are finished editing the dialog box, click on OK or click on Close at any time to exit the dialog box.
Editing, deleting or duplicating rules
When you have clicked on an existing rule, and the rule is visible in the right-hand pane under Rules, there are a number of options available to you.
To disable a rule click the slider across beside the rule name.
To copy a rule, click on the Duplicate button beside the rule name.
To delete a rule, click on the Bin/Trash button .
To view a rule, click on the rule name to open the Edit rule dialog box.
User tip
Create a datasource with all users and their properties, you can create a list field and set the field to the created datasource. You can set the display of the list field to the property value of the data source. With that you will have a selection of user properties which you can use as a search mechanism for users. For example search users that are based in a specific location. To learn more about list field go to List control.
What’s next
To find out more about other User rules go to User rules.
The Invite partner rule allows you to dynamically send out an email to a partner organisation with an invitation to share a process from your subscription. This rule creates a profile for the partner as well as shares a process specified in the rule. You can choose to generate an invite link and store the link in a text box field if needed instead of sending out an automatic email.
When to use
Use this rule when inviting a third-party organisation from within a process instance, for example when your company must hire a third-party organisation to complete a specific task from your process, you can share this process with the third-party organisation to complete the task. Take a maintenance company for example, a process is created to perform a maintenance check. The maintenance company performs a check but some broken parts need to be re-manufactured, therefore the maintenance company sends out a Partner invitation to the manufacturing company in order to manufacture missing or broken parts as the maintenance company makes checks and fixes but not manufacture parts.
You can add this rule:
to a field
to a form
to a process (the rule will run on load)
Before getting started
Before you get started with this rule, you need to create a shared process instance of the process you intend to share with the partner. To learn more how to create a shared process instance, go to Shared processes.
In advance of using the Invite partner rule, in your process you need to have created at least one or more forms. The Invite partner rule also requires you to create a list of fields that are used to hold information about the partner and which process you want to share. See below for the list of fields required in your process before using the invite partner rule:
Partner organisation - text box field representing the name of the organisation that the partner is part of.
Shared process name - text box field representing the name of the process you want to share.
Contact first name - text box field representing the first name of the partner you want to share a process with.
Contact last name - text box field representing the last name of the partner you want to share a process with.
Contact email - text box field representing the email address of the partner you want to share a process with.
Partner country - text box field representing the country that your partner is situated in.
Partner city - text box field representing the city that your partner is in.
How to get started
Click on an existing process by going to Administration > Designer and decide which form, or field you will apply the rule to, by clicking on that item so that it is in edit mode so you can see the Edit/pen button, Pen button .
Click on Add a rule > Users > Invite partner.
In the Edit rule - Invite partner dialog box, give the rule a title in the Title field.
If you want to add conditions for the rule, click on the Edit conditions button see Conditions for more details.
Under the Action section fill out the following:
Partner organisation - field representing the name of the organisation that the partner is part of.
Shared process name - field representing the name of the process you want to share. Note that this name needs to match the name of the Shared process instance and not the name of a process. For example if your subscription has a process called Maintenance check, you need to create a shared process instance and give it an appropriate shared process name, for example Maintenance check - Plumbing Partner. In this field you need to use the Maintenance check - Plumbing Partner as the name.
Contact first name - field representing the first name of the partner you want to share a process with.
Contact last name - field representing the last name of the partner you want to share a process with.
Contact email - field representing the email address of the partner you want to share a process with.
Partner country - field representing the country that your partner is situated in.
Partner city - field representing the city that your partner is in.
Partner logo - text box field representing the URL of the partners logo or a file field with the uploaded logo.
Send invite email - radio list representing whether to send an email to the partner. If No is selected an extra field appears:
Field to store invite link - field used as a container to store the generated invite link.
Partner account - a user picker field used to specify the account of the partner. You can pre-create an account for your partner and set this field with his user. This will prevent the invited partner to create an account when accepting the invite link.
When you are finished editing the dialog box, click on OK or click on Close at any time to exit the dialog box.
Editing, deleting or duplicating rules
When you have clicked on an existing rule, and the rule is visible in the right-hand pane under Rules, there are a number of options available to you.
To disable a rule click the slider across beside the rule name.
To copy a rule, click on the Duplicate button beside the rule name.
To delete a rule, click on the Bin/Trash button .
To view a rule, click on the rule name to open the Edit rule dialog box.
User tip
Prior to inviting a partner, create a shared process instance of a process that you intend your partner to use. Give it a unique name for example use the original process name followed by the partners name. If you have a process called Inspection Checklist and your partners name is Windmill Inspections, call your shared process instance Inspection Checklist - Windmill Inspections. This will help you differentiate between your original process and the shared process.
What’s next
To find out more about other User rules go to User rules.
The Update user property rule allows you to change/update a profile property of a user within your subscription. When updating a property of a user, you can choose to select between the current user of the form or a user that can be selected from a user picker field. To learn more about a user picker field go to User picker control. You can update the following properties of a user:
Phone number
Partner language
Partner region
Custom profile attributes, to learn more about profile attributes go to Profile attributes.
When to use
Use this rule when you need to update a profile property or a profile attribute of a user. Select the current user option to update a property of the user that is currently filling out a form, or create a user picker field to have more flexibility with user selection.
You can add this rule:
to a field
to a form
to a process (the rule will run on load)
Before getting started
In advance of using the Update user property rule, in your process you need to have created at least one or more forms. The update user property rule also requires you to select a user profile source, the source can be the Current user or a User picker field. When selecting the current user option, you will target the property of the user that is currently using the form. When you pick the user picker field, you need to create a User picker field which is used to specify a user when updating a property. For best practices you can create a text box field which will represent the new value of the property you want to update.
User picker (required) - field used to select a user for which you want to update a property. To learn more about user picker field go to User picker control.
Text box (optional) - field representing the new value of the property you want to update. To learn more about text box field go to Text box control.
How to get started
Click on an existing process by going to Administration > Designer and decide which form, or field you will apply the rule to, by clicking on that item so that it is in edit mode so you can see the Edit/pen button, Pen button .
Click on Add a rule > Users > Update user property.
In the Edit rule - Update user property dialog box, give the rule a title in the Title field.
If you want to add conditions for the rule, click on the Edit conditions button see Conditions for more details.
Under the Action section fill out the following:
User profile source - select which type of source you want to use as the user to update the property for, choose from:
Current user - selecting this option will result in targeting the user that is currently using the form.
User picker field - selecting this option will result in a Pick a user field option appearing allowing you to select a user picker field from your process. This will then specify which user you are targeting when wanting to update a property. See image below:
Field or text - you can select a field within your form or type in text manually to represent the value of the property you want to update.
User property to update - list of profile properties and profile attributes that you want the update. Note that you can create your own profile attributes which also appear in the list, to learn more about profile attributes go to Profile attributes.
You can choose to update more than one property of a user, to do so click on the This will result in adding more Field or text and User property to update fields. You can also delete unwanted property selectors by clicking on the red Bin/Trash icon.
When you are finished editing the dialog box, click on OK or click on Close at any time to exit the dialog box.
Editing, deleting or duplicating rules
When you have clicked on an existing rule, and the rule is visible in the right-hand pane under Rules, there are a number of options available to you.
To disable a rule click the slider across beside the rule name.
To copy a rule, click on the Duplicate button beside the rule name.
To delete a rule, click on the Bin/Trash button .
To view a rule, click on the rule name to open the Edit rule dialog box.
User tip
When updating multiple properties at once, create a text box field for each property you want to update. This way you have more control of the value you want to assign to each property. To learn more about text box field go to Text box control.
What’s next
To find out more about other User rules go to User rules.
File management rules is one category of rules to enable operations such as the generation of Word documents, conversion to PDF format and merging PDF files together. These operations are useful when creating Word/Excel where the structure of those documents is the same for every instance but values are different. You can also use the File management rules for creating anonymous links which give access to files without permissions.
Take an example of a Create a file anonymous link rule. Implementing this rule will result in a randomly generated link which will lead to a file that you want to share. This link can be opened in any browser and can be accessible by anyone and there is no need for authentication when opening the link. You can also set the expiry time of the created link which will cause the link not to exist after the specified time. See images below for an example of the Create a file anonymous link rule:
Getting started with File management rules
If you go to Administration > Designer and click on a process or create a new process, then click on Add a rule the File management rules are found in the left-hand pane when you click on File management.
There are seven types of File management rules as follows:
Copy file - allows copying files between datasources. Use this file together with two file fields to move files between two different file locations. For example to copy files between an on premises folder and a SharePoint folder.
Convert to PDF - this rule allows the conversation of DOCX and DOC files into PDF format.
Generate word document - this rule generates a Word document from data associated with a process instance using a user-designed template.
Generate excel document - this rule generates an Excel workbook from data associated with a process instance using a user-designed template.
Set existing file - this rule is used to make an existing file accessible by a link, available within a configured file field. For example when you have access to a file through a link, you can use this link to store the file in a file field within your process.
Merge PDF - this rule allows you to merge two or more PDF files into a single PDF file. It also allows you to merge image file such as PNG or JPG to an existing PDF file.
Create a file anonymous link - this rule generates file links that can be shared anonymously with external users. No authentication is required when opening the anonymous link to a file.
What’s next
To read more about each of the rule types go to the links below:
6.1 - Copy file
Introduction
The Copy file rule allows you to copy a file from one field in your form into another field in a different form. You can use this rule to copy files from one datasource into another, by using different file fields for where you are copying to and from. For example if you want to copy a file from your local file system to a SharePoint location, set file fields for these locations, see gif below:
When to use
Use this rule when you need to copy files from one form to another or to transfer files from one datasource into a different one.
You can add this rule:
to a field
to a form
to a process (the rule will run on load)
Before you get started
In advance of using the Copy file rule, in your process you need to have created at least one or more forms. The rule also requires two file fields in order to select the original file and the other is used to store the copied version. To learn how to add a file go to File upload control.
File field(Original version) - used to hold the file that you want to copy.
File field(Copied version) - used to store the copied version of the original file.
How to get started
Click on an existing process by going to Administration > Designer and decide which form, or field you will apply the rule to, by clicking on that item so that it is in edit mode so you can see the Edit/pen button, Pen button .
Click on Add a rule > File management > Copy file.
In the Edit rule - Copy file dialog box, give the rule a title in the Title field.
If you want to add conditions for the rule, click on the Edit conditions button see Conditions for more details.
Under the Action section fill out the following:
Copy from - select a file field which holds the file that you want to copy.
Copy to - select a file field which will store the copied version of the original file.
Copy mode - you have two options when copying a file from one field into another:
Override - when a file already exists in the Copy to file filed and the copy rule is triggered again, the Copy to file filed will get overridden by the new file from Copy from. See example below:
When the Copy file rule is triggered, the file README.md in the SharePoint datasource field will be overridden by the access_frame.png file in the Local file system field. See below to see the result when Copy file rule is triggered again:
Append - when a file already exists in the Copy to file filed and the copy rule is triggered again, the Copy to file filed will be appended resulting in multiple files in the Copy to filed. See example below:
When the Copy file rule is triggered, the file access_frame.png in the Local file system field will be appended to the already existing README.md file in the SharePoint datasource field. See below to see the result when Copy file rule is triggered again:
When you are finished editing the dialog box, click on OK or click on Close at any time to exit the dialog box.
Editing, deleting or duplicating rules
When you have clicked on an existing rule, and the rule is visible in the right-hand pane under Rules, there are a number of options available to you.
To disable a rule click the slider across beside the rule name.
To copy a rule, click on the Duplicate button beside the rule name.
To delete a rule, click on the Bin/Trash button .
To view a rule, click on the rule name to open the Edit rule dialog box.
User tip
You can use this rule to copy files from one datasource into another. In the file field options of the Copy to field, set the destination to a datasource you want to copy a file into. To learn how to change the destination option in a file field go to File upload control.
The Convert to PDF rule allows you to convert a Word document (.doc or .docx) into a PDF (.pdf) file. This rule is very useful when sharing Word documents using the send email rule, the Convert to PDF rule will convert a file into PDF which can be attached to an email. This will allow other users to open the PDF file on any device.
When to use
You can use this rule when you need to convert a .doc or .docx file into a PDF. PDF files are very useful as they can be opened on any device.
You can add this rule:
to a field
to a form
to a process (the rule will run on load)
Before you get started
In advance of using the Convert to PDF rule, in your process you need to have created at least one or more forms. The rule also requires two file fields in order to select a Word document file and the other is used to store the converted PDF version. To learn how to add a file go to File upload control.
File field(Word document) - used to hold the Word document file that you want to convert.
File field(Converted PDF file) - used to store the converted PDF version of the original Word document file.
How to get started
Click on an existing process by going to Administration > Designer and decide which form, or field you will apply the rule to, by clicking on that item so that it is in edit mode so you can see the Edit/pen button, Pen button .
Click on Add a rule > File management > Convert to PDF.
In the Edit rule - Convert to PDF dialog box, give the rule a title in the Title field.
If you want to add conditions for the rule, click on the Edit conditions button see Conditions for more details.
Under the Action section fill out the following:
Convert Word File - used to hold the Word document file that you want to convert.
Converted PDF File - used to store the converted PDF version of the original Word document file.
See below for an example of a Word document before and after conversion, note the file extension in the Word file field before converting into a PDF:
Below is an image representing the result after converting the Word document file into a PDF, note the file extension in the Converted PDF file field:
When you are finished editing the dialog box, click on OK or click on Close at any time to exit the dialog box.
Editing, deleting or duplicating rules
When you have clicked on an existing rule, and the rule is visible in the right-hand pane under Rules, there are a number of options available to you.
To disable a rule click the slider across beside the rule name.
To copy a rule, click on the Duplicate button beside the rule name.
To delete a rule, click on the Bin/Trash button .
To view a rule, click on the rule name to open the Edit rule dialog box.
User tip
When converting files to a PDF format, you can set the destination of the converted file field to a location where you want to store the PDF. This will save you some time as you will not have to download the converted file because the destination that you choose in the file field will keep a separate copy.
This rule generates a Word document from data stored in the process using a Word .docx template. The Word template needs to be pre-created before using this rule and must be attached to a file field, this way the rule will know which template you want to use when creating the document. The GenerateWord document rule can also convert the Word document into a PDF right after generating the document.
When to use
Use this rule when your process requires dynamic document generation where the structure of those documents is the same for every instance but the values are different. This rule will use a Word template previously mapped with smart tags. Smart tags are created in Word when a field is selected using the Kianda add-in task pane, and then inserted into the document, see image below for more details:
You can add this rule:
to a field
to a form
to a process (the rule will run on load)
Before you get started
In advance of using the Generate Word document rule, in your process you need to have created at least one or more forms. The rule also requires two file fields, one for storing the Word template and the other for storing the generated Word document or PDF. To learn how to add a file go to File upload control.
File field(Template) - used as a container to store the Word template used to generate the Word document.
File field(Generated Word Document) - used as a container to store the generated Word document.
A Word template that is used to generate the Word document also needs to be pre-created using the Kianda add-in for Word. You can make each generated Word document very dynamic by using the smart tags that Kianda add-in uses to retrieve information for your form fields and places the values into the word document when generating it. To learn more about how to install and use Kianda add-in, go to Word document add-in.
How to get started
Click on an existing process by going to Administration > Designer and decide which form, or field you will apply the rule to, by clicking on that item so that it is in edit mode so you can see the Edit/pen button, Pen button .
Click on Add a rule > File management > Generate Word document.
In the Edit rule - Generate Word document dialog box, give the rule a title in the Title field.
If you want to add conditions for the rule, click on the Edit conditions button see Conditions for more details.
Under the Action section fill out the following:
Select a document template - select a file field that stores the word template. Your template can pull all values from Input fields in the Controls section of Kianda. For example if a text box field contains “This is a test” text, the value pulled into the generated word document is “This is a test”, see image below:
Select a document destination - select a file field that will store the generated word document.
Convert to PDF - radio button list which indicates whether you want to convert the generated document into a PDF file or not.
When you are finished editing the dialog box, click on OK or click on Close at any time to exit the dialog box.
Editing, deleting or duplicating rules
When you have clicked on an existing rule, and the rule is visible in the right-hand pane under Rules, there are a number of options available to you.
To disable a rule click the slider across beside the rule name.
To copy a rule, click on the Duplicate button beside the rule name.
To delete a rule, click on the Bin/Trash button .
To view a rule, click on the rule name to open the Edit rule dialog box.
User tip
When using this rule, create a utility panel and make it invisible to other users. You can then move the Word template file filed and the generated word document file field inside the utility panel. This way other users will not be able to see the unnecessary file fields and will not be able to tamper with them. To see an example of a utility panel, go to Creating a utility panel.
You can use the Convert to PDF function of the rule to convert the generated word document into a PDF file instead of using the Convert to PDF rule which is also available in the File management rules.
This rule generates an Excel workbook from data stored in a process using an Excel .xlsx template. The Excel template needs to be pre-created before using this rule and must be attached to a file field, this way the rule will know which template you want to use when creating the workbook.
When to use
Use this rule when your process requires dynamic workbook generation where the structure of those workbooks is the same for every instance, but the values of fields are different. Use this rule with combination of the Table control to output big tables and transfer them into the Excel workbook, to learn more about table control go to Table control. This rule will use an Excel template previously mapped with smart tags. Smart tags are created in Excel when a field is selected using the Kianda add-in task pane, and then inserted into the document, see image below for more details.
You can add this rule:
to a field
to a form
to a process (the rule will run on load)
Before you get started
In advance of using the Generate Excel workbook rule, in your process you need to have created at least one or more forms. The rule also requires two file fields, one for storing the Excel template and the other for storing the generated Excel workbook. To learn how to add a file go to File upload control.
File field(Template) - used as a container to store the Excel template used to generate the workbook.
File field(Generated Excel workbook) - used as a container to store the generated Excel workbook.
An Excel template that is used to generate the Excel workbook also needs to be pre-created using the Kianda add-in for Excel. You can make each generated Excel workbook very dynamic by using the smart tags that Kianda add-in uses to retrieve information for your form fields and places the values into the Excel workbook when generating it. To learn more about how to install and use Kianda add-in in Excel, go to Excel workbook add-in.
How to get started
Click on an existing process by going to Administration > Designer and decide which form, or field you will apply the rule to, by clicking on that item so that it is in edit mode so you can see the Edit/pen button, Pen button .
Click on Add a rule > File management > Generate excel workbook.
In the Edit rule - Generate excel workbook dialog box, give the rule a title in the Title field.
If you want to add conditions for the rule, click on the Edit conditions button , see Conditions for more details.
Under the Action section fill out the following:
Excel workbook template - select a file field that stores the Excel template. Your template can pull all values from Input fields in the Controls section of Kianda. For example if a text box field contains “This is a test” text, the value pulled into the generated Excel workbook is “This is a test”.
Generated workbook destination - select a file field that will store the generated word document.
When you are finished editing the dialog box, click on OK or click on Close at any time to exit the dialog box.
Editing, deleting or duplicating rules
When you have clicked on an existing rule, and the rule is visible in the right-hand pane under Rules, there are a number of options available to you.
To disable a rule, click the slider across beside the rule name.
To copy a rule, click on the Duplicate button beside the rule name.
To delete a rule, click on the Bin/Trash button .
To view a rule, click on the rule name to open the Edit rule dialog box.
User tip
When using this rule, create a utility panel and make it invisible to other users. You can then move the Excel template file field and the generated Excel workbook file field inside the utility panel. This way other users will not be able to see the unnecessary file fields and will not be able to tamper with them. To see an example of a utility panel, go to Creating a utility panel.
Use this rule when working with tables inside of Kianda. It is very easy to create an Excel spreadsheet by transferring data from your processes into Excel using the Excel add-in. Use smart tags from the add-in to add a table, the data from your table will be transferred into the Excel spreadsheet without manually typing them. See Excel workbook add-in for more detail.
The Set existing file rule allows a user to create a file and assign it into a file field based on a provided file URL path. For example if you have access to a file stored in the cloud and have the URL, you can use this URL to download the file from the internet and place it in a file field with a name. The name you give to the downloaded file must contain the extension, for example if the file stored in the cloud is a PDF file and you want the name of the file to be “Workbook”, then you need to set the name of the file to Workbook.pdf. You must provide the correct extension for the file otherwise the created file will not be downloadable.
When to use
Use this rule when your process requires you to bring an existing file that you have a link to but not the file itself. For example if you have a link that leads to a file that is stored in a SharePoint datasource, you can bring this file into your process by using this rule and storing it in a file field.
You can add this rule:
to a field
to a form
to a process (the rule will run on load)
Before you get started
In advance of using the Set existing file rule, in your process you need to have created at least one or more forms. The rule also requires one file field in order to store the file which is created from the given URL.
File field(required) - used to store the created file from the given URL. To learn more on File fields go to File upload control.
How to get started
Click on an existing process by going to Administration > Designer and decide which form, or field you will apply the rule to, by clicking on that item so that it is in edit mode so you can see the Edit/pen button, Pen button .
Click on Add a rule > File management > Set existing file.
In the Edit rule - Set existing file dialog box, give the rule a title in the Title field.
f you want to add conditions for the rule, click on the Edit conditions button see Conditions for more details.
Under the Action section fill out the following:
Set File - file field used as a container to store the created file using the given URL.
FileName field or text - you can select a field within your form or type in text manually to represent the name you want your created file to have.
File URL field or text - you can select a field within your form or type in text manually to represent the URL used to create the file.
Using a field for the name and a field for the URL will allow you to create a different files with a different names every time you use this rule, see the image below and note how the File name field corresponds to the created file in the File field:
When you are finished editing the dialog box, click on OK or click on Close at any time to exit the dialog box.
Editing, deleting or duplicating rules
When you have clicked on an existing rule, and the rule is visible in the right-hand pane under Rules, there are a number of options available to you.
To disable a rule click the slider across beside the rule name.
To copy a rule, click on the Duplicate button beside the rule name.
To delete a rule, click on the Bin/Trash button .
To view a rule, click on the rule name to open the Edit rule dialog box.
User tip
Create a Text box field that can be used to change the URL every time you want to create a file. This will make the rule dynamic and versatile. To laern more about text box field and how to create one, got to Text box control.
Create another Text box field that can be used to change the name of the file every time you want to create it from a URL.
The Merge PDF rule allows you to combine two or more .pdf files together. It is also possible to combine image files to the PDF file, for example .png or jpg. This rule can be useful when creating one large PDF document from smaller files. The generated file name will be the same as the first file used to merge, see image below for an example:
When to use
Use this rule when your process requires you to merge dynamically two or more PDF files. For example automatically merge expense receipts submitted by users into a single PDF files containing all images or PDF receipts.
You can add this rule:
to a field
to a form
to a process (the rule will run on load)
Before you get started
In advance of using the Merge PDF rule, in your process you need to have created at least one or more forms. The rule also requires at least 3 file fields, which are used to select files that you want to merge and a file field to store the merged PDF. To learn how to add a file go to File upload control.
File field(To be merged file #1) - used to hold the first file that you want to merge.
File field(To be merged file #2) - used to hold the second file that you want to merge.
File field(Merged PDF file) - used to store the merged PDF version of the two files.
How to get started
Click on an existing process by going to Administration > Designer and decide which form, or field you will apply the rule to, by clicking on that item so that it is in edit mode so you can see the Edit/pen button, Pen button .
Click on Add a rule > File management > Merge PDF.
In the Edit rule - Merge PDF dialog box, give the rule a title in the Title field.
If you want to add conditions for the rule, click on the Edit conditions button see Conditions for more details.
Under the Action section fill out the following:
Files to be merged (PDF OR Images) - select a file field which contains a PDF file or an image. Note that in order to merge PDF and image files, your first merging file must be a .pdf file followed by other image files, see image below:
+Add more files - you can choose to merge multiple PDF or image files together by clicking on Add more files button. You can also remove file fields by clicking on the Bin/Trash icon . Adding more file fields will allow you to attach more PDF or images files that you want to merge, see below image as an example:
Merged PDF file - select a file field from your process that you want use to store your merged PDF file.
When you are finished editing the dialog box, click on OK or click on Close at any time to exit the dialog box.
Editing, deleting or duplicating rules
When you have clicked on an existing rule, and the rule is visible in the right-hand pane under Rules, there are a number of options available to you.
To disable a rule click the slider across beside the rule name.
To copy a rule, click on the Duplicate button beside the rule name.
To delete a rule, click on the Bin/Trash button .
To view a rule, click on the rule name to open the Edit rule dialog box.
User tip
When merging file with this rule, you need to place the .pdf file first followed by the image files.
The Create a file anonymous link rule enables you to create a link to a file from your process. The link is fully anonymous which means anybody can access the file if they have the link. You can set an expiry time of the link (in hours), the count down will start from the time the link was created. It is possible to create anonymous link for multiple files as long as your file field supports it, see image below for an example:
Multiple files uploaded to a file field.
File field settings to allow multiple files to be uploaded.
When to use
Use this rule when your process or application requires sharing anonymously a file stored in one of the supported file connectors. For example when sharing a file link to a report stored behind an authenticated file system.
Add this rule to any form element.
to a field
to a form
to a process (the rule will run on load)
Before you get started
In advance of using the Anonymous form link, in your process you need to have created at least one or more forms. The create a file anonymous link rule also requires two control fields in order to store a file which you want to share and a text box control for storing the link. You can also create another text box or a number field to store the link duration, this field is optional but can be a good idea if you want to customise the duration of the link dynamically.
File field - used to store the file which you want to create a link to. To learn how to create a file filed go to File upload control.
Text box field - used to store the generated anonymous link which can be shared with other users. To learn how to create a text box field go to Text box control.
Text box or Number field (optional) - allows you to determine the duration of the link in hours. To learn hot to create a number field go to Number control.
How to get started
Click on an existing process by going to Administration > Designer and decide which form, or field you will apply the rule to, by clicking on that item so that it is in edit mode so you can see the Edit/pen button, Pen button .
Click on Add a rule > File management > Create a file anonymous link.
In the Edit rule - Create a file anonymous link dialog box, give the rule a title in the Title field.
If you want to add conditions for the rule, click on the Edit conditions button see Conditions for more details.
Under the Action section fill out the following:
Select a file field to create anonymous link(s) for - select the field that contain the file that you want to create the link for.
Link duration in hours (Default is 6 hours) - an optional field indicating the link expiry in hours.
Select a filed to store resulting anonymous link(s) - field to store the generated link. When there are multiple files uploaded to create the links for, the resulted links will be displayed between square brackets[] and separated by a , see below image:
When you are finished editing the dialog box, click on OK or click on Close at any time to exit the dialog box.
Editing, deleting or duplicating rules
When you have clicked on an existing rule, and the rule is visible in the right-hand pane under Rules, there are a number of options available to you.
To disable a rule click the slider across beside the rule name.
To copy a rule, click on the Duplicate button beside the rule name.
To delete a rule, click on the Bin/Trash button .
To view a rule, click on the rule name to open the Edit rule dialog box.
User tip
When sharing an anonymous link with someone, use the send email rule and attach the link in the body of the email. Make sure to generate the link before sending the email.
To make the rule versatile with setting the duration time, create a text box or a number field and select it in the Link duration in hours field. This way you can set the expiry of the link every time you create one.
Table rules is one category of rules to enable table operations such as sorting, copying table rows to another table, exporting and importing table data as .csv files and adding and removing table rows. These operations are useful to implement in external data sources, automating actions using Kianda processes.
Take an example of a Sort table rule. Implementing this rule will result in a table being sorted in an ascending or descending manner depending on what column of the table you want to sort by. For an example, take the image below as your table.
You can attach the Sort table rule to a button and selecting one of the columns available, for example Total Price, and the order of sorting for example descending. The result of the table after sorting will look as follows:
Getting started with Table rules
If you go to Administration > Designer and click on a process or create a new process, then click on Add a rule, the Table rules are found in the left-hand pane when you click on Tables.
There are 12 types of Table rules as follows:
Loop table - this rule loops through table rows, where other rules can be triggered and implemented.
Add table row - this rule adds a new row to a table.
Remove table row - this rule removes a current row from a table.
Import CSV - this rule imports .csv or .xlsx file data into a table, based on mapping provided within the rule.
Export CSV - this rule is export the contents of a table to a .csv file.
Copy table rows - this rule copies table rows from one table to another.
Clear table rows - this rule removes table rows that match given criteria.
Lookup value from table - this rule performs a lookup on a table value that match given criteria
Update table values -this rule updates table columns that match given criteria.
Sort table -this rule sorts table data based on multiple conditions.
Aggregate table - this rule aggregates table values.
Hide/Show column - this rule allows you to hide or show columns within a table
What’s next
To read more about each of the rule types go to the links below:
7.1 - Loop table
Introduction
The Loop table rule allows you to loop through table rows within a table of choice from within your process. When selected the rule allows you to trigger fields or rules to perform a particular action within the specified table. For example if a button is added to the table with an associated action, you can then trigger that action while looping through the table.
For example in the table below, there is a Calculate total button in a Calculate total column. This button has a rule that will set a value in the field in the Total column. Using the Loop table rule every row is looped through and this Calculate total button rule is triggered, completing the fields for each row in the Total column.
If the Loop table rule isn’t used, the user has to manually click on the Calculate Total button for each row, to populate the field in the Total column.
When to use
This rule is often used when the same action must be performed for multiple rows within a table.
You can add this rule:
to a field
to a form
to a process (the rule will run on load)
Before you get started
To demonstrate this rule, we will loop through a simple Purchase table described in the introduction above, in which we will calculate the total price spent on each item bought. To learn more on how to add a table into your form go to In the table we will have the following columns:
Item - text box field representing the name of the item bought. To learn how to add a text box field go to Text box control.
Price - number field representing the price of the item. To learn how to add a number field go to Number control.
Quantity - number field representing the quantity of the item.
Total - number field representing the total quantity spent on the item.
Calculate total - a button with a Set form field rule attached. To learn more on how to add and how to use the Set form field go to Set form field rule.
The goal in this example is to loop though the table and trigger the Calculate total button so that for each item purchased, the total can be calculated depending on its quantity.
How to get started
Click on an existing process by going to Administration > Designer and decide which form, or field you will apply the rule to, by clicking on that item so that it is in edit mode so you can see the Edit/pen button, Pen button .
Click on Add a rule > Table > Loop table.
In the Edit rule - Loop table dialog box, give the rule a title in the Title field.
In the Select a table option, select the table you want to loop through.
In the Select a column field or rule to trigger option, select a field or rule you want to trigger when looping through the table. In this example, we will select the Calculate total button from the table column.
Enable start action gives you two options:
Yes - allows you to select a field that will execute before the loop starts.
No - means no changes are made, the loop will execute straight away.
Enable end action gives you two options:
Yes - allows you to select a field that will execute after the loop finishes.
No - means no changes are made, the loop will end without any action.
Editing, deleting or duplicating rules
When you have clicked on an existing rule, and the rule is visible in the right-hand pane under Rules, there are a number of options available to you.
To disable a rule click the slider across beside the rule name.
To copy a rule, click on the Duplicate button beside the rule name.
To delete a rule, click on the Bin/Trash button .
To view a rule, click on the rule name to open the Edit rule dialog box.
What’s next
To find out more about other Table rules go to Table rules.
The Add table row rule allows you to add rows within a specified table. You can set values for each field within the newly created row by mapping values into them. For assigning values to each field in a row, you can use manually typed text or use other fields from your process. By default you need to give a value to a field in the newly created row, but can also add rows with no values. You can do that by clicking on the Bin/Trash icon in the New row mapping as shown in the image below:
This will delete the mapping fields and allow you to add the rule without assigning values to a field in the new row. The new row mapping should look as follows:
When to use
You can use this rule if you want more dynamic and more automated tables. By removing the original add row button from the table and adding a new button with the Add table row rule attached, you can map specific row fields to automatically appear with values when adding the rows. Take a look below how to add and use the Add table row rule.
You can add this rule:
to a field
to a form
to a process (the rule will run on load)
How to get started
Click on an existing process by going to Administration > Designer and decide which form, or field you will apply the rule to, by clicking on that item so that it is in edit mode so you can see the Edit/pen button, Pen button .
Click on Add a rule > Table > Add table row.
In the Edit rule - Add table row dialog box, give the rule a title in the Title field.
If you want to add conditions for the rule, click on the Edit conditions button see Conditions for more details.
In the Select a table option, select the table you want to add a new row to. New mapping options are presented when you select a table.
In the New row mapping you have the option to assign values to newly created rows and the fields within it.
Table row field - allows you to select a field from the row which you want to map a value to.
Form field or text - you can select a field within your form or type in text manually to represent the value you want your row field to contain.
Add mapping - you can choose to assign values to multiple row in your row by clicking on Add mapping button. You can also remove fields by clicking on the Bin/Trash icon . To add a row without any values, delete all mapping fields as shown below.
When you are finished editing the dialog box, click on OK or click on Close at any time to exit the dialog box.
Editing, deleting or duplicating rules
When you have clicked on an existing rule, and the rule is visible in the right-hand pane under Rules, there are a number of options available to you.
To disable a rule click the slider across beside the rule name.
To copy a rule, click on the Duplicate button beside the rule name.
To delete a rule, click on the Bin/Trash button .
To view a rule, click on the rule name to open the Edit rule dialog box.
What’s next
To find out more about other Table rules go to Table rules.
The Remove table row rule allows you to remove rows within a specified table. The rule targets only the last row in a table and will do nothing when there are no rows present in a table. You can apply conditions to this rule which will allow you to perform checks and only remove rows when a certain condition is met.
When to use
You can use this rule paired up with the Add table row rule. The add table rule will allow you to add a row with data in its columns and remove table row rule could be applied to a button, used to remove a row if wrong data has been entered. This gives the user the ability to add a row and remove rows. Give the remove table row rule a condition to make sure not to delete valuable data, see Conditions for more detail. To learn more about Add table row rule go to Add table row.
You can add this rule:
to a field
to a form
to a process (the rule will run on load)
Before you get started
For this rule to work you need to have one or more tables in your process. This will allow you to select a table that you want to target when removing rows. To learn how to add a table to your process go to Table control.
How to get started
Click on an existing process by going to Administration > Designer and decide which form, or field you will apply the rule to, by clicking on that item so that it is in edit mode so you can see the Edit/pen button, Pen button .
Click on Add a rule > Table > Remove table row.
In the Edit rule - Remove table row dialog box, give the rule a title in the Title field.
If you want to add conditions for the rule, click on the Edit conditions button see Conditions for more details. It is a good idea to add condition to this rule to prevent deleting valuable information from the table.
In the Select a table option, select the table you want to remove a row from.
When you are finished editing the dialog box, click on OK or click on Close at any time to exit the dialog box.
Editing, deleting or duplicating rules
When you have clicked on an existing rule, and the rule is visible in the right-hand pane under Rules, there are a number of options available to you.
To disable a rule click the slider across beside the rule name.
To copy a rule, click on the Duplicate button beside the rule name.
To delete a rule, click on the Bin/Trash button .
To view a rule, click on the rule name to open the Edit rule dialog box.
What’s next
To find out more about other Table rules go to Table rules.
The Import CSV rule allows you import a Comma-Separated Values (CSV) file and populate a specified table within your process. Using this rule automates and speeds up the process of populating a table when a lot of data is present. CSV files may look different depending on what program you will open it with, here is an example of a CSV file opened with Excel:
Here is the same file opened using Notepad:
As shown in the two images above, the format changes depending on what program you open the file with. Using the Notepad, each column is separated with a comma and each new line is a row. Excel formats commas and new lines automatically and creates numbers for rows and letters for columns. The CSV file can be separated using different separators other than comma. For example you can use ; as a separator, keep in mind that Excel does not format non-comma separated values correctly and the file will look as follows when opened using Excel:
Here is the same file opened using Notepad:
When to use
You can use this rule to populate a table when there is a lot of data present in a CSV file. Apply this rule to a process so that your table is populated automatically when a process has been loaded.
You can add this rule:
to a field
to a form
to a process (the rule will run on load)
Before you get started
For this rule to work there are a couple of prerequisites needed inside of your process:
Table - needed to let the rule know which table will be populated using the csv file, for more detail on how to add a table go to Table control.
File - needed as a container to hold your csv file. Using a file control, you can upload a csv file and use that csv file to populate a table. For more detail on how to add a file go to File upload control.
Keep in mind that in order to populate a table within your process correctly, you need to have the same amount of columns in the table as inside of the CSV file. For example a table looking as follows:
This indicates that the CSV file that we want to import should have three columns:
How to get started
Click on an existing process by going to Administration > Designer and decide which form, or field you will apply the rule to, by clicking on that item so that it is in edit mode so you can see the Edit/pen button, Pen button .
Click on Add a rule > Table > Import CSV.
In the Edit rule - Import CSV dialog box, give the rule a title in the Title field.
If you want to add conditions for the rule, click on the Edit conditions button see Conditions for more details.
Under the Action section fill out the following:
Select the CSV file field - select a file field containing a csv file. This file field needs to be pre-created as it is a required field when using this rule. the csv file attached to this field will be used to populate the table.
CSV separator - the default separator is a comma ( , ) but you can set it to any character, number or symbol you want. Keep in mind that the separator fields separates each column of a row. For example you can have a file that looks as follows:
This image represents how a table looks like applying the Import CSV rule with a sample file and when the CSV separator is set to a comma ( , ) see below:
Num cols. in CSV - this field represents the number of columns in your CSV file. From the example and image above, this field is set to three.
Skip first line - radio button asking whether to skip the first line or add the first line of the CSV file. If the first line of your CSV file represents the title of the column, you can select Yes and the line will not be included in your table.
Destination table - field that allows you to select the table you want to target when populating data from the CSV file. New mapping options are presented when selecting a table.
Table row field - select the row you want to target when setting a value.
CSV field or text - you can select a field/column within your CSV file or type in text manually to represent the value you want your field to contain.
Add mapping - you can choose to assign values to multiple fields in your row by clicking on Add mapping button. You can also remove fields by clicking on the Bin/Trash icon .
Going back to the CSV separator example image, to achieve the correct mapping, we need to add three fields as shown below:
Existing rows behavior - you have two options when populating data into your selected table:
Override - will override all existing rows of your table with the new data from your CSV file.
Append - will ignore the existing rows inside of your table and simply append all the new rows from your CSV file to the end of the table.
CSV Date format - type in manually the data format that you have set in your CSV file. This applies to a column when it is of type Date. The formatting of the date specified in tis field must be the same as in your CSV file. For example when your date format in the CSV file is DD/MM/YYYY and CSV Date format option is set to YYYY/DD/MM, you can encounter date bugs in your table.
When you are finished editing the dialog box, click on OK or click on Close at any time to exit the dialog box.
Editing, deleting or duplicating rules
When you have clicked on an existing rule, and the rule is visible in the right-hand pane under Rules, there are a number of options available to you.
To disable a rule click the slider across beside the rule name.
To copy a rule, click on the Duplicate button beside the rule name.
To delete a rule, click on the Bin/Trash button .
To view a rule, click on the rule name to open the Edit rule dialog box.
What’s next
To find out more about other Table rules go to Table rules.
The Export CSV rule allows you export a specified table from within your process into a CSV (Comma Separated Values) file. In the edit rule dialog box you can format how each value is separated and which columns to include and exclude when exporting. Keep in mind when exporting a table into a CSV format, it will export data for the following field types:
Text box
Number
Date
Any other field types will be ignored, for example all control types from within Layout and Actions will be ignored.
When to use
You can use this rule when you want to open the table with a notepad or excel. This rule is also useful when you want to share a table with other users, you can do that by exporting the table into a File field and attaching the file into an email using the Send email rule. To learn more about attaching a file into an email go to Attachments.
You can add this rule:
to a field
to a form
to a process (the rule will run on load)
Before you get started
For this rule to work there are a couple of prerequisites needed inside of your process:
Table - needed to let the rule know which table will be used to export into the CSV file, for more detail on how to add a table go to Table control.
File - needed as a container to hold your exported CSV file. When the table is exported into this file field, you can downloaded by clicking on the file name. For more detail on how to add a file field go to File upload control.
How to get started
Click on an existing process by going to Administration > Designer and decide which form, or field you will apply the rule to, by clicking on that item so that it is in edit mode so you can see the Edit/pen button, Pen button .
Click on Add a rule > Table > Export CSV.
In the Edit rule - Export CSV dialog box, give the rule a title in the Title field.
If you want to add conditions for the rule, click on the Edit conditions button see Conditions for more details. It is a good idea to add condition to this rule to prevent exporting incomplete tables.
Under the Action section fill out the following:
Origin table - field that allows you to select the table you want to target when exporting into a CSV file. When selecting a table, new options appear:
Columns to export - this is a checklist allowing you to select or deselect columns from a table that you want to keep or dismiss from exporting into the CSV file. These fields will correspond to field names given in your table, see below image for an example.
Table with three columns will correspond to Columns to export option in the export CSV edit rule dialog box.
CSV separator - the default separator is a comma , but you can set it to any character, number or symbol you want. Keep in mind that the separator fields separates each column of a row. For example you can have a file that looks as follows when setting this field with a semi-colon ;as shown with Notepad below:
Keep in mind when exporting a table using a separator other than a comma , and open it in Excel, the data will not be formatted correctly within Excel as it recognises columns when only separated by commas , for example the above file is opened with Notepad while the image below shows the same exported file opened with Excel:
Include header row - radio button asking whether to include the header row meaning that the column title will be included or not.
Destination file field - field specifying the container which hold the csv file of the exported table. When the CSV file is present in the file field, the name of the file will be the same as the title of the table specified to export. For example if the title of a table is Countries, the file will be called Countrie.csv. You can download the file by clicking on the file name.
When you are finished editing the dialog box, click on OK or click on Close at any time to exit the dialog box.
Editing, deleting or duplicating rules
When you have clicked on an existing rule, and the rule is visible in the right-hand pane under Rules, there are a number of options available to you.
To disable a rule click the slider across beside the rule name.
To copy a rule, click on the Duplicate button beside the rule name.
To delete a rule, click on the Bin/Trash button .
To view a rule, click on the rule name to open the Edit rule dialog box.
What’s next
To find out more about other Table rules go to Table rules.
The Copy table rows rule allows you copy any field from within a specified table into another table within your process. You can select the same tables which will act similar to Add table row, see Add table row for more detail.
When to use
You can use this rule when you want to copy specific fields from one table to another. You do not need to copy all columns from a row. For example, from a table row that has Country, City, Currency columns, you can just copy the City column.
You can add this rule:
to a field
to a form
to a process (the rule will run on load)
Before you get started
For this rule to work you need to have one or more tables in your process. This will allow you to select a table to copy from and to. It is possible to have only one table in your process but that will limit you to copy a row from the specific table to the same table.
How to get started
Click on an existing process by going to Administration > Designer and decide which form, or field you will apply the rule to, by clicking on that item so that it is in edit mode so you can see the Edit/pen button, Pen button .
Click on Add a rule > Table > Copy table rows.
In the Edit rule - Copy table rows dialog box, give the rule a title in the Title field.
If you want to add conditions for the rule, click on the Edit conditions button see Conditions for more details.
Under the Action section fill out the following:
Table to copy rows from - select the table you wish to copy fields from. This table needs to be pre-created before adding this rule. If no table is selected in this field, an error message will show.
Table to copy rows to - select the table you wish to copy fields to. This field must be pre-created before adding this rule. You can select the same table as in the Table to copy from section. This will act similar to add table row rule, see Add table row for more detail.
When both the Table to copy rows from and Table to copy rows to are assigned, more options are presented.
Copy row conditions - allows you to add conditions to the fields you want to copy into the new table. These conditions work like filters. For example if a table looks like this:
We can set a condition using the Copy row condition to copy only specific rows. For example we only want to copy the rows which contain the word “land” in the country field. To achieve this, the Copy row condition would look as follows:
Box 1 represents the field from the table which you are copying from.
Box 2 represents the conditional check.
This is an example of the output using the conditions shown above. Note we are only copying the country and currency into the new table:
Column mapping - allows you to assign values from fields within your process into the newly copied row.
Field or text - you can select a field within your form or type in text manually to represent the value you want your field in the new row to contain.
To table - select the field from the table you are copying to, to contain the value specified in the Field or text section.
Add mapping - you can choose to set multiple fields of a row by clicking on Add mapping button. You can also remove fields by clicking on the Bin/Trash icon .
When you are finished editing the dialog box, click on OK or click on Close at any time to exit the dialog box.
Editing, deleting or duplicating rules
When you have clicked on an existing rule, and the rule is visible in the right-hand pane under Rules, there are a number of options available to you.
To disable a rule click the slider across beside the rule name.
To copy a rule, click on the Duplicate button beside the rule name.
To delete a rule, click on the Bin/Trash button .
To view a rule, click on the rule name to open the Edit rule dialog box.
What’s next
To find out more about other Table rules go to Table rules.
The Clear table rows rule allows you clear/delete all or some rows from a specified table in your process. This rule acts similar to Remove table row except with the Clear table rows, you can delete multiple rows and filter out which rows to delete by adding conditions. To learn more about Remove table row go to Remove table row.
When to use
You can use this rule when you want clear all rows from a table or by adding criteria to delete rows, you can filter out which rows to clear from the table.
You can add this rule:
to a field
to a form
to a process (the rule will run on load)
Before you get started
For this rule to work you need to have one or more tables in your process. This will allow you to select a table that you want to clear rows in. To learn how to add a table to your process go to Table control.
How to get started
Click on an existing process by going to Administration > Designer and decide which form, or field you will apply the rule to, by clicking on that item so that it is in edit mode so you can see the Edit/pen button, Pen button .
Click on Add a rule > Table > Clear table rows.
In the Edit rule - Clear table rows dialog box, give the rule a title in the Title field.
If you want to add conditions for the rule, click on the Edit conditions button see Conditions for more details.
Under the Action section fill out the following:
Table to clear rows from - select the table you wish target when clearing rows from. This table needs to be pre-created before adding this rule. If no table is selected in this field, an error message will show. When the Table to clear rows from is assigned, the Criteria to delete rows is presented.
Criteria to delete rows - allows you to add a condition which works like a filter. Adding a condition will allow you to filter out which rows to delete and which to keep when using the Clear table rows rule. For example if a table looks like this:
We can set a condition using the Criteria to delete rows button. For example if we want to delete all rows in which the Country field contains the word “land”. To achieve this, the Criteria to delete rows would look as follows:
Box 1 represents the field from the table which you are clearing rows in.
Box 2 represents the conditional check.
This is an example of the output using the conditions shown above:
When you are finished editing the dialog box, click on OK or click on Close at any time to exit the dialog box.
Editing, deleting or duplicating rules
When you have clicked on an existing rule, and the rule is visible in the right-hand pane under Rules, there are a number of options available to you.
To disable a rule click the slider across beside the rule name.
To copy a rule, click on the Duplicate button beside the rule name.
To delete a rule, click on the Bin/Trash button .
To view a rule, click on the rule name to open the Edit rule dialog box.
What’s next
To find out more about other Table rules go to Table rules.
The Lookup value from table rule allows you look for a column field within a row that contains a value specified in a lookup condition. When the lookup condition is met, you can extract any column value from that row and set a different field from within your process with that value.
When to use
You can use this rule when you want to extract values from the first row when a condition is met.
You can add this rule:
to a field
to a form
to a process (the rule will run on load)
Before you get started
For this rule to work you need to have one or more tables in your process. This will allow you to select a table that you wanttarget when looking up values. To learn how to add a table to your process go to Table control.
How to get started
Click on an existing process by going to Administration > Designer and decide which form, or field you will apply the rule to, by clicking on that item so that it is in edit mode so you can see the Edit/pen button, Pen button .
Click on Add a rule > Table > Lookup value from table.
In the Edit rule - Lookup value from table dialog box, give the rule a title in the Title field.
If you want to add conditions for the rule, click on the Edit conditions button see Conditions for more details.
Under the Action section fill out the following:
Table to lookup value from - select the table you wish target when looking up values from. This table needs to be pre-created before adding this rule. If no table is selected in this field, an error message will show. When the Table to lookup value from is assigned, two more options are presented:
Table lookup conditions - allows you to add a condition that works like a filter. Adding a condition will allow you to target a column of a row and check if it has a specific value. For example checking if a currency column is equals to Euro, the condition will look as follows:
Box 1 represents the column from a row which you are looking up.
Box 2 represents the value you are making the check against.
Lookup mapping - allows you to extract a value from the row that met the lookup condition.
Column to extract - select the specific column from the row to extract the value.
Field to store extracted value - select a pre-created field to store the value from the selected column in the Column to extract section.
Add mapping - you can choose to extract multiple values from a row by clicking on Add mapping button. You can also remove fields by clicking on the Bin/Trash icon .
When you are finished editing the dialog box, click on OK or click on Close at any time to exit the dialog box.
Editing, deleting or duplicating rules
When you have clicked on an existing rule, and the rule is visible in the right-hand pane under Rules, there are a number of options available to you.
To disable a rule click the slider across beside the rule name.
To copy a rule, click on the Duplicate button beside the rule name.
To delete a rule, click on the Bin/Trash button .
To view a rule, click on the rule name to open the Edit rule dialog box.
What’s next
To find out more about other Table rules go to Table rules.
The Update table values rule loops through a table allowing you to update column values. You can update all values in a selected column or update just the columns that match a condition.
When to use
You can use this rule when you want to update a column value in rows that match the condition specified inside the rule.
You can add this rule:
to a field
to a form
to a process (the rule will run on load)
Before you get started
For this rule to work you need to have one or more tables in your process. This will allow you to select a table that you want to update values in. To learn how to add a table to your process go to Table control.
How to get started
Click on an existing process by going to Administration > Designer and decide which form, or field you will apply the rule to, by clicking on that item so that it is in edit mode so you can see the Edit/pen button, Pen button .
Click on Add a rule > Table > Update table values.
In the Edit rule - Update table values dialog box, give the rule a title in the Title field.
If you want to add conditions for the rule, click on the Edit conditions button see Conditions for more details.
Under the Action section fill out the following:
Table to update - select the table you wish target to update values in. This table needs to be pre-created before adding this rule. If no table is selected in this field, an error message will show. When the Table to update is assigned, three more options are presented:
Table lookup conditions - allows you to add a condition that works like a filter. Adding a condition will allow you to target the specific row that the condition specifies. For example checking if a currency column is equal to Euro, the condition will look as follows:
Box 1 represents the column from a row which you are looking up.
Box 2 represents the value you are making the check against.
Table column to update - allows you to select a column you want to update when a condition in the Table lookup conditions option is met. This field will be updated with the value given in Field or text to update table column with section.
Field or text to update table column with - you can select a field within your form or type in text manually to represent the value you want your updated column to contain.
When you are finished editing the dialog box, click on OK or click on Close at any time to exit the dialog box.
Editing, deleting or duplicating rules
When you have clicked on an existing rule, and the rule is visible in the right-hand pane under Rules, there are a number of options available to you.
To disable a rule click the slider across beside the rule name.
To copy a rule, click on the Duplicate button beside the rule name.
To delete a rule, click on the Bin/Trash button .
To view a rule, click on the rule name to open the Edit rule dialog box.
What’s next
To find out more about other Table rules go to Table rules.
The Sort table rule loops through a table allowing you to sort data in an ascending or descending manner. In the rule options, you can select which column of the table to sort by. The column you select can be any of the Control input fields, the sorting algorithm takes the numerical or text value of each field and sorts it accordingly. For example if there is a User picker column in the table like shown below:
The sorting algorithm will use the text value or in this case the name of each user and sort it in an alphabetical order as the order is set to ascending. Take note that the Favorite Image column has also changes the order to the matching user as the sorting rule targets the whole row, not just the column. The result of the sort is as follows:
When to use
You can use this rule when you want to sort a table in an ascending or descending manner. The rule allows you to select the column by which you want to sort it, a field which identifies that column will make your table dynamic and very versatile. For example having a List field with options for all columns in your table.
You can add this rule:
to a field
to a form
to a process (the rule will run on load)
Before you get started
For this rule to work you need to have one or more tables in your process. This will allow you to select a table that you want to be sorted. To learn how to add a table to your process go to Table control.
How to get started
Click on an existing process by going to Administration > Designer and decide which form, or field you will apply the rule to, by clicking on that item so that it is in edit mode so you can see the Edit/pen button, Pen button .
Click on Add a rule > Table > Sort table.
In the Edit rule - Sort table dialog box, give the rule a title in the Title field.
If you want to add conditions for the rule, click on the Edit conditions button see Conditions for more details.
Under the Action section fill out the following:
Select a table - select the table you wish target when sorting values in. This table needs to be pre-created before adding this rule. If no table is selected in this field, an error message will show.
Column to sort - allows you to select a column within your table you wish to sort by.
Sort order - radio button selection of the sorting order:
Asc - Ascending order. For example sorting number in an ascending order will look as follows:
Desc - Descending order. For example sorting number in an descending order will look as follows:
Add Sort - you can choose to set multiple columns to sort your table by clicking on Add Sort button. You can also remove fields by clicking on the Bin/Trash icon .
When you are finished editing the dialog box, click on OK or click on Close at any time to exit the dialog box.
Editing, deleting or duplicating rules
When you have clicked on an existing rule, and the rule is visible in the right-hand pane under Rules, there are a number of options available to you.
To disable a rule click the slider across beside the rule name.
To copy a rule, click on the Duplicate button beside the rule name.
To delete a rule, click on the Bin/Trash button .
To view a rule, click on the rule name to open the Edit rule dialog box.
What’s next
To find out more about other Table rules go to Table rules.
The Aggregate table rule loops through a table allowing you to aggregate a specific column and store the value in another field from within you process. There are three functions of the Aggregate table rule which are Sum, Average and Count. Sum and Average only work on number fields while Count will count the number of rows it looped through.
When to use
You can use this rule to sum up all the values in a column or get the average. Sum and Average functions of the aggregate rule work only on number fields. The Count function can be used to count the rows that the aggregate rule looped through.
You can add this rule:
to a field
to a form
to a process (the rule will run on load)
Before you get started
For this rule to work there are a couple of prerequisites needed inside of your process:
Table - needed to let the rule know which table will be used to aggregate columns together, for more detail on how to add a table go to Table control.
Text box - needed as a container to hold the result from the aggregate. For more detail on how to add a text box field go to Text box control.
How to get started
Click on an existing process by going to Administration > Designer and decide which form, or field you will apply the rule to, by clicking on that item so that it is in edit mode so you can see the Edit/pen button, Pen button .
Click on Add a rule > Table > Aggregate table.
In the Edit rule - Aggregate table dialog box, give the rule a title in the Title field.
If you want to add conditions for the rule, click on the Edit conditions button see Conditions for more details.
Under the Action section fill out the following:
Select a table field - select the table you wish target when aggregating values. This table needs to be pre-created before adding this rule. If no table is selected in this field, an error message will show.
Table aggregate conditions - allows you to add a condition that works like a filter. Adding a condition will allow you to target the specific row that the condition matches. For example, you want to aggregate all rows that the avarage score is more than 50%.
Operation - radio selection of the operation that you want performed on the aggregate rule:
Sum - counts all fields together and outputs the total(only works with numbers). Requires a Number field within your table. To lean more on Number field, got to Number control.
Average - gets the average from all the values provided in a column(only works with numbers). Requires a Number field within your table. To lean more on Number field, got to Number control.
Count - counts all row instances that the aggregate rule looped through.
Select a number field to aggregate - allows you to select a number field within your table. It is only used with the Sum and Average operations.
Result field - select the field you want to store the value of the aggregation.
Auto update result - checkbox allowing you to enable or disable auto update. This will determine if the result field will be updated when more rows are added after the aggregation.
When you are finished editing the dialog box, click on OK or click on Close at any time to exit the dialog box.
Editing, deleting or duplicating rules
When you have clicked on an existing rule, and the rule is visible in the right-hand pane under Rules, there are a number of options available to you.
To disable a rule click the slider across beside the rule name.
To copy a rule, click on the Duplicate button beside the rule name.
To delete a rule, click on the Bin/Trash button .
To view a rule, click on the rule name to open the Edit rule dialog box.
What’s next
To find out more about other Table rules go to Table rules.
The Hide / Show column rule allows you change the visibility of a selected column within a table in a process. You can either disable or enable the property, you can also toggle between both of the visible states.
When to use
You can use this rule to hide or show specific columns in your table. This rule is often used when hiding private data from users that do not need access to it. For example you can choose to show total earning column of a table to your managers but not other employees. You can also apply this rule to a button and give it the toggle function which will allow you to toggle the visible property of a column.
You can add this rule:
to a field
to a form
to a process (the rule will run on load)
Before you get started
For this rule to work you need to have one or more tables in your process. This will allow you to select a table in which you want to hide or show a column in. To learn how to add a table to your process go to Table control.
How to get started
Click on an existing process by going to Administration > Designer and decide which form, or field you will apply the rule to, by clicking on that item so that it is in edit mode so you can see the Edit/pen button, Pen button .
Click on Add a rule > Table > Hide/Show column.
In the Edit rule - Hide/Show column dialog box, give the rule a title in the Title field.
If you want to add conditions for the rule, click on the Edit conditions button see Conditions for more details.
Under the Action section fill out the following:
Select a table to hide / show columns from - select the table you wish target. This table needs to be pre-created before adding this rule. If no table is selected in this field, an error message will show. When the table is selected, an + Add button appears. Click on it to add a field where you can select the column you wish to hide or show.
[1] Column to hide / show - select the column you want to target you want the hide / show rule to apply to.
[2] Visible - select to which visible property you want the column to be set to.
Hide - will set the visible property to disabled.
Show- will set the visible property to enabled.
Toggle visible - will set the visible property as the opposite of what it is. For example if the current state of the visible property is enabled, when this rule is triggered, it will set the visible property to disabled.
Add - you can choose to change visibile property of multiple columns in your table by clicking on + Add button. You can also remove fields by clicking on the Bin/Trash icon .
When you are finished editing the dialog box, click on OK or click on Close at any time to exit the dialog box.
Editing, deleting or duplicating rules
When you have clicked on an existing rule, and the rule is visible in the right-hand pane under Rules, there are a number of options available to you.
To disable a rule click the slider across beside the rule name.
To copy a rule, click on the Duplicate button beside the rule name.
To delete a rule, click on the Bin/Trash button .
To view a rule, click on the rule name to open the Edit rule dialog box.
What’s next
To find out more about other Table rules go to Table rules.
Date rules is a category of rules that allows for the calculation, manipulation and general formatting of times and dates. Date rules can be utilised to set the time of a scheduled task, determine which process user submitted an instance first, and format dates that are inputted in date fields. To learn more about dates, see Date control.
Below is an example of a date rule in operation; a Compare date rule is applied to a date field input in a form. If the date entered is after a set deadline, the field Status - After Deadline? in this process is set to Yes. You could use this to ensure that process instances must be completed before an upcoming deadline.
Getting started with Date rules
If you go to Administration > Designer and click on a process or create a new process, then click on Add a rule, the Date rules are found in the left-hand pane when you click on Dates.
There are four types of Date rules as follows:
Add time to date - this rule allows the addition of time to a date which can be based on a chosen be parameter such as starting from now, today or another specified value. This can used in conjunction with the Schedule a rule rule to schedule reminders for certain process instances.
Calculate time - this rule calculates the number of time units between two dates, or between now/today and a given date.
Compare dates - this rule allows the comparison of date fields to know if one date is for example, between dates, before or after a given date. The rule could be used to ensure that process instances must be completed before an upcoming deadline.
Format date - this rule applies custom formatting to input date fields so you can choose the format of the date (for example, parsing the date format MM/DD/YY to DD/MM/YY).
What’s next
We have briefly introduced the four types of Date rules. To read more about each of the rule types go to the links below:
8.1 - Add time to date
Introduction
The Add time to date rule allows you to add time to a date field in order to have a future date set within your form. This rule can remind users through set intervals to complete a process instance before a set time. An example of this rule would be entering a numeric value of 1 into the Time to add or a field, selecting Days from the Time unit drop-down list, and selecting Today() from the To date radio button options.
When to use
The Add time to date rule should be used when a user wishes to add time to a date. For example, sending a reminder email after a set interval of time.
You can add this rule:
to a field
to a form
to a process (the rule will run on load)
Before you get started
In advance of using this rule, you need to have created one or more forms, complete with control fields. For example, you must have a created field in your form that the Add time to date rule can be applied to. See Date control for more information on using date fields.
How to get started
Click on an existing process by going to Administration > Designer and decide which form, or field you will apply the rule to, by clicking on that item so that it is in edit mode so you can see the Edit/pen button, Pen button .
Click on Add a rule > Dates > Add time to date.
In the Edit rule - Add time to date dialog box, give the rule a title in the Title field.
If you want to add conditions for the rule, click on the Edit conditions button . See Conditions for more details.
Under Action create one or more actions for the rule by filling out the following:
Time to add or a field - click on the field and select a numerical value, or another field in your Kianda form. This will be the interval quantity.
Time unit - choose an option from the drop-down list to serve as your interval unit:
Minutes
Hours
Days
Weeks
Months
Years
To date - choose from the radio buttons:
Now() - adding time to date immediately
Today() - adding time to date from midnight today
Date field - adding time to date from the date specified in another field
Destination date field - choose the date field within your form which this new date is to be stored. If the Use business hours? checkbox is ticked, you will be prompted to enter the start and end time of your business’ working day, using the time picker list. It should be noted that this checkbox only appears when the time unit chosen is minutes or hours.
Date calculation settings - you can select whether the time added to your chosen date field:
Includes weekends
Excludes weekends
Excludes weekends and special dates
Excludes special dates
Special dates - you can also define custom special dates and save them accordingly. Click on Add special date to add in a date. Enter a label for this special date in the left field and a date in the right field. By choosing a title for a new special date, and entering the date into the date field, the date can be saved using the Save special dates for reuse button . To load previously saved dates, click on the Load special dates button . You can delete a saved Special date by clicking on the Bin/Trash button.
Finally, clicking on the OK button will save the new rule you have just created and apply it to the chosen field.
Editing, deleting or duplicating rules
When you have clicked on an existing rule, and the rule is visible in the right-hand pane under Rules, there are a number of options available to you.
To disable a rule click the slider across beside the rule name.
To copy a rule, click on the Duplicate button beside the rule name.
To delete a rule, click on the Bin/Trash button .
To view a rule, click on the rule name to open the Edit rule dialog box.
User tip
Multiple Special dates can be loaded at once to allow you to select a number of specific dates to exclude from the rule.
The Add time to date rule is commonly used with the Schedule a rule rule to apply the specified time to a rule on a button, for example. This can be used like a clock to countdown to an event such as sending a reminder email.
What’s next
To find out more about other date rules go to Dates.
The Calculate time rule allows you to calculate the difference in time units between one date field and another, or from the current date and a chosen date field. The resulting number is then stored within a separate field within a Kianda form. An example of this rule would be entering a date under From date, selecting the Now() radio button, and entering a field under destination field. This will display the amount of days that are between the entered date field, and now.
For example, the resulting number could be utilised as a countdown feature to communicate to the user that an important date is approaching, and that a task needs to be completed (as seen below). In this instance, there are 20 days before a deadline. To learn more about dates, see Date control.
When to use
The Calculate time rule should be used when a user wishes to calculate the time difference between a date field and another date/time. For example, creating a countdown function that returns the amount of time units between two set dates.
You can add this rule:
to a field
to a form
to a process (the rule will run on load)
Before you get started
In advance of using this rule, you need to have created one or more forms, complete with control fields. For example, you must have a created field in your form that the Calculate time rule can be applied to. See Date control for more information on using date fields.
How to get started
Click on an existing process by going to Administration > Designer and decide which form, or field you will apply the rule to, by clicking on that item so that it is in edit mode so you can see the Edit/pen button, Pen button .
Click on Add a rule > Dates > Calculate time.
In the Edit rule - Calculate time dialog box, give the rule a title in the Title field.
If you want to add conditions for the rule, click on the Edit conditions button . See Conditions for more details.
Under Action > Calculate time between dates, create one or more actions for the rule by filling out the following:
Time unit - choose an option from the drop-down list to serve as your calculation unit:
Minutes
Hours
Days
Weeks
Months
Years
From date - click on the field and select another field from the drop-down list. This will be the date the calculation will start counting from.
To date - choose from the radio buttons:
Now() - calculating the number of time units between the From date to now.
Today() - calculating the number of time units between the From date to today at midnight.
Date field - calculating the number of time units between the From date to the date specified in another field.
Destination date field - choose the date field within your form which this new date is to be stored. If the Use business hours? checkbox is ticked, you will be prompted to enter the start and end time of your business’ working day, using the time picker list.
Date calculation settings - you can select whether the time calculated:
Includes weekends
Excludes weekends
Excludes weekends and special dates
Excludes special dates
Beside the Count only full hours? label (or time unit chosen), if the No radio button is selected, the Round result hours? (or time unit chosen) label will appear to the right. You will be prompted to select either a Yes or No radio button, allowing you to neatly round the chosen time unit to the nearest whole number (if Yes is selected).
Special dates - you can also define custom special dates and save them accordingly. Click on Add special date to add in a date. Enter a label for this special date in the left field and a date in the right field. By choosing a title for a new special date, and entering the date into the date field, the date can be saved using the Save special dates for reuse button . To load previously saved dates, click on the Load special dates button . You can delete a saved Special date by clicking on the Bin/Trash button.
Finally, clicking on the OK button will save the new rule you have just created and apply it to the chosen field.
Editing, deleting or duplicating rules
When you have clicked on an existing rule, and the rule is visible in the right-hand pane under Rules, there are a number of options available to you.
To disable a rule click the slider across beside the rule name.
To copy a rule, click on the Duplicate button beside the rule name.
To delete a rule, click on the Bin/Trash button .
To view a rule, click on the rule name to open the Edit rule dialog box.
User tip
Multiple Special dates can be loaded at once to allow you to select a number of specific dates to exclude from the rule.
What’s next
To find out more about other date rules go to Dates.
The Compare dates rule is utilised to compare two date fields. Depending on the selected comparison function, the result of this rule will be saved as a boolean value (true/false) in another Kianda form field.
In the below example, the Compare dates rule is applied to a date field input in a form. If the date entered is after a set deadline, the field Status - After Deadline? in this process is set to Yes. You could use this to ensure that process instances must be completed before an upcoming deadline.
When to use
The Compare dates rule should be used when a user wishes to compare two different dates. For example, creating a submission deadline function that disallows form submissions after a specified date.
You can add this rule:
to a field
to a form
to a process (the rule will run on load)
Before you get started
In advance of using this rule, you need to have created one or more forms, complete with control fields. For example, you must have a created field in your form that the Compare dates rule can be applied to. See Date control for more information on using date fields.
How to get started
Click on an existing process by going to Administration > Designer and decide which form, or field you will apply the rule to, by clicking on that item so that it is in edit mode so you can see the Edit/pen button, Pen button .
Click on Add a rule > Dates > Compare dates.
In the Edit rule - Compare dates dialog box, give the rule a title in the Title field.
If you want to add conditions for the rule, click on the Edit conditions button . See Conditions for more details.
Under Action > Compare dates, create one or more actions for the rule by filling out the following:
Date to compare - choose a date field from the drop-down list to serve as the date you would like to compare. This date will be placed before the comparison function.
Compare to date - choose a date field from the drop-down list to serve as the date you would like to compare to the initially selected date (Date to compare). This date will be placed after the comparison function.
Compare function - Choose from the radio buttons:
Is between dates - checking this button displays a new field Compare from date, where you must select a start date field from the drop-down list, as well as choosing a Compare to date from the other drop-down list (end date). This function returns true or false if the Date to compare falls within the start and end dates selected.
Is before date - checking this button determines if the selected date for the Date to compare field falls before the selected date for the Compare to date field.
Is after date - checking this button determines if the selected date for the Date to compare field falls after the selected date for the Compare to date field.
Under Action > Result:
Destination field - choose the field within your Kianda form where you would like to store the resulting boolean value of the comparison function. As can be seen in the below example, you can utilise the result as a status checker using a destination text field.
Value when true - if the result of the comparison function is true, enter what string of text you would like to return to your form.
Value when false - if the result of the comparison function is false, enter what string of text you would like to return to your form.
The resulting value can be used in a Kianda Condition to control other parameters. See Conditions for more details.
Finally, clicking on the OK button will save the new rule you have just created and apply it to the chosen field.
Editing, deleting or duplicating rules
When you have clicked on an existing rule, and the rule is visible in the right-hand pane under Rules, there are a number of options available to you.
To disable a rule click the slider across beside the rule name.
To copy a rule, click on the Duplicate button beside the rule name.
To delete a rule, click on the Bin/Trash button .
To view a rule, click on the rule name to open the Edit rule dialog box.
User tip
Selecting the Compare to date function displays an additional field where you can select two different dates, and determine if your Date to compare is within.
The resulting boolean value can be used within other Kianda Conditions.
What’s next
To find out more about other date rules go to Dates.
The Format date rule is used to reformat a selected date field within your Kianda form, and send it to a destination field. You can choose from a range of date formats where month or day leads, and time is also included, see step 5 in How to get started.
In the below example, the Format date rule is applied to a selected field from the drop-down list and is formatted to the MM/DD/YYYY format. The resulting formatted date is then displayed in the Formatted Date field that is selected under Select a destination field for the formatted date. You can utilise this rule to format the entered date so that it matches various national date formatting standards. The default formatting for Kianda dates are DD/MM/YYYY, so in the below example an entered date of 23/08/2022 would become 08/23/2022.
When to use
The format date rule should be used when you wish to amend the formatting of a date field within Kianda. For example, you receive a date from a data source in one format and wish to present it in the form in another format.
You can add this rule:
to a field
to a form
to a process (the rule will run on load)
Before you get started
In advance of using this rule, you need to have created one or more forms, complete with control fields. For example, you must have a created field in your form that the Format date rule can be applied to. See Date control for more information on using date fields.
How to get started
Click on an existing process by going to Administration > Designer and decide which form, or field you will apply the rule to, by clicking on that item so that it is in edit mode so you can see the Edit/pen button, Pen button .
Click on Add a rule > Dates > Format date.
In the Edit rule - Format date dialog box, give the rule a title in the Title field.
If you want to add conditions for the rule, click on the Edit conditions button . See Conditions for more details.
Under Action, create one or more actions for the rule by filling out the following:
Select a date field - choose a date field from the drop-down list you would like to be formatted. The help button provides you with additional support.
Define a format or select a predefined value - choose from the drop-down list the type of date formatting you would like to change your date to:
Select a destination field for the formatted date - choose a date field from the drop-down list where you would like to store the new formatted date.
Finally, clicking on the OK button will save the new rule you have just created and apply it to the chosen field.
Editing, deleting or duplicating rules
When you have clicked on an existing rule, and the rule is visible in the right-hand pane under Rules, there are a number of options available to you.
To disable a rule click the slider across beside the rule name.
To copy a rule, click on the Duplicate button beside the rule name.
To delete a rule, click on the Bin/Trash button .
To view a rule, click on the rule name to open the Edit rule dialog box.
User tip
This rule can be utilised to format a date to various national date formatting standards.
What’s next
To find out more about other date rules go to Dates.
Rules within the Form action rules category allow you to perform form specific actions on forms and processes such as saving a form / process, submitting a form, closing a form, deleting a process and validating form input.
Getting started with Form action rules
If you go to Administration > Designer and click on a process or create a new process, then click on Add a rule the Form action rules are found in the left-hand pane when you click on Form action.
There are six Form action rules as follows:
Validate input - provides ability perform flexible data validation and prevents incorrect data submission
Field display mode - this rule forces the display mode to override the automatic display mode of fields and forms
Submit form - marks the current form as complete and makes it read-only
Save form - commits a record or process instance in the server
Close form - closes the form and navigates to another resource
Delete form - marks the record or process instance to be deleted
What’s next
To read more about each of the rule types go to the links below:
9.1 - Validate input
The Validate input provides the ability to perform flexible data validation and prevents incorrect data submission. For example, this could be performed on a Date of Incident field, where the validation checks that the date entered is a past date.
When to use
You can add this rule:
to a field
to a form
to a process (the rule will run on load)
How to get started
To showcase the Validate input rule in action, we will make a validation check on a Date of Incident field to see if the entered date is a past date.
To implement the rule:
Click on an existing process by going to Administration > Designer and decide which form, or field you will apply the rule to, by clicking on that item so that it is in edit mode so you can see the Edit/pen button, Pen button .
Click on Add a rule > Form actions > Validate input.
In the Edit rule - Field display mode dialog box, give the rule a title in the Title field.
Click on Edit conditions to add a validation condition. To learn more about conditions go to Conditions.
Select the field you want the condition check to be performed on. In this example it is the Date of Incident field.
Select type of validation to be performed. In this example it is the Is After Today validation.
In the Edit rule - Validate input dialog box, In the Error message to display when rule conditions above apply text box, type in the error message you want to be displayed if validation condition apply.
Select a form or field to Trigger rules if validation condition apply so that rules attached to that particular form or field are initiated if the condition(s) set in step 6 apply.
For example if the Submit button is selected in this field, all its rules will be executed which means the Submit process, Save process and Close rules will be executed after a condition is met.
From the example mentioned above, we created a simple Incident Form in which a user needs to select a date of an incident. The image below displays the Validate input rule in action, where the date selected Is After Today therefore the condition is valid and an error message is displayed.
Editing, deleting or duplicating rules
When you have clicked on an existing rule, and the rule is visible in the right-hand pane under Rules, there are a number of options available to you.
To disable a rule click the slider across beside the rule name.
To copy a rule, click on the Duplicate button beside the rule name.
To delete a rule, click on the Bin/Trash button .
To view a rule, click on the rule name to open the Edit rule dialog box.
User tip
When validating a field, form or a process, think of conditions. When a condition is met, an action must follow. For example an error message is displayed (Action) when the wrong date is entered (Condition).
What’s next
To find our more about other form action rules go to Form Action rules.
The Field display mode rule temporarily changes the display mode of a field or form creating a temporary form or field display mode. This rule forces the display mode to override the automatically calculated display mode of fields and forms.
When to use
You can add this rule:
to a field
to a form
to a process (the rule will run on load)
How to get started
To showcase the Field display mode in action, we will change the display mode of a user picker field to Read mode after a user has been chosen. To learn more about User picker field go to User picker control.
To implement the rule:
Click on an existing process by going to Administration > Designer and decide which form, or field you will apply the rule to, by clicking on that item so that it is in edit mode so you can see the Edit/pen button, Pen button .
Click on Add a rule > Form actions > Field display mode.
In the Edit rule - Field display mode dialog box, give the rule a title in the Title field.
If you want to add conditions for the rule, click on the Edit conditions button to create conditions for the rule, see Conditions for more details.
To demonstrate how this rule works, we will add a condition to a field. Select the field you want the condition to be applied to. In this example it is the Employee field.
Select type of operator check to be performed on the condition. In this example it is the Not blank operator. Here we are checking whether the Employee field is Not blank.
In the Field or form option, select the field you want the Field display mode rule to affect. In this example it is the Employee field.
Choose from Edit mode or Read mode.
Edit mode - allows the form or field to be edited.
Read mode - sets the mode of a form or a field to Read-only.
Click on Add to add as many fields or forms as needed.
The video below demonstrates the Field Display mode rule in action, where the Employee field becomes Read mode after a user is selected. The Date field which was not editable changes to Edit mode after a user is selected. This is achieved by applying a condition to the Employee field. The condition checks if the Employee field is Not blank, therefore when a user has been selected this condition is valid, activating the Field Display mode rule.
Editing, deleting or duplicating rules
When you have clicked on an existing rule, and the rule is visible in the right-hand pane under Rules, there are a number of options available to you.
To disable a rule click the slider across beside the rule name.
To copy a rule, click on the Duplicate button beside the rule name.
To delete a rule, click on the Bin/Trash button .
To view a rule, click on the rule name to open the Edit rule dialog box.
User tip
Form state (Edit / Read) will not be saved. It is recommended that display mode is reverted once no longer needed.
What’s next
To find our more about other form action rules go to Form Action rules.
The Submit form rule marks the current form as complete and makes it read-only. By default upon submit of a form, the next form in the process is activated.
This rule is automatically attached to Submit button which is added to all forms by default.
When to use
This action is used to submit a form that you are working on, that is the ‘current’ form.
You can add this rule:
to a field
to a form
to a process (the rule will run on load)
How to get started
To implement the rule:
Click on an existing process by going to Administration > Designer and decide which form, or field you will apply the rule to, by clicking on that item so that it is in edit mode so you can see the Edit/pen button, Pen button .
Click on Add a rule > Form actions > Field display mode.
In the Edit rule - Field display mode dialog box, give the rule a title in the Title field.
If you want to add conditions for the rule, click on the Edit conditions button to create conditions for the rule, see Conditions for more details.
Under Action, Set process status choose from Auto (Current form title) or Manual. If you choose Manual then type in the desired text to appear to users in the Status text after submit field.
Each process contains an internal status value, this is automatically set to the name of the active form. For example there are two forms in a Incident process, a Incident form, a Review form and the Auto (Current form title) is selected in the Set process status option. When the Incident form is completed and submitted, the internal status will be set to the next active form, in this case the Review form. When all forms are completed and submitted, the internal status is set to completed. The image below shows how the internal status of the process can be reflected in a dashboard to keep track of the current stage of a process.
We can also set our own value for the internal status by changing the Set process status option to Manual. This will open a textbox field in which you can enter in a custom status after a form is submitted. For example, after submitting the first form, we will set the status to open:
Editing, deleting or duplicating rules
When you have clicked on an existing rule, and the rule is visible in the right-hand pane under Rules, there are a number of options available to you.
To disable a rule click the slider across beside the rule name.
To copy a rule, click on the Duplicate button beside the rule name.
To delete a rule, click on the Bin/Trash button .
To view a rule, click on the rule name to open the Edit rule dialog box.
User tip
You can display the internal status of a process in a list widget on your dashboard. This can help you keep track of the current state the process instance is. For example when the process is complete or which form in the process is currently active.
What’s next
To find our more about other form action rules go to Form Action rules.
The Save form rule saves changes made in a form. This is particularly useful if a user needs to complete a long form, or is offsite, so that initial changes to the form are saved and then all changes can be submitted later on. The rule commits a record in the server.
This rule is automatically attached to Submit and Save buttons which are added to forms by default.
When to use
Use this rule to ensure the state of the application is stored with data.
You can add this rule:
to a field
to a form
to a process (the rule will run on load)
How to get started
To implement the rule:
Click on an existing process by going to Administration > Designer and decide which form, or field you will apply the rule to, by clicking on that item so that it is in edit mode so you can see the Edit/pen button, Pen button .
Click on Add a rule > Form actions > Save form.
In the Edit rule - Save form dialog box, give the rule a Title.
Under Action, check the box for Perform background save if you want to perform background save of forms. This option MUST be enabled to allow background upload and chunked upload to be possible in the File upload control.
Edit rule - Save form dialog box
For example if you are offsite or don’t have a good internet connection and need to upload files to forms, then it is useful to allow ‘chunked’ and ‘background upload’ so that the file can be transmitted in resumable chunks. See File upload control for more information on file upload.
File upload - background and chunked upload options
Under Action, you can also check the box for Perform partial save to allow partial save of a form.
For example if this option is selected, it will allow you to save a form in small amounts so information is not lost when internet connection is lost.
You can also create a notification to display to users when a save has been successful by typing a message in the Save notification field.
You can create conditions for the actions to happen, see Conditions for more information.
Editing, deleting or duplicating rules
When you have clicked on an existing rule, and the rule is visible in the right-hand pane under Rules, there are a number of options available to you.
To disable a rule click the slider across beside the rule name.
To copy a rule, click on the Duplicate button beside the rule name.
To delete a rule, click on the Bin/Trash button .
To view a rule, click on the rule name to open the Edit rule dialog box.
User tip
You can add a condition to the Save form rule to make sure that users fill out certain pieces of information in your form before they can actually save it.
What’s next
To find our more about other form action rules go to Form Action rules.
The Close form rule closes the form and allows users to navigate back to home page of Kianda platform or to another resource. This rule is automatically attached to Close, Submit and Save buttons which are added to forms by default.
When to use
Together with the Submit, and Save rules, the Close form rule forms the shutdown procedures for forms and should not be deleted from Submit, Save or Close buttons.
You can add this rule:
to a field
to a form
to a process (the rule will run on load)
How to get started
By default all forms come with a Close button, and therefore a Close form rule however, you can set a close rule yourself, and redirect the user anywhere. To do so:
Click on an existing process by going to Administration > Designer and decide which form, or field you will apply the rule to, by clicking on that item so that it is in edit mode so you can see the Edit/pen button, Pen button .
Click on Add a rule > Form actions > Close form.
In the Edit rule - Close form dialog box, give the rule a Title.
In the On form close navigate to option, you can select from four different actions.
Auto - This option will redirect the user to the last location they were before opening the form.
Return to a dashboard - This option will redirect the user to a dashboard of choice. To navigate to a specific dashboard, in the Please choose a dashboard option select the desired dashboard.
In the dashboard Query string parameters are used to populate the Filterwidget when a given dashboard is loaded. To learn more about query parameters go to Query parameters. To learn more about Filter widget and how to use query strings there, go to Filter widget - query strings.
Return to URL - This option will redirect the user to any URL specified in the Please choose a field or type the URL text box.
Go to process - This option will redirect you to a process specified in the Please indicate the process or instance ID text box. See heading below for more information.
How the ‘Go to process’ option works
With this option selected, you can now enter an ID of a process you want the user to be navigated to. There is also a Is new instance? radio list available with a Yes or No options. If you choose:
Yes - In the Please indicate the process or instance ID text box, you MUST specify a process ID which is the ID (Unique) of a process.
No - In the Please indicate the process or instance ID text box, you MUST specify an instance ID of a process. The instance ID is a unique identifier for a process instance. For example an Incident process may have more than one instances and each of those instances contains a unique ID as shown in the image below.
Query string parameters are used to populate form or fields when a given form is loaded. To learn more about query strings, visit Query Strings and for a more specific example visit Close rule Query Strings.
Editing, deleting or duplicating rules
When you have clicked on an existing rule, and the rule is visible in the right-hand pane under Rules, there are a number of options available to you.
To disable a rule click the slider across beside the rule name.
To copy a rule, click on the Duplicate button beside the rule name.
To delete a rule, click on the Bin/Trash button .
To view a rule, click on the rule name to open the Edit rule dialog box.
User tip
Note, You cannot use Close form and Go to form in the same button.
Note, it is not necessary to add a condition to the rule. In this case the rule will be triggered automatically:
if the rule is applied to a field, then the rule will be triggered when the user enters a value in that field.
if the rule is applied to a button, then the rule will be triggered when the user clicks the button.
if the rule is applied to a form, then the rule will be triggered when the form is submitted.
if the rule is applied to a process, then the rule will be triggered on load, that is when the process is initiated.
What’s next
To find our more about other form action rules go to Form Action rules.
The Delete form rule marks a process instance to be deleted. This rule can be used for example for General Data Protection Regulation (GDPR) reasons whereby a process instance with personal data is deleted.
When to use
Use this rule with the Save form rule to commit the deletion request in the server.
You can add this rule:
to a field
to a form
to a process (the rule will run on load)
How to get started
As mentioned in the example above, we will use this rule to delete personal data for GDPR reasons.
To implement the rule:
Click on an existing process by going to Administration > Designer and decide which form, or field you will apply the rule to, by clicking on that item so that it is in edit mode so you can see the Edit/pen button, Pen button .
Click on Add a rule > Form actions > Delete form.
In the Edit rule - Delete form dialog box, give the rule a Title.
There is no action on the Delete form rule that can be specified. The internal action of this rule is to delete the process instance if a condition becomes true, see Conditions for more information.
To apply a condition to the Delete form rule, in the Edit rule - Delete form dialog box click on Edit conditions.
GDPR example use case
In this example we have two forms:
Personal Information form in which some personal data of an employee are being stored.
Company feedback form in which the employee can give feedback of the company and decide whether to keep personal information in the company system or delete them.
In this example we will add the Delete form rule to the Submit button of the Company feedback form.
Follow steps 1 through 5 above to add the rule to a desired field. In this example it is the Submit button in the Company feedback form.
In the Edit conditions dialog box select a field for the condition check. In this example it is the Delete personal data for GDPR reasons field.
Select desired operator for the condition . In this example it is the Equals operator.
Choose a value for the conditional check. In this example type in Yes.
The image below presents deleted process instances. As shown in the Delete personal data for GDPR reasons column, there is no Yes values as all those processes were deleted from the system.
Editing, deleting or duplicating rules
When you have clicked on an existing rule, and the rule is visible in the right-hand pane under Rules, there are a number of options available to you.
To disable a rule click the slider across beside the rule name.
To copy a rule, click on the Duplicate button beside the rule name.
To delete a rule, click on the Bin/Trash button .
To view a rule, click on the rule name to open the Edit rule dialog box.
User tip
When adding the Delete form rule to a process, make sure to change the rule order of execution of the Delete form to be after Submit form. Remember that you can’t submit a deleted form.
What’s next
To find our more about other form action rules go to Form Action rules.
Kianda AI rules is one category of rules in Kianda that is used to analyse text within fields of your process, for example analysing a feedback text box of a process.
AI (Artificial Intelligence) is a form of intelligence demonstrated by machines, opposed to natural intelligence displayed by humans or animals. The AI system used in the Kianda AI rules is Text Analysis.
Text Analysis is a process by which the AI is programmed to distil information and meaning from text. For example, this can be analysing text written in feedback forms, item reviews or analysing documentation to understand its purpose.
Take an example of Text analysis rule and its extract key phrases function. Implementing this rule will analyse the block of text and as a result, it will give back key and most relevant words or expressions into another field within your process. See the image below for an example of a feedback text and resulting key phrases:
Getting started with Kianda AI rules
If you go to Administration > Designer and click on a process or create a new process, then click on Add a rule, the Kianda AI rules are found in the left-hand pane when you click on Kianda AI.
Currently, there is one rule available in the Kianda AI rule category:
Text analysis - gives sentiment analysis or extracts key phrases from a block of text.
10.1 - Text Analysis
Introduction
The Text analysis rule allows you to analyse small or large amounts of text. There are two functions for analysis with the Text analysis rule:
Sentiment analysis
Extract key phrases
With each function, the AI is programmed to distil information and meaning from a text block. For example, extract key phrases function is programmed to extract most relevant words or expressions from a block of text. Sentiment analysis on the other hand can be used to give a Positive or Negative result on feedback forms or item reviews and presented in a dashboard, see image below for an example dashboard sentiment analysis:
When to use
Use this rule when you want to analyse large blocks of text into a Positive or Negative result with a percentage score, or when you want to extract key phrases.
You can add this rule:
to a field
to a form
to a process (the rule will run on load)
Before you get started
To be able to use the Text analysis rule, there a couple of prerequisites needed in your process. To use both functions, your process needs a Text box field which will represent the text that is targeted during Text analysis. To learn more on how to add a text box to your process, go to Text box control.
To use the Sentiment analysis function, you need the following:
Text box field - container which will store the computed sentiment result. Positive or Negative.
Number field - container used to store the percentage score of the result. To learn on how to add a number field to your process, go to Number control.
To use the Extract key phrases function, you will need the following:
Text box field - container which will store all of the most relevant words or expressions.
How to get started
Click on an existing process by going to Administration > Designer and decide which form, or field you will apply the rule to, by clicking on that item so that it is in edit mode so you can see the Edit/pen button, Pen button .
Click on Add a rule > Kianda AI > Text analysis.
In the Edit rule - Text analysis dialog box, give the rule a title in the Title field.
If you want to add conditions for the rule, click on the Edit conditions button see Conditions for more details.
Under the Action section fill out the following:
Input field containing text for analysis - select a field from within your process that you wish to target when analysing text.
Text analysis function - from the radio list, select the desired text analysis function.
Sentimental analysis - analysis text while giving it a positive or negative result along with the percentage score of the result.
Extract key phrases - extract most relevant words or expressions from a block of text.
Text input language - select the language in which the targeted text is in. The choices are as follows:
English
French
German
Portuguese
When the Sentiment analysis function is selected, fill out the following fields:
Field to store computed sentiment (Negative or Positive) - select a field from your process to store the result of the analysis.
Fields to store the sentiment score - select a field from your process to store the percentage score of the analysis.
When the Extract key phrases function is selected, fill out the following:
Field to store computed key phrases - select a field from your process to store all of the most relevant words or expressions of the analysis.
When you are finished editing the dialog box, click on OK or click on Close at any time to exit the dialog box.
SharePoint rules is a category of rules within Kianda that are associated with SharePoint specific functionality. These rules are using SharePoint Application Programming Interface (API) to perform Create, Read, Update and Delete (CRUD) operations within your SharePoint connector. The SharePoint rules are designed to manage your SharePoint connector instead of populating it with data. With these rules you can create a site, a list or a group on your SharePoint connector along with adding users to groups, removing them from groups or changing user or group permissions.
Take an example of a Find a user rule. Implementing this rule will result in acquiring a Username or User Id of a particular user which is part of your SharePoint users group. When using SharePoint rules that are managing users, the Find a user rule is very useful as rules such as Add user to a group or remove user from a group require a User Id that can be retrieved from the Find a user rule.
Before getting started
In advance of using the SharePoint rules you must have created a SharePoint data connector and establish a connection with your SharePoint site. The data connector is used as part of the SharePoint rules to perform CRUD operations on a site you established a connection with. To learn more about the SharePoint data connector go to SharePoint connector.
Getting started with SharePoint rules
If you go to Administration > Designer and click on a process or create a new process, then click on Add a rule, the SharePoint rules are found in the left-hand pane when you click on SharePoint.
There are 10 SharePoint rules as follows:
Create a list - creates a new list in a SharePoint site.
Create a site - creates a new site on SharePoint, enabling the use of a site template.
Create a group - creates a new group on SharePoint
Find a user - finds or searches for a user within SharePoint
Add a user to a group - adds a SharePoint user to a SharePoint group. It is important to note the difference between SharePoint users and Kianda users. SharePoint users are users of the SharePoint system. Kianda users are users of the Kianda system.
Remove a user from a group - removes a SharePoint user from a SharePoint group
Reset an item permissions - changes the SharePoint permissions for a given list, document or folder.
Check in / out an item - checks in or out a file in SharePoint
Get attachments - reads the attachments from a SharePoint list
Create anonymous link - creates anonymous links for a SharePoint held file
What’s next
We have briefly introduced each of the ten types of SharePoint rules. Click on the links below to find out more about each rule in detail.
11.1 - Add a user to a group
This rule allows you to add a user into a SharePoint group using Kianda.
When to use
This rule should be used when a user within Kianda should be added to SharePoint Group, for example, a new hire being added to a team group during their onboarding phase.
You can add this rule:
to a field
to a form
to a process (the rule will run on load)
Before you get started
In advance of using the Add a user to a group rule, you need to have created one or more forms. In the forms you must have created two separate fields which are needed for:
Field which represents the title of the group you are adding the user to. This field can for example be a Text box field. To learn more about how to create a text box field go to Text box control.
Field which represents the Username or User Id of the user you want to add to the group, this can also be a text box field.
How to use
To apply this rule, first choose an item to attach the rule to and have a SharePoint data source ready where you want the user to be located. This data source should be a predefined data connector created with Data sources under Administration.
Select the field or other item to attach the rule to.
Click on Add a rule > SharePoint > Add a user to a group.
In the Edit rule - Add a user to a group dialog box, give the rule a Title. Then select a SharePoint data source from the drop-down list.
Two new fields will appear:
For Group title field, select the field where the group title is stored for example, a list field.
For Username or User Id, select the field where the Username or User id is stored.
Once these fields are set you can also set conditions for the rule, see Conditions for more information.
The final two sections are optional: On success mapping and Error mapping. See Success and Error Mapping for more information.
Click on OK when complete.
User tips
To use this rule, you must have a user predefined in Kianda and in SharePoint. The group must also be predefined in SharePoint. This rule gives the advantage of allowing multiple users to move to SharePoint groups which could be useful for example during restructuring in an organisation, where existing users need to move to other departments/groups.
If you have multiple rules attached to the field or other item, you may wish to reorder the rules to change the order of rule execution. Go to Multiple rules to find out more.
What’s next
Now that you’ve learned about Add a user to a group, return to the SharePoint rules page to find out about other SharePoint rules.
11.2 - Check in or out an item
This rule allows you to check in or check out an item within SharePoint using Kianda.
When to use
This rule should be used when a user within Kianda wanted to check in or check out an item from SharePoint
You can add this rule:
to a field
to a form
to a process (the rule will run on load)
Before you get started
In advance of using the Check in or out an item rule, you need to have created one or more forms within your process. When using the check in or out function of the rule, you are required to have a field within your process that specifies an Id of an item you want to check in or out. For example the Item Id field can be a Text box field. When using the Check in functionality of the rule, you are required to create a field which is used to store a comment for the check in, the field type of the comment can also be a text box.
How to use
To apply this rule, first choose an item to attach the rule to and have a SharePoint data source ready where you want to check in or out an item. This data source should be a predefined data connector created with Data sources under Administration.
Select the field or other item to attach the rule to.
Click on Add a rule > SharePoint > Check in/out an item.
In the Edit rule - Check in/out an item dialog box, give the rule a Title. Then select a SharePoint data source from the drop-down list.
Three options are presented:
List - select the list where the item is present which is needed to be checked in/out.
Operation - choose from Check in or Check out. If you choose Check in, then select also a field from a Kianda form which will serve as a Check in comment field.
Item Id field - this will be used to determine which item is being checked in/out. Select the appropriate field from a Kianda form.
Once these fields are set you can also set conditions for the rule, see Conditions for more information.
The final two sections are optional: On success mapping and Error mapping. See Success and Error Mapping for more information.
Click on OK when complete.
User tip
If you have multiple rules attached to the field or other item, you may wish to reorder the rules to change the order of rule execution. Go to Multiple rules to find out more.
What’s next
Now that you’ve learned about Check in/out an item, return to the SharePoint rules page to find out about other SharePoint rules.
11.3 - Create a group
This rule allows you to create a SharePoint group from within Kianda.
When to use
This rule should be used when you want to create a new SharePoint group from within your Kianda process for example as part of a new project you want to create a group in SharePoint to provide permissions to specific users.
You can add this rule:
to a field
to a form
to a process (the rule will run on load)
Before you get started
In advance of using the Create a group rule, you need to have created one or more forms. In the forms you must have created two separate fields which are needed for:
Field which will represent the title of the group, for example a Text box field. To learn more about how to create a text box field go to Text box control.
Field which will represent the description of the group, this can also be a text box field.
How to use
To apply this rule, first choose an item to attach the rule to and have a SharePoint data source ready where you want the group to be located. This data source should be a predefined data connector created with Data sources under Administration.
Select the field or other item to attach the rule to.
Click on Add a rule > SharePoint > Create a group.
In the Edit rule - Create a group dialog box, give the rule a Title. Then select a SharePoint data source from the drop-down list.
Two new fields will appear to allow you to confirm group details:
For Group title field, select the field where the group title is stored for example, a list field.
For Group Description field, create a description for the group.
Once these fields are set you can also set conditions for the rule, see Conditions for more information.
The final two sections are optional: On success mapping and Error mapping. See Success and Error Mapping for more information.
Click on OK when complete.
User tip
If you have multiple rules attached to the field or other item, you may wish to reorder the rules to change the order of rule execution. Go to Multiple rules to find out more.
What’s next
Now that you’ve learned about Create a group, return to the SharePoint rules page to find out about other SharePoint rules.
11.4 - Create a list
This rule allows you to create a SharePoint List from within Kianda.
When to use
This rule should be used when within your Kianda process you wish to create a new SharePoint list, for example as part of a new project you want to create a list in SharePoint to store information pertaining to that project such as invoice numbers.
You can add this rule:
to a field
to a form
to a process (the rule will run on load)
Before you get started
In advance of using the Create a list rule, you need to have created one or more forms within your process and within the process you need to create three separate fields which will be used when setting up the rule:
A field which will represent the Name of the list, for example a text box field. To learn more about a text box field, go to Text box control.
A field which will represent the Description of the newly created list. This field can also be a text box field.
A field which will be used when creating the URL for the list. You can also use a text box field.
How to use
To apply this rule, first choose an item to attach the rule to and have a SharePoint data source ready where you want the list to be located. This data source should be a predefined data connector created with Data sources under Administration.
Select a field or other item to attach the rule to.
Click on Add a rule > SharePoint > Create a list.
In the Edit rule - Create a list dialog box, give the rule a Title. Then select a SharePoint data source from the drop-down list.
You will be presented with five options within the dialog box:
List template allows you to select an existing SharePoint list within the SharePoint data source to emulate the formatting and design of the list.
List name field allows you to create a name for the list. This field, List url field and List description field are all populated from a Kianda form. Choose a field from a Kianda form.
List url field will be used in the creation of the URL within SharePoint. Choose a field from a Kianda form.
List description field will be used for the SharePoint list description. Choose a field from a Kianda form.
Quick Launch menu - options are Yes or No.
Once these fields are set you can also set conditions for the rule, see Conditions for more information.
The final two sections are optional: On success mapping and Error mapping. See Success and Error Mapping for more information.
Click on OK when complete.
User tip
If you have multiple rules attached to the field or other item, you may wish to reorder the rules to change the order of rule execution. Go to Multiple rules to find out more.
What’s next
Now that you’ve learned about Create a list, return to the SharePoint rules page to find out about other SharePoint rules.
11.5 - Create a site
This rule allows you to create a SharePoint site from within Kianda.
When to use
This rule should be used when within your Kianda process you wish to create a new SharePoint site, for example, as part of a new project you want to create a site in SharePoint to store information pertaining to that project, to include all lists and other documentation that you need.
You can add this rule:
to a field
to a form
to a process (the rule will run on load)
Before you get stared
In advance of using the Create a site rule, you need to have created one or more forms within your process and within the process you need to create three separate fields. Those fields that you create will be used when filling out the rule details:
A field which will represent the Name of the site, for example a text box field. To learn more about a text box field, go to Text box control.
A field which will represent the Description of the newly created site, for example a text box field.
A field which will be used when creating the URL for the site, for example a text box field.
How to use
To apply this rule, first choose an item to attach the rule to and have a SharePoint data source ready where you want the site to be located. This data source should be a predefined data connector created with Data sources under Administration.
Select a field or other item to attach the rule to.
Click on Add a rule > SharePoint > Create a site.
In the Edit rule - Create a site dialog box, give the rule a Title. Then select a SharePoint data source from the drop-down list.
You will be presented with five options within the dialog box:
Site template allows you to select an existing SharePoint site within the SharePoint data source to emulate the formatting and design of the site.
Site title field will be used to create the name of the site. Site title field, site URL, and site description field are all derived from the Kianda form. Choose a field from a Kianda form.
Site url field will be used in the creation of the URL within SharePoint. Choose a field from a Kianda form.
Site description field will be used for the SharePoint site description. Choose a field from a Kianda form.
Inherit parent permissions - options are: Yes and No. If you choose ‘Yes’ it will allow your new site to inherit parent permissions for that SharePoint location.
Once these fields are set you can also set conditions for the rule, see Conditions for more information.
The final two sections are optional: On success mapping and Error mapping. See Success and Error Mapping for more information.
Click on OK when complete.
User tip
If you have multiple rules attached to the field or other item, you may wish to reorder the rules to change the order of rule execution. Go to Multiple rules to find out more.
What’s next
Now that you’ve learned about Create a site, return to the SharePoint rules page to find out about other SharePoint rules.
11.6 - Create an anonymous link
This rule allows you to create an anonymous link for a file within SharePoint from a Kianda form. This can be useful for example to share with contractors who don’t need to be set up as SharePoint users, but may need access to a file in SharePoint.
When to use
This rule should be used when a file within SharePoint should be shared with an individual via an anonymous link.
You can add this rule:
to a field
to a form
to a process (the rule will run on load)
Before you get started
In advance of using the Create anonymous link, in your process you need to have created at least one or more forms. The create anonymous link rule also requires two control fields. A file control in order to store a file which you want to share and a text box control for storing the generated link. You can also create another text box or a number field to store the link duration, this field is optional but can be a good idea if you want to customise the duration of the link dynamically.
File field - used to store the file which you want to create a link to. To learn how to create a file field go to File upload control.
Text box field - used to store the generated anonymous link which can be shared with other users. To learn how to create a text box field go to Text box control.
Text box or Number field (optional) - allows you to determine the duration of the link in hours. To learn how to create a number field go to Number control.
How to use
To apply this rule, first choose an item to attach the rule to, for example a file field within a form in Kianda.
Select a file field.
Click on Add a rule > SharePoint > Create anonymous link.
In the Edit rule - Create anonymous link dialog box, give the rule a Title.
Under Select a file field with files to create anonymous link(s) select the file field to link to the desired SharePoint file(s).
Under Link duration in hours type in a number value. By default the link duration is 6 hours, but this can be increased or decreased as needed.
Under Select a field to store resulting anonymous link(s) choose a field within Kianda to store this anonymous link, which can then be used to access the file. For example you could create a utility panel with a textbox for the anonymous link, where the panel and the textbox are not visible to users. This textbox is simply used to hold the system generated link.
Once these fields are set you can also set conditions for the rule, see Conditions for more information.
The final two sections are optional: On success mapping and Error mapping. See Success and Error Mapping for more information.
Click on OK when complete.
User tip
If you have multiple rules attached to the field or other item, you may wish to reorder the rules to change the order of rule execution. Go to Multiple rules to find out more.
What’s next
Now that you’ve learned about Create anonymous link, return to the SharePoint rules page to find out about other SharePoint rules.
11.7 - Find a user
This rule allows you to find a user from a data source using a Kianda process.
When to use
Use this rule to pull user data into a Kianda form for example when someone wants to add employee information to a form using SharePoint details.
You can add this rule:
to a field
to a form
to a process (the rule will run on load)
Before you get started
In advance of using the Find a user rule, you need to have created at least one or more forms within your process. The find a user rule also requires you to create a field which is used as the search term for the user. You can retrieve two pieces of data from a user that you are looking for, a Username and a User Id. You can store the retrieved data in a field within your form, for example in a Text box field.
How to use
To apply this rule, first choose an item to attach the rule to and have a SharePoint data source ready where you have your user located. This data source should be a predefined data connector created with Data sources under Administration.
Select a field or other item to attach the rule to.
Click on Add a rule > SharePoint > Find a user.
In the Edit rule - Find a user dialog box, give the rule a Title. Then select a SharePoint data source from the drop-down list.
You will be presented with two options within the dialog box:
Find user by provides the search criteria to find the user that is, display name, email, or ID. These are all SharePoint parameters.
Search term field is used to select the Kianda form field which will be used to lookup the user details from the data source.
Once these fields are set you can also set conditions for the rule, see Conditions for more information.
On success mapping is used to retrieve data from the user we are searching for. The two pieces of data you can retrieve is a Username and User Id. Go to On success mapping to learn how to retrieve data and populate it in a form field.
The final section is optional: Error mapping. See On error Mapping for more information.
Click on OK when complete.
User tip
If you have multiple rules attached to the field or other item, you may wish to reorder the rules to change the order of rule execution. Go to Multiple rules to find out more.
What’s next
Now that you’ve learned about Find a user, return to the SharePoint rules page to find out about other SharePoint rules.
11.8 - Get List item attachments
This rule allows you to retrieve an attachment from a SharePoint list for use in a Kianda process.
When to use
This rule should be used when an attachment needs to be extracted from SharePoint and displayed within a Kianda process, for example a SharePoint list with attachment as seen in the image below.
You can add this rule:
to a field
to a form
to a process (the rule will run on load)
Before you get stared
In advance of using the Get attachments rule, in your process you need to have created at least one or more forms. The get attachments rule also requires one file field which is used to store the attachment that you want to retrieve from your SharePoint. To learn more about file field in Kianda, go to File upload control.
How to use
To apply this rule, first choose an item to attach the rule to and have a SharePoint data source ready where you have your attachments from a list located. This data source should be a predefined data connector created with Data sources under Administration.
Select the field or other item to attach the rule to.
Click on Add a rule > SharePoint > Get attachments.
In the Edit rule - Get attachments dialog box, give the rule a Title.
If you want to add conditions for the rule, click on the Edit conditions button . You create a condition for a rule if you want it to be triggered when a condition is true or false, see Conditions for more details.
Under the Action section fill out the following:
Select data source - this button when pressed is used to select a SharePoint datasource that you want to use when retrieving an attachment.
Data source filter - this is used to filter data within your datasource. It works on condition bases which allows you to pull wanted and unwanted data back into the process. To learn more about conditions go to Conditions.
Select a destination file input - this drop-down field is used to select a file field from your process. The selected file field will store the attachment retrieved from the datasource.
When you are finished editing the dialog box, click on OK or click on Close at any time to exit the dialog box.
This rule can then be run for example on a button which is manually triggered by a user, or automatically on load of the process. From here the file can be utilised to populate data fields, tables and so on. Go to the Rules page to navigate to other rules.
User tip
If you have multiple rules attached to the field or other item, you may wish to reorder the rules to change the order of rule execution. Go to Multiple rules to find out more.
What’s next
Now that you’ve learned about Get attachments, return to the SharePoint rules page to find out about other SharePoint rules.
11.9 - Remove a user from a group
This rule allows you to remove a user from a SharePoint group using Kianda.
When to use
This rule should be used when a user within Kianda should be removed from a SharePoint Group, for example, an employee leaving a company and to ensure they are removed from team groups.
You can add this rule:
to a field
to a form
to a process (the rule will run on load)
Before you get started
In advance of using the Remove a user from a group rule, you need to have created one or more forms in your process. In the forms you must have created two separate fields which are needed for:
Field which will represent the title of the group you want to remove a user from, for example a Text box field. To learn more about how to create a text box field go to Text box control.
Field which will represent the description of the group, this can also be a text box field.
How to use
To apply this rule, first choose an item to attach the rule to and have a SharePoint data source ready where you want the user to be removed from a group. This data source should be a predefined data connector created with Data sources under Administration.
Select the field or other item to attach the rule to.
Click on Add a rule > SharePoint > Remove a user from a group.
In the Edit rule - Remove a user from a group dialog box, give the rule a Title. Then select a SharePoint data source from the drop-down list.
Two new fields will appear: Username and Group name. These are used to confirm the user which is to be removed and the group they are to be removed from.
For Group titlefield, select the field where the group title is stored for example, a list field.
For Username or User Id, select the field where the Username or User id is stored.
Once these fields are set you can also set conditions for the rule, see Conditions for more information.
The final two sections are optional: On success mapping and Error mapping. See Success and Error Mapping for more information.
Click on OK when complete.
User tip
If you have multiple rules attached to the field or other item, you may wish to reorder the rules to change the order of rule execution. Go to Multiple rules to find out more.
What’s next
Now that you’ve learned about Remove a user from a group, return to the SharePoint rules page to find out about other SharePoint rules.
11.10 - Reset permissions
This rule allows you to reset permissions for a user/group within a SharePoint site/list/item using Kianda.
When to use
This rule should be used when you wish to alter permissions within Kianda to reflect within SharePoint.
You can add this rule:
to a field
to a form
to a process (the rule will run on load)
How to use
To apply this rule, first choose an item to attach the rule to and have a SharePoint data source ready where you want the user/group permissions to be reset. This data source should be a predefined data connector created with Data sources under Administration.
Select the field to attach the rule to.
Click on Add a rule > SharePoint > Reset an item permissions.
In the Edit rule - Reset an item permissions dialog box, give the rule a Title. Then select a SharePoint data source from the drop-down list.
You will be presented with three options:
Item type is used to confirm what level the permissions are to be set, be it at a site level, list level or item level. Choose from the options:
Site - When selecting the site option, a Site relative url field drop-down is presented which is used to select a field from your process. The field should contain the full URL path to the site that you want to reset permissions for.
List - When selecting the list option, a List relative url field drop-down is presented which is used to select a field from your process. The field should contain the full URL path to the list that you want to reset permissions for.
Item - When selecting the item option, an Item id field drop-down and List title field drop-down are presented. The item id field is used to specify which Kianda field contains the Id identifier for the item you want to change permissions for. The List title field is used to specify which Kianda field contains the title of the list that stores the item.
Existing permissions allows you to either append or override the permissions of the user/group within SharePoint. Choose from the options: Add to existing or Replace existing. If it is set to Add to existing it will append the permissions and if it is set to Replace existing it will override the current permissions and only reflect the new permissions assigned via this rule.
Under Input mapping section, click on Add mapping. This setting is used to determine what level of permissions the user/group will be assigned.
For User or Group id, select the field where the user is stored. This could be either a User Picker field or a text field.
Select the Permission level from the drop-down list.
There are 10 permissions:
Full control - enables users to have full control of the website
Design - enables users to view, add, update, delete, approve, and customize items or pages in the website.
Edit - enables users to manage lists.
Contribute - enables users to manage personal views, edit items and user information, delete versions in existing lists and document libraries, and add, remove, and update personal Web Parts.
Read - enables users to view pages and list items, and to download documents.
View Only - enables users to view application pages. The View Only permission level is used for the Excel Services Viewers group.
Approve - enables users to edit and approve pages, list items, and documents. For publishing sites only.
Manage Hierarchy - enables users to create sites; edit pages, list items, and documents, and change site permissions. For Publishing sites only.
Restricted Read - enables users to view pages and documents. For publishing sites only.
Restricted Interfaces for Translation - enables users to view lists/libraries properties by remote interface (like REST API, Web Services).
Once these fields are set you can also set conditions for the rule, see Conditions for more information.
The final two sections are optional: On success mapping and Error mapping. See Success and Error Mapping for more information.
Click on OK when complete.
User tip
If you have multiple rules attached to the field or other item, you may wish to reorder the rules to change the order of rule execution. Go to Multiple rules to find out more.
What’s next
Now that you’ve learned about Reset permissions, return to the SharePoint rules page to find out about other SharePoint rules.
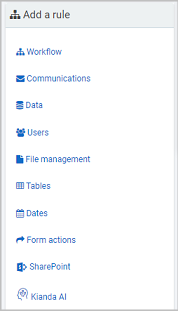
 for example a form Training Approval or Submit button. For new processes, add in forms and fields and select an element to add a rule to.
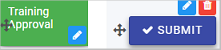
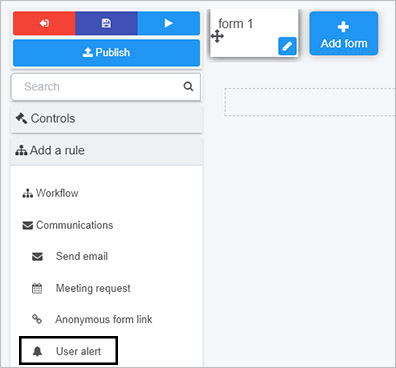
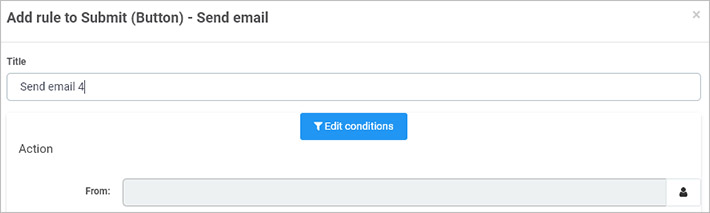
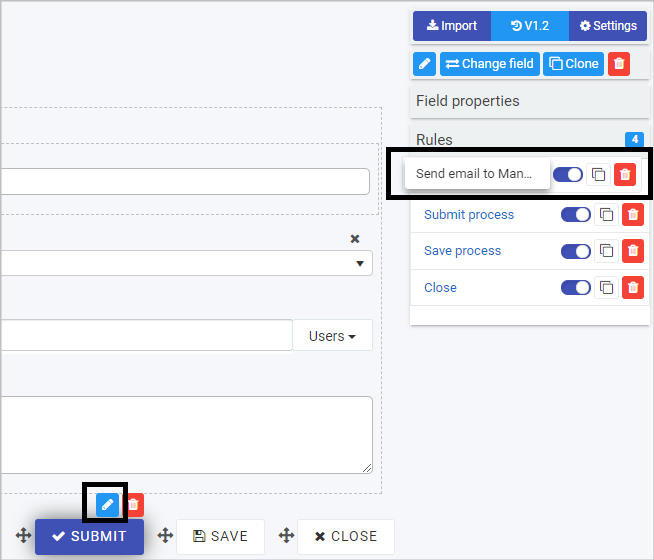
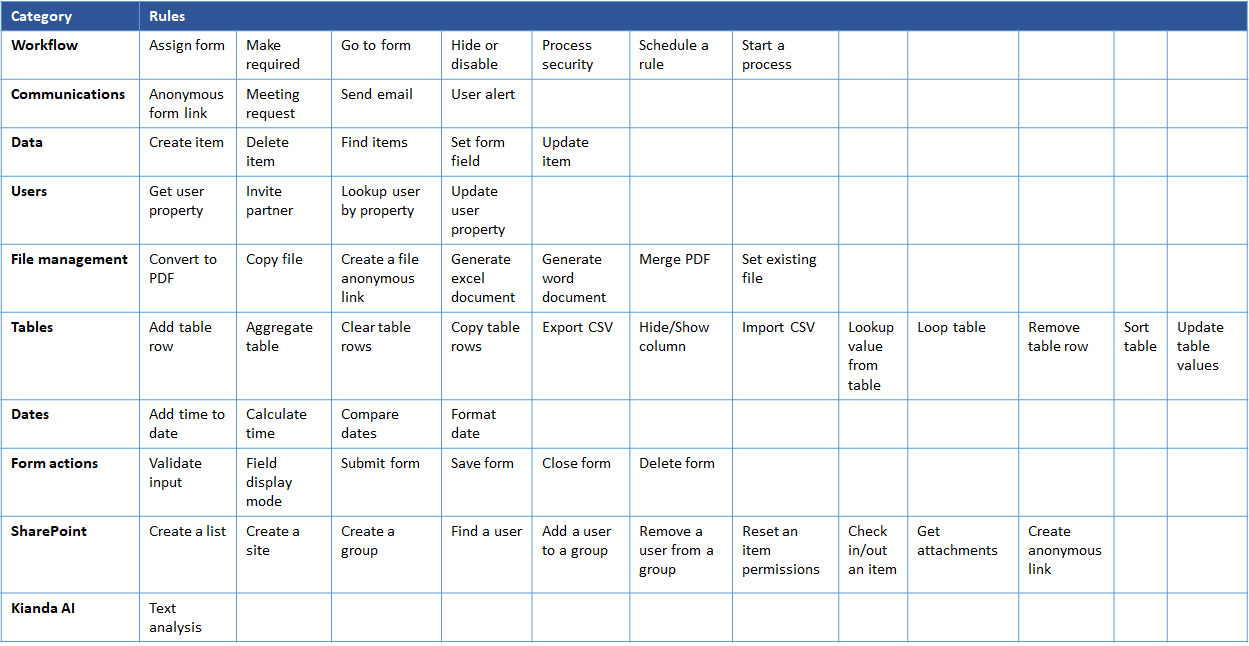

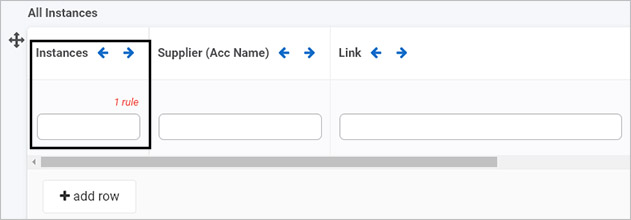
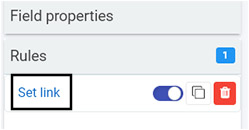

 used to add expressions to rules so that dynamic values can be returned based on calculations or form IDs, see
  button next to the rule name.
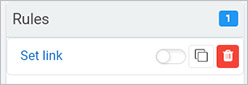

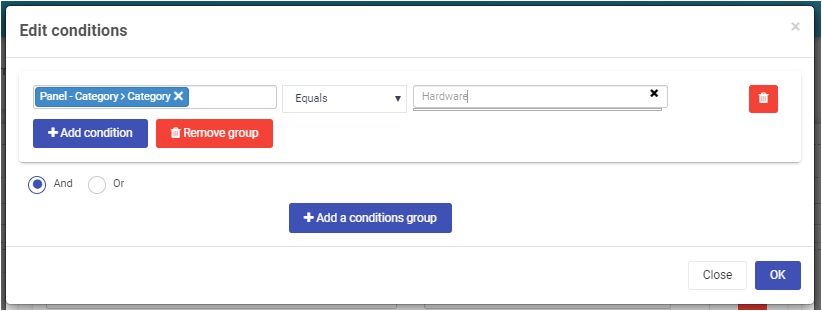
 is found within all rules as well as
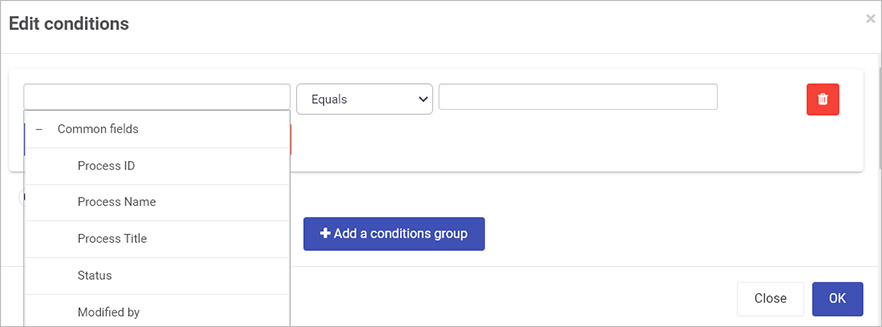
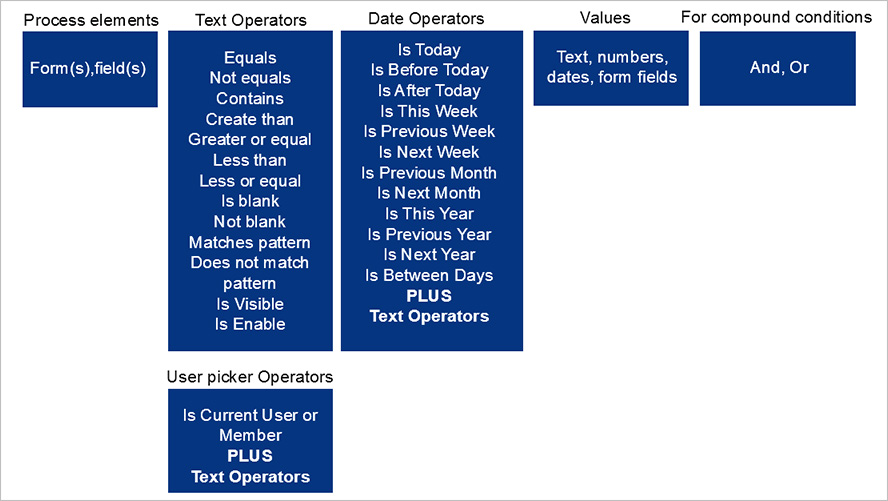
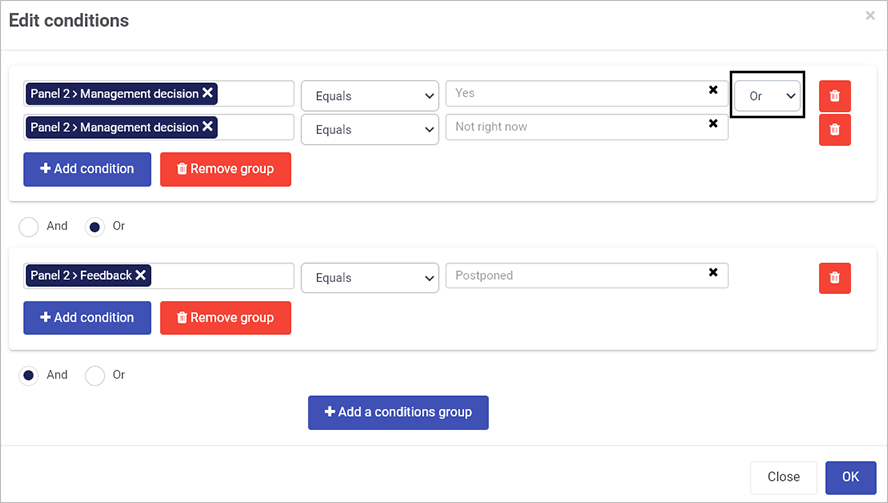
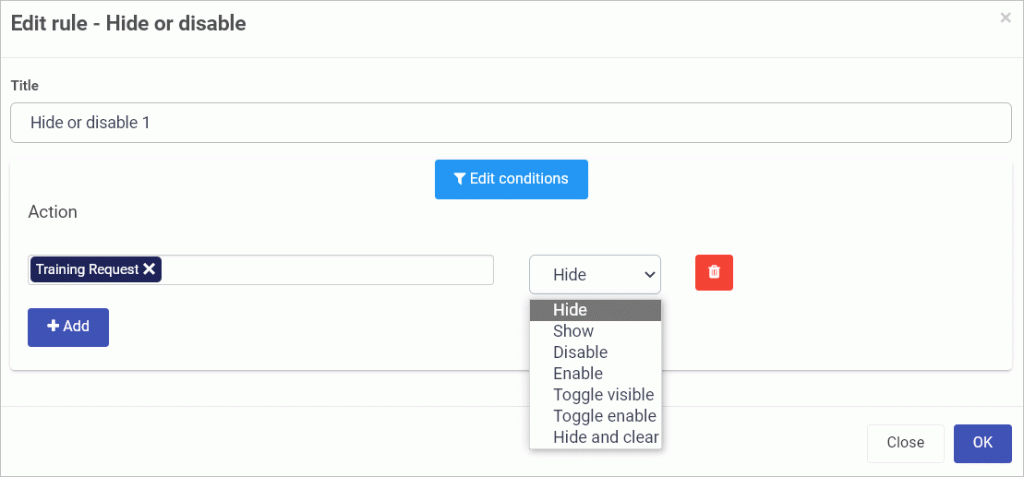
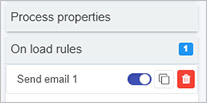
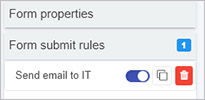

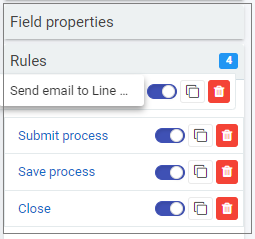
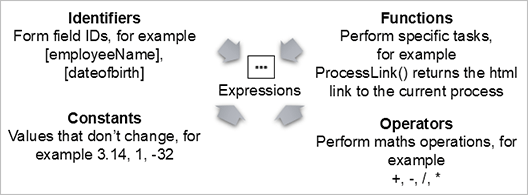

 found in Edit rule dialog boxes and other menu items, such as enabling quick actions for processes and number fields.
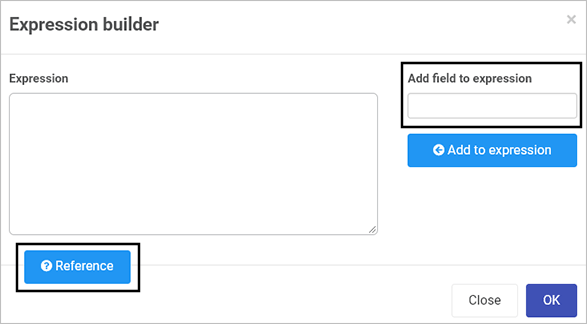
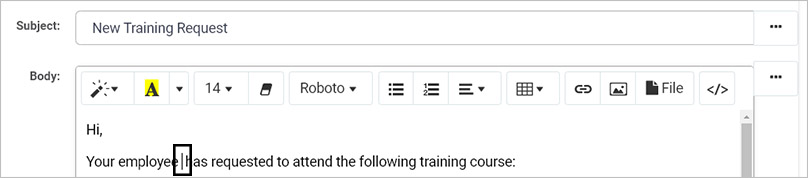
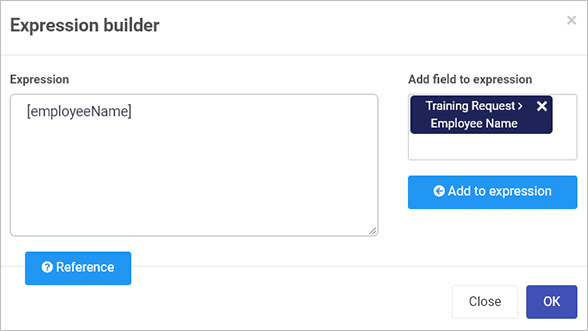
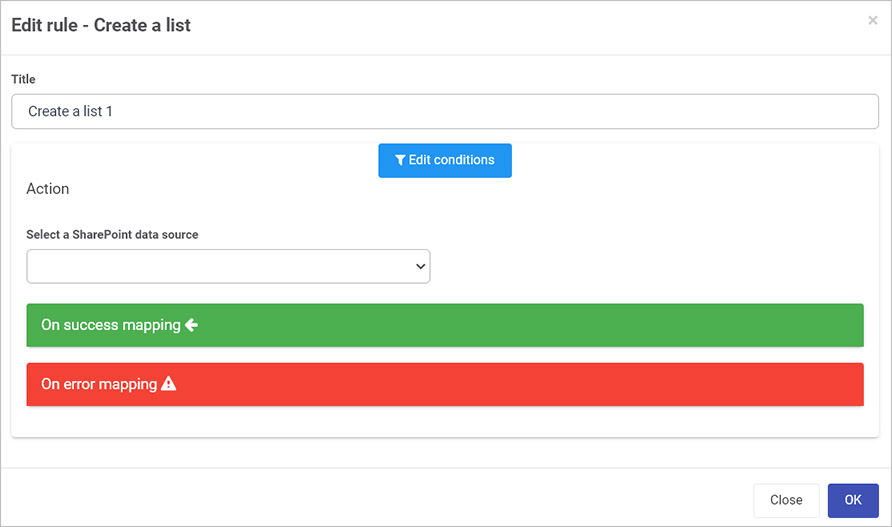
 to create conditions for the rule, see
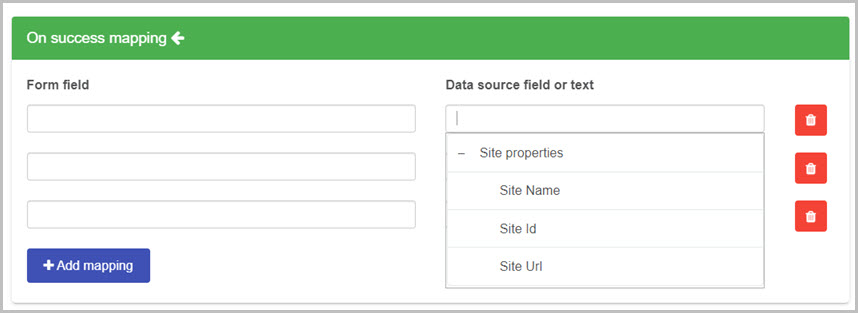
 - Click on the Bin/Trash button
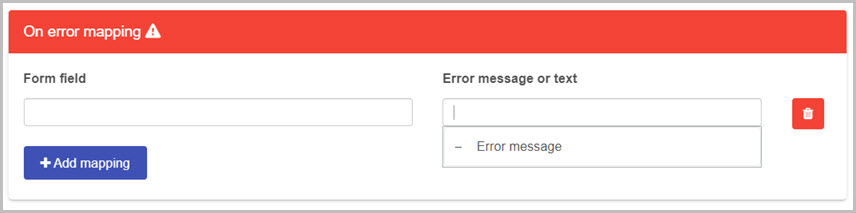
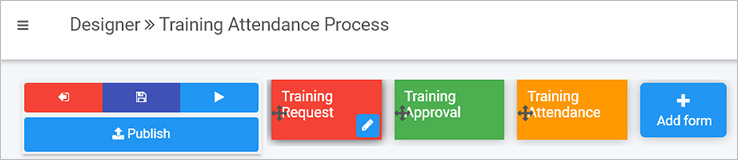
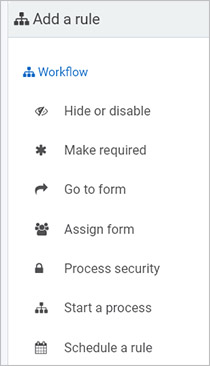
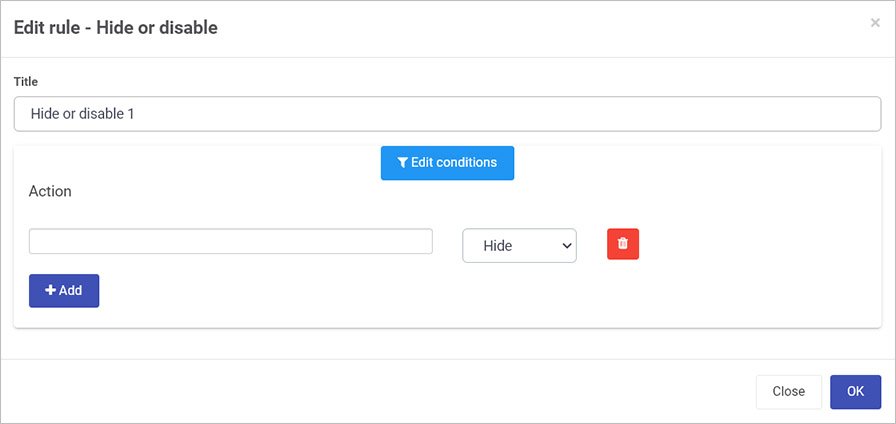
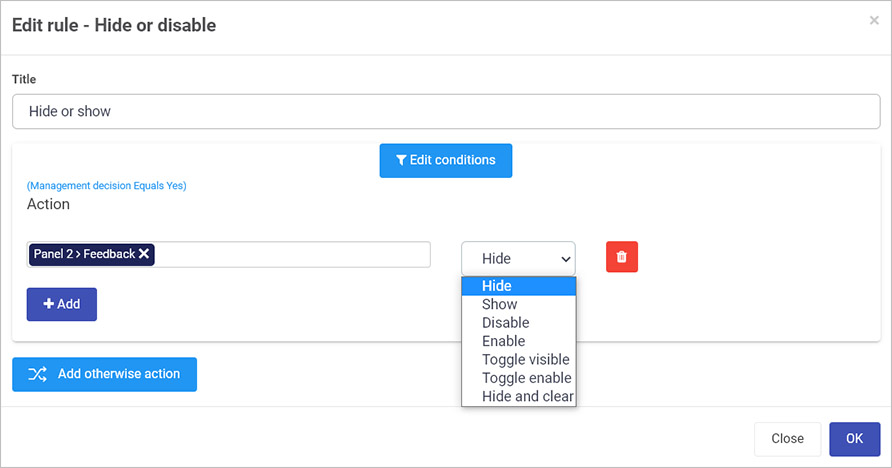
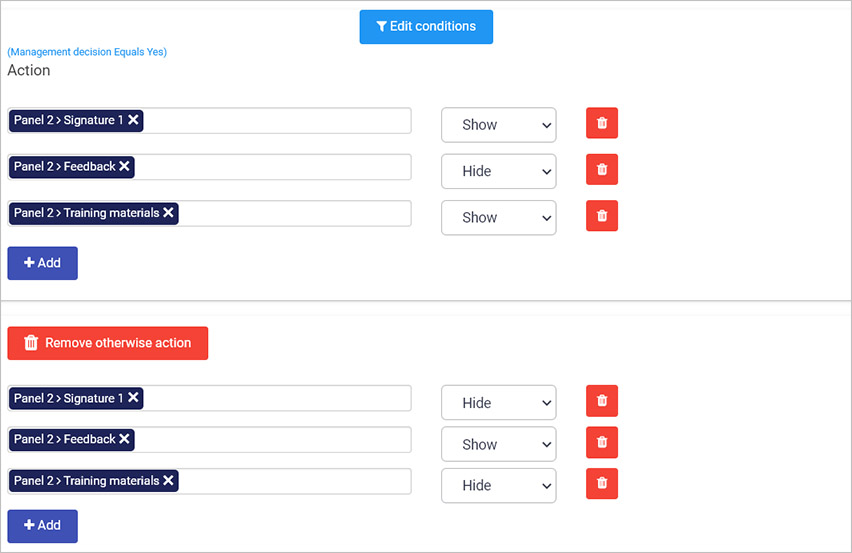
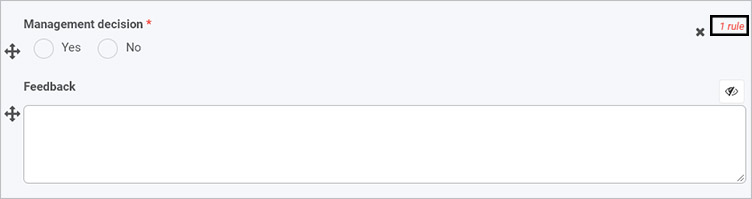
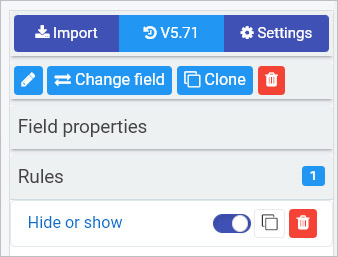

 beside the rule name.
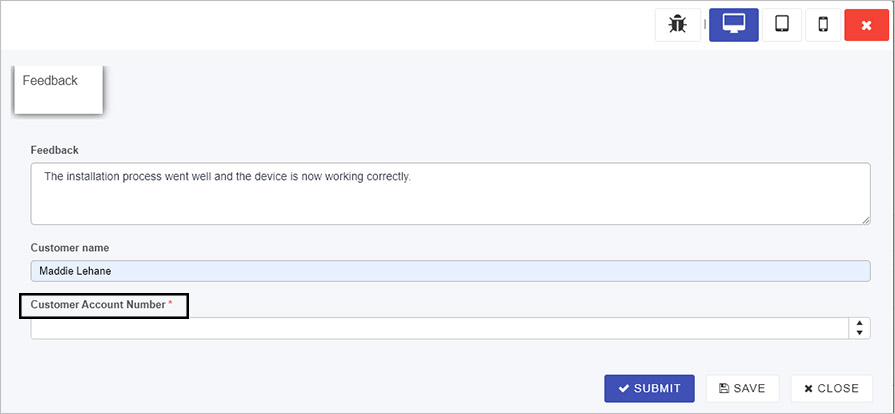
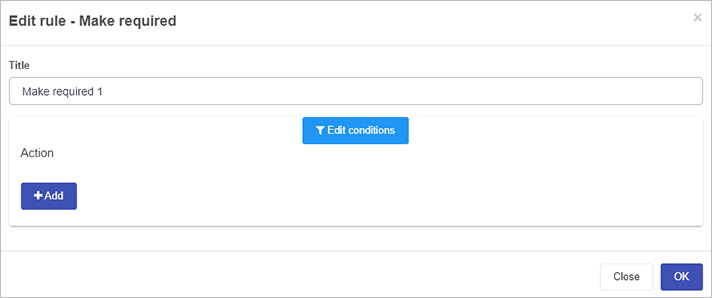
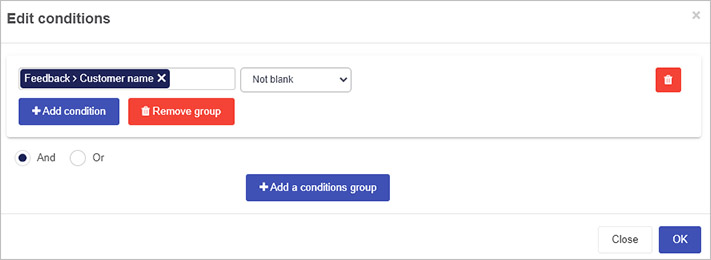
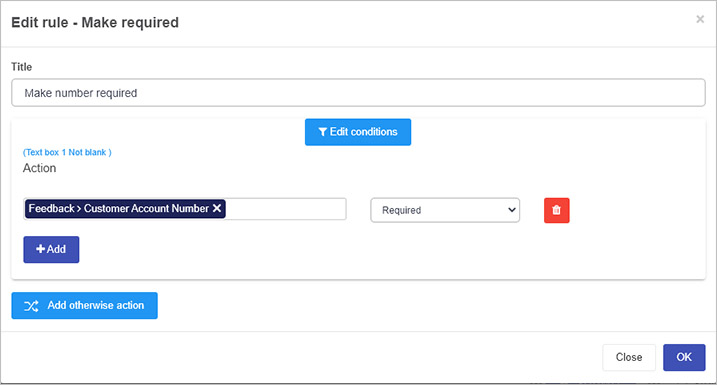

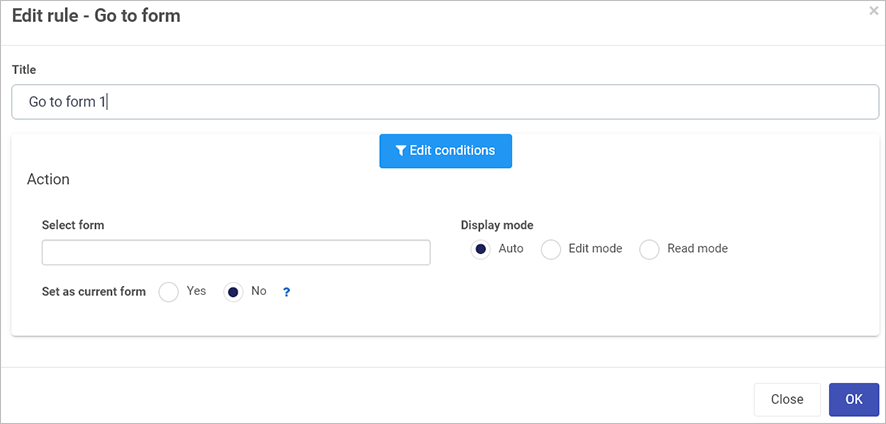
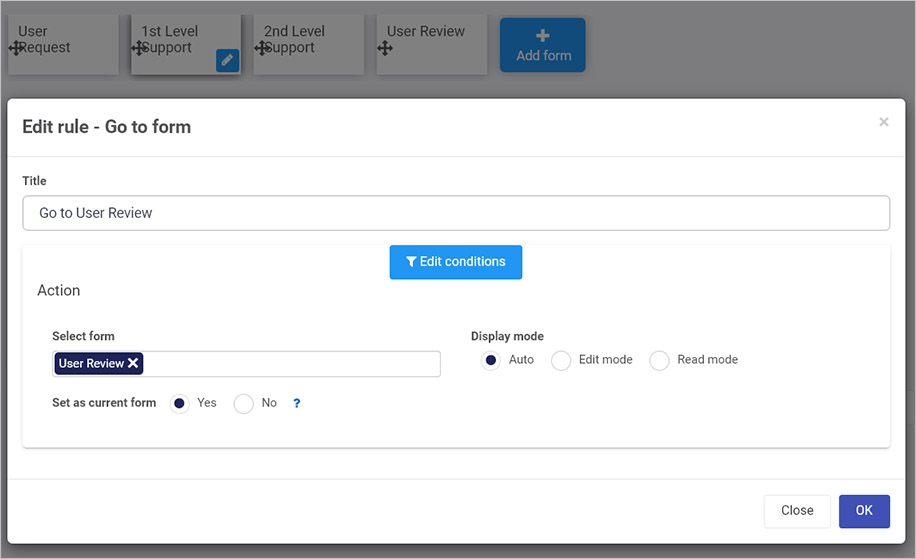
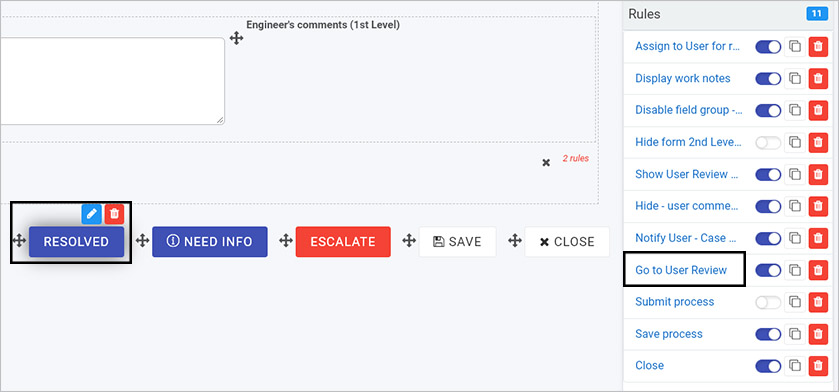
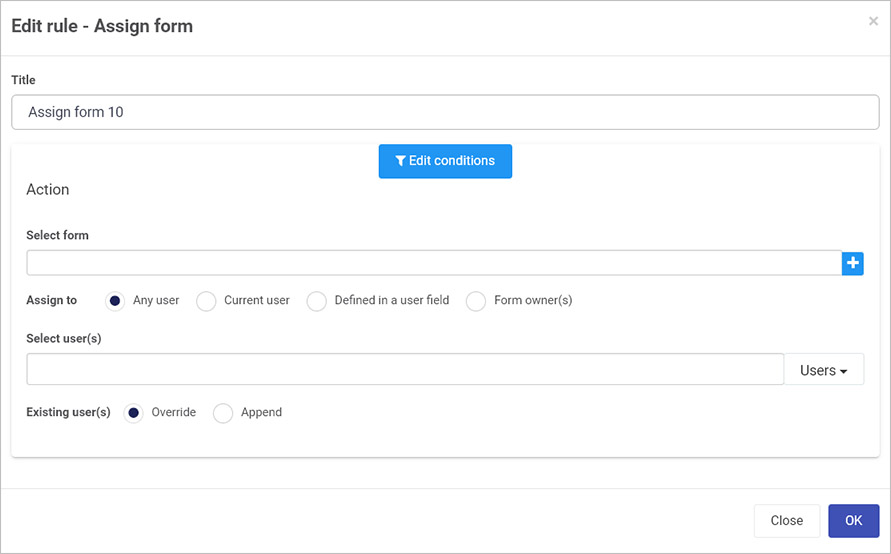
 to add more forms to assign. If you change your mind and want to delete a form, click on the Bin/Trash button
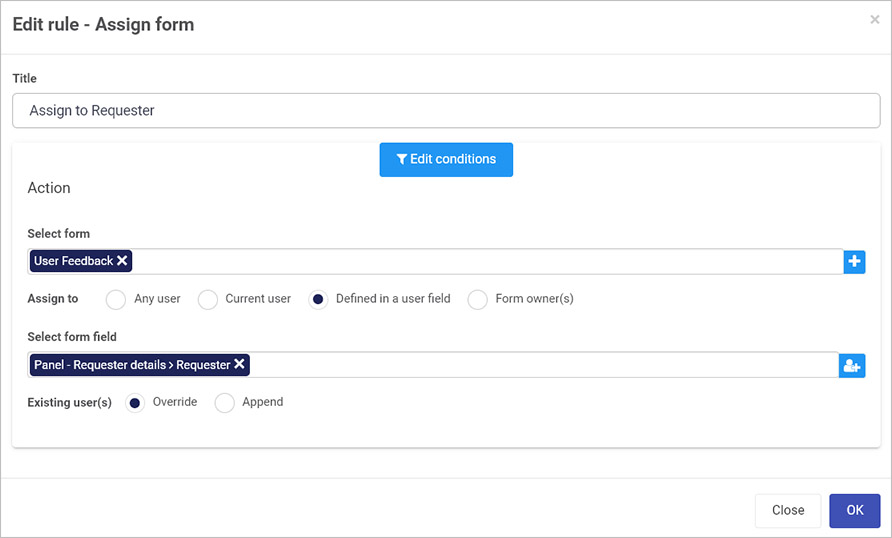
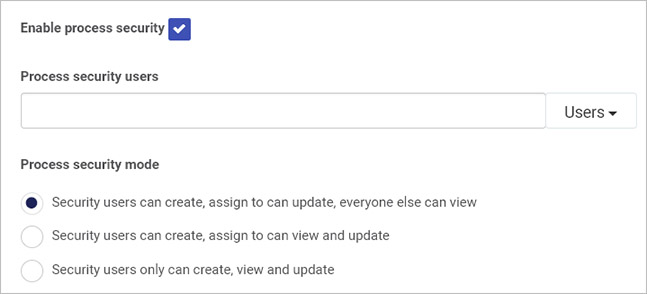

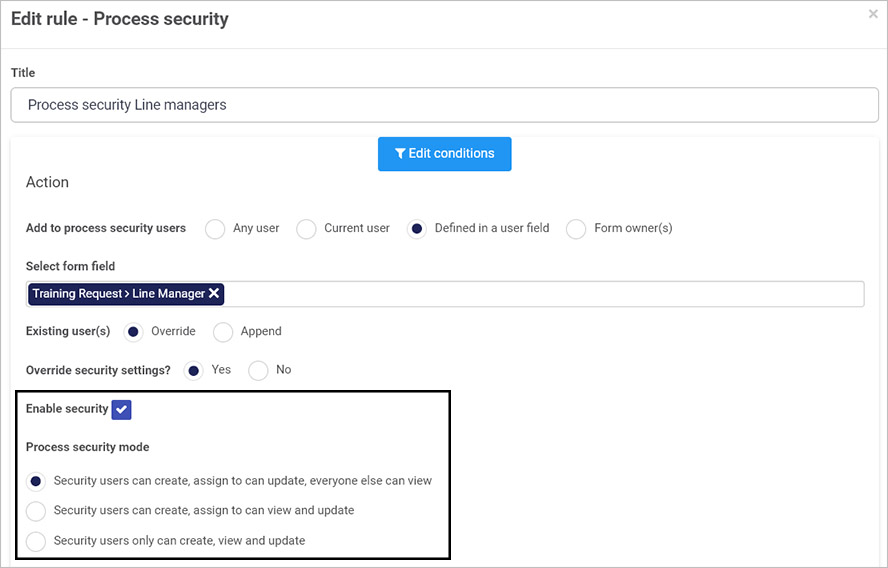
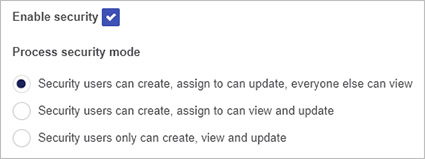
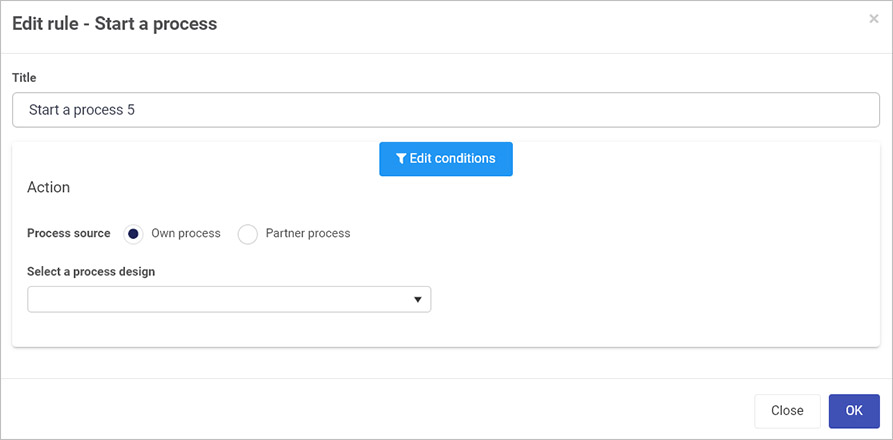
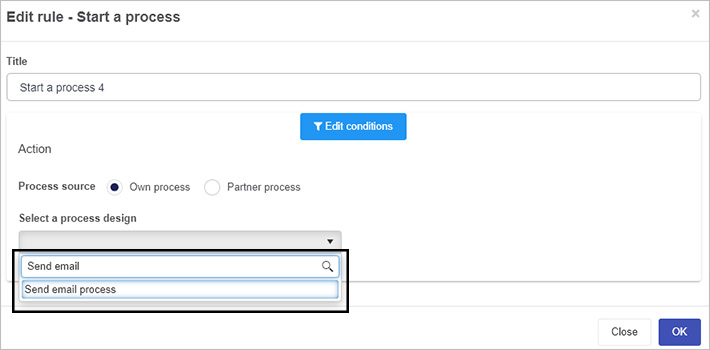

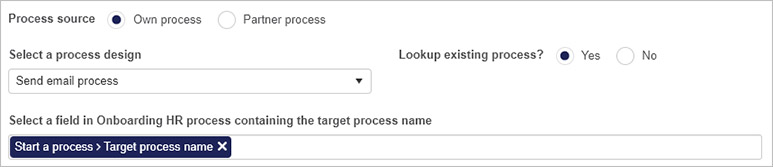
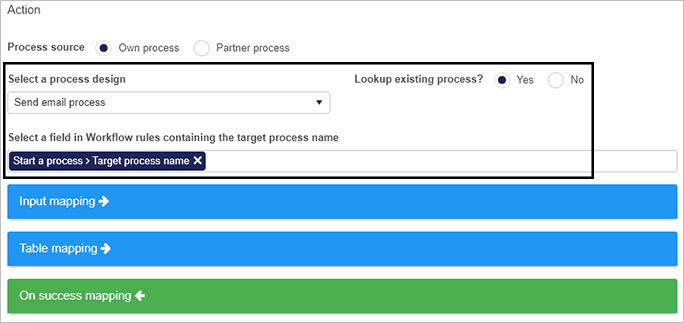
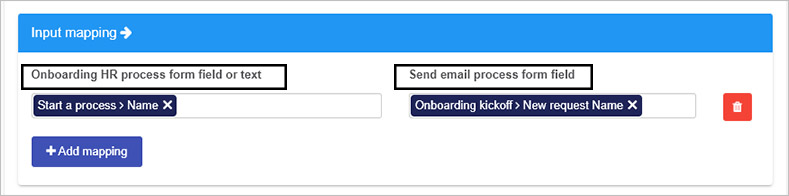
 to delete a mapping.
 to add further mappings from the secondary/target process to the primary process. Ensure that form fields are already precreated to hold these values.
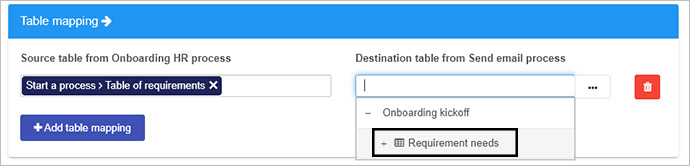
 to open the Table mappings dialog box.
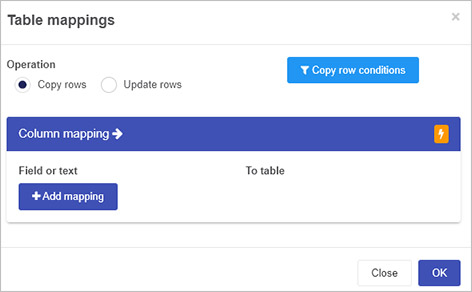
 then column titles from the primary and secondary processes are automatically listed under Column mapping as shown below, where Need and Reason are column headings in the table in the primary process and Customer need and Reason given are column headings in the table in the secondary/target process. In the example below, a condition has been set so that if Need equals the text ‘Broadband connection’ then the values input into the columns listed will be copied over.
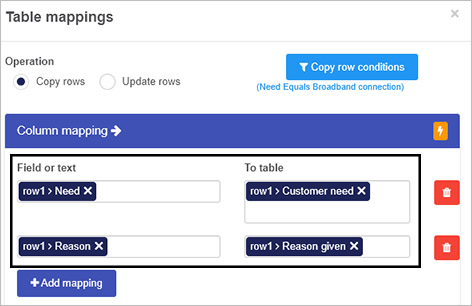
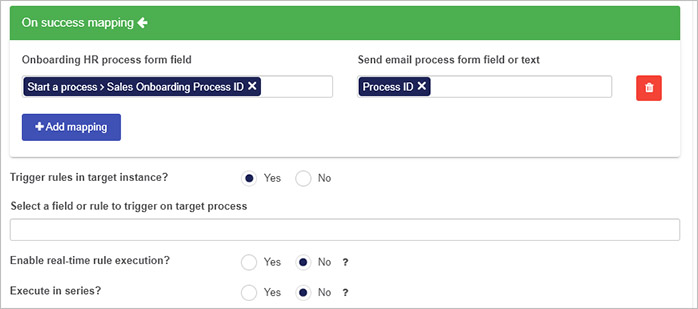


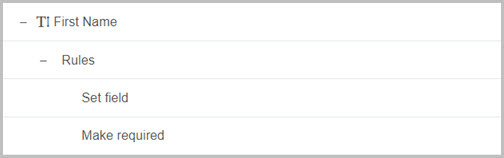
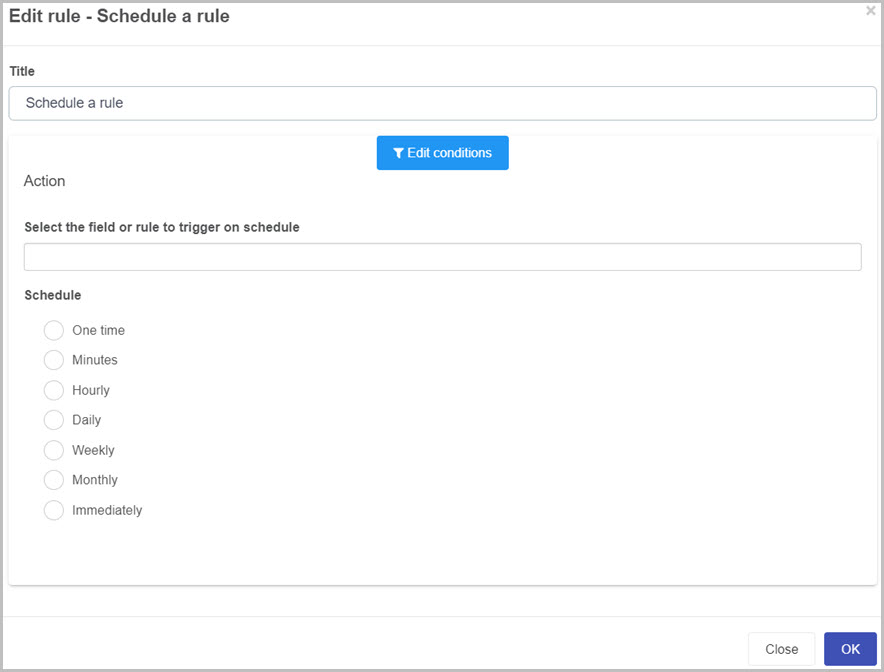
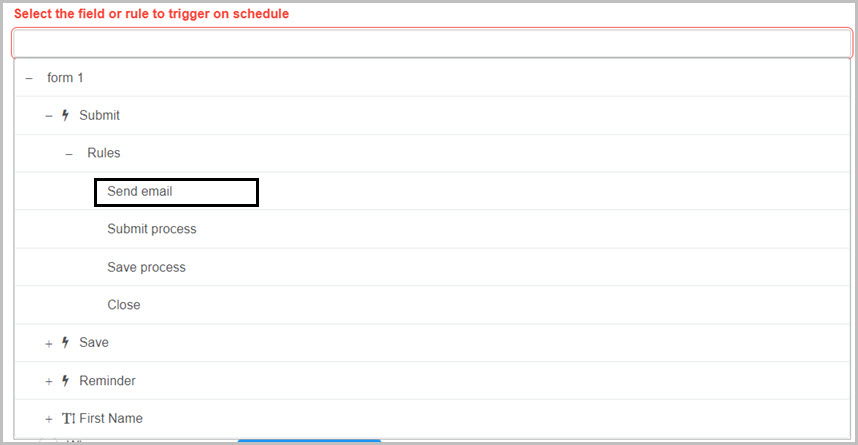
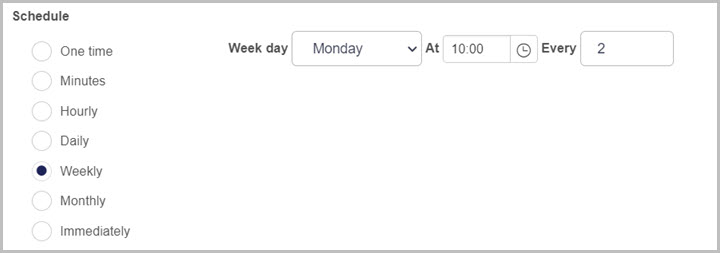
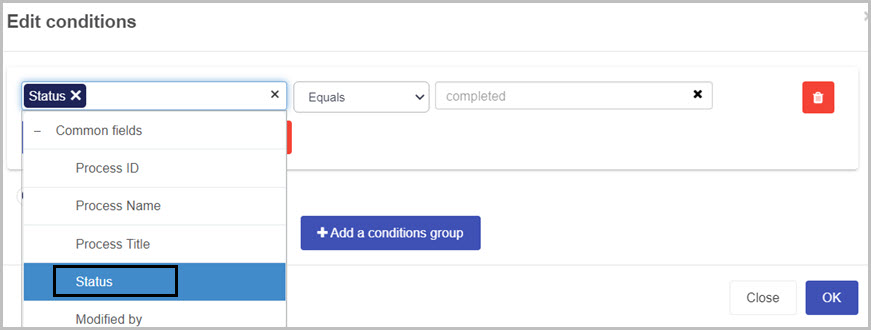


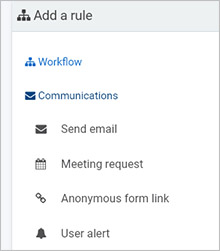
 . For example selecting the Submit as shown below.
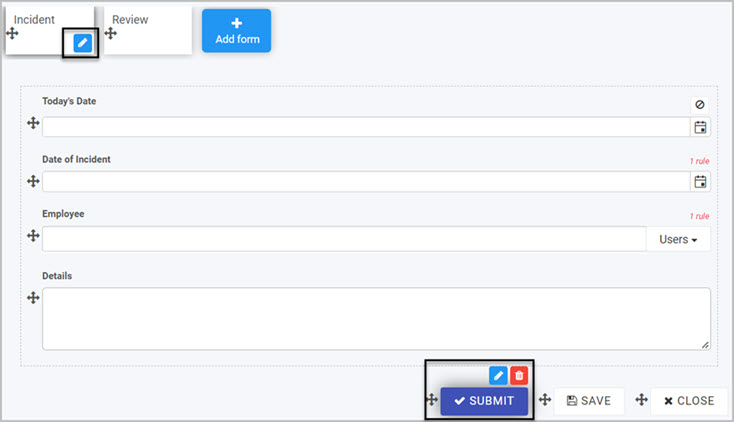
 and choose from the appropriate Selection mode, see
  to add an expression, go to
  you can copy HTML code directly into the body text.
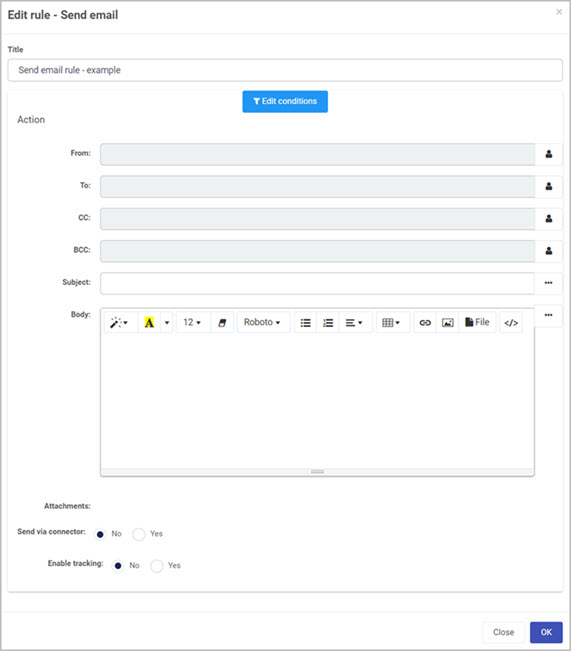
 you will be redirected to the File storage area where you can search for existing images stored in the Kianda file system, create a folder, or upload a file.

 on the dropdown field in the Select email users dialog box.
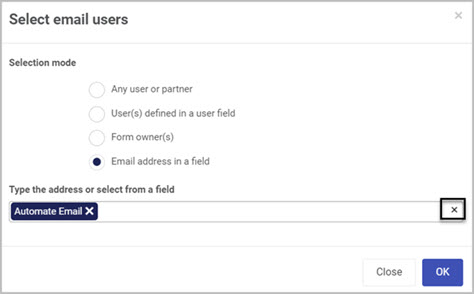
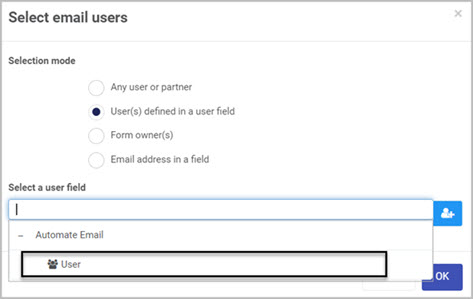
 to add more selection fields.

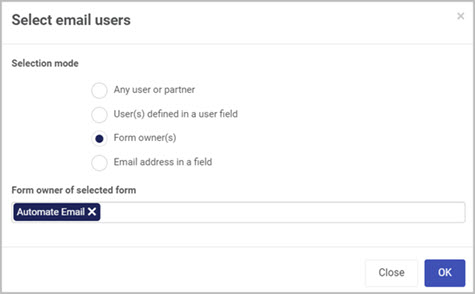
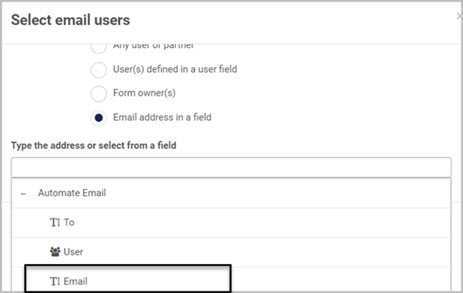

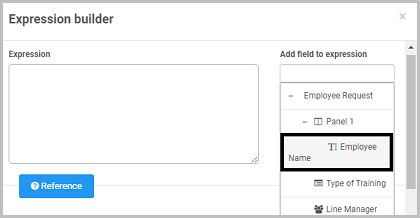
 to add the field as an expression. Note that the expression is the Name(unique) of that field.
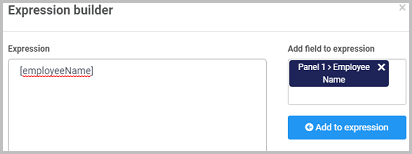

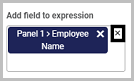
 to find out how to use particular functions in your email. For example ProcessLink() returns the html link to the current process. Copy this function into the Expression box and click on OK to add the function. Then in the Body type in the text you want associated with this link for example “click here” into the brackets of the function:
 . The Attach file to email dialog box opens.
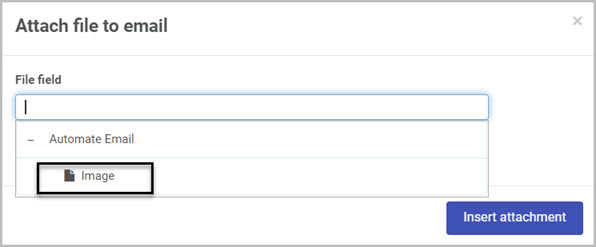
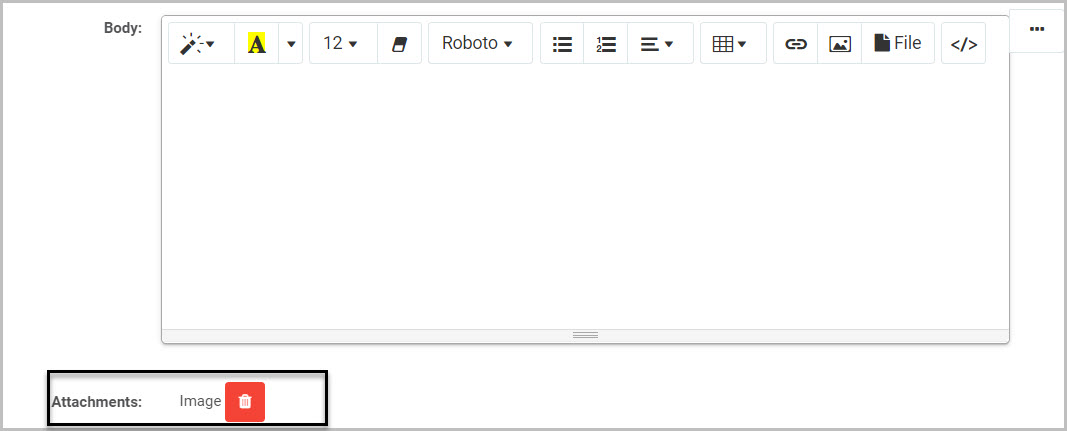

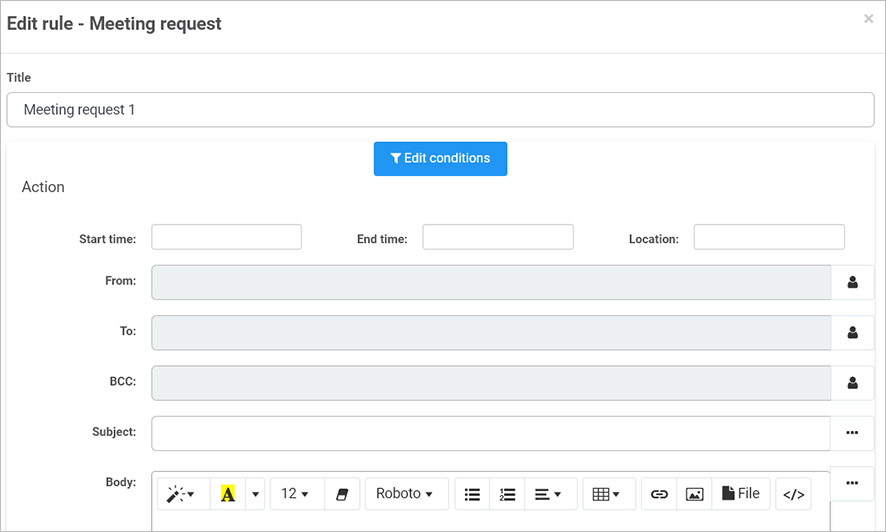

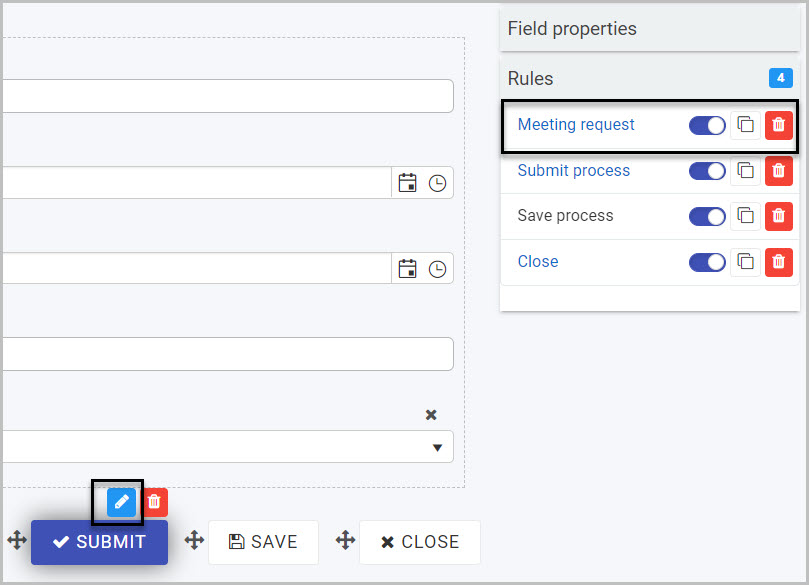
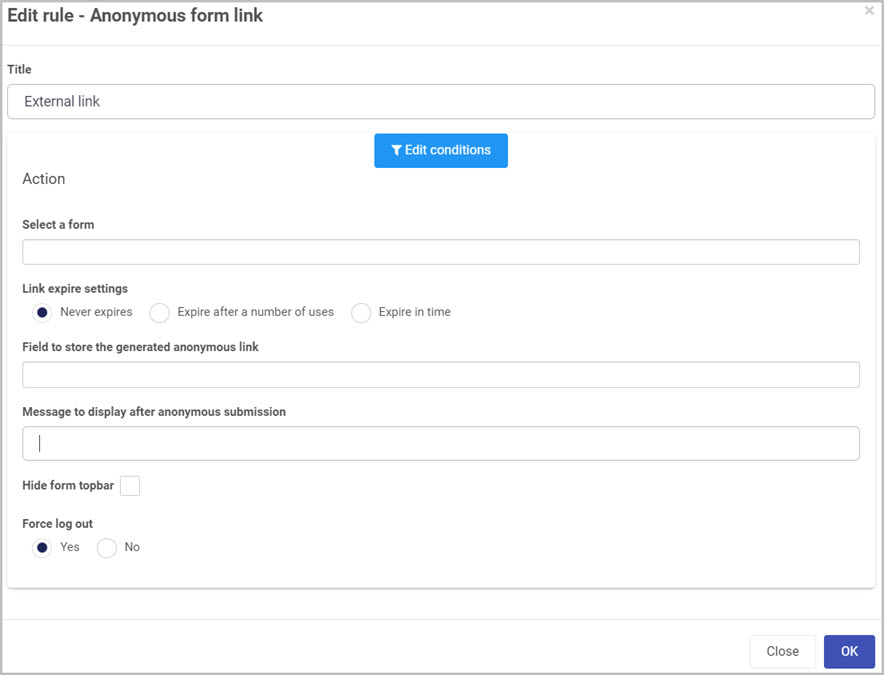
 to create conditions for the rule, see
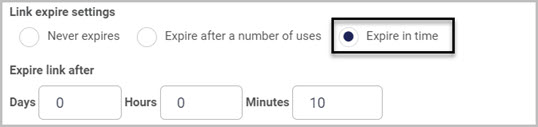


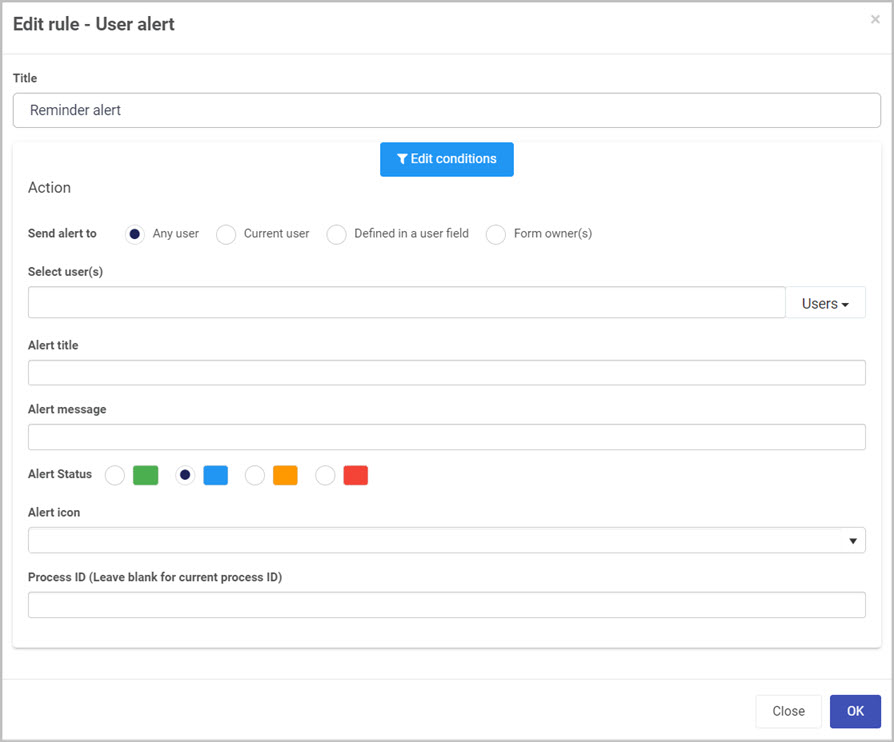
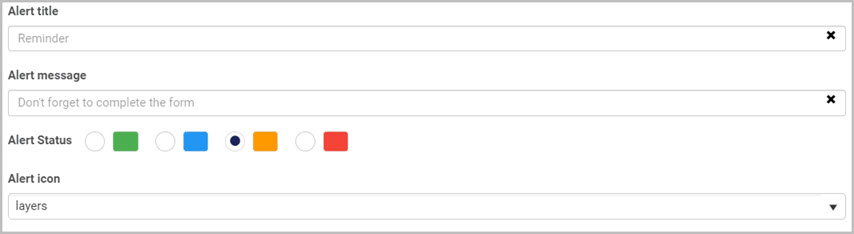
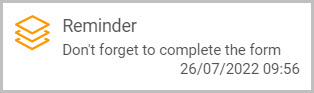
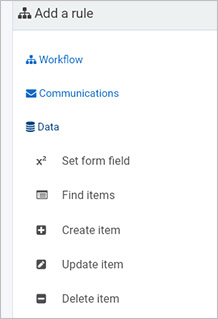

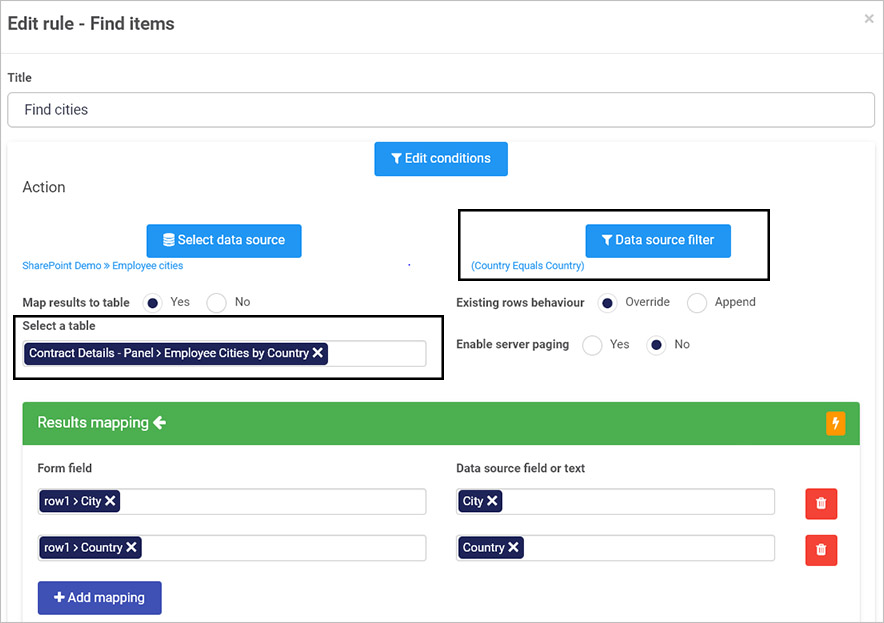
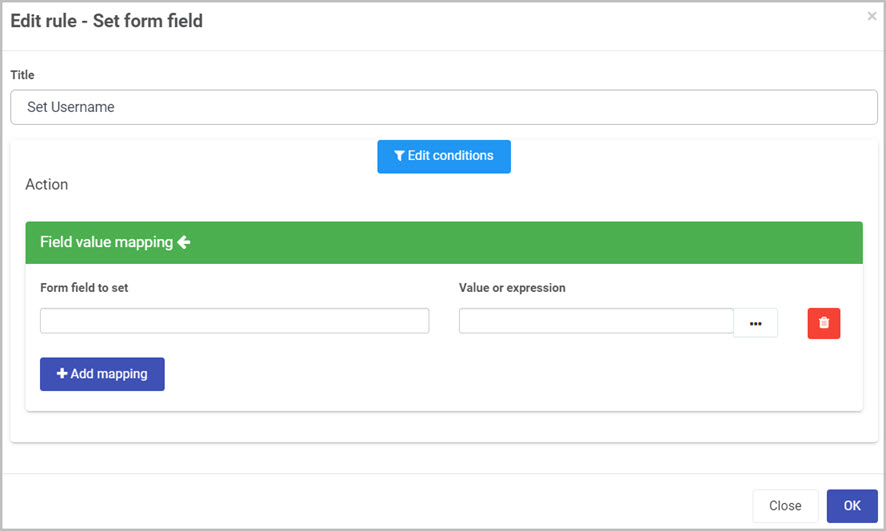
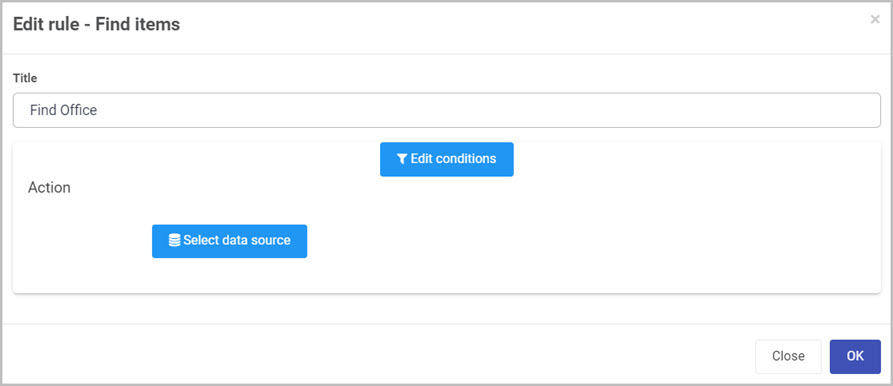
 to select the desired data source. When you select your data source, new mappings options are presented.
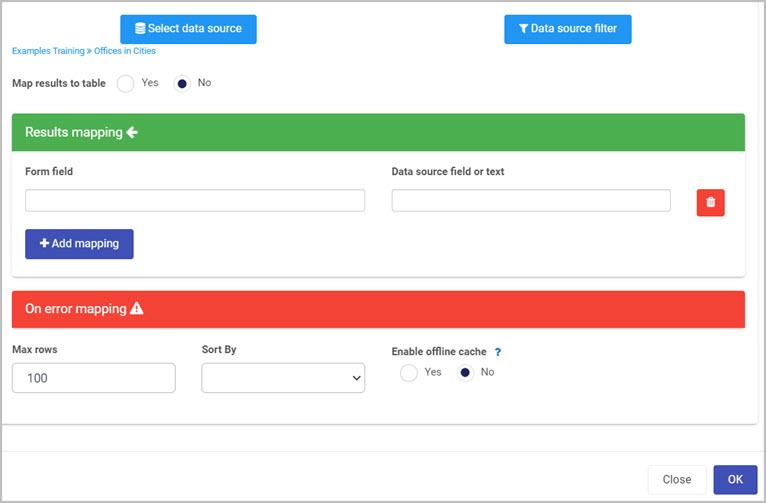

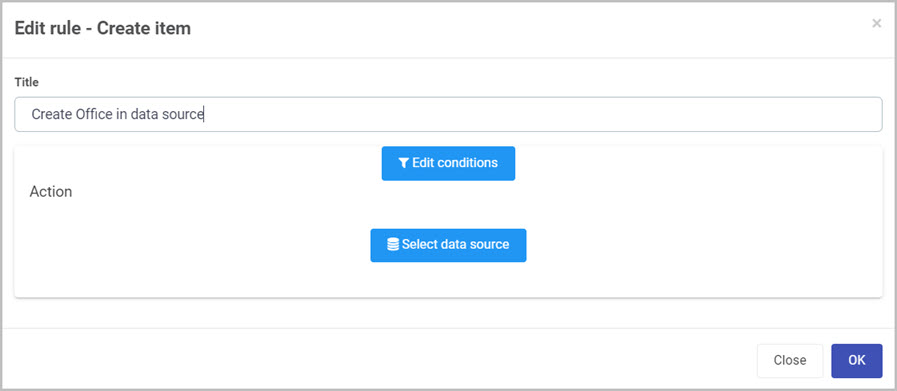
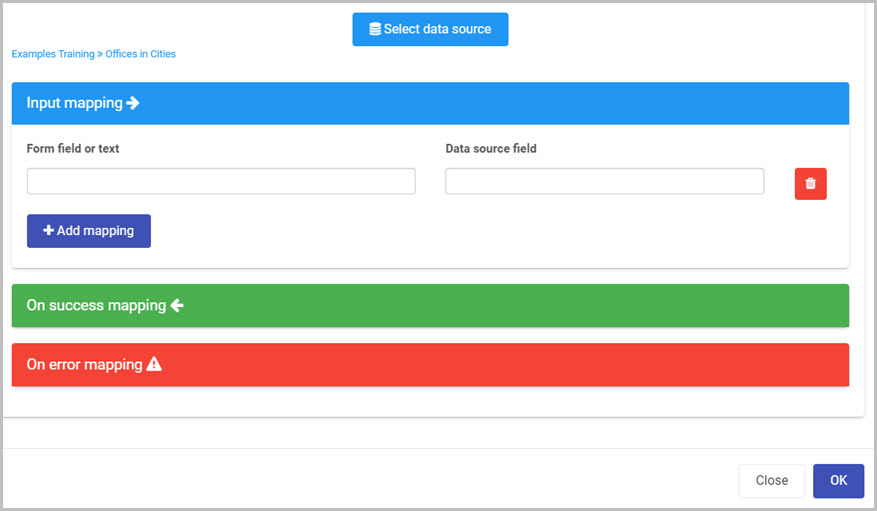
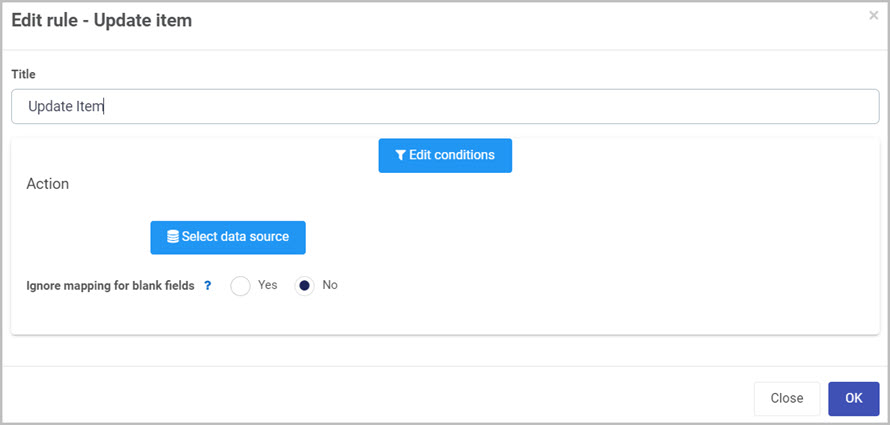
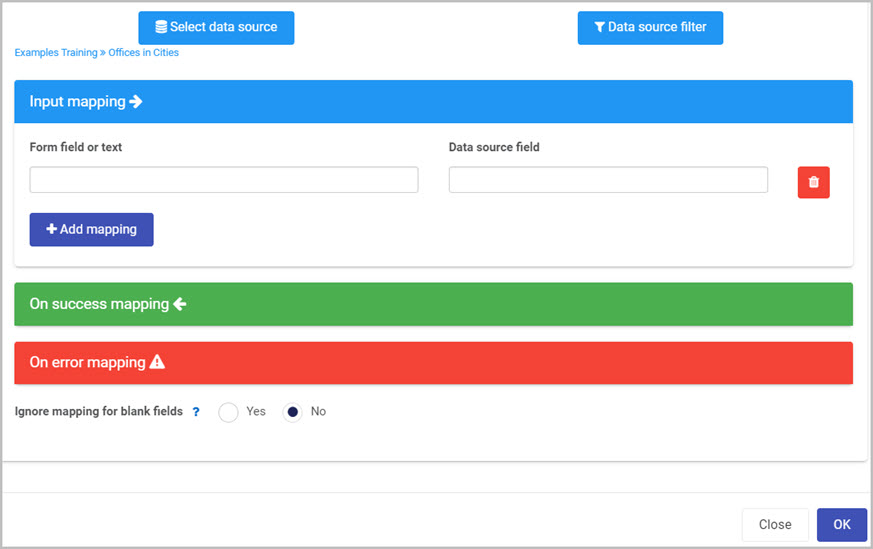
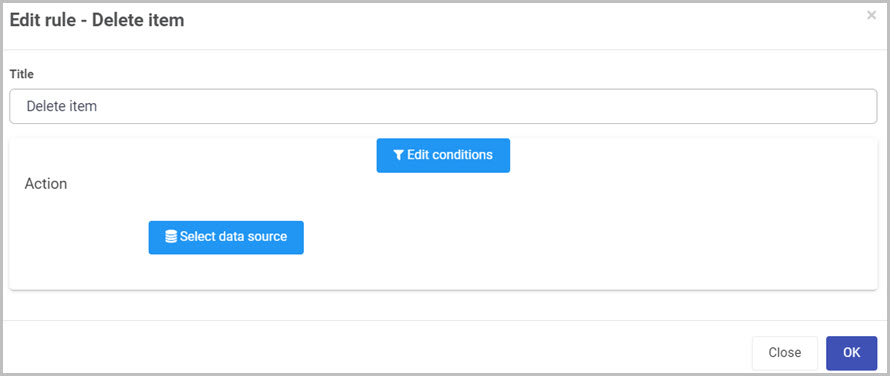


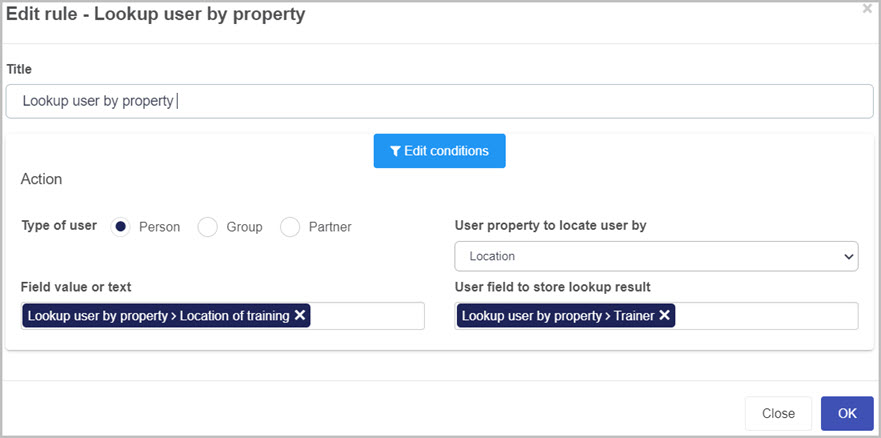

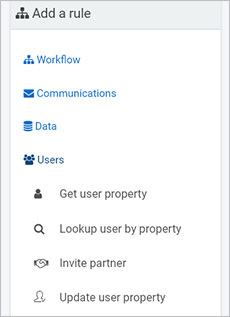

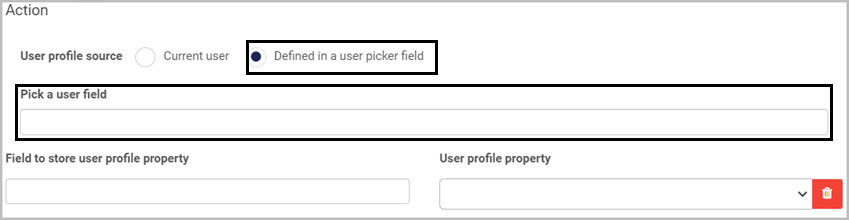
 button. This will result in adding more Field to store user profile property and User profile property fields. You can also delete unwanted fields by clicking on the red Bin/trash icon.
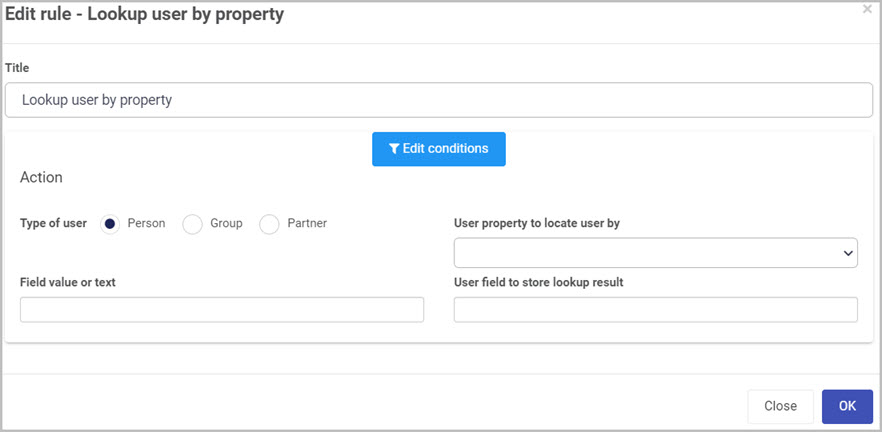


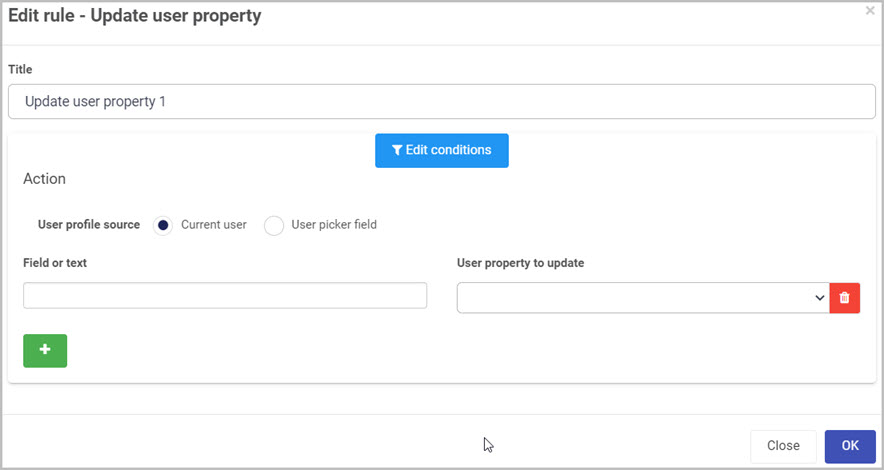
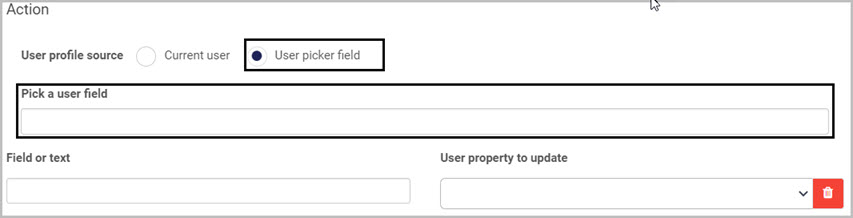
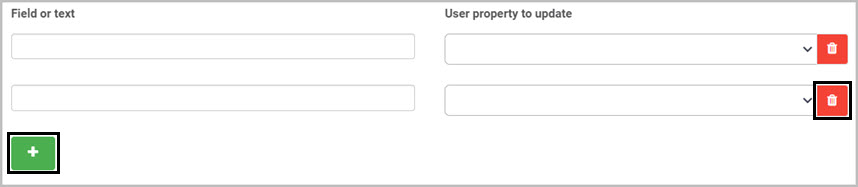
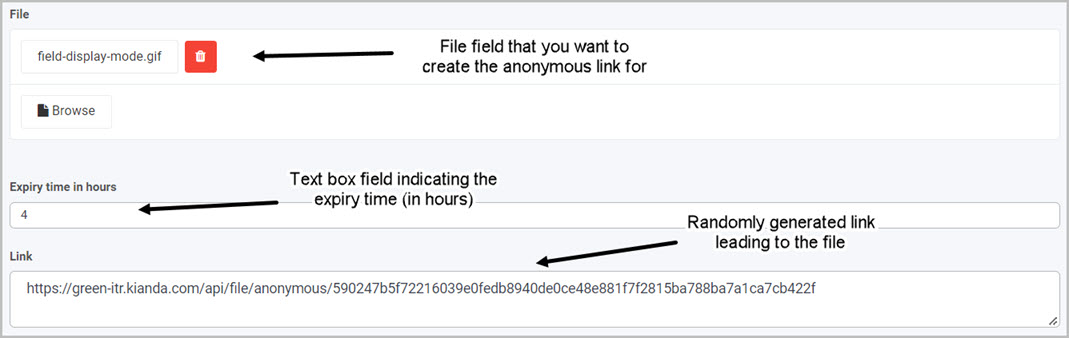
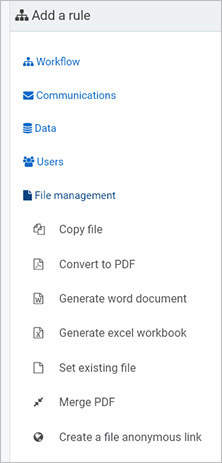
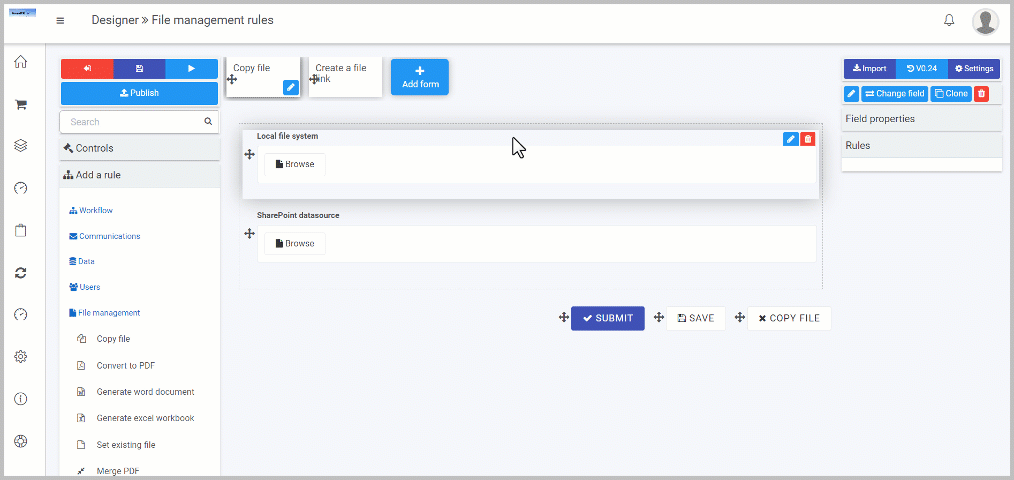
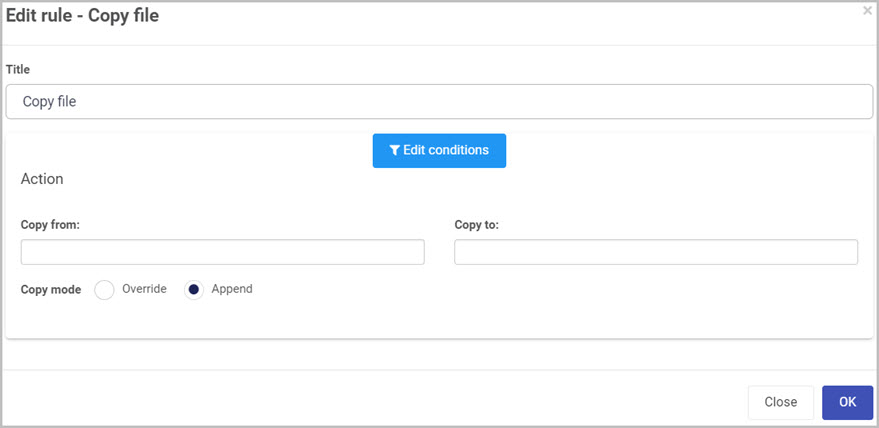

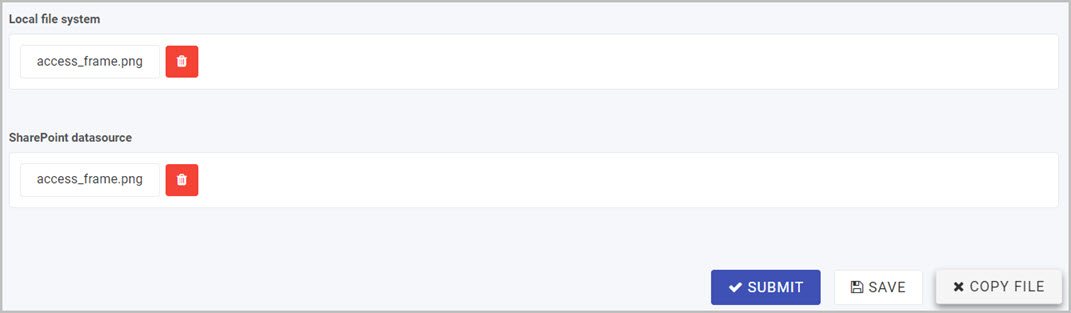
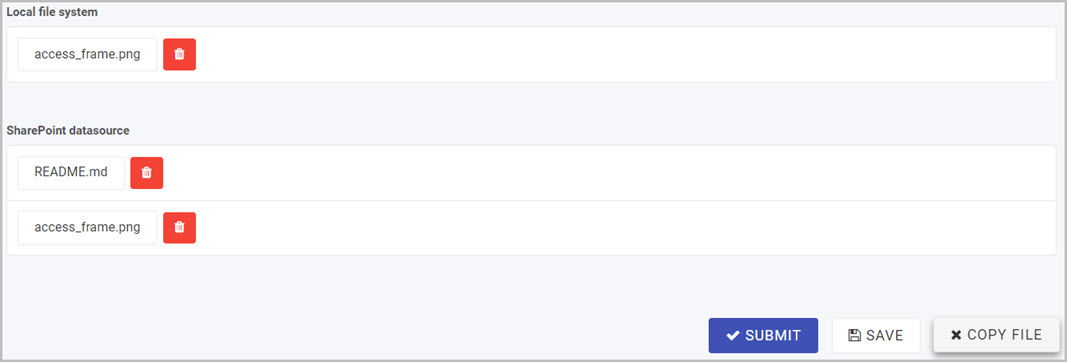
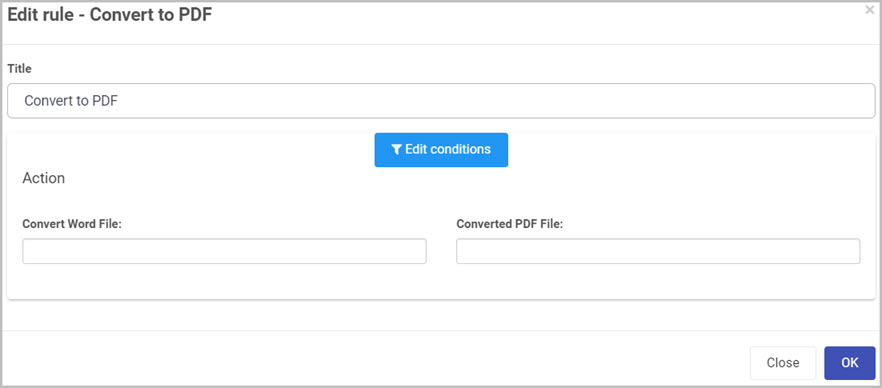
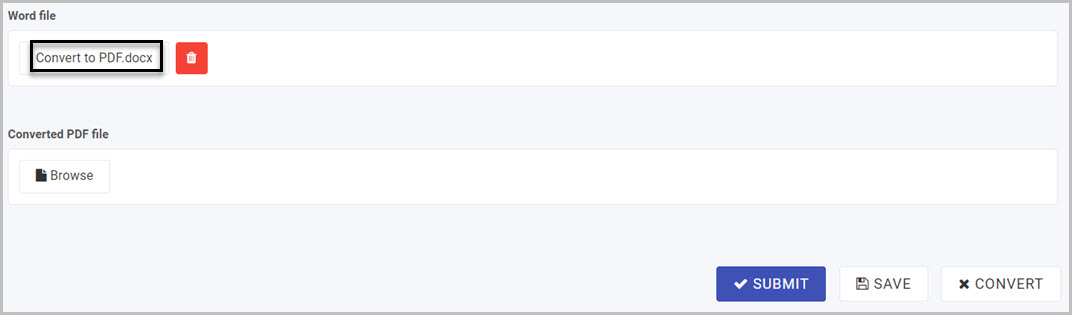
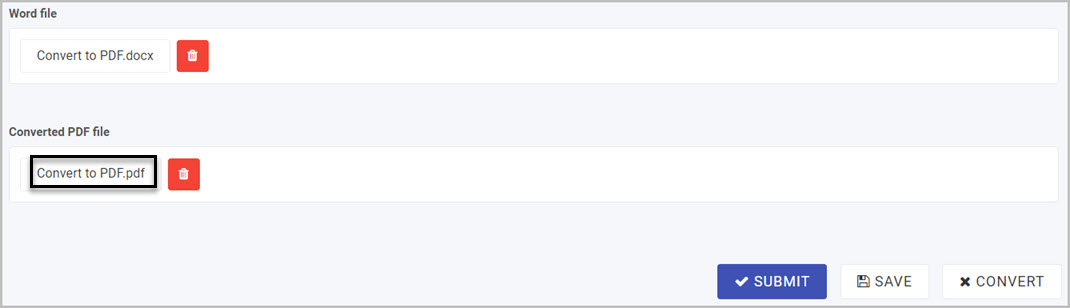
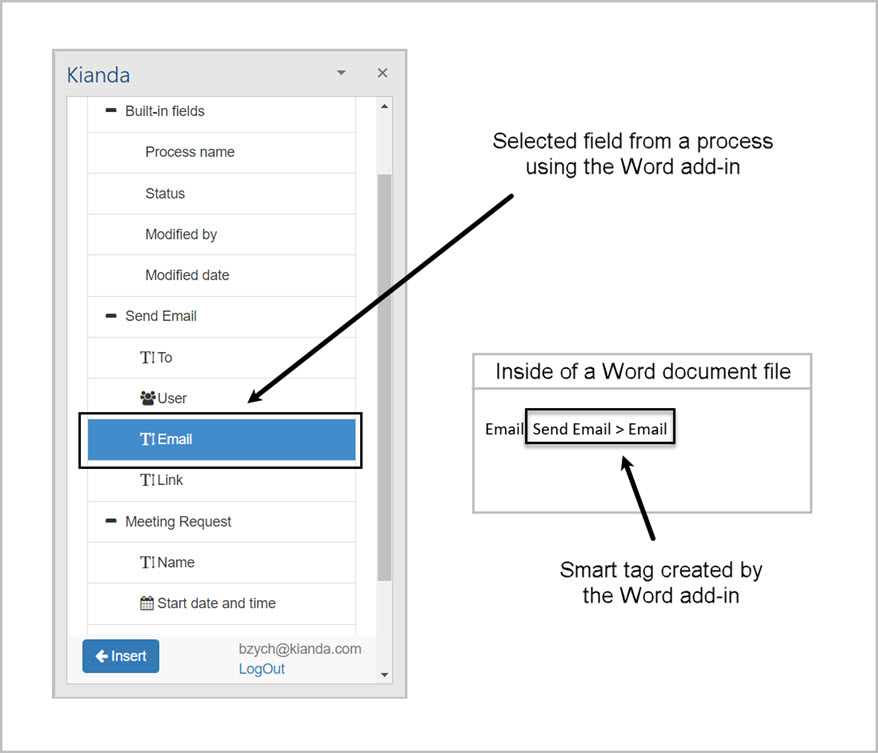
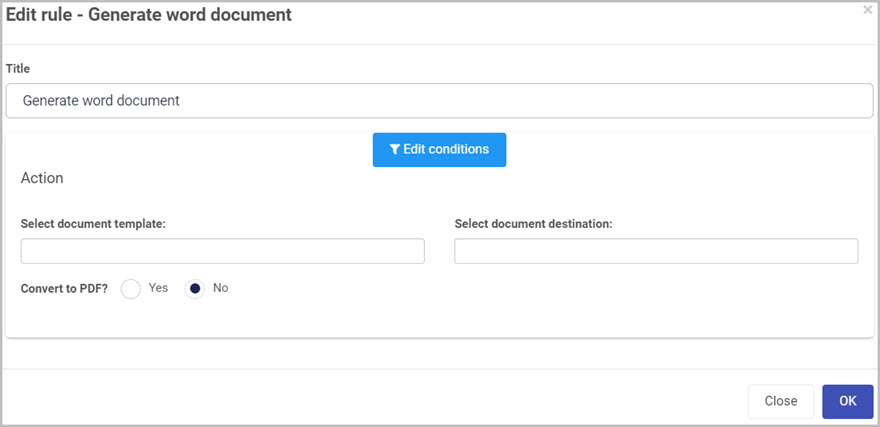
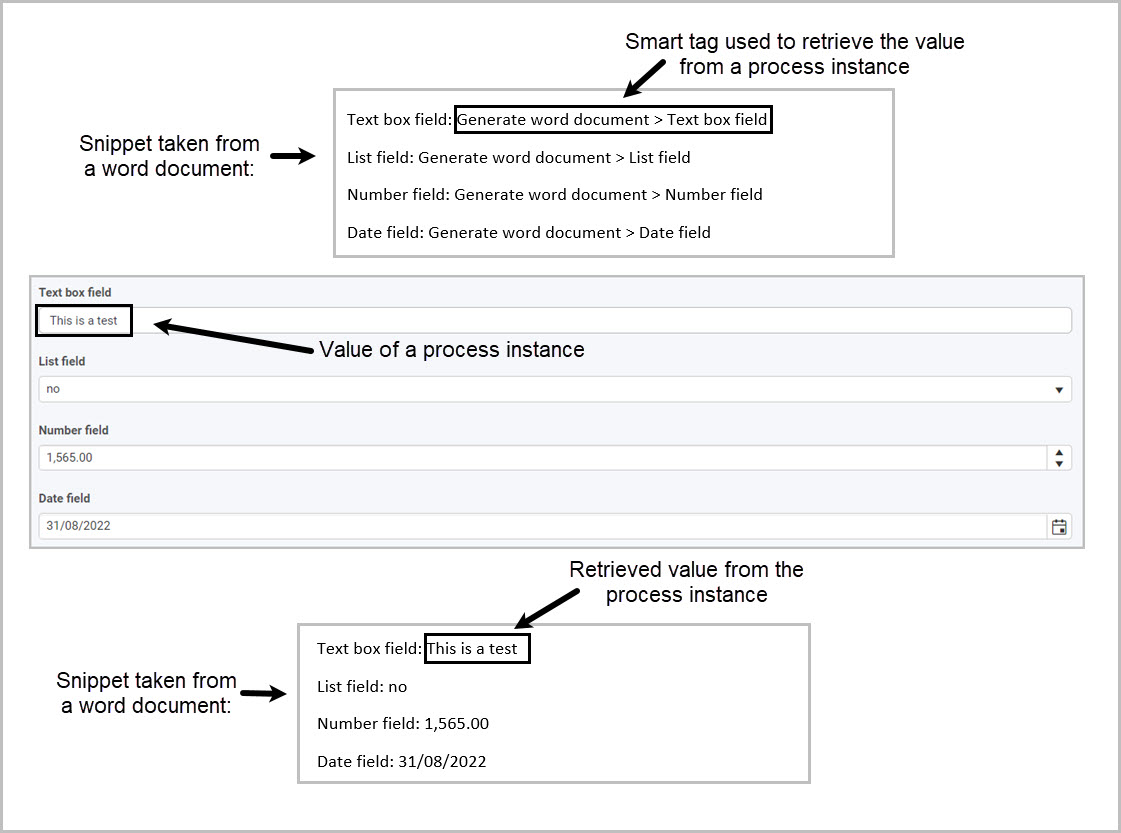
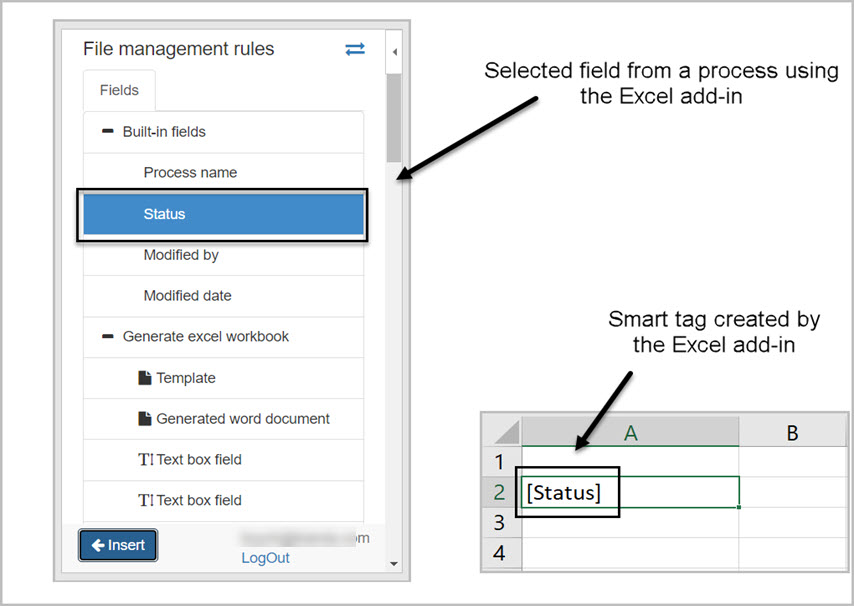
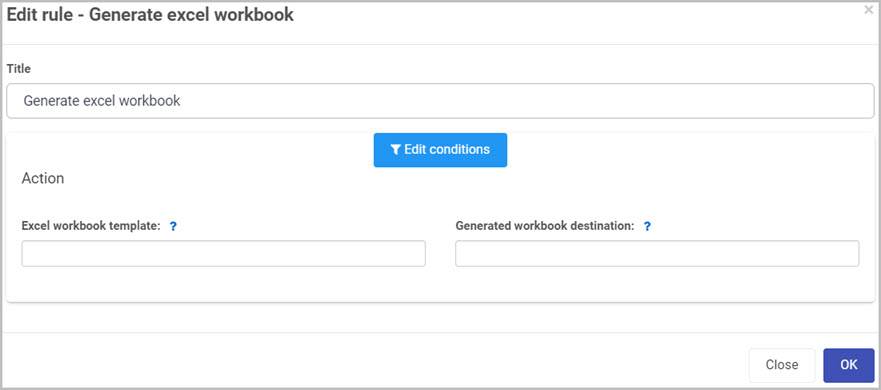
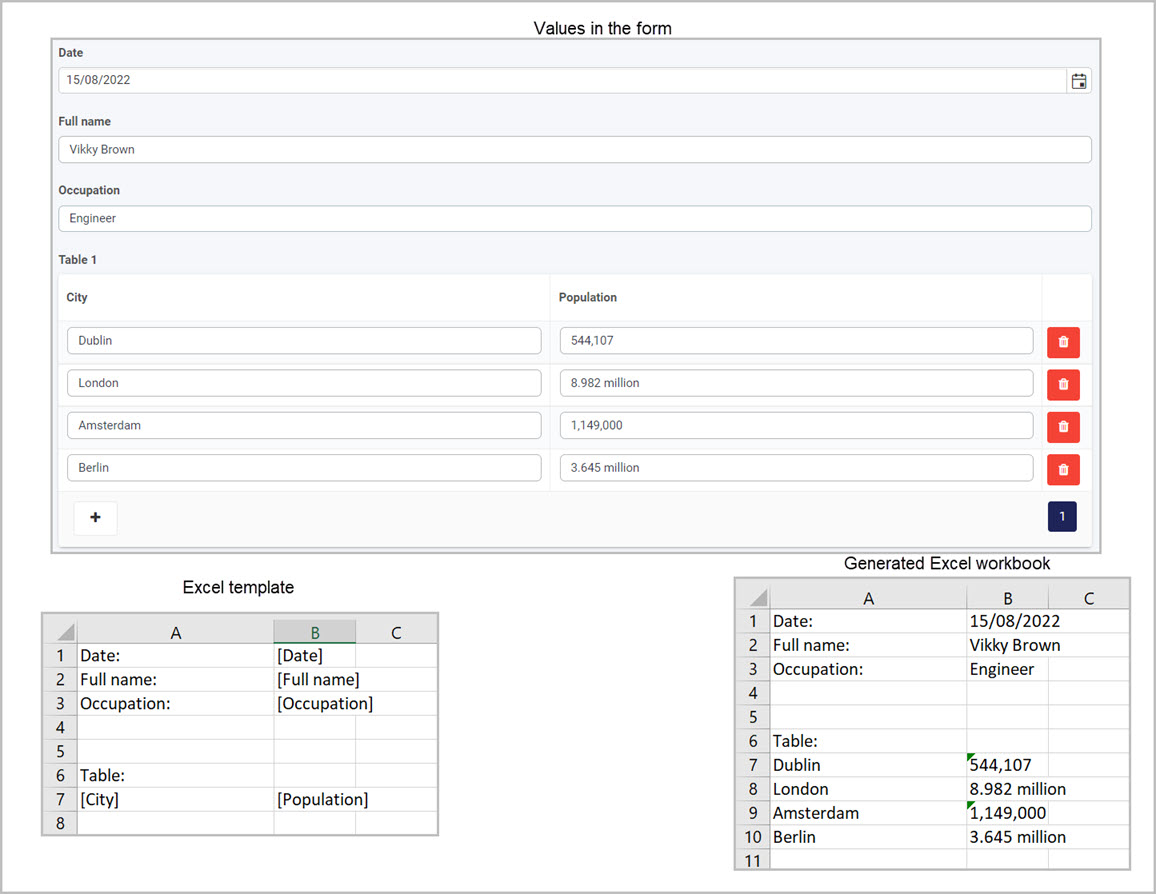
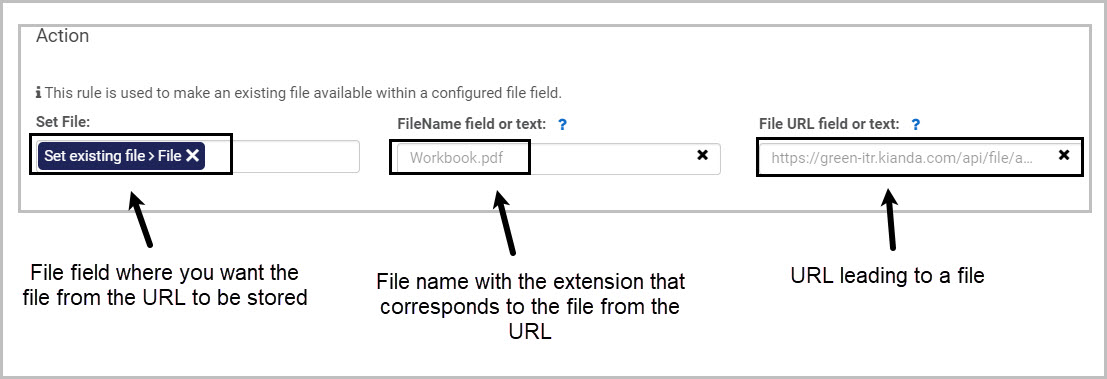

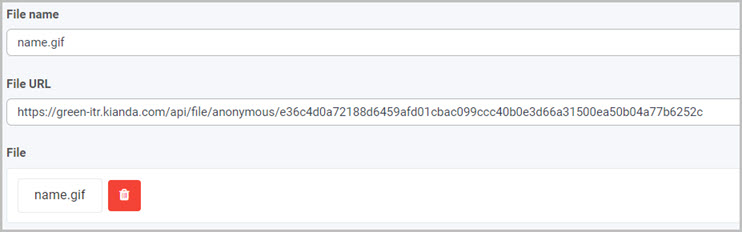
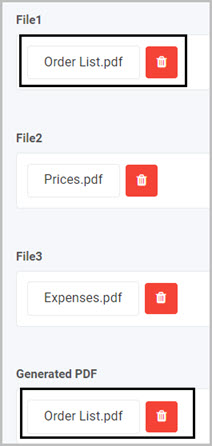
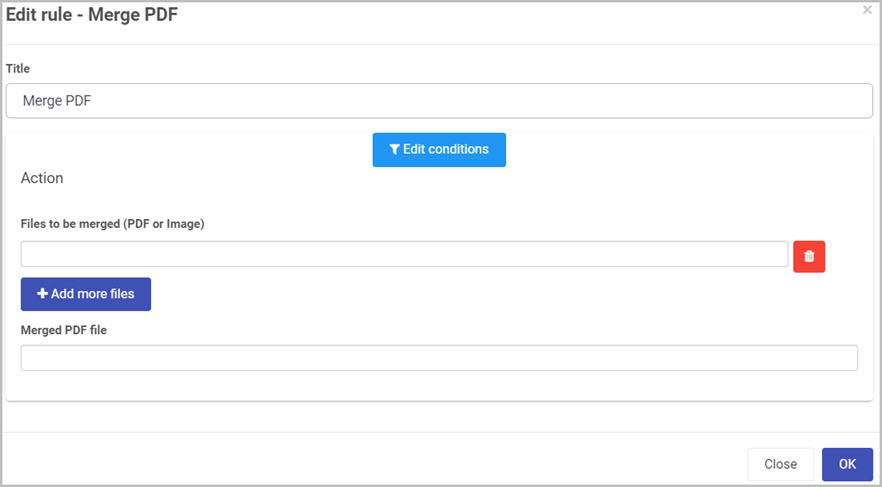
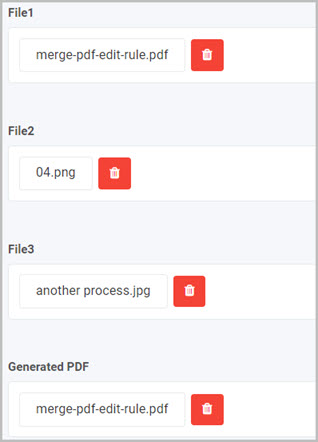
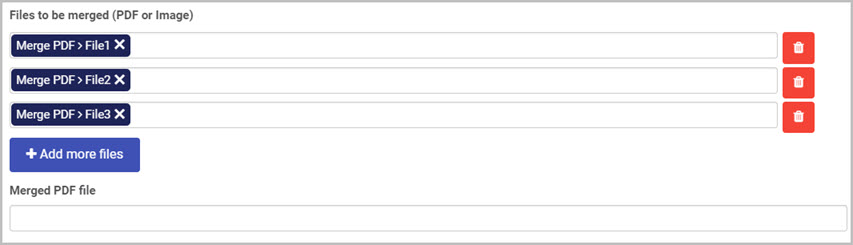
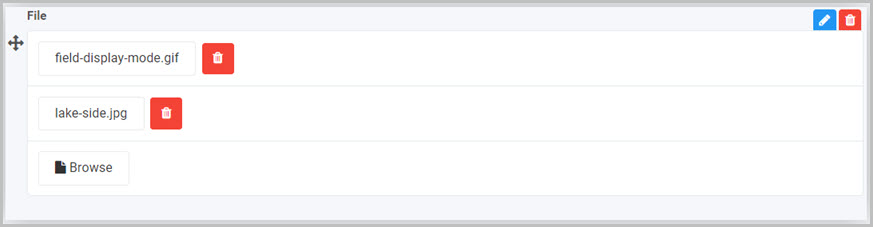
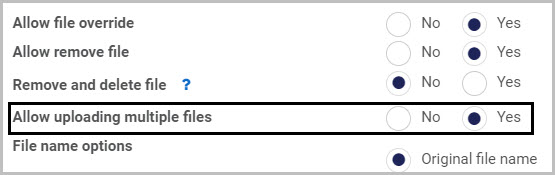
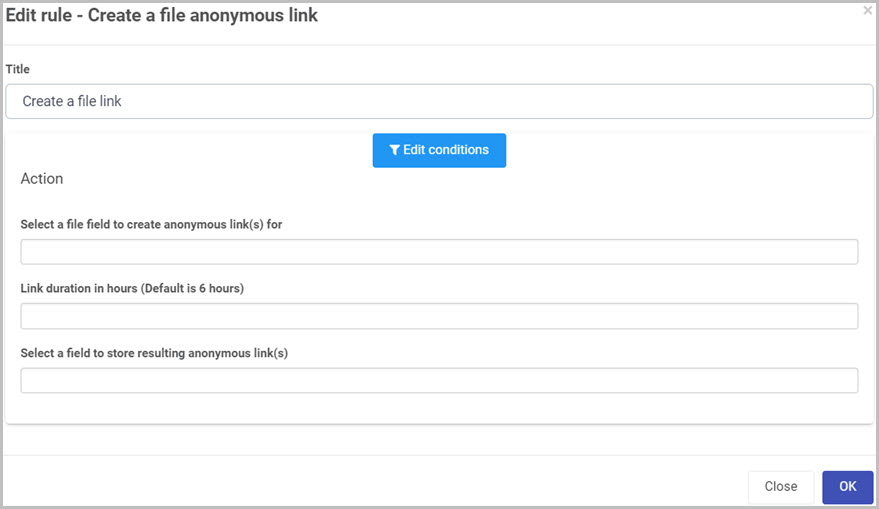
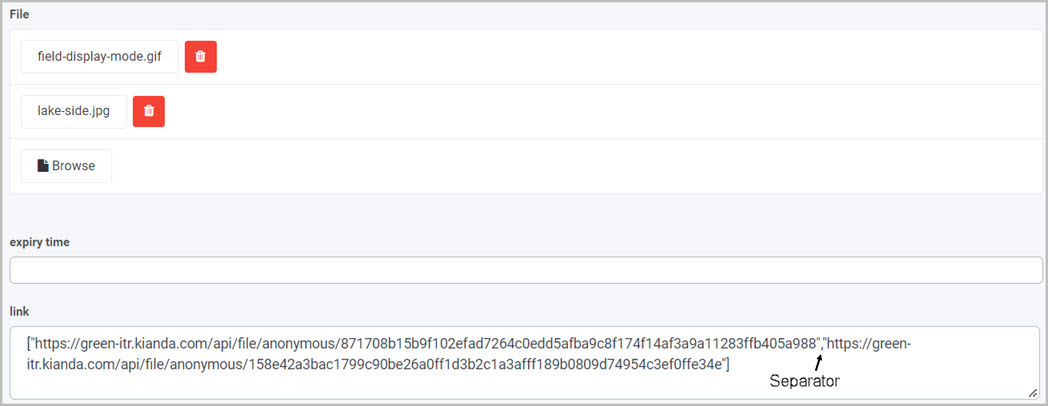
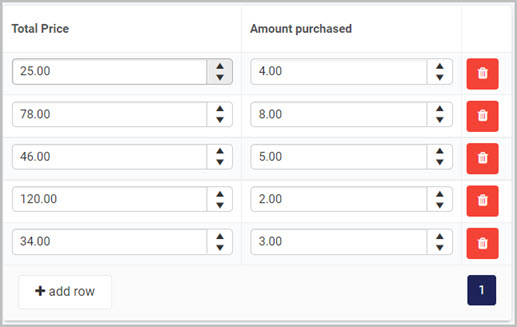
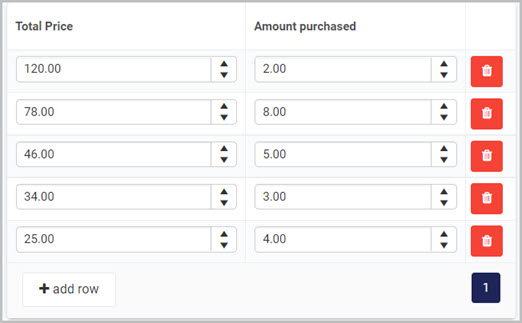

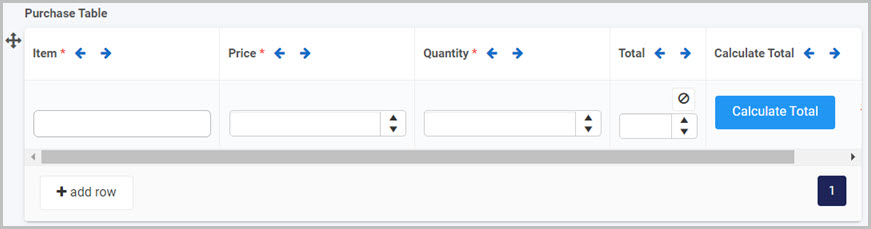
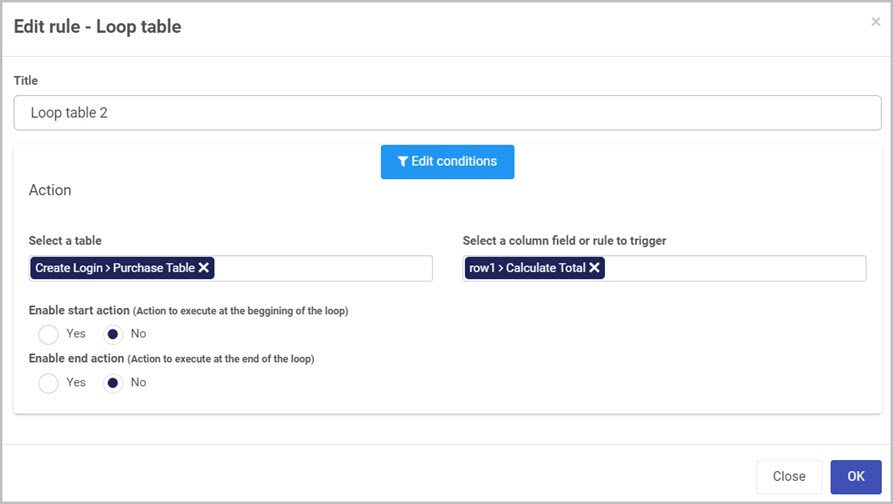
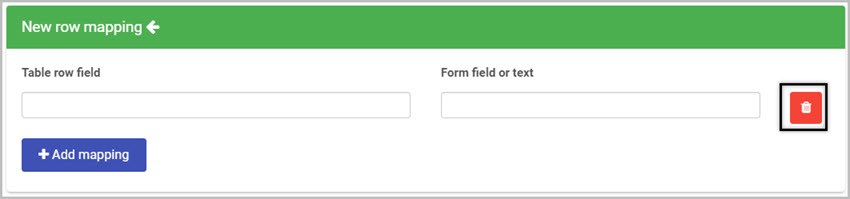
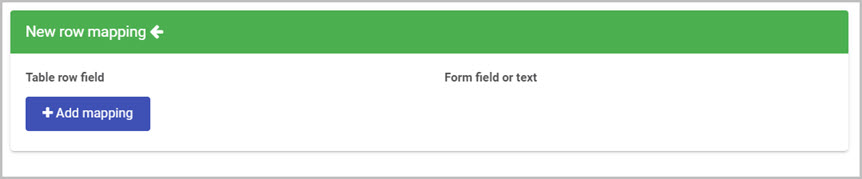
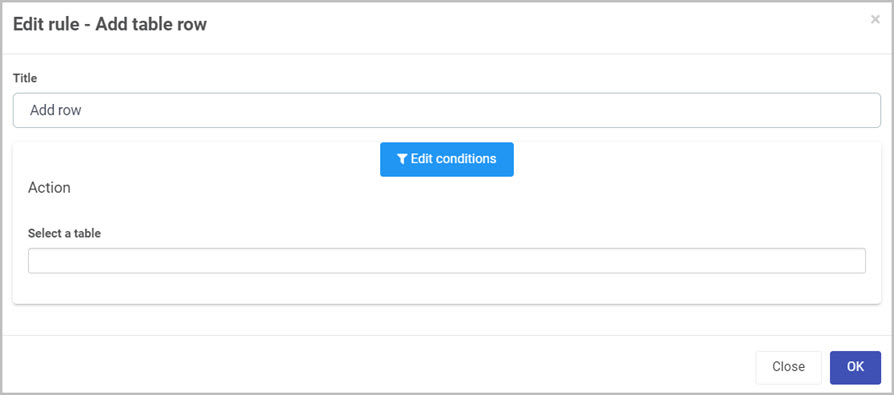
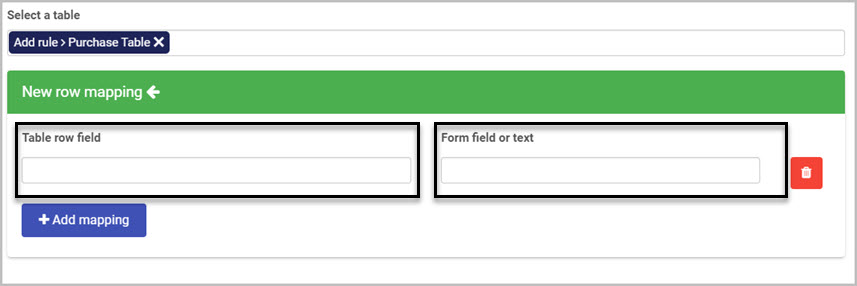
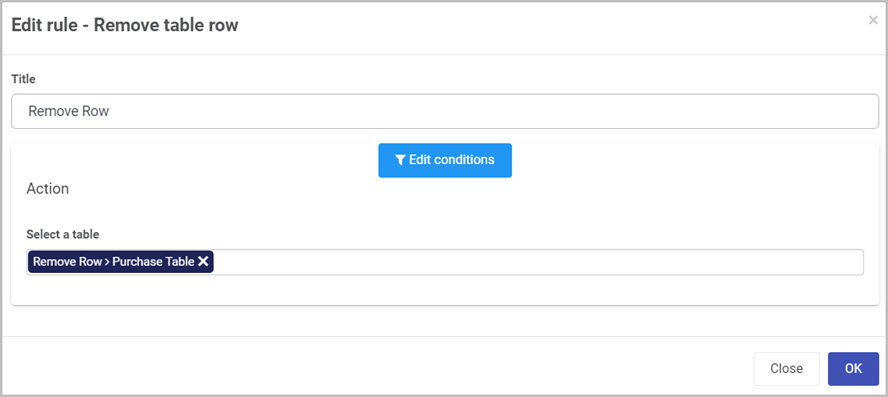
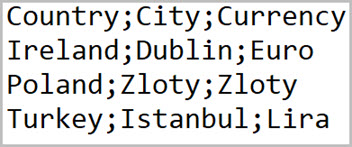

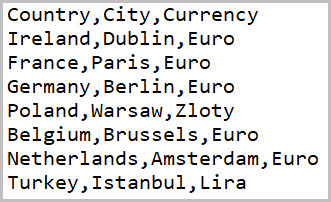
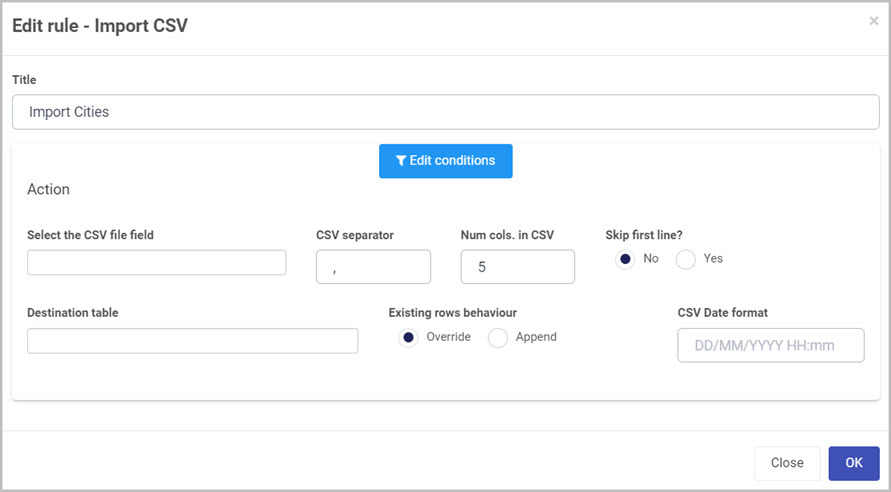


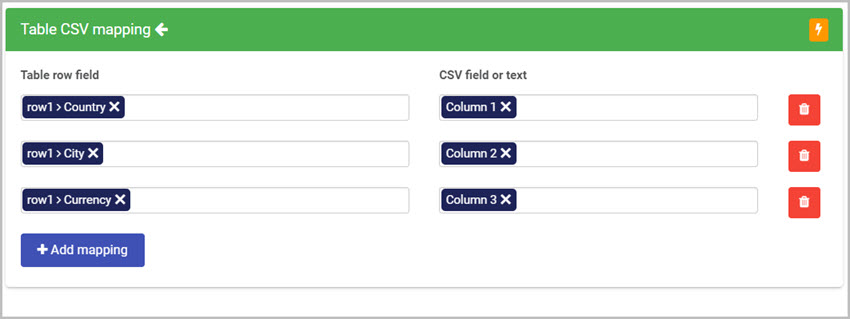

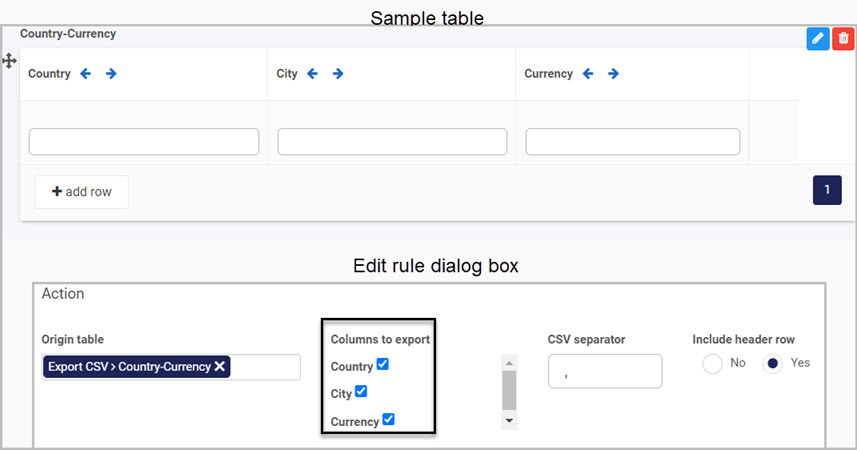
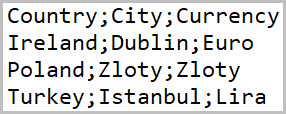
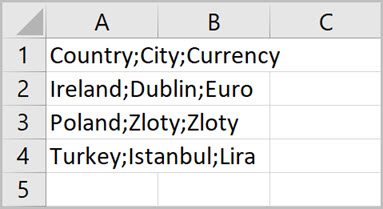
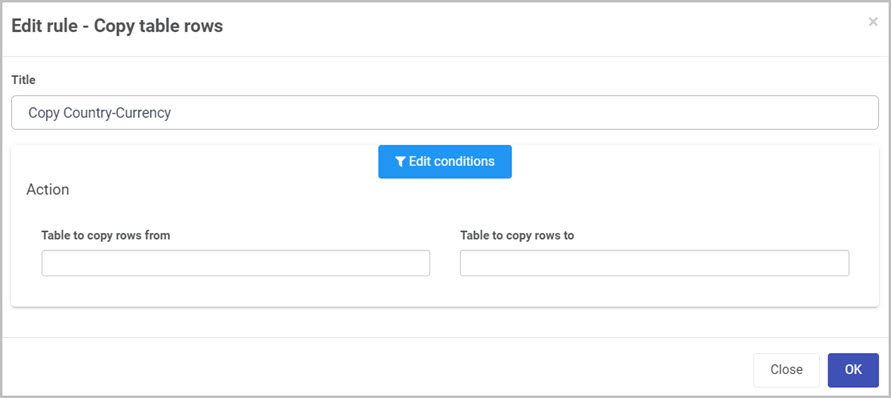
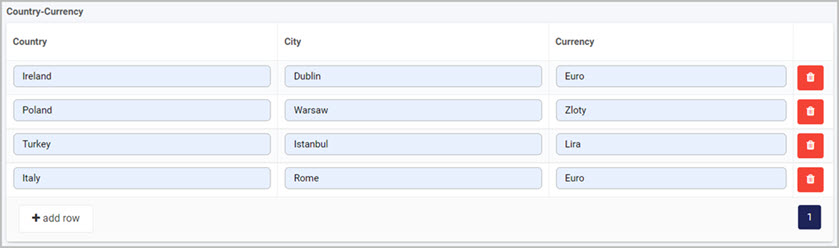
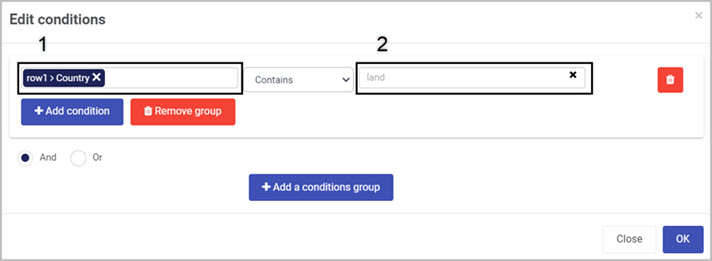
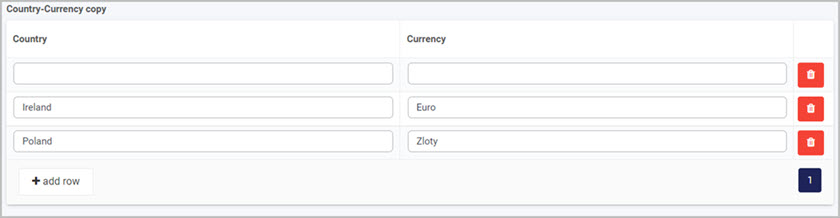
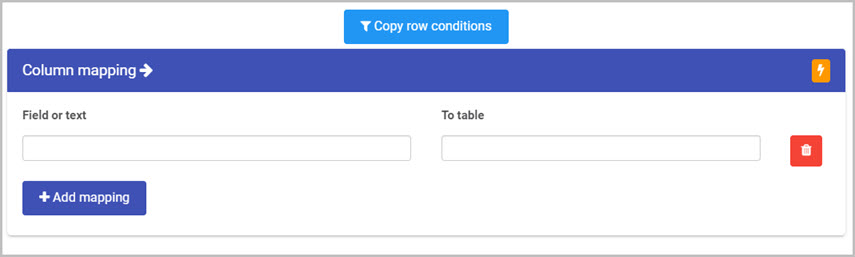
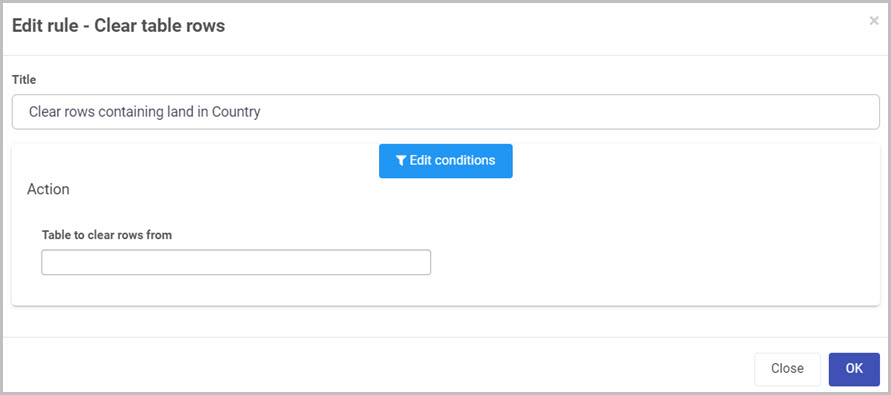
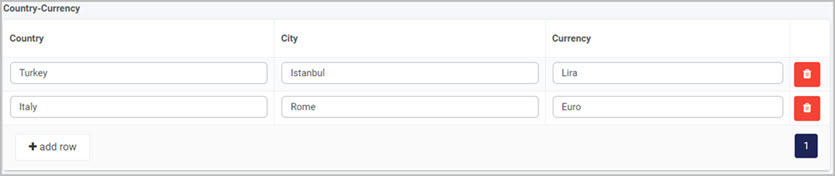

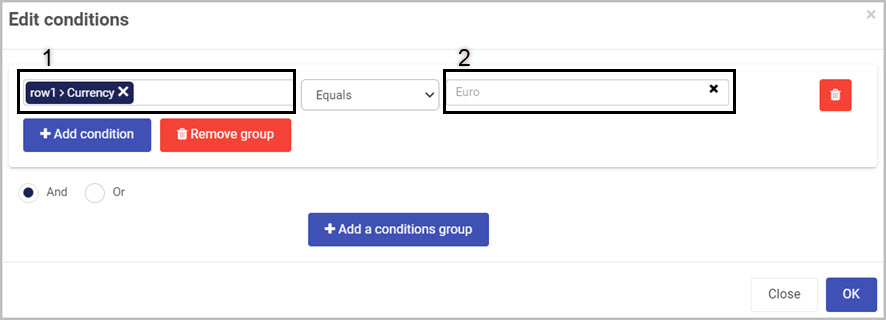
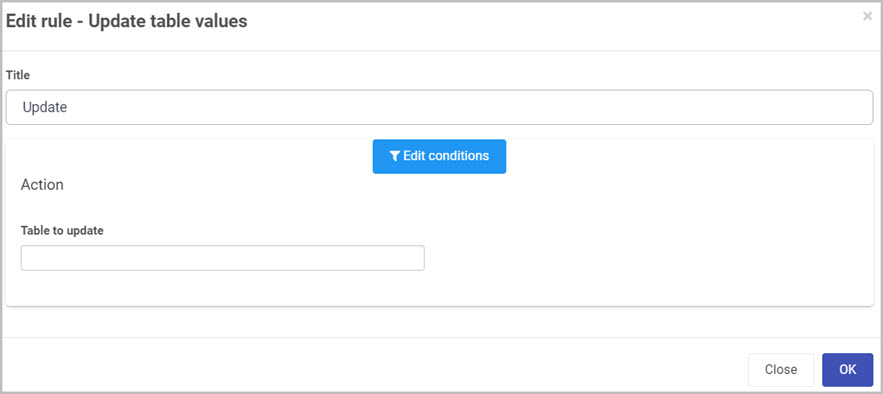
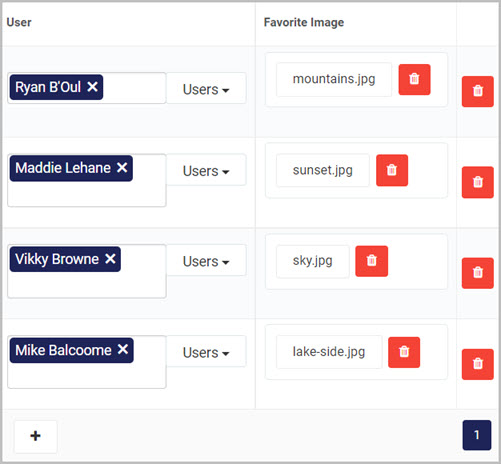
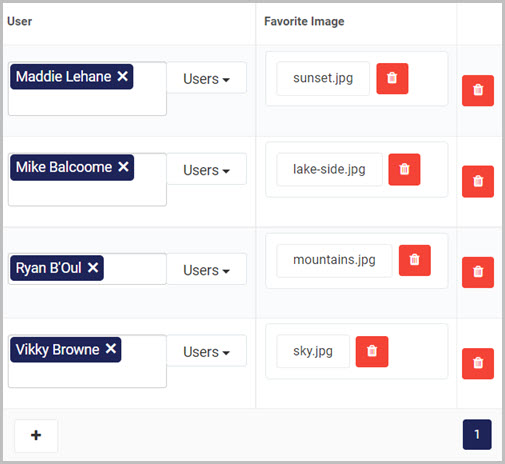
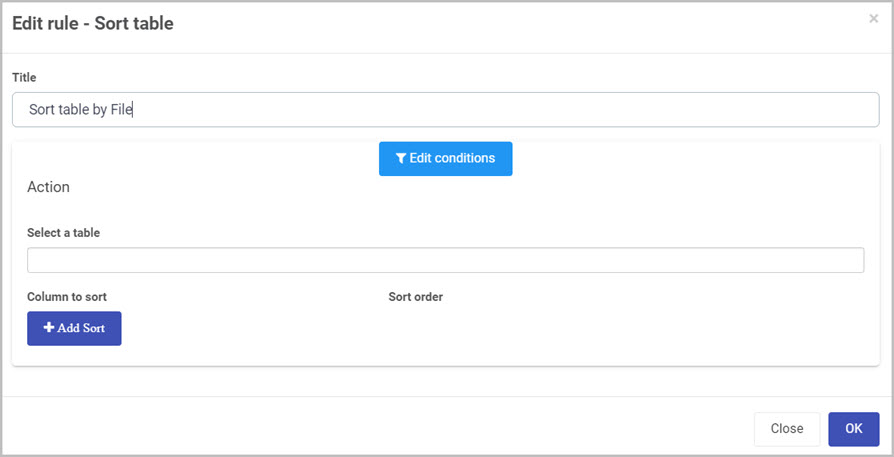
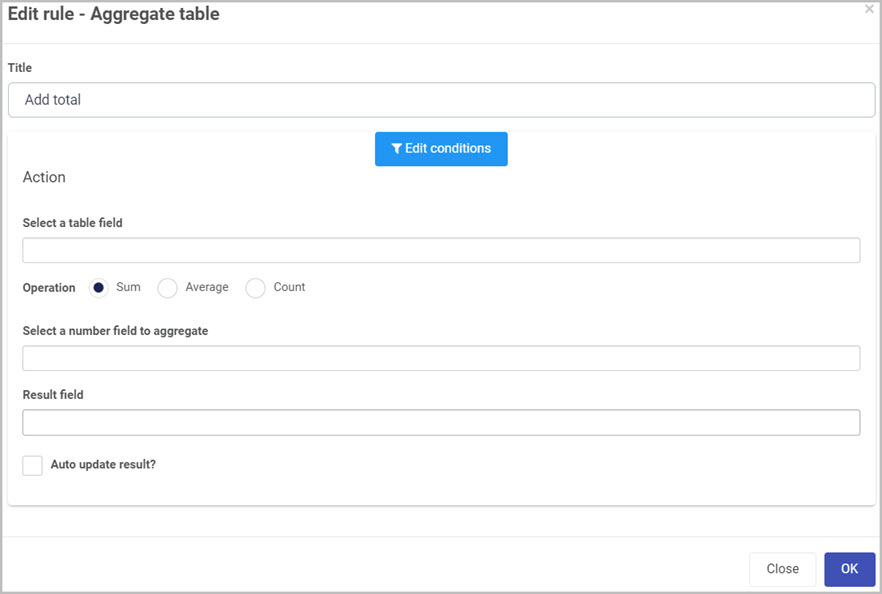
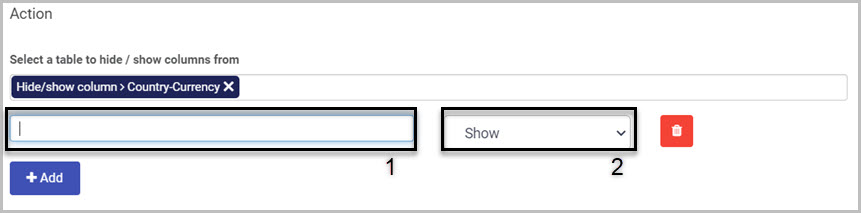
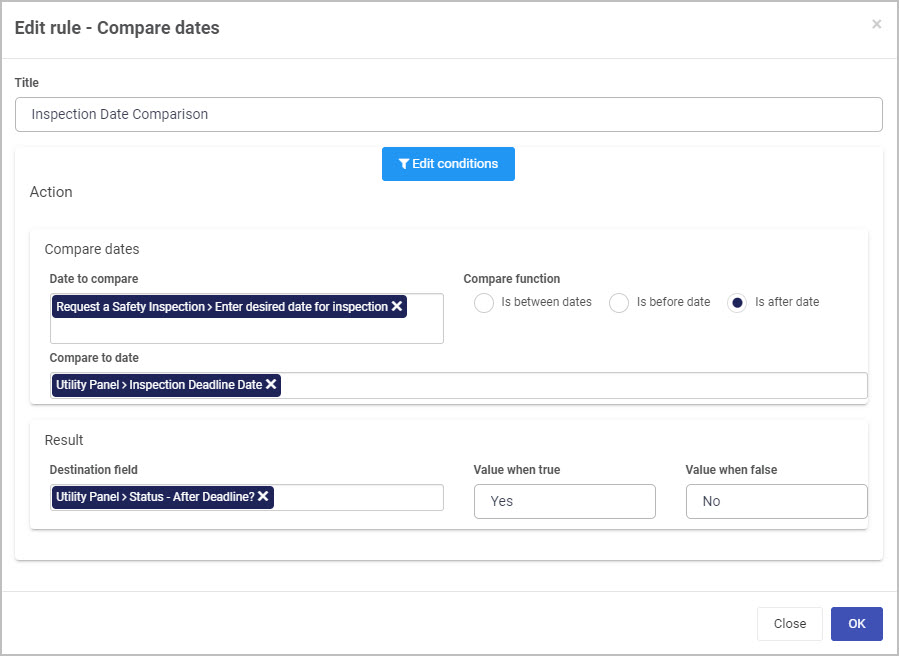

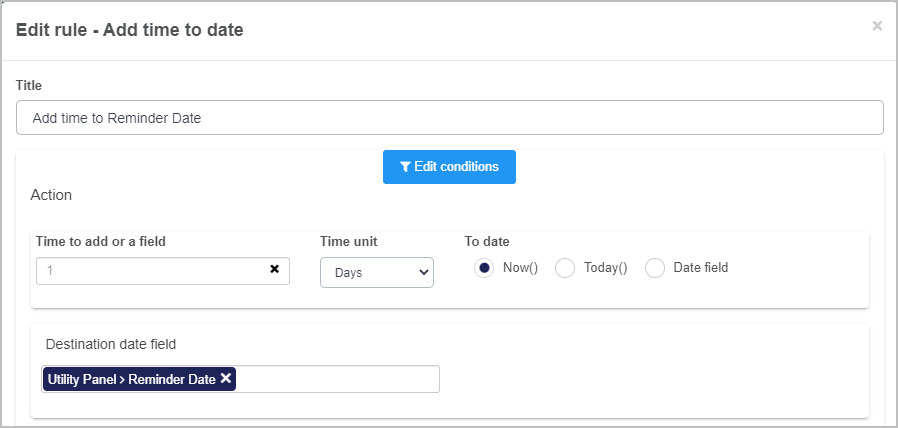
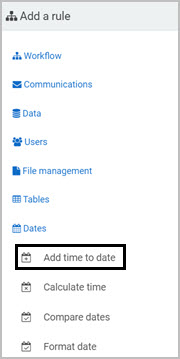


 . To load previously saved dates, click on the Load special dates button
  . You can delete a saved Special date by clicking on the Bin/Trash button
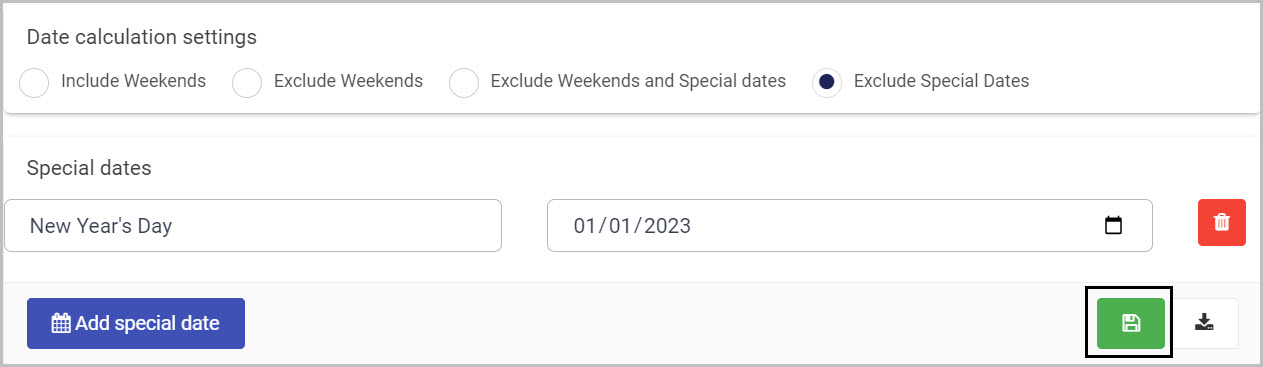
 button will save the new rule you have just created and apply it to the chosen field.
 beside the rule name.
 .
.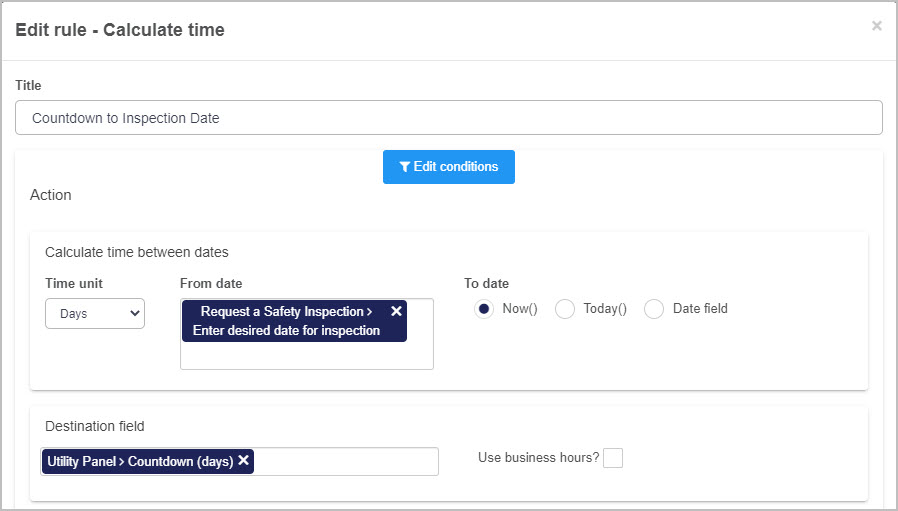
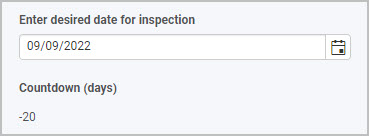
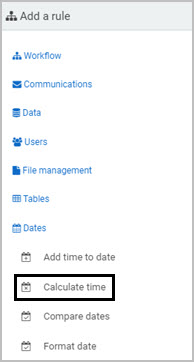
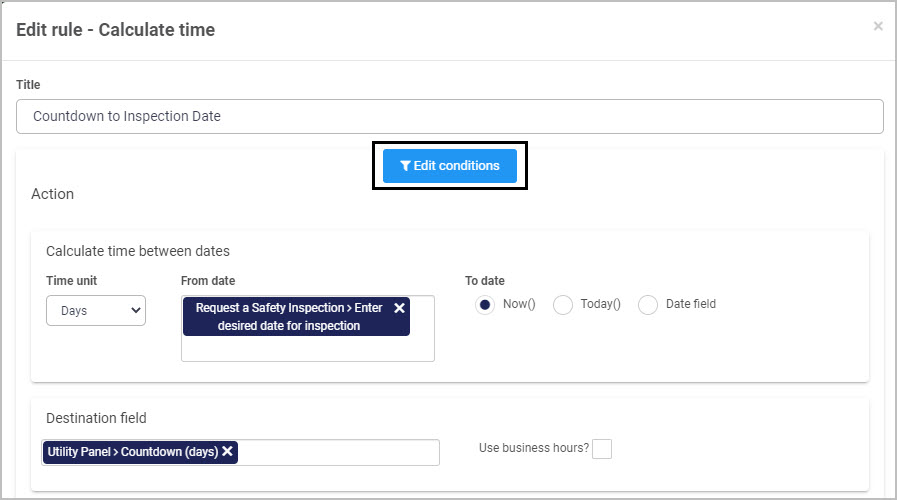
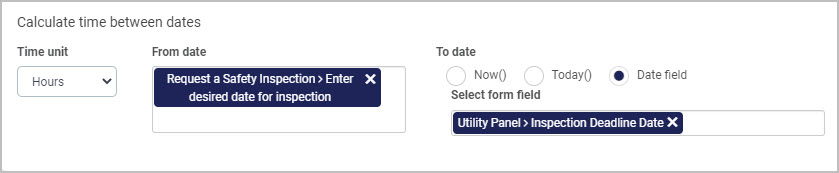
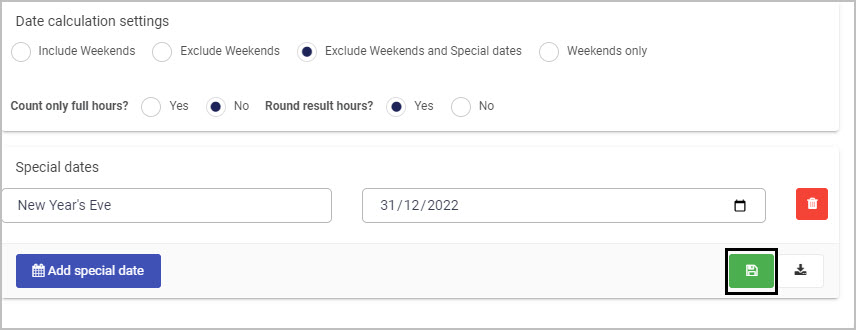
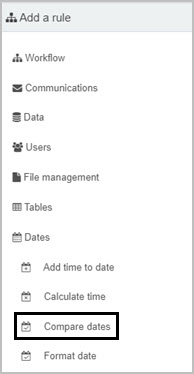
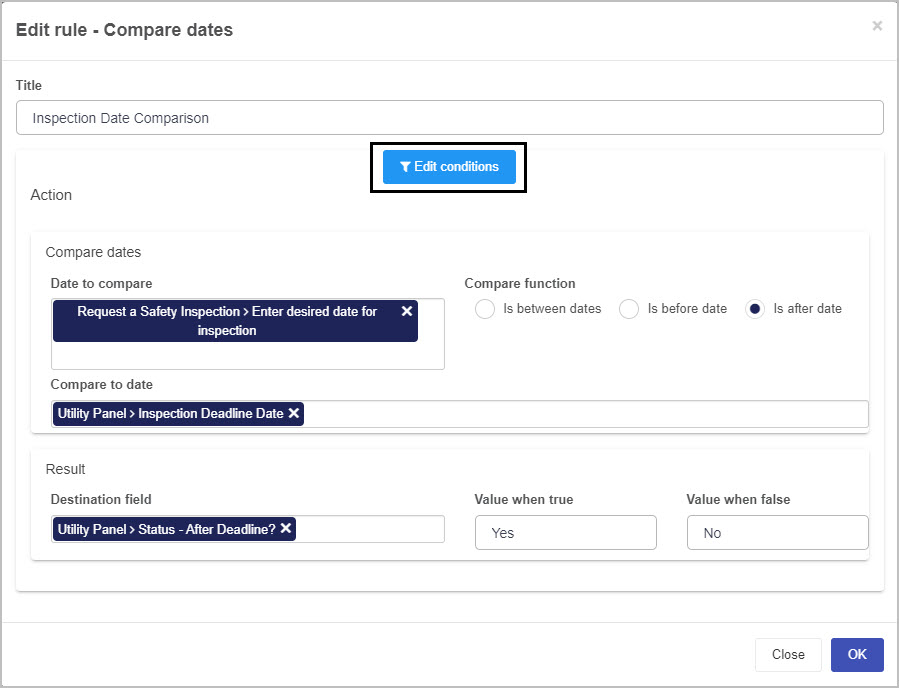
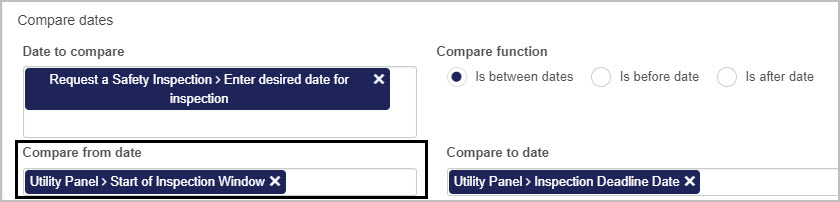

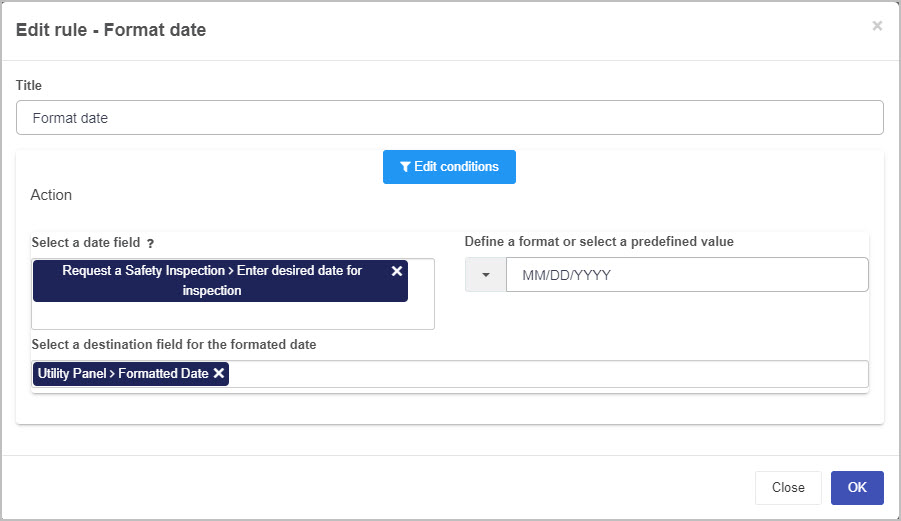
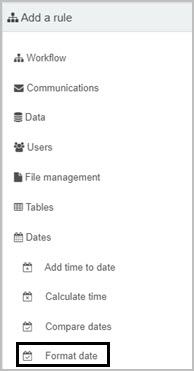
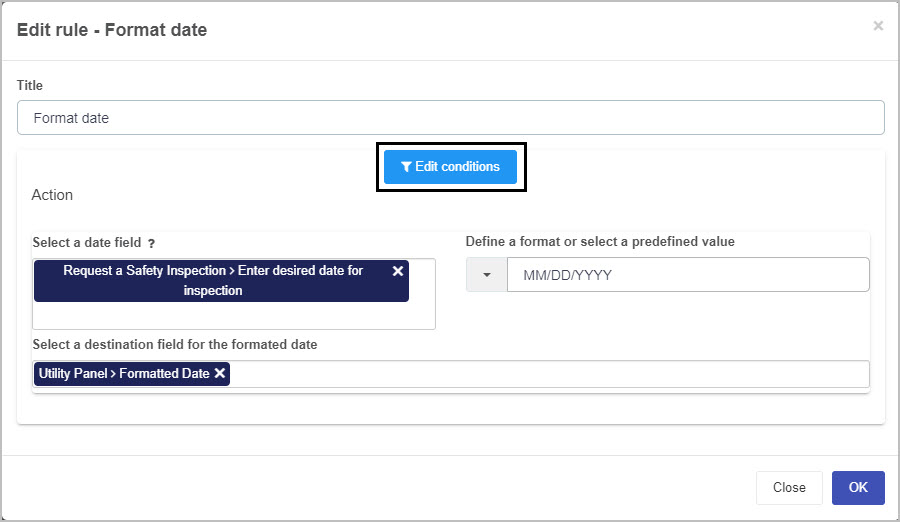
 provides you with additional support.