Create data item rule
Introduction
This rule implements the Create function which is one of the four CRUD (Create, Read, Update and Database) functions. The rule will create one or more items of data from a chosen data source, for example SharePoint, SAP or Oracle databases, see Data connectors for more details.
The Create item rule allows you to create an item of any type in the specified data connector. When applying this rule, you must select a data source in which you want to create the item. When the data source is connecter, you can map inputs from your form fields into your source. Also, you could map a data source field or text back to Kianda on success or store an error message on failure.
When to use
You can add this rule:
- to a field
- to a form
- to a process (the rule will run on load)
How to get started
-
Click on an existing process by going to Administration > Designer and decide which form, or field you will apply the rule to, by clicking on that item so that it is in edit mode so you can see the Edit/pen button, Pen button
 .
. -
Click on Add a rule > Data > Create item.
-
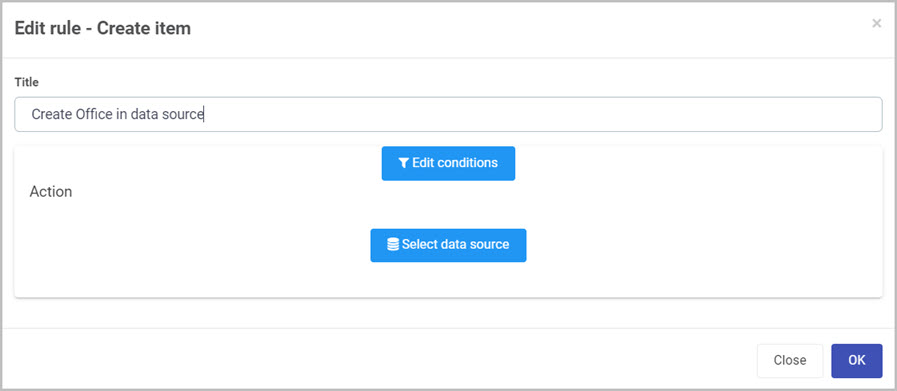
In the Edit rule - Create item dialog box, give the rule a title in the Title field.
-
If you want to add conditions for the rule, click on the Edit conditions button
 , see Conditions for more details.
 -
Click on Select data source button
 to select the data source you want to create a new item in. When you select your data source, new mapping options are presented.
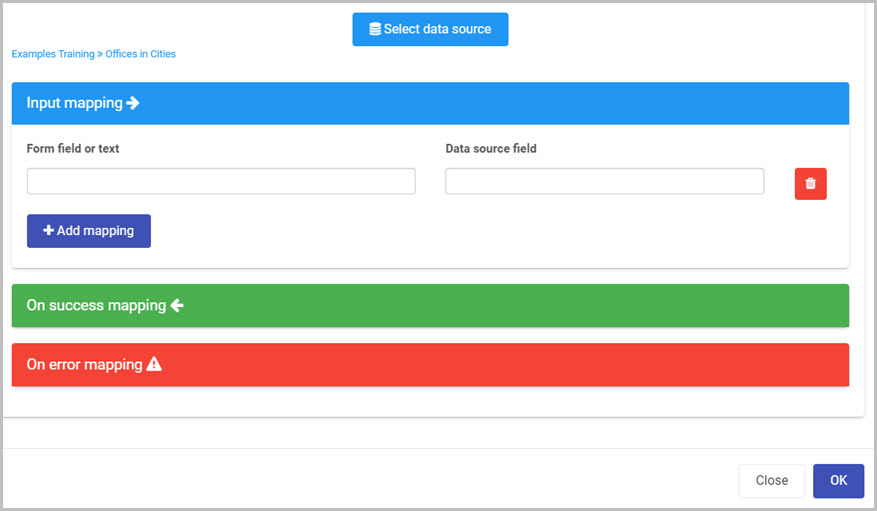
- Input mapping - used to create an item inside of the data source that you selected.
- Form field or text - you can select a field within your form or type in text manually to represent the value you want to your new item to contain.
- Data source field - select a field in your data source to hold the new value.
- Add mapping - you can choose to create multiple items in your data source by clicking on Add mapping button. You can also remove fields by clicking on the Bin/Trash icon
 .
.
- On success mapping - select the field(s) in the form which will store information and populate the data source field or text field with the respective data source value. To learn more about success mapping go to On Success Mapping.
- On error mapping - select the field(s) in the form which will store error messages. Then type in a value or use Error message, to create a system generated error message if an error occurs during rule execution. To learn more about error mapping go to On Error Mapping.
- Input mapping - used to create an item inside of the data source that you selected.
Editing, deleting or duplicating rules
When you have clicked on an existing rule, and the rule is visible in the right-hand pane under Rules, there are a number of options available to you.
- To disable a rule click the slider across beside the rule name.
- To copy a rule, click on the Duplicate button
 beside the rule name.
 - To delete a rule, click on the Bin/Trash button .
- To view a rule, click on the rule name to open the Edit rule dialog box.
What’s next 
To find out more about other Data rules go to Data rules.
To find out more about other rules go to Rules.
Feedback
Was this page helpful?
Glad to hear it! Please tell us how we can improve.
Sorry to hear that. Please tell us how we can improve.