This is the multi-page printable view of this section.
Click here to print.
Return to the regular view of this page.
Date rules
Date rules is a category of rules that allows for the calculation, manipulation and general formatting of times and dates. Date rules can be utilised to set the time of a scheduled task, determine which process user submitted an instance first, and format dates that are inputted in date fields. To learn more about dates, see Date control.
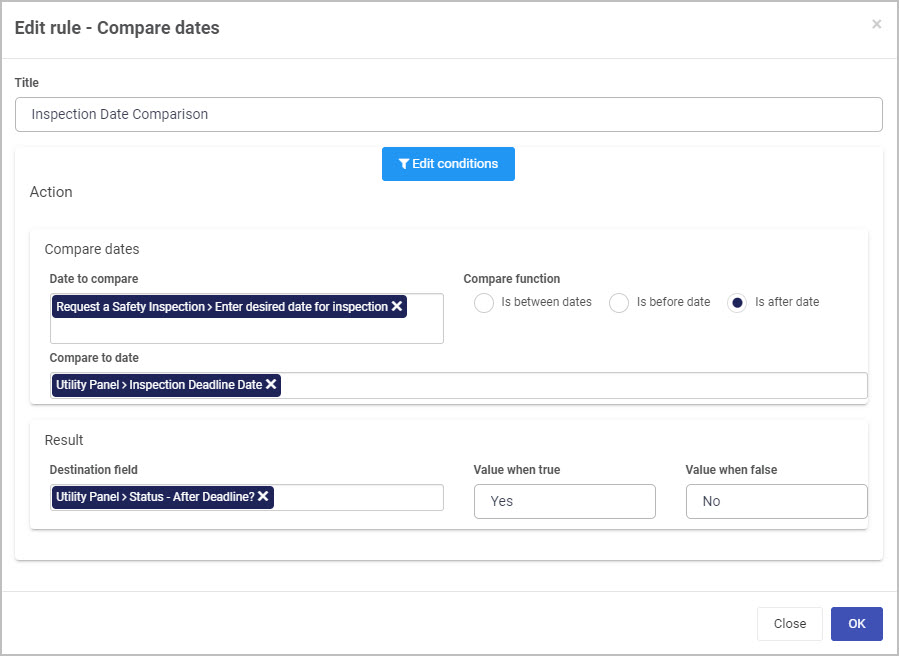
Below is an example of a date rule in operation; a Compare date rule is applied to a date field input in a form. If the date entered is after a set deadline, the field Status - After Deadline? in this process is set to Yes. You could use this to ensure that process instances must be completed before an upcoming deadline.
Getting started with Date rules
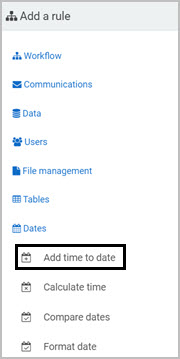
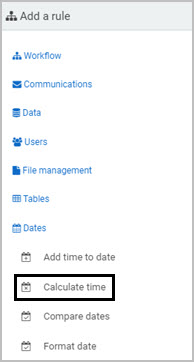
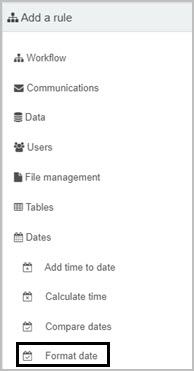
If you go to Administration > Designer and click on a process or create a new process, then click on Add a rule, the Date rules are found in the left-hand pane when you click on Dates.

There are four types of Date rules as follows:
-
Add time to date - this rule allows the addition of time to a date which can be based on a chosen be parameter such as starting from now, today or another specified value. This can used in conjunction with the Schedule a rule rule to schedule reminders for certain process instances.
-
Calculate time - this rule calculates the number of time units between two dates, or between now/today and a given date.
-
Compare dates - this rule allows the comparison of date fields to know if one date is for example, between dates, before or after a given date. The rule could be used to ensure that process instances must be completed before an upcoming deadline.
-
Format date - this rule applies custom formatting to input date fields so you can choose the format of the date (for example, parsing the date format MM/DD/YY to DD/MM/YY).
What’s next 
We have briefly introduced the four types of Date rules. To read more about each of the rule types go to the links below:
1 - Add time to date
Introduction
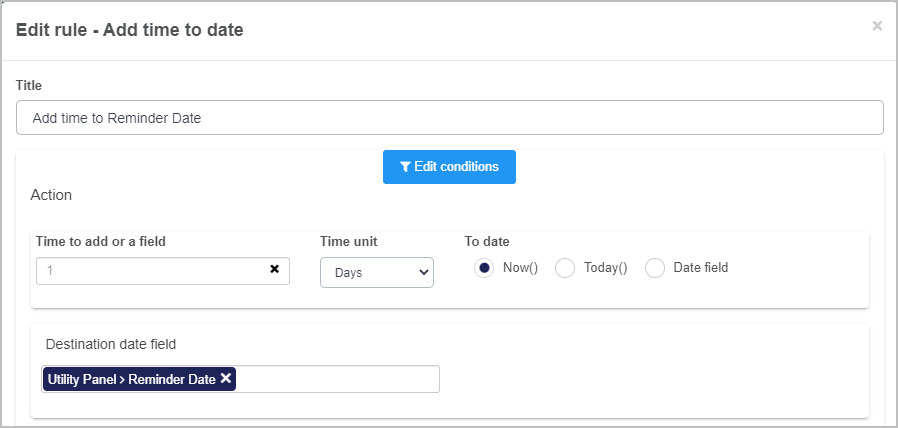
The Add time to date rule allows you to add time to a date field in order to have a future date set within your form. This rule can remind users through set intervals to complete a process instance before a set time. An example of this rule would be entering a numeric value of 1 into the Time to add or a field, selecting Days from the Time unit drop-down list, and selecting Today() from the To date radio button options.
When to use
The Add time to date rule should be used when a user wishes to add time to a date. For example, sending a reminder email after a set interval of time.
You can add this rule:
Before you get started
In advance of using this rule, you need to have created one or more forms, complete with control fields. For example, you must have a created field in your form that the Add time to date rule can be applied to. See Date control for more information on using date fields.
How to get started
-
Click on an existing process by going to Administration > Designer and decide which form, or field you will apply the rule to, by clicking on that item so that it is in edit mode so you can see the Edit/pen button, Pen button  .
.
-
Click on Add a rule > Dates > Add time to date.
-
In the Edit rule - Add time to date dialog box, give the rule a title in the Title field.
-
If you want to add conditions for the rule, click on the Edit conditions button  . See Conditions for more details.

-
Under Action create one or more actions for the rule by filling out the following:
-
Time to add or a field - click on the field and select a numerical value, or another field in your Kianda form. This will be the interval quantity.
-
Time unit - choose an option from the drop-down list to serve as your interval unit:
-
Minutes
-
Hours
-
Days
-
Weeks
-
Months
-
Years
-
To date - choose from the radio buttons:
-
Now() - adding time to date immediately
-
Today() - adding time to date from midnight today
-
Date field - adding time to date from the date specified in another field

-
Destination date field - choose the date field within your form which this new date is to be stored. If the Use business hours? checkbox is ticked, you will be prompted to enter the start and end time of your business’ working day, using the time picker list. It should be noted that this checkbox only appears when the time unit chosen is minutes or hours.

-
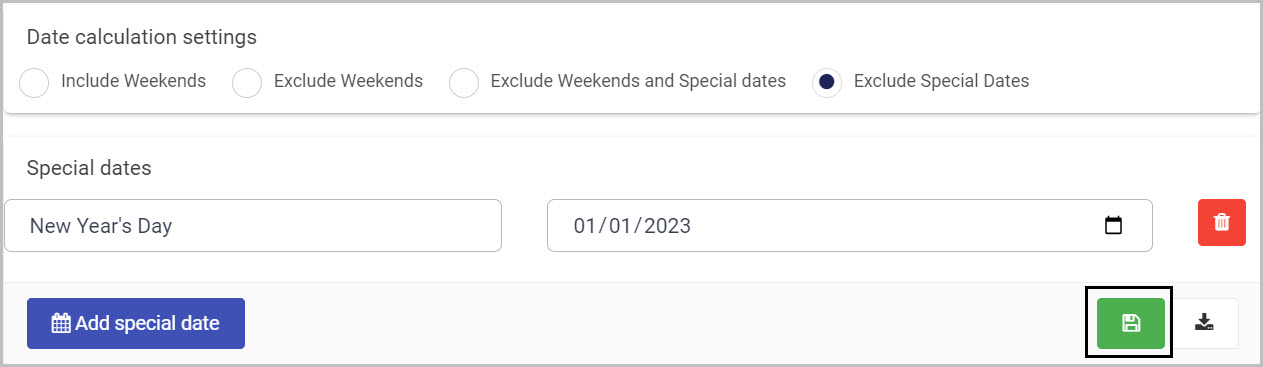
Date calculation settings - you can select whether the time added to your chosen date field:
- Includes weekends
- Excludes weekends
- Excludes weekends and special dates
- Excludes special dates
-
Special dates - you can also define custom special dates and save them accordingly. Click on Add special date to add in a date. Enter a label for this special date in the left field and a date in the right field. By choosing a title for a new special date, and entering the date into the date field, the date can be saved using the Save special dates for reuse button  . To load previously saved dates, click on the Load special dates button
  . You can delete a saved Special date by clicking on the Bin/Trash button
 .
.
-
Finally, clicking on the OK  button will save the new rule you have just created and apply it to the chosen field.
Editing, deleting or duplicating rules
When you have clicked on an existing rule, and the rule is visible in the right-hand pane under Rules, there are a number of options available to you.
- To disable a rule click the slider across beside the rule name.
- To copy a rule, click on the Duplicate button
 beside the rule name.
 - To delete a rule, click on the Bin/Trash button
 .
. - To view a rule, click on the rule name to open the Edit rule dialog box.
User tip 
Multiple Special dates can be loaded at once to allow you to select a number of specific dates to exclude from the rule.
The Add time to date rule is commonly used with the Schedule a rule rule to apply the specified time to a rule on a button, for example. This can be used like a clock to countdown to an event such as sending a reminder email.
What’s next
To find out more about other date rules go to Dates.
To find out more about other rules go to Rules.
2 - Calculate time
Introduction
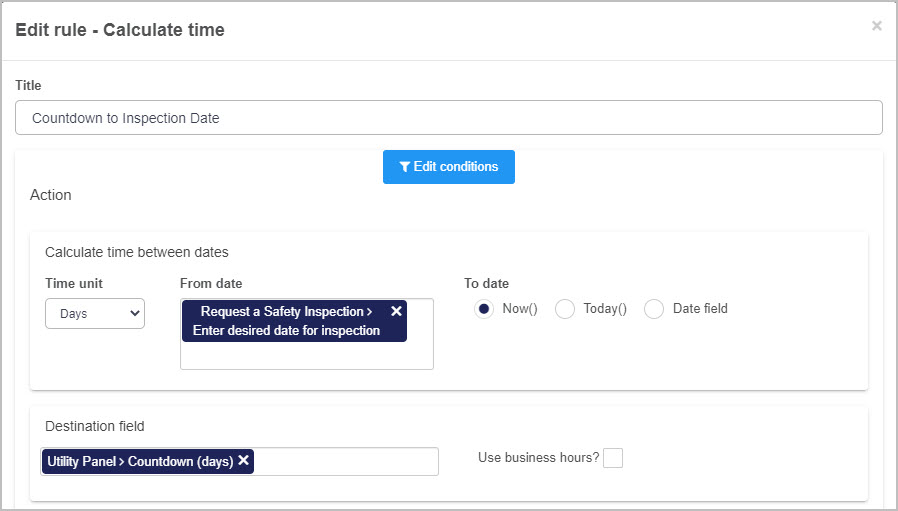
The Calculate time rule allows you to calculate the difference in time units between one date field and another, or from the current date and a chosen date field. The resulting number is then stored within a separate field within a Kianda form. An example of this rule would be entering a date under From date, selecting the Now() radio button, and entering a field under destination field. This will display the amount of days that are between the entered date field, and now.
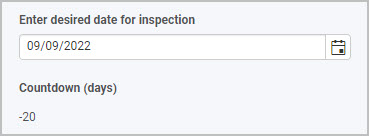
For example, the resulting number could be utilised as a countdown feature to communicate to the user that an important date is approaching, and that a task needs to be completed (as seen below). In this instance, there are 20 days before a deadline. To learn more about dates, see Date control.
When to use
The Calculate time rule should be used when a user wishes to calculate the time difference between a date field and another date/time. For example, creating a countdown function that returns the amount of time units between two set dates.
You can add this rule:
Before you get started
In advance of using this rule, you need to have created one or more forms, complete with control fields. For example, you must have a created field in your form that the Calculate time rule can be applied to. See Date control for more information on using date fields.
How to get started
-
Click on an existing process by going to Administration > Designer and decide which form, or field you will apply the rule to, by clicking on that item so that it is in edit mode so you can see the Edit/pen button, Pen button .
-
Click on Add a rule > Dates > Calculate time.
-
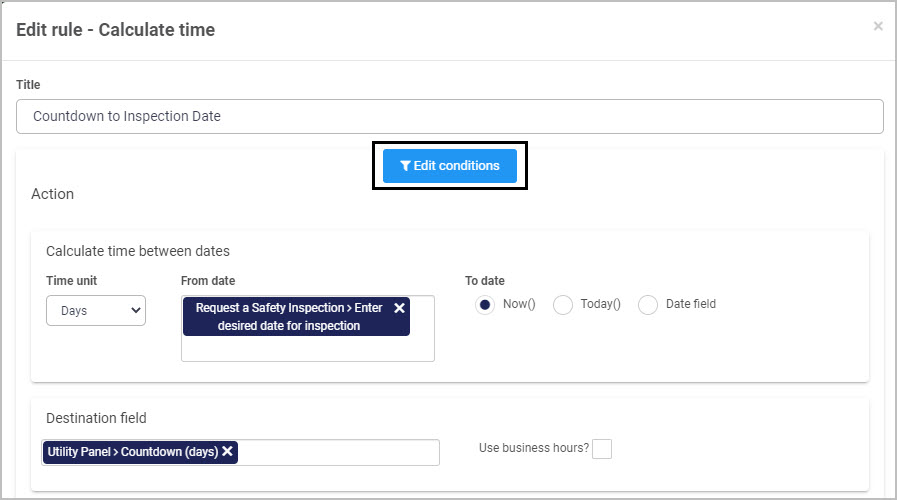
In the Edit rule - Calculate time dialog box, give the rule a title in the Title field.
-
If you want to add conditions for the rule, click on the Edit conditions button . See Conditions for more details.
-
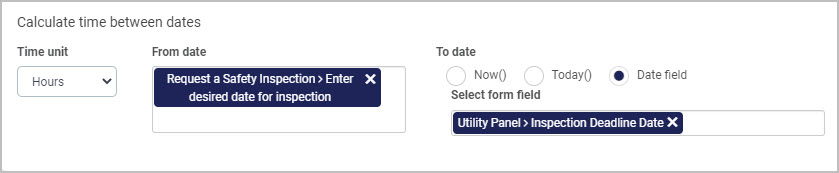
Under Action > Calculate time between dates, create one or more actions for the rule by filling out the following:
-
Time unit - choose an option from the drop-down list to serve as your calculation unit:
-
Minutes
-
Hours
-
Days
-
Weeks
-
Months
-
Years
-
From date - click on the field and select another field from the drop-down list. This will be the date the calculation will start counting from.
-
To date - choose from the radio buttons:
-
Now() - calculating the number of time units between the From date to now.
-
Today() - calculating the number of time units between the From date to today at midnight.
-
Date field - calculating the number of time units between the From date to the date specified in another field.
-
Destination date field - choose the date field within your form which this new date is to be stored. If the Use business hours? checkbox is ticked, you will be prompted to enter the start and end time of your business’ working day, using the time picker list.
-
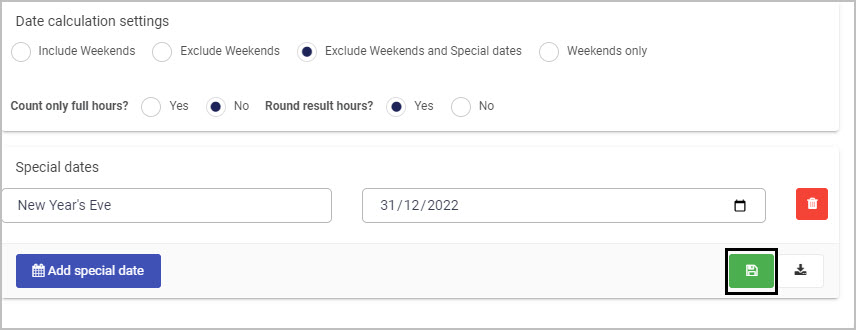
Date calculation settings - you can select whether the time calculated:
- Includes weekends
- Excludes weekends
- Excludes weekends and special dates
- Excludes special dates
Beside the Count only full hours? label (or time unit chosen), if the No radio button is selected, the Round result hours? (or time unit chosen) label will appear to the right. You will be prompted to select either a Yes or No radio button, allowing you to neatly round the chosen time unit to the nearest whole number (if Yes is selected).
-
Special dates - you can also define custom special dates and save them accordingly. Click on Add special date to add in a date. Enter a label for this special date in the left field and a date in the right field. By choosing a title for a new special date, and entering the date into the date field, the date can be saved using the Save special dates for reuse button . To load previously saved dates, click on the Load special dates button . You can delete a saved Special date by clicking on the Bin/Trash button.
- Finally, clicking on the OK button will save the new rule you have just created and apply it to the chosen field.
Editing, deleting or duplicating rules
When you have clicked on an existing rule, and the rule is visible in the right-hand pane under Rules, there are a number of options available to you.
- To disable a rule click the slider across beside the rule name.
- To copy a rule, click on the Duplicate button beside the rule name.
- To delete a rule, click on the Bin/Trash button .
- To view a rule, click on the rule name to open the Edit rule dialog box.
User tip
Multiple Special dates can be loaded at once to allow you to select a number of specific dates to exclude from the rule.
What’s next
To find out more about other date rules go to Dates.
To find out more about other rules go to Rules.
3 - Compare dates
Introduction
The Compare dates rule is utilised to compare two date fields. Depending on the selected comparison function, the result of this rule will be saved as a boolean value (true/false) in another Kianda form field.
In the below example, the Compare dates rule is applied to a date field input in a form. If the date entered is after a set deadline, the field Status - After Deadline? in this process is set to Yes. You could use this to ensure that process instances must be completed before an upcoming deadline.
When to use
The Compare dates rule should be used when a user wishes to compare two different dates. For example, creating a submission deadline function that disallows form submissions after a specified date.
You can add this rule:
Before you get started
In advance of using this rule, you need to have created one or more forms, complete with control fields. For example, you must have a created field in your form that the Compare dates rule can be applied to. See Date control for more information on using date fields.
How to get started
-
Click on an existing process by going to Administration > Designer and decide which form, or field you will apply the rule to, by clicking on that item so that it is in edit mode so you can see the Edit/pen button, Pen button .
-
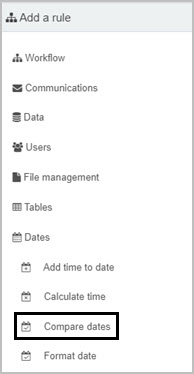
Click on Add a rule > Dates > Compare dates.
-
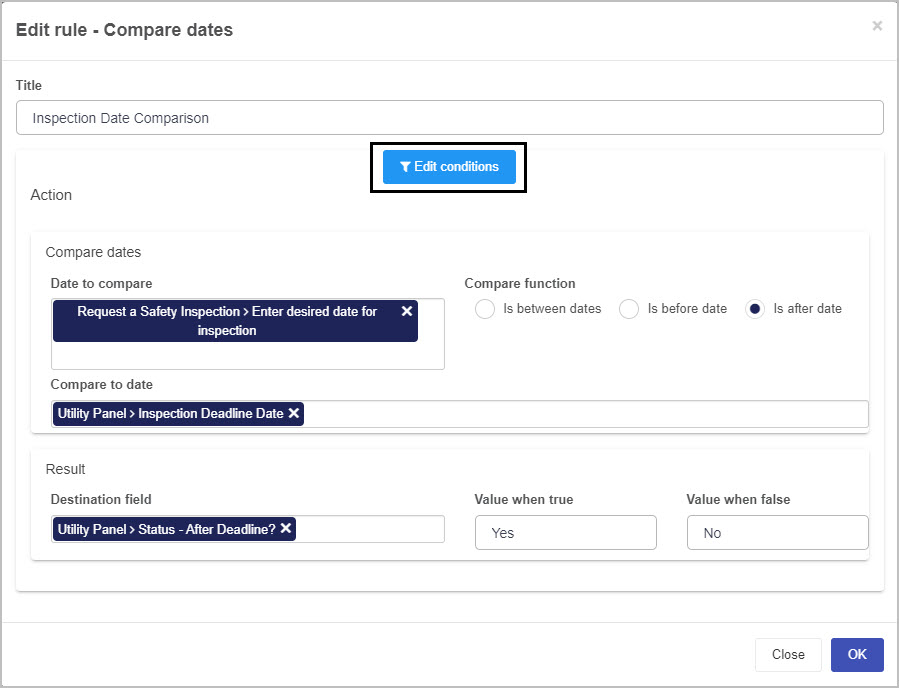
In the Edit rule - Compare dates dialog box, give the rule a title in the Title field.
-
If you want to add conditions for the rule, click on the Edit conditions button . See Conditions for more details.
-
Under Action > Compare dates, create one or more actions for the rule by filling out the following:
-
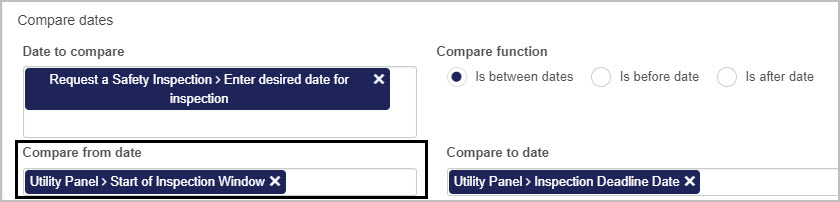
Date to compare - choose a date field from the drop-down list to serve as the date you would like to compare. This date will be placed before the comparison function.
-
Compare to date - choose a date field from the drop-down list to serve as the date you would like to compare to the initially selected date (Date to compare). This date will be placed after the comparison function.
-
Compare function - Choose from the radio buttons:
-
Is between dates - checking this button displays a new field Compare from date, where you must select a start date field from the drop-down list, as well as choosing a Compare to date from the other drop-down list (end date). This function returns true or false if the Date to compare falls within the start and end dates selected.
-
Is before date - checking this button determines if the selected date for the Date to compare field falls before the selected date for the Compare to date field.
-
Is after date - checking this button determines if the selected date for the Date to compare field falls after the selected date for the Compare to date field.
-
Under Action > Result:
-
Destination field - choose the field within your Kianda form where you would like to store the resulting boolean value of the comparison function. As can be seen in the below example, you can utilise the result as a status checker using a destination text field.
-
Value when true - if the result of the comparison function is true, enter what string of text you would like to return to your form.
-
Value when false - if the result of the comparison function is false, enter what string of text you would like to return to your form.
The resulting value can be used in a Kianda Condition to control other parameters. See Conditions for more details.

-
Finally, clicking on the OK button will save the new rule you have just created and apply it to the chosen field.
Editing, deleting or duplicating rules
When you have clicked on an existing rule, and the rule is visible in the right-hand pane under Rules, there are a number of options available to you.
- To disable a rule click the slider across beside the rule name.
- To copy a rule, click on the Duplicate button beside the rule name.
- To delete a rule, click on the Bin/Trash button .
- To view a rule, click on the rule name to open the Edit rule dialog box.
User tip
Selecting the Compare to date function displays an additional field where you can select two different dates, and determine if your Date to compare is within.
The resulting boolean value can be used within other Kianda Conditions.
What’s next
To find out more about other date rules go to Dates.
To find out more about other rules go to Rules.
4 - Format date
Introduction
The Format date rule is used to reformat a selected date field within your Kianda form, and send it to a destination field. You can choose from a range of date formats where month or day leads, and time is also included, see step 5 in How to get started.
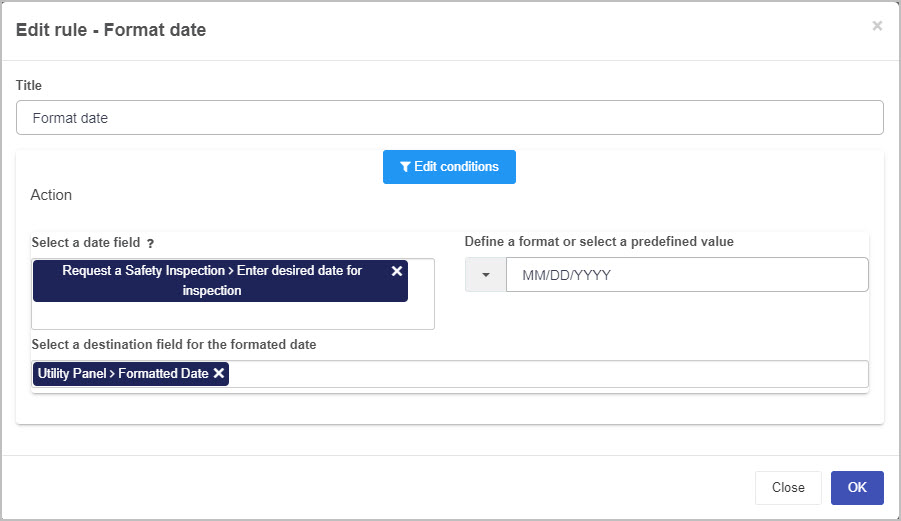
In the below example, the Format date rule is applied to a selected field from the drop-down list and is formatted to the MM/DD/YYYY format. The resulting formatted date is then displayed in the Formatted Date field that is selected under Select a destination field for the formatted date. You can utilise this rule to format the entered date so that it matches various national date formatting standards. The default formatting for Kianda dates are DD/MM/YYYY, so in the below example an entered date of 23/08/2022 would become 08/23/2022.
When to use
The format date rule should be used when you wish to amend the formatting of a date field within Kianda. For example, you receive a date from a data source in one format and wish to present it in the form in another format.
You can add this rule:
Before you get started
In advance of using this rule, you need to have created one or more forms, complete with control fields. For example, you must have a created field in your form that the Format date rule can be applied to. See Date control for more information on using date fields.
How to get started
-
Click on an existing process by going to Administration > Designer and decide which form, or field you will apply the rule to, by clicking on that item so that it is in edit mode so you can see the Edit/pen button, Pen button .
-
Click on Add a rule > Dates > Format date.
-
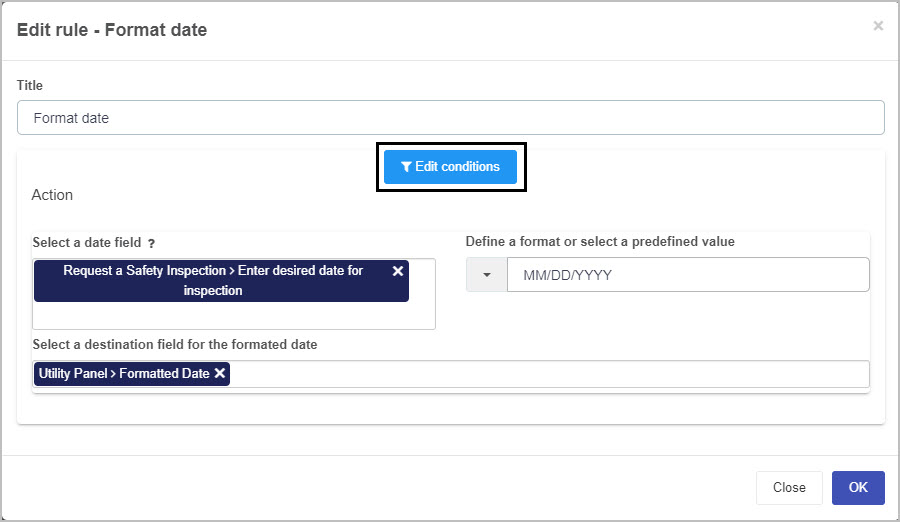
In the Edit rule - Format date dialog box, give the rule a title in the Title field.
-
If you want to add conditions for the rule, click on the Edit conditions button . See Conditions for more details.
-
Under Action, create one or more actions for the rule by filling out the following:
-
Select a date field - choose a date field from the drop-down list you would like to be formatted. The help button  provides you with additional support.
-
Define a format or select a predefined value - choose from the drop-down list the type of date formatting you would like to change your date to:

-
Select a destination field for the formatted date - choose a date field from the drop-down list where you would like to store the new formatted date.
-
Finally, clicking on the OK button will save the new rule you have just created and apply it to the chosen field.
Editing, deleting or duplicating rules
When you have clicked on an existing rule, and the rule is visible in the right-hand pane under Rules, there are a number of options available to you.
- To disable a rule click the slider across beside the rule name.
- To copy a rule, click on the Duplicate button beside the rule name.
- To delete a rule, click on the Bin/Trash button .
- To view a rule, click on the rule name to open the Edit rule dialog box.
User tip
This rule can be utilised to format a date to various national date formatting standards.
What’s next
To find out more about other date rules go to Dates.
To find out more about other rules go to Rules.