This is the multi-page printable view of this section.
Click here to print.
Return to the regular view of this page.
File management rules
File management rules is one category of rules to enable operations such as the generation of Word documents, conversion to PDF format and merging PDF files together. These operations are useful when creating Word/Excel where the structure of those documents is the same for every instance but values are different. You can also use the File management rules for creating anonymous links which give access to files without permissions.
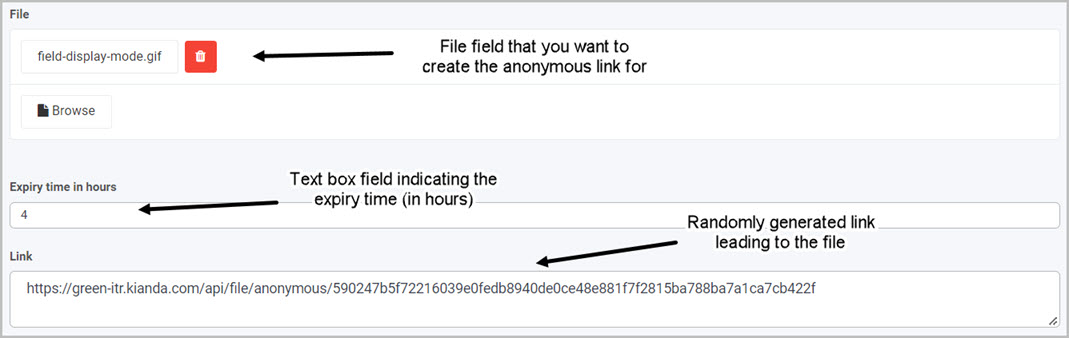
Take an example of a Create a file anonymous link rule. Implementing this rule will result in a randomly generated link which will lead to a file that you want to share. This link can be opened in any browser and can be accessible by anyone and there is no need for authentication when opening the link. You can also set the expiry time of the created link which will cause the link not to exist after the specified time. See images below for an example of the Create a file anonymous link rule:
Getting started with File management rules
If you go to Administration > Designer and click on a process or create a new process, then click on Add a rule the File management rules are found in the left-hand pane when you click on File management.
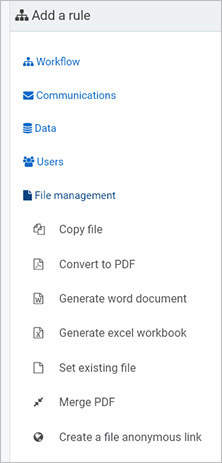
There are seven types of File management rules as follows:
-
Copy file - allows copying files between datasources. Use this file together with two file fields to move files between two different file locations. For example to copy files between an on premises folder and a SharePoint folder.
-
Convert to PDF - this rule allows the conversation of DOCX and DOC files into PDF format.
-
Generate word document - this rule generates a Word document from data associated with a process instance using a user-designed template.
-
Generate excel document - this rule generates an Excel workbook from data associated with a process instance using a user-designed template.
-
Set existing file - this rule is used to make an existing file accessible by a link, available within a configured file field. For example when you have access to a file through a link, you can use this link to store the file in a file field within your process.
-
Merge PDF - this rule allows you to merge two or more PDF files into a single PDF file. It also allows you to merge image file such as PNG or JPG to an existing PDF file.
-
Create a file anonymous link - this rule generates file links that can be shared anonymously with external users. No authentication is required when opening the anonymous link to a file.
What’s next 
To read more about each of the rule types go to the links below:
1 - Copy file
Introduction
The Copy file rule allows you to copy a file from one field in your form into another field in a different form. You can use this rule to copy files from one datasource into another, by using different file fields for where you are copying to and from. For example if you want to copy a file from your local file system to a SharePoint location, set file fields for these locations, see gif below:
When to use
Use this rule when you need to copy files from one form to another or to transfer files from one datasource into a different one.
You can add this rule:
Before you get started
In advance of using the Copy file rule, in your process you need to have created at least one or more forms. The rule also requires two file fields in order to select the original file and the other is used to store the copied version. To learn how to add a file go to File upload control.
- File field (Original version) - used to hold the file that you want to copy.
- File field (Copied version) - used to store the copied version of the original file.
How to get started
-
Click on an existing process by going to Administration > Designer and decide which form, or field you will apply the rule to, by clicking on that item so that it is in edit mode so you can see the Edit/pen button, Pen button  .
.
-
Click on Add a rule > File management > Copy file.
-
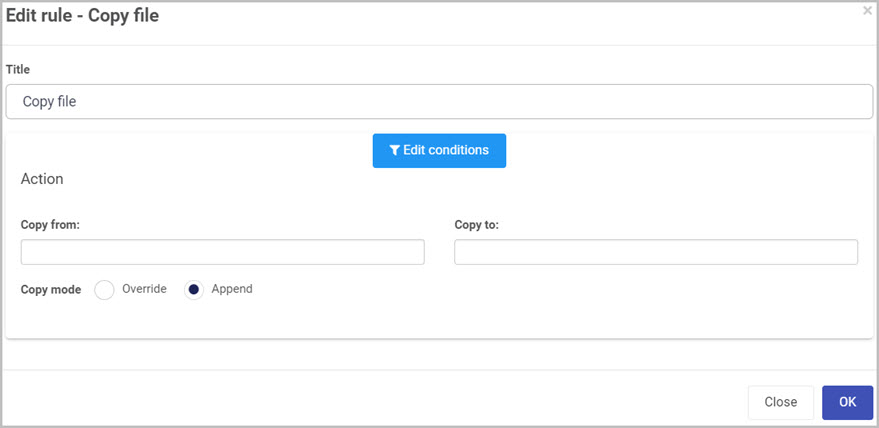
In the Edit rule - Copy file dialog box, give the rule a title in the Title field.
-
If you want to add conditions for the rule, click on the Edit conditions button  see Conditions for more details.
-
Under the Action section fill out the following:
-
Copy from - select a file field which holds the file that you want to copy.
-
Copy to - select a file field which will store the copied version of the original file.
-
Copy mode - you have two options when copying a file from one field into another:
-
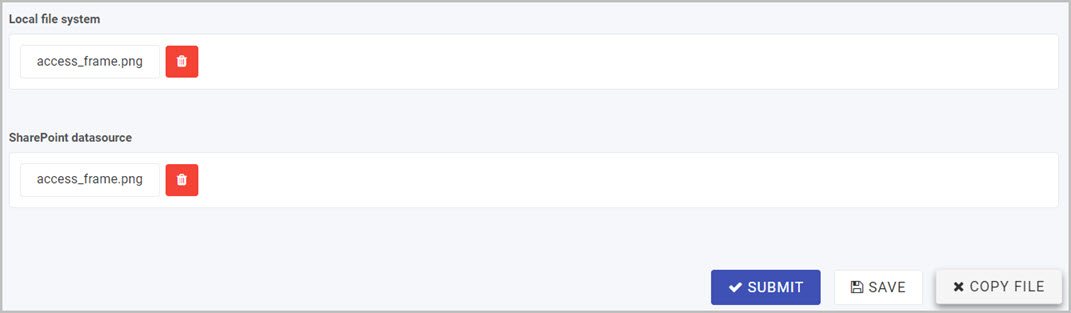
Override - when a file already exists in the Copy to file filed and the copy rule is triggered again, the Copy to file filed will get overridden by the new file from Copy from. See example below:

When the Copy file rule is triggered, the file README.md in the SharePoint datasource field will be overridden by the access_frame.png file in the Local file system field. See below to see the result when Copy file rule is triggered again:
-
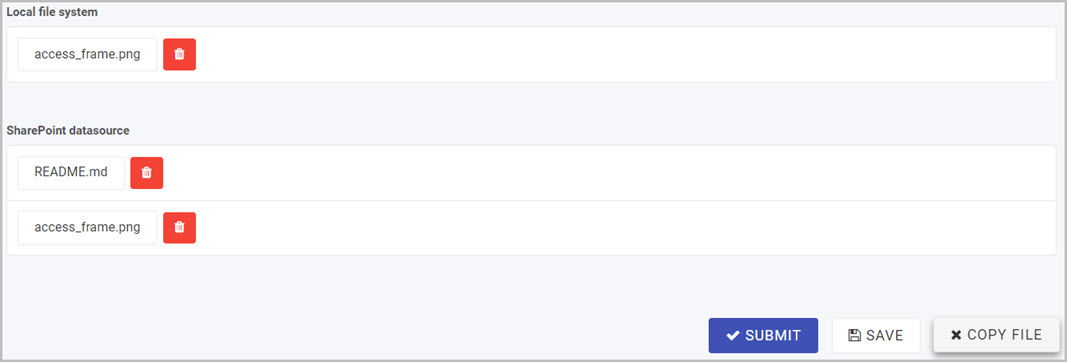
Append - when a file already exists in the Copy to file filed and the copy rule is triggered again, the Copy to file filed will be appended resulting in multiple files in the Copy to filed. See example below:
When the Copy file rule is triggered, the file access_frame.png in the Local file system field will be appended to the already existing README.md file in the SharePoint datasource field. See below to see the result when Copy file rule is triggered again:
-
When you are finished editing the dialog box, click on OK or click on Close at any time to exit the dialog box.
Editing, deleting or duplicating rules
When you have clicked on an existing rule, and the rule is visible in the right-hand pane under Rules, there are a number of options available to you.
- To disable a rule click the slider across beside the rule name.
- To copy a rule, click on the Duplicate button
 beside the rule name.
 - To delete a rule, click on the Bin/Trash button
 .
. - To view a rule, click on the rule name to open the Edit rule dialog box.
User tip 
- You can use this rule to copy files from one datasource into another. In the file field options of the Copy to field, set the destination to a datasource you want to copy a file into. To learn how to change the destination option in a file field go to File upload control.
What’s next
To find out more about other File management rules go to File management rules.
To find out more about other rules go to Rules.
2 - Convert to PDF
The Convert to PDF rule allows you to convert a Word document (.doc or .docx) into a PDF (.pdf) file. This rule is very useful when sharing Word documents using the send email rule, the Convert to PDF rule will convert a file into PDF which can be attached to an email. This will allow other users to open the PDF file on any device.
When to use
You can use this rule when you need to convert a .doc or .docx file into a PDF. PDF files are very useful as they can be opened on any device.
You can add this rule:
Before you get started
In advance of using the Convert to PDF rule, in your process you need to have created at least one or more forms. The rule also requires two file fields in order to select a Word document file and the other is used to store the converted PDF version. To learn how to add a file go to File upload control.
- File field (Word document) - used to hold the Word document file that you want to convert.
- File field (Converted PDF file) - used to store the converted PDF version of the original Word document file.
How to get started
-
Click on an existing process by going to Administration > Designer and decide which form, or field you will apply the rule to, by clicking on that item so that it is in edit mode so you can see the Edit/pen button, Pen button .
-
Click on Add a rule > File management > Convert to PDF.
-
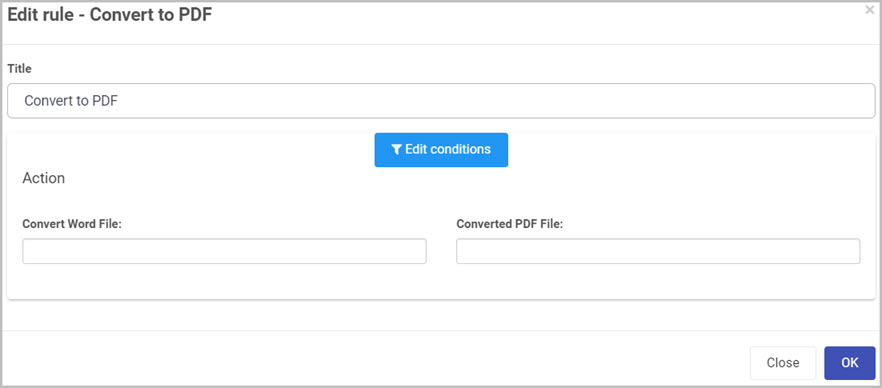
In the Edit rule - Convert to PDF dialog box, give the rule a title in the Title field.
-
If you want to add conditions for the rule, click on the Edit conditions button see Conditions for more details.
-
Under the Action section fill out the following:
-
Convert Word File - used to hold the Word document file that you want to convert.
-
Converted PDF File - used to store the converted PDF version of the original Word document file.
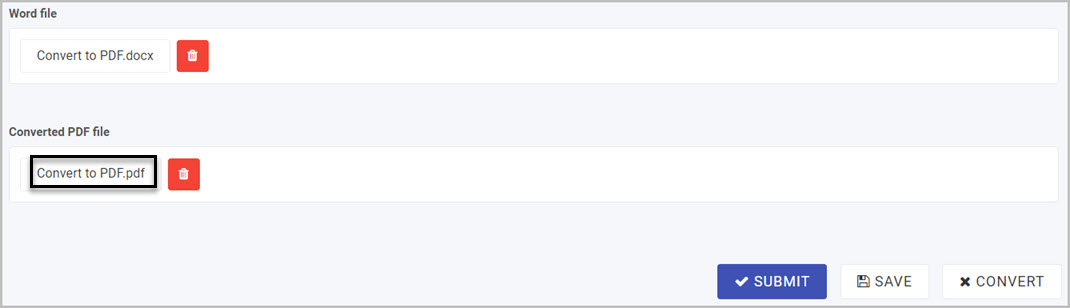
See below for an example of a Word document before and after conversion, note the file extension in the Word file field before converting into a PDF:
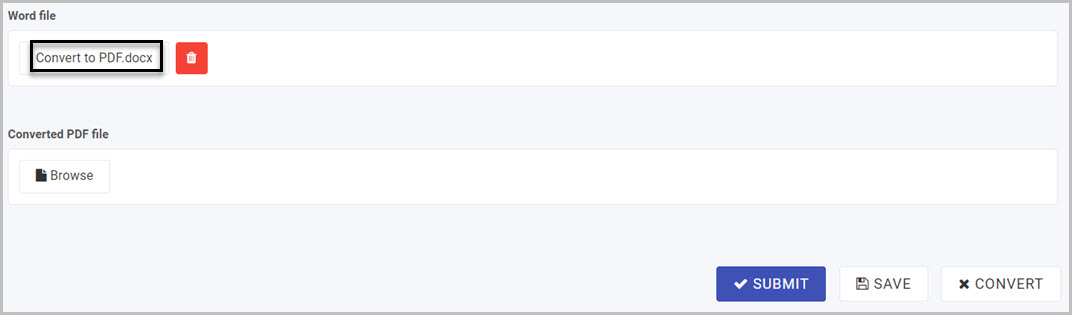
Below is an image representing the result after converting the Word document file into a PDF, note the file extension in the Converted PDF file field:
-
When you are finished editing the dialog box, click on OK or click on Close at any time to exit the dialog box.
Editing, deleting or duplicating rules
When you have clicked on an existing rule, and the rule is visible in the right-hand pane under Rules, there are a number of options available to you.
- To disable a rule click the slider across beside the rule name.
- To copy a rule, click on the Duplicate button beside the rule name.
- To delete a rule, click on the Bin/Trash button .
- To view a rule, click on the rule name to open the Edit rule dialog box.
User tip
- When converting files to a PDF format, you can set the destination of the converted file field to a location where you want to store the PDF. This will save you some time as you will not have to download the converted file because the destination that you choose in the file field will keep a separate copy.
What’s next
To find out more about other File management rules go to File management rules.
To find out more about other rules go to Rules.
3 - Generate Word document
Introduction
This rule generates a Word document from data stored in the process using a Word .docx template. The Word template needs to be pre-created before using this rule and must be attached to a file field, this way the rule will know which template you want to use when creating the document. The Generate Word document rule can also convert the Word document into a PDF right after generating the document.
When to use
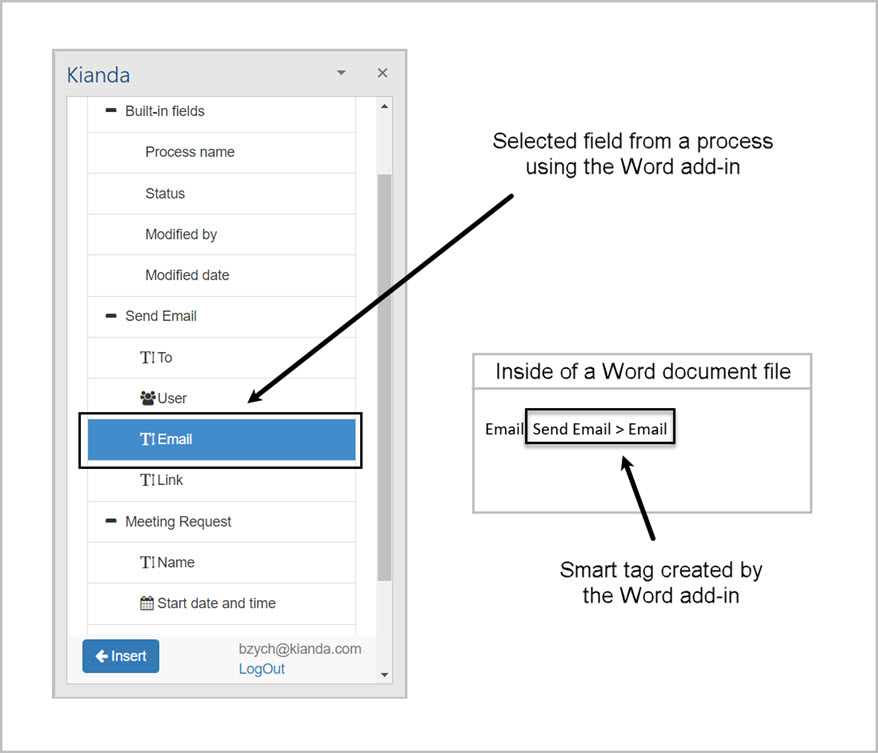
Use this rule when your process requires dynamic document generation where the structure of those documents is the same for every instance but the values are different. This rule will use a Word template previously mapped with smart tags. Smart tags are created in Word when a field is selected using the Kianda add-in task pane, and then inserted into the document, see image below for more details:
You can add this rule:
Before you get started
In advance of using the Generate Word document rule, in your process you need to have created at least one or more forms. The rule also requires two file fields, one for storing the Word template and the other for storing the generated Word document or PDF. To learn how to add a file go to File upload control.
- File field (Template) - used as a container to store the Word template used to generate the Word document.
- File field (Generated Word Document) - used as a container to store the generated Word document.
A Word template that is used to generate the Word document also needs to be pre-created using the Kianda add-in for Word. You can make each generated Word document very dynamic by using the smart tags that Kianda add-in uses to retrieve information for your form fields and places the values into the word document when generating it. To learn more about how to install and use Kianda add-in, go to Word document add-in.
How to get started
-
Click on an existing process by going to Administration > Designer and decide which form, or field you will apply the rule to, by clicking on that item so that it is in edit mode so you can see the Edit/pen button, Pen button .
-
Click on Add a rule > File management > Generate Word document.
-
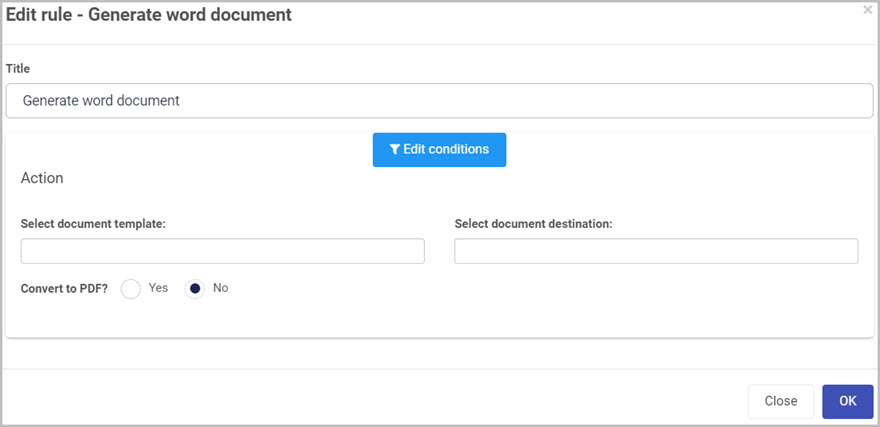
In the Edit rule - Generate Word document dialog box, give the rule a title in the Title field.
-
If you want to add conditions for the rule, click on the Edit conditions button see Conditions for more details.
-
Under the Action section fill out the following:
-
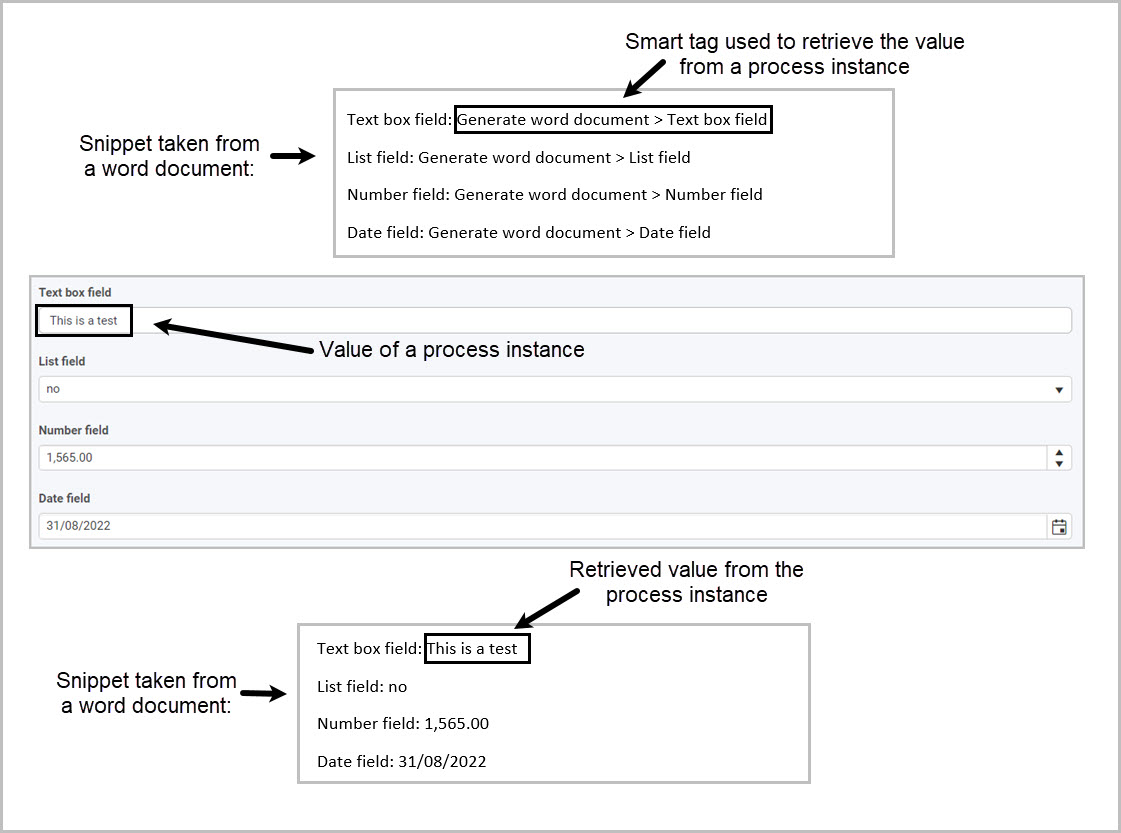
Select a document template - select a file field that stores the word template. Your template can pull all values from Input fields in the Controls section of Kianda. For example if a text box field contains “This is a test” text, the value pulled into the generated word document is “This is a test”, see image below:
-
Select a document destination - select a file field that will store the generated word document.
-
Convert to PDF - radio button list which indicates whether you want to convert the generated document into a PDF file or not.
-
When you are finished editing the dialog box, click on OK or click on Close at any time to exit the dialog box.
Editing, deleting or duplicating rules
When you have clicked on an existing rule, and the rule is visible in the right-hand pane under Rules, there are a number of options available to you.
- To disable a rule click the slider across beside the rule name.
- To copy a rule, click on the Duplicate button beside the rule name.
- To delete a rule, click on the Bin/Trash button .
- To view a rule, click on the rule name to open the Edit rule dialog box.
User tip
- When using this rule, create a utility panel and make it invisible to other users. You can then move the Word template file filed and the generated word document file field inside the utility panel. This way other users will not be able to see the unnecessary file fields and will not be able to tamper with them. To see an example of a utility panel, go to Creating a utility panel.
- You can use the Convert to PDF function of the rule to convert the generated word document into a PDF file instead of using the Convert to PDF rule which is also available in the File management rules.
What’s next
To find out more about other File management rules go to File management rules.
To find out more about other rules go to Rules.
4 - Generate excel workbook
Introduction
This rule generates an Excel workbook from data stored in a process using an Excel .xlsx template. The Excel template needs to be pre-created before using this rule and must be attached to a file field, this way the rule will know which template you want to use when creating the workbook.
When to use
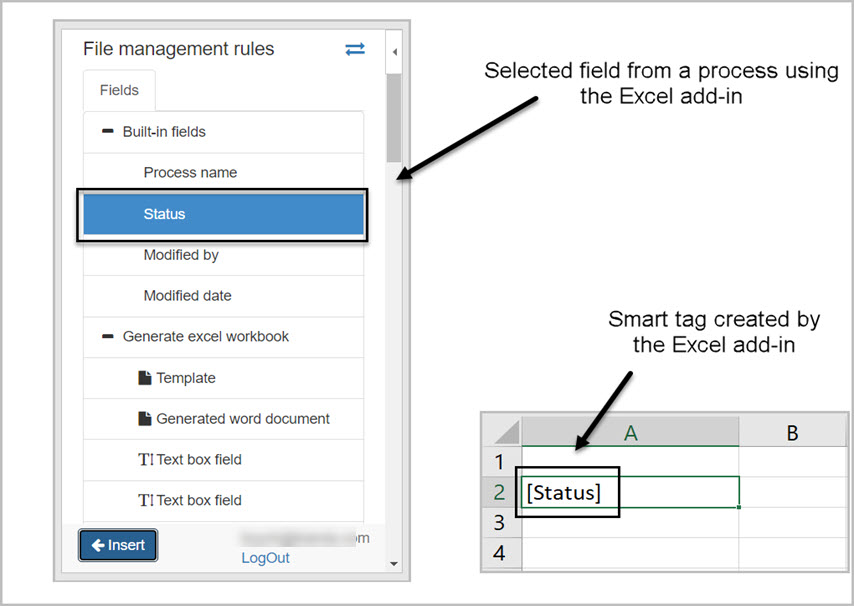
Use this rule when your process requires dynamic workbook generation where the structure of those workbooks is the same for every instance, but the values of fields are different. Use this rule with combination of the Table control to output big tables and transfer them into the Excel workbook, to learn more about table control go to Table control. This rule will use an Excel template previously mapped with smart tags. Smart tags are created in Excel when a field is selected using the Kianda add-in task pane, and then inserted into the document, see image below for more details.
You can add this rule:
Before you get started
In advance of using the Generate Excel workbook rule, in your process you need to have created at least one or more forms. The rule also requires two file fields, one for storing the Excel template and the other for storing the generated Excel workbook. To learn how to add a file go to File upload control.
- File field (Template) - used as a container to store the Excel template used to generate the workbook.
- File field (Generated Excel workbook) - used as a container to store the generated Excel workbook.
An Excel template that is used to generate the Excel workbook also needs to be pre-created using the Kianda add-in for Excel. You can make each generated Excel workbook very dynamic by using the smart tags that Kianda add-in uses to retrieve information for your form fields and places the values into the Excel workbook when generating it. To learn more about how to install and use Kianda add-in in Excel, go to Excel workbook add-in.
How to get started
-
Click on an existing process by going to Administration > Designer and decide which form, or field you will apply the rule to, by clicking on that item so that it is in edit mode so you can see the Edit/pen button, Pen button .
-
Click on Add a rule > File management > Generate excel workbook.
-
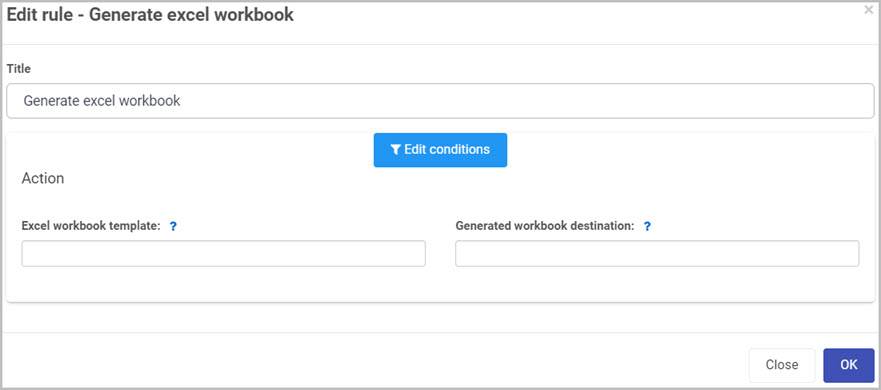
In the Edit rule - Generate excel workbook dialog box, give the rule a title in the Title field.
-
If you want to add conditions for the rule, click on the Edit conditions button , see Conditions for more details.
-
Under the Action section fill out the following:
-
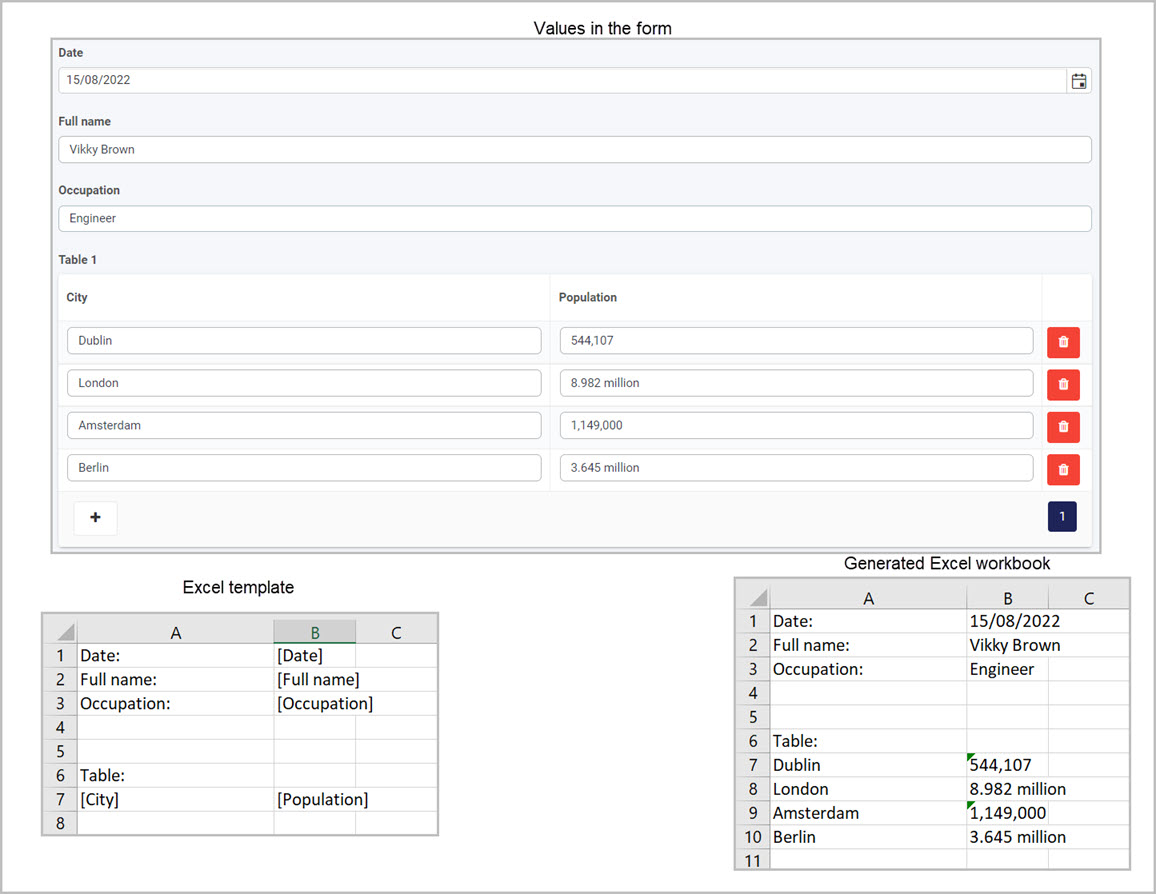
Excel workbook template - select a file field that stores the Excel template. Your template can pull all values from Input fields in the Controls section of Kianda. For example if a text box field contains “This is a test” text, the value pulled into the generated Excel workbook is “This is a test”.
-
Generated workbook destination - select a file field that will store the generated word document.
-
When you are finished editing the dialog box, click on OK or click on Close at any time to exit the dialog box.
Editing, deleting or duplicating rules
When you have clicked on an existing rule, and the rule is visible in the right-hand pane under Rules, there are a number of options available to you.
- To disable a rule, click the slider across beside the rule name.
- To copy a rule, click on the Duplicate button beside the rule name.
- To delete a rule, click on the Bin/Trash button .
- To view a rule, click on the rule name to open the Edit rule dialog box.
User tip
- When using this rule, create a utility panel and make it invisible to other users. You can then move the Excel template file field and the generated Excel workbook file field inside the utility panel. This way other users will not be able to see the unnecessary file fields and will not be able to tamper with them. To see an example of a utility panel, go to Creating a utility panel.
- Use this rule when working with tables inside of Kianda. It is very easy to create an Excel spreadsheet by transferring data from your processes into Excel using the Excel add-in. Use smart tags from the add-in to add a table, the data from your table will be transferred into the Excel spreadsheet without manually typing them. See Excel workbook add-in for more detail.
What’s next
To find out more about other File management rules go to File management rules.
To find out more about other rules go to Rules.
5 - Set existing file
Introduction
The Set existing file rule allows a user to create a file and assign it into a file field based on a provided file URL path. For example if you have access to a file stored in the cloud and have the URL, you can use this URL to download the file from the internet and place it in a file field with a name. The name you give to the downloaded file must contain the extension, for example if the file stored in the cloud is a PDF file and you want the name of the file to be “Workbook”, then you need to set the name of the file to Workbook.pdf. You must provide the correct extension for the file otherwise the created file will not be downloadable.
When to use
Use this rule when your process requires you to bring an existing file that you have a link to but not the file itself. For example if you have a link that leads to a file that is stored in a SharePoint datasource, you can bring this file into your process by using this rule and storing it in a file field.
You can add this rule:
Before you get started
In advance of using the Set existing file rule, in your process you need to have created at least one or more forms. The rule also requires one file field in order to store the file which is created from the given URL.
- File field (required) - used to store the created file from the given URL. To learn more on File fields go to File upload control.
How to get started
-
Click on an existing process by going to Administration > Designer and decide which form, or field you will apply the rule to, by clicking on that item so that it is in edit mode so you can see the Edit/pen button, Pen button .
-
Click on Add a rule > File management > Set existing file.
-
In the Edit rule - Set existing file dialog box, give the rule a title in the Title field.

-
f you want to add conditions for the rule, click on the Edit conditions button see Conditions for more details.
-
Under the Action section fill out the following:
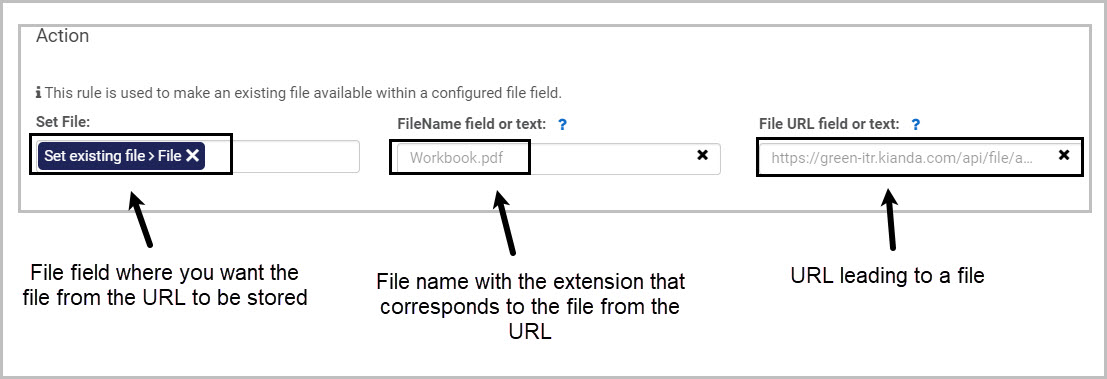
- Set File - file field used as a container to store the created file using the given URL.
- FileName field or text - you can select a field within your form or type in text manually to represent the name you want your created file to have.
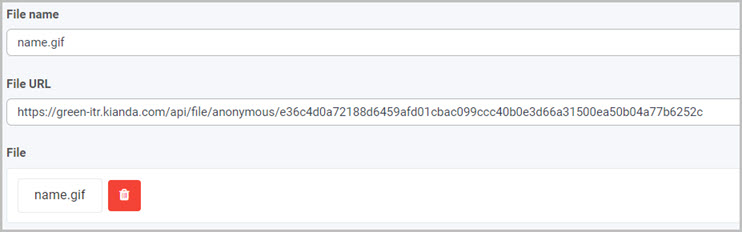
- File URL field or text - you can select a field within your form or type in text manually to represent the URL used to create the file.
Using a field for the name and a field for the URL will allow you to create a different files with a different names every time you use this rule, see the image below and note how the File name field corresponds to the created file in the File field:
-
When you are finished editing the dialog box, click on OK or click on Close at any time to exit the dialog box.
Editing, deleting or duplicating rules
When you have clicked on an existing rule, and the rule is visible in the right-hand pane under Rules, there are a number of options available to you.
- To disable a rule click the slider across beside the rule name.
- To copy a rule, click on the Duplicate button beside the rule name.
- To delete a rule, click on the Bin/Trash button .
- To view a rule, click on the rule name to open the Edit rule dialog box.
User tip
- Create a Text box field that can be used to change the URL every time you want to create a file. This will make the rule dynamic and versatile. To laern more about text box field and how to create one, got to Text box control.
- Create another Text box field that can be used to change the name of the file every time you want to create it from a URL.
What’s next
To find out more about other File management rules go to File management rules.
To find out more about other rules go to Rules.
6 - Merge PDF
Introduction
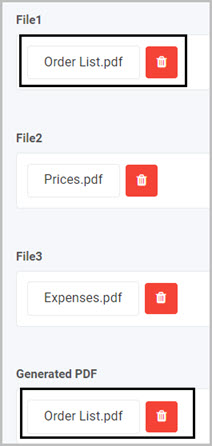
The Merge PDF rule allows you to combine two or more .pdf files together. It is also possible to combine image files to the PDF file, for example .png or jpg. This rule can be useful when creating one large PDF document from smaller files. The generated file name will be the same as the first file used to merge, see image below for an example:
When to use
Use this rule when your process requires you to merge dynamically two or more PDF files. For example automatically merge expense receipts submitted by users into a single PDF files containing all images or PDF receipts.
You can add this rule:
Before you get started
In advance of using the Merge PDF rule, in your process you need to have created at least one or more forms. The rule also requires at least 3 file fields, which are used to select files that you want to merge and a file field to store the merged PDF. To learn how to add a file go to File upload control.
- File field (To be merged file #1) - used to hold the first file that you want to merge.
- File field (To be merged file #2) - used to hold the second file that you want to merge.
- File field (Merged PDF file) - used to store the merged PDF version of the two files.
How to get started
-
Click on an existing process by going to Administration > Designer and decide which form, or field you will apply the rule to, by clicking on that item so that it is in edit mode so you can see the Edit/pen button, Pen button .
-
Click on Add a rule > File management > Merge PDF.
-
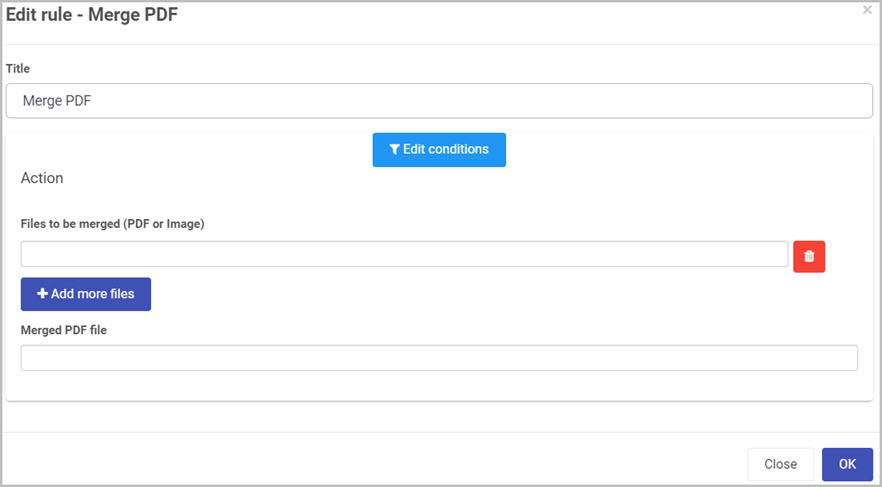
In the Edit rule - Merge PDF dialog box, give the rule a title in the Title field.
-
If you want to add conditions for the rule, click on the Edit conditions button see Conditions for more details.
-
Under the Action section fill out the following:
-
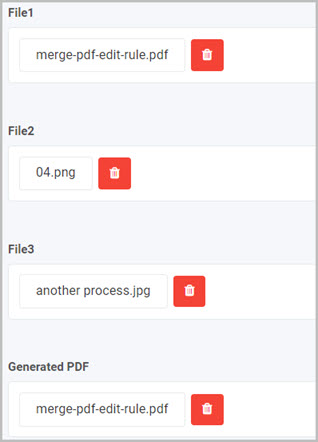
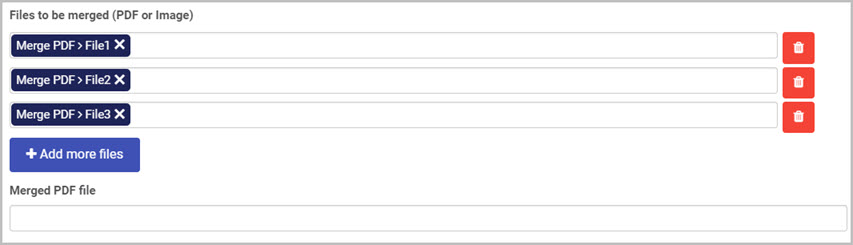
Files to be merged (PDF OR Images) - select a file field which contains a PDF file or an image. Note that in order to merge PDF and image files, your first merging file must be a .pdf file followed by other image files, see image below:
-
+Add more files - you can choose to merge multiple PDF or image files together by clicking on Add more files button. You can also remove file fields by clicking on the Bin/Trash icon . Adding more file fields will allow you to attach more PDF or images files that you want to merge, see below image as an example:
-
Merged PDF file - select a file field from your process that you want use to store your merged PDF file.
-
When you are finished editing the dialog box, click on OK or click on Close at any time to exit the dialog box.
Editing, deleting or duplicating rules
When you have clicked on an existing rule, and the rule is visible in the right-hand pane under Rules, there are a number of options available to you.
- To disable a rule click the slider across beside the rule name.
- To copy a rule, click on the Duplicate button beside the rule name.
- To delete a rule, click on the Bin/Trash button .
- To view a rule, click on the rule name to open the Edit rule dialog box.
User tip
- When merging file with this rule, you need to place the
.pdf file first followed by the image files.
What’s next
To find out more about other File management rules go to File management rules.
To find out more about other rules go to Rules.
7 - Create a file anonymous link
Introduction
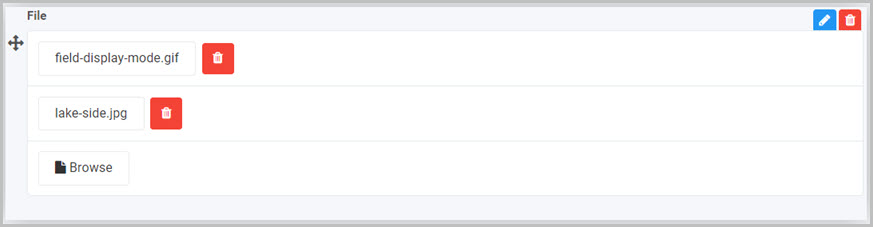
The Create a file anonymous link rule enables you to create a link to a file from your process. The link is fully anonymous which means anybody can access the file if they have the link. You can set an expiry time of the link (in hours), the count down will start from the time the link was created. It is possible to create anonymous link for multiple files as long as your file field supports it, see image below for an example:
Multiple files uploaded to a file field.
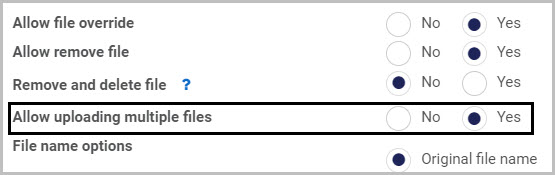
File field settings to allow multiple files to be uploaded.
When to use
Use this rule when your process or application requires sharing anonymously a file stored in one of the supported file connectors. For example when sharing a file link to a report stored behind an authenticated file system.
Add this rule to any form element.
Before you get started
In advance of using the Anonymous form link, in your process you need to have created at least one or more forms. The create a file anonymous link rule also requires two control fields in order to store a file which you want to share and a text box control for storing the link. You can also create another text box or a number field to store the link duration, this field is optional but can be a good idea if you want to customise the duration of the link dynamically.
- File field - used to store the file which you want to create a link to. To learn how to create a file filed go to File upload control.
- Text box field - used to store the generated anonymous link which can be shared with other users. To learn how to create a text box field go to Text box control.
- Text box or Number field (optional) - allows you to determine the duration of the link in hours. To learn hot to create a number field go to Number control.
How to get started
-
Click on an existing process by going to Administration > Designer and decide which form, or field you will apply the rule to, by clicking on that item so that it is in edit mode so you can see the Edit/pen button, Pen button .
-
Click on Add a rule > File management > Create a file anonymous link.
-
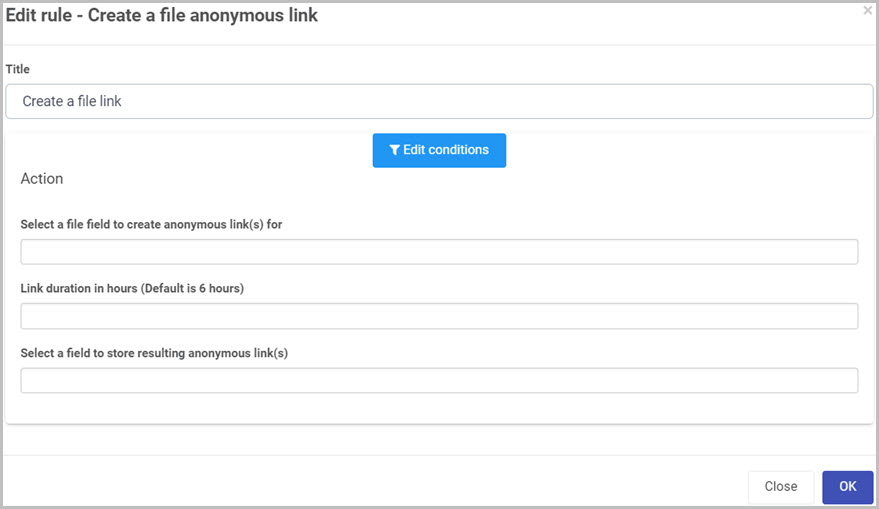
In the Edit rule - Create a file anonymous link dialog box, give the rule a title in the Title field.
-
If you want to add conditions for the rule, click on the Edit conditions button see Conditions for more details.
-
Under the Action section fill out the following:
-
Select a file field to create anonymous link(s) for - select the field that contain the file that you want to create the link for.
-
Link duration in hours (Default is 6 hours) - an optional field indicating the link expiry in hours.
-
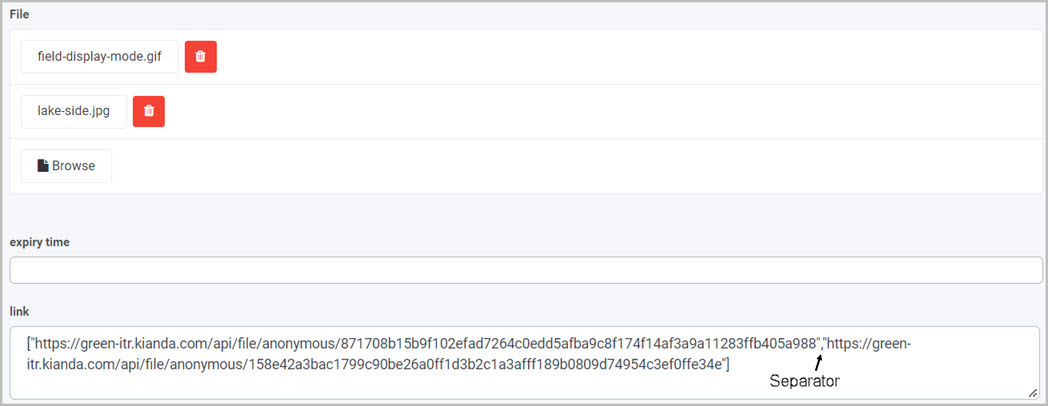
Select a filed to store resulting anonymous link(s) - field to store the generated link. When there are multiple files uploaded to create the links for, the resulted links will be displayed between square brackets[] and separated by a , see below image:
-
When you are finished editing the dialog box, click on OK or click on Close at any time to exit the dialog box.
Editing, deleting or duplicating rules
When you have clicked on an existing rule, and the rule is visible in the right-hand pane under Rules, there are a number of options available to you.
- To disable a rule click the slider across beside the rule name.
- To copy a rule, click on the Duplicate button beside the rule name.
- To delete a rule, click on the Bin/Trash button .
- To view a rule, click on the rule name to open the Edit rule dialog box.
User tip
- When sharing an anonymous link with someone, use the send email rule and attach the link in the body of the email. Make sure to generate the link before sending the email.
- To make the rule versatile with setting the duration time, create a text box or a number field and select it in the Link duration in hours field. This way you can set the expiry of the link every time you create one.
What’s next
To find out more about other File management rules go to File management rules.
To find out more about other rules go to Rules.