This is the multi-page printable view of this section.
Click here to print.
Return to the regular view of this page.
Form action rules
Rules within the Form action rules category allow you to perform form specific actions on forms and processes such as saving a form / process, submitting a form, closing a form, deleting a process and validating form input.
If you go to Administration > Designer and click on a process or create a new process, then click on Add a rule the Form action rules are found in the left-hand pane when you click on Form action.

There are six Form action rules as follows:
-
Validate input - provides ability perform flexible data validation and prevents incorrect data submission
-
Field display mode - this rule forces the display mode to override the automatic display mode of fields and forms
-
Submit form - marks the current form as complete and makes it read-only
-
Save form - commits a record or process instance in the server
-
Close form - closes the form and navigates to another resource
-
Delete form - marks the record or process instance to be deleted
What’s next 
To read more about each of the rule types go to the links below:
1 - Validate input
The Validate input provides the ability to perform flexible data validation and prevents incorrect data submission. For example, this could be performed on a Date of Incident field, where the validation checks that the date entered is a past date.
When to use
You can add this rule:
How to get started
To showcase the Validate input rule in action, we will make a validation check on a Date of Incident field to see if the entered date is a past date.
To implement the rule:
-
Click on an existing process by going to Administration > Designer and decide which form, or field you will apply the rule to, by clicking on that item so that it is in edit mode so you can see the Edit/pen button, Pen button  .
.
-
Click on Add a rule > Form actions > Validate input.
-
In the Edit rule - Field display mode dialog box, give the rule a title in the Title field.
-
Click on Edit conditions  to add a validation condition. To learn more about conditions go to Conditions.
-
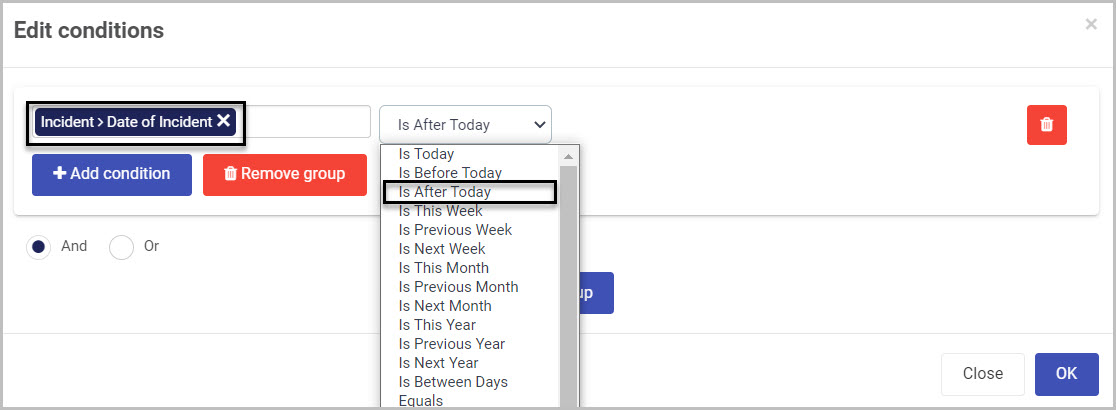
Select the field you want the condition check to be performed on. In this example it is the Date of Incident field.
-
Select type of validation to be performed. In this example it is the Is After Today validation.
-
In the Edit rule - Validate input dialog box, In the Error message to display when rule conditions above apply text box, type in the error message you want to be displayed if validation condition apply.
-
Select a form or field to Trigger rules if validation condition apply so that rules attached to that particular form or field are initiated if the condition(s) set in step 6 apply.
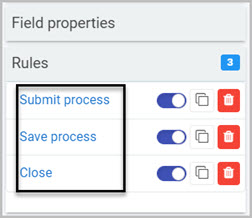
For example if the Submit button is selected in this field, all its rules will be executed which means the Submit process, Save process and Close rules will be executed after a condition is met.
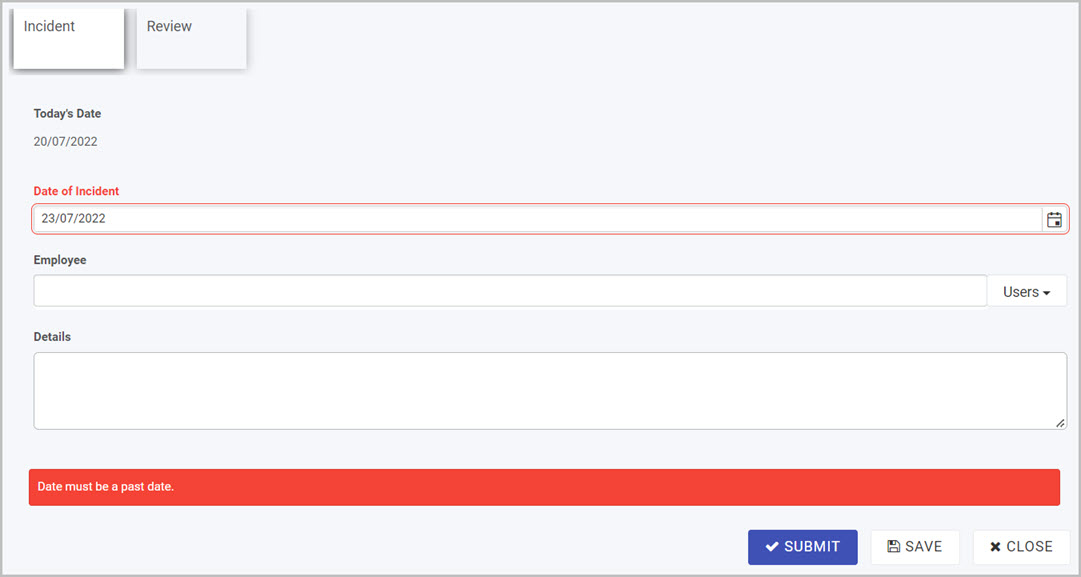
From the example mentioned above, we created a simple Incident Form in which a user needs to select a date of an incident. The image below displays the Validate input rule in action, where the date selected Is After Today therefore the condition is valid and an error message is displayed.
Editing, deleting or duplicating rules
When you have clicked on an existing rule, and the rule is visible in the right-hand pane under Rules, there are a number of options available to you.
-
To disable a rule click the slider across beside the rule name.
-
To copy a rule, click on the Duplicate button  beside the rule name.
-
To delete a rule, click on the Bin/Trash button  .
.
-
To view a rule, click on the rule name to open the Edit rule dialog box.
User tip 
- When validating a field, form or a process, think of conditions. When a condition is met, an action must follow. For example an error message is displayed (Action) when the wrong date is entered (Condition).
What’s next
To find our more about other form action rules go to Form Action rules.
To find out more about other rules go to Rules.
2 - Field Display mode
The Field display mode rule temporarily changes the display mode of a field or form creating a temporary form or field display mode. This rule forces the display mode to override the automatically calculated display mode of fields and forms.
When to use
You can add this rule:
How to get started
To showcase the Field display mode in action, we will change the display mode of a user picker field to Read mode after a user has been chosen. To learn more about User picker field go to User picker control.
To implement the rule:
-
Click on an existing process by going to Administration > Designer and decide which form, or field you will apply the rule to, by clicking on that item so that it is in edit mode so you can see the Edit/pen button, Pen button .
-
Click on Add a rule > Form actions > Field display mode.
-
In the Edit rule - Field display mode dialog box, give the rule a title in the Title field.
-
If you want to add conditions for the rule, click on the Edit conditions button to create conditions for the rule, see Conditions for more details.
-
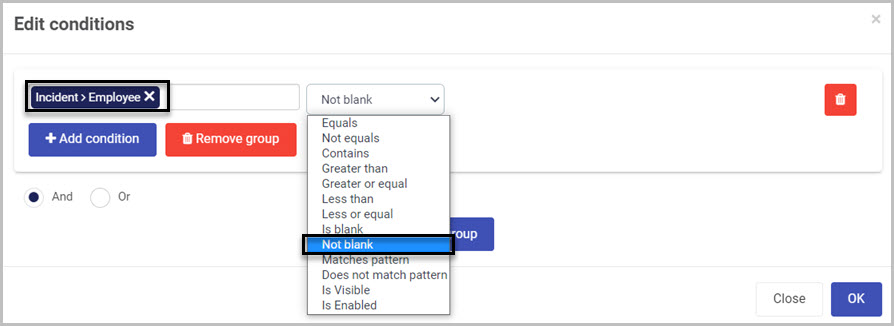
To demonstrate how this rule works, we will add a condition to a field. Select the field you want the condition to be applied to. In this example it is the Employee field.
-
Select type of operator check to be performed on the condition. In this example it is the Not blank operator. Here we are checking whether the Employee field is Not blank.
-
In the Field or form option, select the field you want the Field display mode rule to affect. In this example it is the Employee field.
-
Choose from Edit mode or Read mode.
- Edit mode - allows the form or field to be edited.
- Read mode - sets the mode of a form or a field to Read-only.
-
Click on Add to add as many fields or forms as needed.
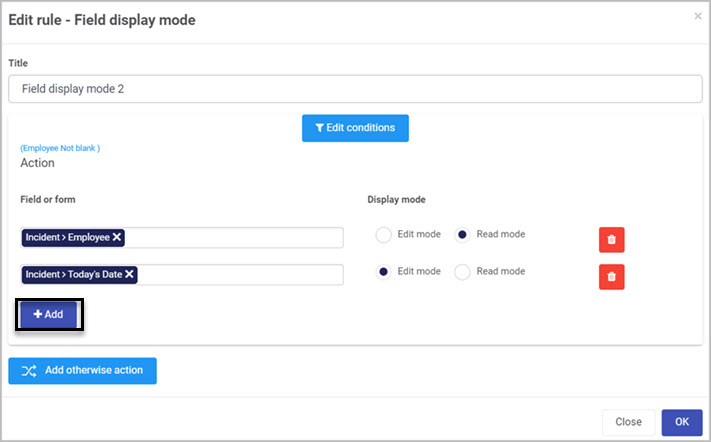
The video below demonstrates the Field Display mode rule in action, where the Employee field becomes Read mode after a user is selected. The Date field which was not editable changes to Edit mode after a user is selected. This is achieved by applying a condition to the Employee field. The condition checks if the Employee field is Not blank, therefore when a user has been selected this condition is valid, activating the Field Display mode rule.
Editing, deleting or duplicating rules
When you have clicked on an existing rule, and the rule is visible in the right-hand pane under Rules, there are a number of options available to you.
-
To disable a rule click the slider across beside the rule name.
-
To copy a rule, click on the Duplicate button beside the rule name.
-
To delete a rule, click on the Bin/Trash button .
-
To view a rule, click on the rule name to open the Edit rule dialog box.
User tip
- Form state (Edit / Read) will not be saved. It is recommended that display mode is reverted once no longer needed.
What’s next
To find our more about other form action rules go to Form Action rules.
To find out more about other rules go to Rules.
3 - Submit form
The Submit form rule marks the current form as complete and makes it read-only. By default upon submit of a form, the next form in the process is activated.
This rule is automatically attached to Submit button which is added to all forms by default.
When to use
This action is used to submit a form that you are working on, that is the ‘current’ form.
You can add this rule:
How to get started
To implement the rule:
-
Click on an existing process by going to Administration > Designer and decide which form, or field you will apply the rule to, by clicking on that item so that it is in edit mode so you can see the Edit/pen button, Pen button .
-
Click on Add a rule > Form actions > Field display mode.
-
In the Edit rule - Field display mode dialog box, give the rule a title in the Title field.
-
If you want to add conditions for the rule, click on the Edit conditions button to create conditions for the rule, see Conditions for more details.
-
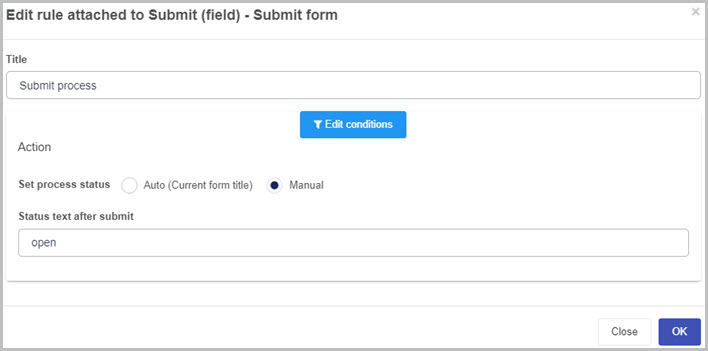
Under Action, Set process status choose from Auto (Current form title) or Manual. If you choose Manual then type in the desired text to appear to users in the Status text after submit field.
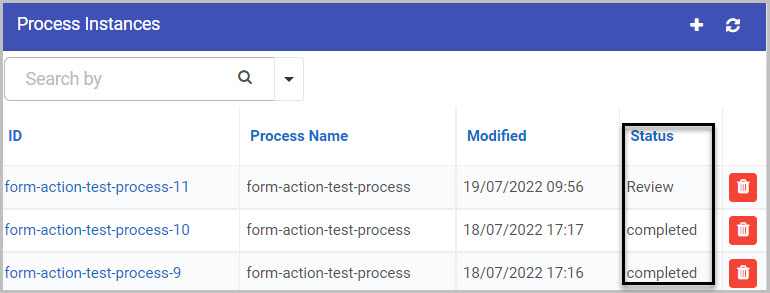
Each process contains an internal status value, this is automatically set to the name of the active form. For example there are two forms in a Incident process, a Incident form, a Review form and the Auto (Current form title) is selected in the Set process status option. When the Incident form is completed and submitted, the internal status will be set to the next active form, in this case the Review form. When all forms are completed and submitted, the internal status is set to completed. The image below shows how the internal status of the process can be reflected in a dashboard to keep track of the current stage of a process.
We can also set our own value for the internal status by changing the Set process status option to Manual. This will open a textbox field in which you can enter in a custom status after a form is submitted. For example, after submitting the first form, we will set the status to open:
Editing, deleting or duplicating rules
When you have clicked on an existing rule, and the rule is visible in the right-hand pane under Rules, there are a number of options available to you.
-
To disable a rule click the slider across beside the rule name.
-
To copy a rule, click on the Duplicate button beside the rule name.
-
To delete a rule, click on the Bin/Trash button .
-
To view a rule, click on the rule name to open the Edit rule dialog box.
User tip
- You can display the internal status of a process in a list widget on your dashboard. This can help you keep track of the current state the process instance is. For example when the process is complete or which form in the process is currently active.
What’s next
To find our more about other form action rules go to Form Action rules.
To find out more about other rules go to Rules.
4 - Save form
The Save form rule saves changes made in a form. This is particularly useful if a user needs to complete a long form, or is offsite, so that initial changes to the form are saved and then all changes can be submitted later on. The rule commits a record in the server.
This rule is automatically attached to Submit and Save buttons which are added to forms by default.
When to use
Use this rule to ensure the state of the application is stored with data.
You can add this rule:
How to get started
To implement the rule:
-
Click on an existing process by going to Administration > Designer and decide which form, or field you will apply the rule to, by clicking on that item so that it is in edit mode so you can see the Edit/pen button, Pen button .
-
Click on Add a rule > Form actions > Save form.
-
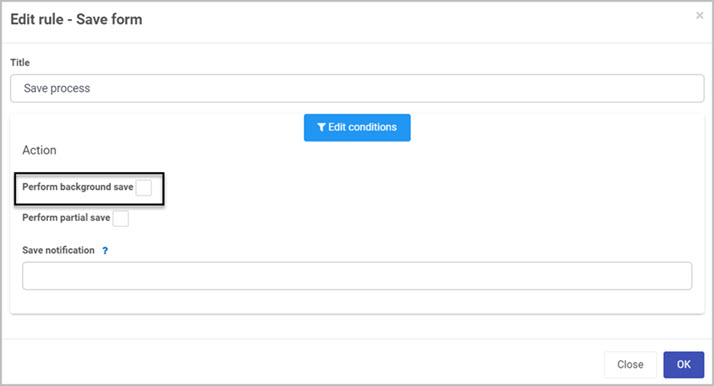
In the Edit rule - Save form dialog box, give the rule a Title.
-
Under Action, check the box for Perform background save if you want to perform background save of forms. This option MUST be enabled to allow background upload and chunked upload to be possible in the File upload control.
Edit rule - Save form dialog box
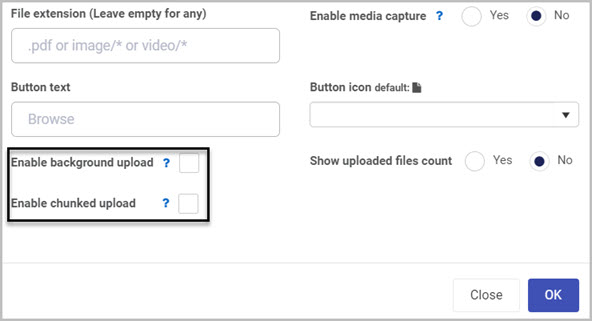
For example if you are offsite or don’t have a good internet connection and need to upload files to forms, then it is useful to allow ‘chunked’ and ‘background upload’ so that the file can be transmitted in resumable chunks. See File upload control for more information on file upload.
File upload - background and chunked upload options
-
Under Action, you can also check the box for Perform partial save to allow partial save of a form.
For example if this option is selected, it will allow you to save a form in small amounts so information is not lost when internet connection is lost.
-
You can also create a notification to display to users when a save has been successful by typing a message in the Save notification field.
-
You can create conditions for the actions to happen, see Conditions for more information.
Editing, deleting or duplicating rules
When you have clicked on an existing rule, and the rule is visible in the right-hand pane under Rules, there are a number of options available to you.
-
To disable a rule click the slider across beside the rule name.
-
To copy a rule, click on the Duplicate button beside the rule name.
-
To delete a rule, click on the Bin/Trash button .
-
To view a rule, click on the rule name to open the Edit rule dialog box.
User tip
- You can add a condition to the Save form rule to make sure that users fill out certain pieces of information in your form before they can actually save it.
What’s next
To find our more about other form action rules go to Form Action rules.
To find out more about other rules go to Rules.
5 - Close form
The Close form rule closes the form and allows users to navigate back to home page of Kianda platform or to another resource. This rule is automatically attached to Close, Submit and Save buttons which are added to forms by default.
When to use
Together with the Submit, and Save rules, the Close form rule forms the shutdown procedures for forms and should not be deleted from Submit, Save or Close buttons.
You can add this rule:
How to get started
By default all forms come with a Close button, and therefore a Close form rule however, you can set a close rule yourself, and redirect the user anywhere. To do so:
-
Click on an existing process by going to Administration > Designer and decide which form, or field you will apply the rule to, by clicking on that item so that it is in edit mode so you can see the Edit/pen button, Pen button .
-
Click on Add a rule > Form actions > Close form.
-
In the Edit rule - Close form dialog box, give the rule a Title.
-
In the On form close navigate to option, you can select from four different actions.
-
Auto - This option will redirect the user to the last location they were before opening the form.
-
Return to a dashboard - This option will redirect the user to a dashboard of choice. To navigate to a specific dashboard, in the Please choose a dashboard option select the desired dashboard.
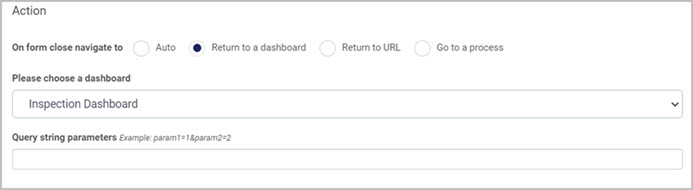
In the dashboard Query string parameters are used to populate the Filter widget when a given dashboard is loaded. To learn more about query parameters go to Query parameters. To learn more about Filter widget and how to use query strings there, go to Filter widget - query strings.
-
Return to URL - This option will redirect the user to any URL specified in the Please choose a field or type the URL text box.
-
Go to process - This option will redirect you to a process specified in the Please indicate the process or instance ID text box. See heading below for more information.
How the ‘Go to process’ option works
With this option selected, you can now enter an ID of a process you want the user to be navigated to. There is also a Is new instance? radio list available with a Yes or No options. If you choose:
-
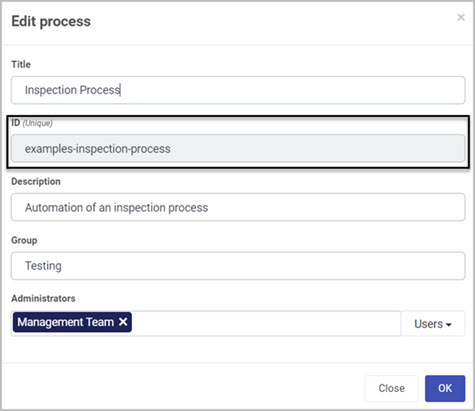
Yes - In the Please indicate the process or instance ID text box, you MUST specify a process ID which is the ID (Unique) of a process.
-
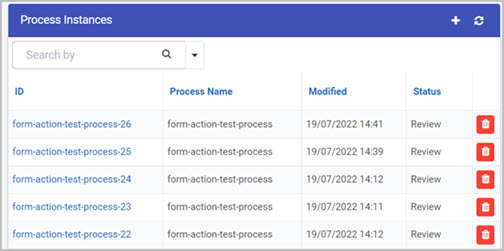
No - In the Please indicate the process or instance ID text box, you MUST specify an instance ID of a process. The instance ID is a unique identifier for a process instance. For example an Incident process may have more than one instances and each of those instances contains a unique ID as shown in the image below.
Query string parameters are used to populate form or fields when a given form is loaded. To learn more about query strings, visit Query Strings and for a more specific example visit Close rule Query Strings.
Editing, deleting or duplicating rules
When you have clicked on an existing rule, and the rule is visible in the right-hand pane under Rules, there are a number of options available to you.
- To disable a rule click the slider across beside the rule name.

-
To copy a rule, click on the Duplicate button beside the rule name.
-
To delete a rule, click on the Bin/Trash button .
-
To view a rule, click on the rule name to open the Edit rule dialog box.
User tip
Note, You cannot use Close form and Go to form in the same button.
Note, it is not necessary to add a condition to the rule. In this case the rule will be triggered automatically:
- if the rule is applied to a field, then the rule will be triggered when the user enters a value in that field.
- if the rule is applied to a button, then the rule will be triggered when the user clicks the button.
- if the rule is applied to a form, then the rule will be triggered when the form is submitted.
- if the rule is applied to a process, then the rule will be triggered on load, that is when the process is initiated.
What’s next
To find our more about other form action rules go to Form Action rules.
To find out more about other rules go to Rules.
6 - Delete form
The Delete form rule marks a process instance to be deleted. This rule can be used for example for General Data Protection Regulation (GDPR) reasons whereby a process instance with personal data is deleted.
When to use
Use this rule with the Save form rule to commit the deletion request in the server.
You can add this rule:
How to get started
As mentioned in the example above, we will use this rule to delete personal data for GDPR reasons.
To implement the rule:
- Click on an existing process by going to Administration > Designer and decide which form, or field you will apply the rule to, by clicking on that item so that it is in edit mode so you can see the Edit/pen button, Pen button .
- Click on Add a rule > Form actions > Delete form.
- In the Edit rule - Delete form dialog box, give the rule a Title.
- There is no action on the Delete form rule that can be specified. The internal action of this rule is to delete the process instance if a condition becomes true, see Conditions for more information.
- To apply a condition to the Delete form rule, in the Edit rule - Delete form dialog box click on Edit conditions .
GDPR example use case
In this example we have two forms:
-
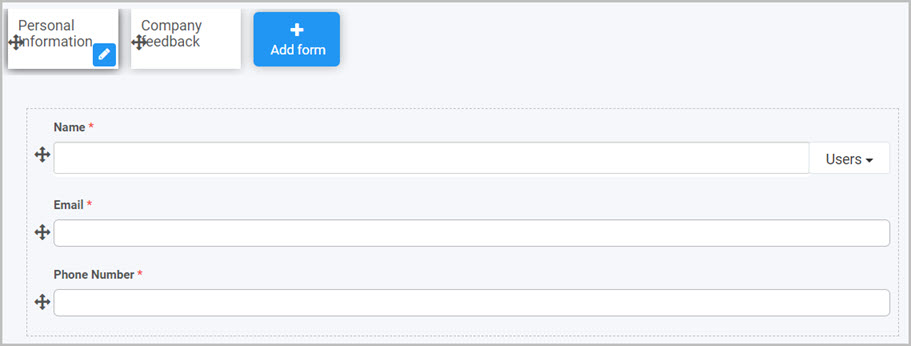
Personal Information form in which some personal data of an employee are being stored.
-
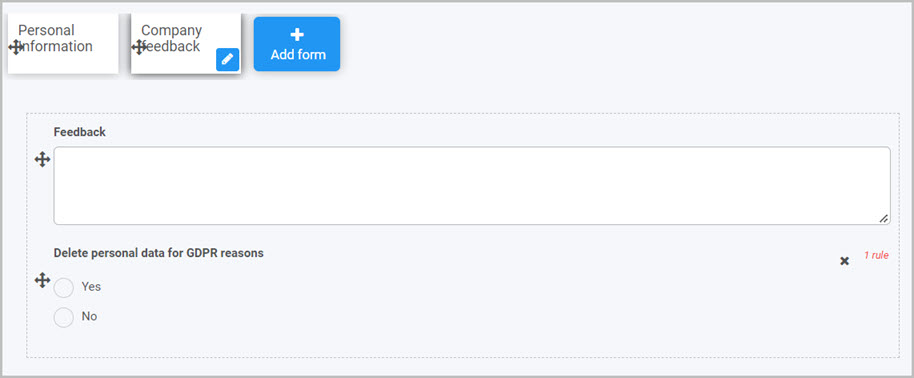
Company feedback form in which the employee can give feedback of the company and decide whether to keep personal information in the company system or delete them.
In this example we will add the Delete form rule to the Submit button of the Company feedback form.
-
Follow steps 1 through 5 above to add the rule to a desired field. In this example it is the Submit button in the Company feedback form.
-
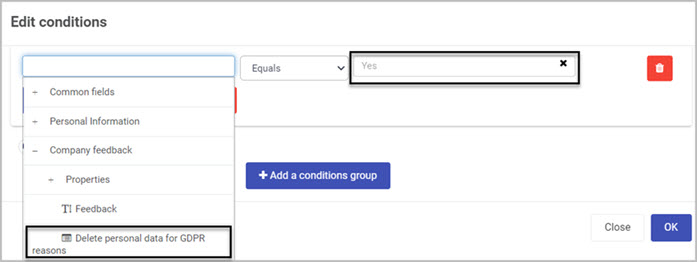
In the Edit conditions dialog box select a field for the condition check. In this example it is the Delete personal data for GDPR reasons field.
-
Select desired operator for the condition . In this example it is the Equals operator.
-
Choose a value for the conditional check. In this example type in Yes.
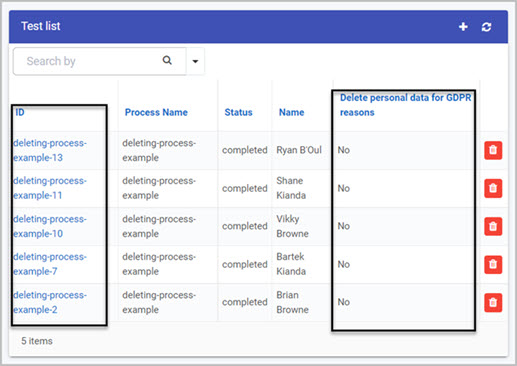
The image below presents deleted process instances. As shown in the Delete personal data for GDPR reasons column, there is no Yes values as all those processes were deleted from the system.
Editing, deleting or duplicating rules
When you have clicked on an existing rule, and the rule is visible in the right-hand pane under Rules, there are a number of options available to you.
-
To disable a rule click the slider across beside the rule name.
-
To copy a rule, click on the Duplicate button beside the rule name.
-
To delete a rule, click on the Bin/Trash button .
-
To view a rule, click on the rule name to open the Edit rule dialog box.
User tip
- When adding the Delete form rule to a process, make sure to change the rule order of execution of the Delete form to be after Submit form. Remember that you can’t submit a deleted form.
What’s next
To find our more about other form action rules go to Form Action rules.
To find out more about other rules go to Rules.