Rules are an important component of any process as they can be used to trigger automated actions, requiring minimal user management once created. There are 60 predefined rules in Kianda covering workflow applications, communications and file management to name a few.
Categories of rules
Workflow - Enables you to execute actions that might change the flow of the information within a process.
Communications - Enables sending emails or meeting requests or even user (push) notifications.
Data - This is an important and flexible rule group because it allows you to configure CRUD (Create, Read, Update and Delete) actions to configured data sources.
Users - This enables you to retrieve a user property, updating user properties or lookup for a user based on a user attribute.
File management - Allows operations such as the generation of a word document and conversion to PDF and more.
Tables - Provides specialised rules to enable working with tables like sorting, copying table rows to another table and more.
Dates - Enables convenient date calculation with advanced options like ignoring weekends or special dates.
Form actions - Allows operations like submit, save, close and delete forms.
SharePoint - Provides a variety of operations to be performed on the SharePoint connection. These rules include operations like create a list, find a user, define permission to an item, check-in / out an item or adding a user to a SharePoint group.
Working with rules
The following headings step through how to view, add, copy, edit and disable rules in processes. It is also important to keep in mind how rules should be listed when multiple rules are used on the same field.
When to add a rule
to a field
to a form
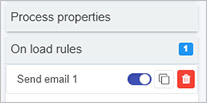
to a process (the rule will run on load)
How to view a rule
If rules have already been created
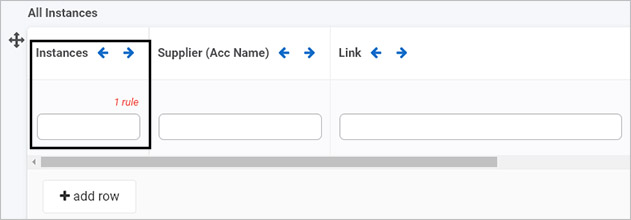
Select the field or form that contains a rule, for example a button at the end of a form. If a field within a form has rules attached to it, this will be indicated within the form, as shown in the example below where the column Instances has 1 rule attached.
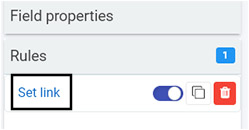
Under Rules in the right-hand pane, click on the given rule name to view the rule details, for example a ‘Set form’ rule called ‘Set link’ as shown below.
Details of the rule are available in the Edit rule dialog box, for example the Set form field rule is shown below.
You can view rule conditions by clicking on Edit conditions and actions to be performed as part of the rule are under Action. Other features to note in the dialog box are:
Expression button used to add expressions to rules so that dynamic values can be returned based on calculations or form IDs, see Expressions for more details.
Mapping - mapping is used within rule actions, for example in the Set form field rule shown in the image above, the rule updates a form field based on a given value or expression. In many other fields mapping can be used to determine success or error during rule execution, see Success and error mapping for more details.
How to add a rule
To add a rule to a specific component:
Select the field you want.
Under Add a rule, select a category of rules, and then select the rule you want.
Edit the rule dialog box and click ‘OK’. The rule will be displayed on the right-hand side of the page.
How to copy a rule
Duplicating rules can be very useful where you have similar rules that are associated with different fields. To duplicate a rule:
Select the field with the desired rule.
Under Rules in the right-hand pane, click on the Duplicate rule button next to the rule name.
Choose Copy to another field if you wish to copy to another field and select the field you want to copy to. Select OK when complete.
Alternatively select OK without copying to another field or click on Close at any time to exit the dialog box.
Create or edit conditions for the rule by clicking on the Edit conditions button.
Change how the rule performs by changing details under Action. Actions will differ depending on the rule in use.
How to disable a rule
Disabling a rule means that the rule is not active but is still visible in the Rules pane. The rule can be activated at any time again by clicking on the toggle button.
Select the field that contains a rule, for example a button at the end of a form, or a field within a form that has rules attached.
Under Rules in the right-hand pane, beside the given rule name slide the toggle button from ‘on’ to ‘off’ to view the rule details, for example a ‘Set form’ rule called ‘Set link’ as shown below.
To enable the rule at any time again follow the steps above and slide the toggle button into the ‘on’ position.
Where to place a rule in a list of rules
The rule order refers to the order of execution of multiple rules. To change the rule order:
Select the field with the rules attached.
Under Rules in the right-hand pane, drag and drop the rules in the order you want them.
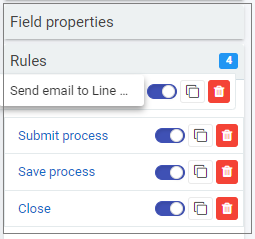
The top-most rule is the first rule to be executed. By default buttons at the end of a form will automatically have Submit, Save, and Close rules. If you create rules you may wish to have these rules placed above these shutdown rules so that your rules are executed first before form shutdown.
Note: Rule order becomes important when the output of one rule impacts the execution of another, for example if a process remains ‘open’ because a user must perform a particular action, then it is useful to have an automated email reminder sent to the user while the process is open. For example
the order of rules on a Submit button could be: Set Status, Send Email, Submit, Save, Close, whereby the status of the process instance is set first, before an automated email and then the form shutdown rules of Submit, Save and Close occur.
To read more about multiple rules, go to Multiple rules.
Conditions
Flexible and dynamic conditions form an important component to make forms fully dynamic. This feature enables you to create natural language conditions when rules should be triggered.
To configure a rule to conditionally execute an action:
Select the field or form that the rule will be attached to.
Under Add a rule in the left-hand pane, click on a category of rules, for example Workflow and then a rule itself, for example Process security.
Click on Edit conditions button within the rule.
Add the conditions that satisfy your scenario. Multiple conditions can be grouped with condition groups.
For more information on Conditions, go to the Conditions page.
Custom rules
Under custom rules, you will find any custom-developed rules available under your developer section. Custom rules provide access to rules that are built for extensibility of Kianda capabilities. This is particularly used in situations when existing rules do not provide the required functionality.
Custom rules have the purpose of providing a user interface for the end-users. If you need to build a rule then you should use a custom rule widget.
It allows a developer to quickly build a reusable component that would then be used by process designers in real processes.
Check-out the development section for more details on how to build custom widgets in Kianda.
What’s next
We have briefly introduced the key concepts of rules. Click on the links below to read more about rule concepts in detail:
1 - Adding Conditions
Conditions are a key component of Kianda rules. They are the triggers that result in fully dynamic forms. Conditions enable you to create natural language conditions when rules should be triggered.
The Conditions button is found within all rules as well as dashboard widgets. Conditions can also be set when setting data source security levels for B2B portals.
Conditions add an important level of interactivity, creating dynamic pathways within a process. These pathways could result from user interaction or from other events that happen.
Conditions work on the ‘if…then’ principle: ‘if’ the condition exists ‘then’ an action happens, and where applicable, if the condition does not exist, then another action can happen. You can use these principles as steps to implementing conditions:
Create the condition(s)
Create the action(s) that will be applied as a result of the first condition being in place.
Where applicable, create the otherwise action(s) based on other conditions being in place.
Create the condition
To create conditions, first choose the process element you want the condition to apply to – such as a form, set of forms, a field/control or set of fields. This could also be a set of common fields associated with all process instances, such as Process ID, Status or Modified by, see image below.
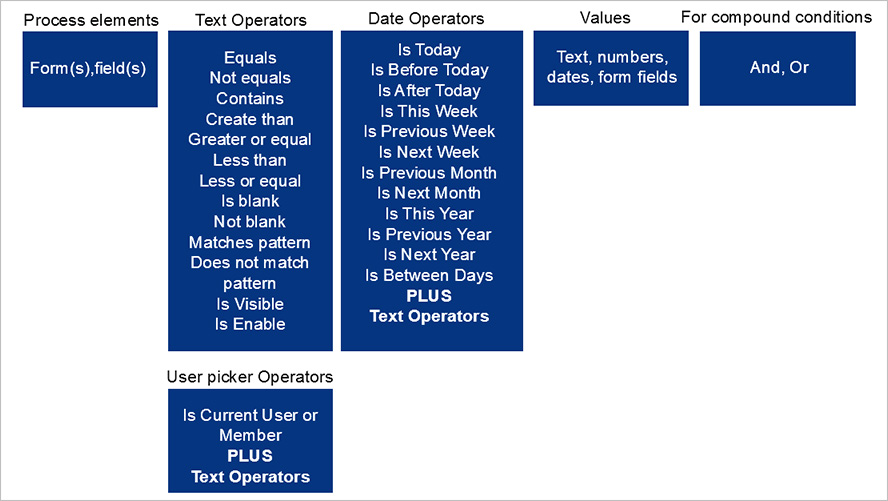
Next, depending on whether the rule is applied to text-based fields, date fields or user picker fields, choose from 13 text operators, 25 date operators and one additional user picker operator, as shown in the image below.
Then choose a value, this could be typed in text, number(s), date(s), form(s) or field(s).
Condition elements
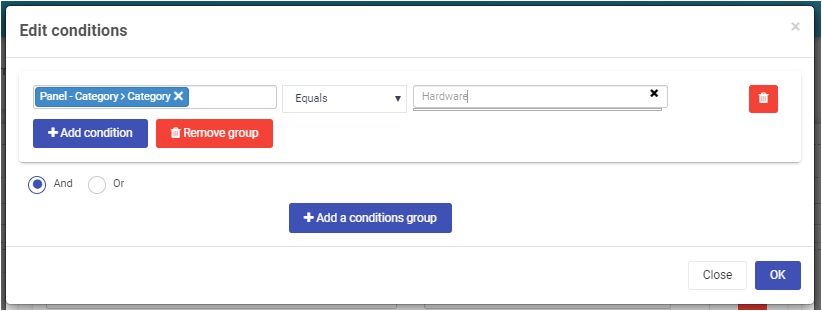
In the case of multiple conditions, you can use And or Or to create a group of compound conditions:
The result is a flexible process workflow that will result in desired actions based on any number of conditions.
Rule action(s) – example Hide or Disable rule
To create actions and where applicable, otherwise actions, the action will depend on the rule that is chosen. All Kianda rules use a natural language structure to make it is easy to apply actions. For example, for the Workflow rule, Hide or Disable, you can choose forms and fields from your process and then apply seven possible actions (as shown below).
Action elements for Hide or Disable
The actions within Hide or disable are:
Hide will hide a process element (forms or fields) from view.
Show will show the element.
Disable blocks a user from editing an element.
Enable allows a user to add a value to an element.
Toggle visible will toggle between showing an element or not, based on subsequent clicks of a field that the rule is applied to.
Toggle enable will toggle between allowing an element to be edited or not, based on subsequent clicks of a field that the rule is applied to.
Hide and clear will allow you to hide a process element and clear the details. For example, if a toggle button has this rule applied, with an otherwise action of show on a textbox, then if one value is chosen on the toggle button, the user is allowed enter details into the textbox. The otherwise action is that the field is hidden and cleared of data, so that no data can be retrieved. This might be useful, for example, when sensitive information is used, like a social security number on a form.
Note: You can use rules to create actionswithout conditions too. In this case the rule will simply execute, for example when a form or field is clicked on.
What’s next
Depending on how the rule is applied, for example to a Submit button, the rule order is important to consider, see Multiple rules.
To find out more about rule implementation, go to the main Rules page and then click on the links to the different rule categories.
2 - Multiple rules
Introduction
When working with rules in forms, a key principle to consider is rule order. Rule order is important if there are multiple rules attached to an item like a button or form field to determine the sequence of rule execution. As a form designer, you can change the order of execution to suit your specific process design.
Remember you can assign rules at:
Process level - onload rules that execute when a new process instance is initiated.
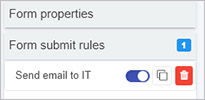
Form level - onload rules that execute when a form is submitted.
Button/field level - rules attached to buttons or fields within forms, or at the end of a form, for example a Submit button. An example of rule order is given at this level in the section below Rule order example.
Rules are typically synchronously executed in Kianda, so for example when using a Start a process rule, when the rule is executed first any mappings from a secondary/target process are mapped into a primary process, and from there if there are any rules to trigger on the secondary/target process those are executed, but a rule will only execute when the previous rule has completed. This is different to asynchronous execution where the system will execute rules without waiting for the previous rule execution to finish. Within time defined rules, like Start a process and Schedule a rule there is an option to choose between synchronous/in-series or asynchronous/in-parallel where the latter may be useful for rules without dependency.
Rule order example
For example, you may want a process to send automated emails to a safety manager, where the email includes submitted form data. In this case a Send email rule could be attached to a form Submit button so an email is sent once the button is clicked. This will result in an automated email to a designated person. To generate a report of the completed form, you can use the Generate worddocumentrule triggered again when the Submit button is clicked. In this example the Generate word document rule has to be executed before the Send email rule, so that the Word document can be generated and then attached to the email.
The rule order consideration is therefore particularly important when rules are dependent on each other - where the output of one rule is the input of another rule.
Changing the rule order of multiple rules
In the example below we will look at changing the rule order of a Send email rule attached to a Submit button. The Submit, Save and Close buttons by default already have Submit, Save and Close process rules attached, in order to allow form shutdown.
To change rule order, when the rule is created:
Click on the item that has multiple rules attached, for example a Submit button. Remember by default Submit buttons in forms will have ‘form shutdown’ rules, namely Submit, Save and Close.
Click on Rules in the right-hand pane, drag the Send email rule to the top of the list by clicking on the rule and drag it to the top of the list, before Submit, Save and Close rules.
The video below shows an example of a Send email rule being created and saved. The rule is attached to the Submit button. Once the rule is created, by default the new rule goes to the bottom of the list of rules. To move the rule, simply click on it and drag it to where you wish to place it. In this example we want the email sent before any of the shutdown processes like Submit or Save, but after a Generate Inspection rule, so the output from that rule can be used in the Send email rule.
What’s next
To find out more about rule implementation, go to the main Rules page and then click on the links to the different rule categories.
3 - Expression builder
Introduction
Expressions allow you to put together form identifiers (form field IDs) and constants with operators and functions to return a dynamic value that can be used in various places – for example, in a form or field rule to automate processes.
Expressions
For example, expressions could be used in the body of an automated email sent using the Send email rule, as shown here:
Expression example
In the example above, [RequesterName] and [category] are identifiers, that are unique IDs for form fields. ProcessLink() is a function that will return a link to that process instance. Using the expressions above in an email will mean that every time an instance of the process runs, the values will be presented in an automated email, creating greater efficiencies and personalising the email for the recipient.
Getting started with expressions – example Email body text
Expressions are recognisable in Kianda from the Expressions button found in Edit rule dialog boxes and other menu items, such as enabling quick actions for processes and number fields.
Within rules, expressions can be created using the Expression builder where you can Add field to an expression or use the handy Reference guide to get a list of commonly used functions.
Expression builder
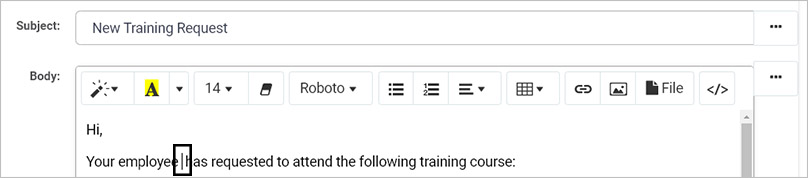
Let’s look at an example of using an expression in the Body section of an email being sent using the Send email rule:
First, add a Send email rule to a form or forms, field or fields by selecting Add a rule > Communications> Send email from the left-side pane.
Type in any text that you want in the email Body and position your cursor where you want to add the expression.
On the right of the Body section of the email, click on the Expressions button .
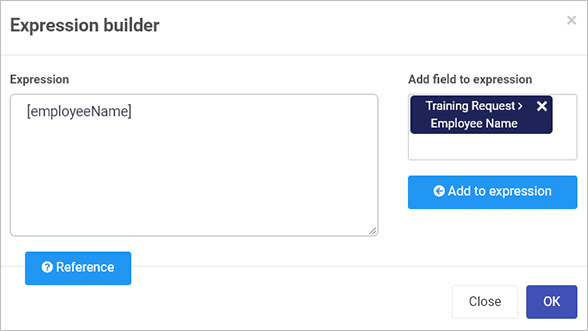
The Expression builder dialog box appears.
Click on the blank box under Add field to expression and find the field you want to reference in your email, for example, a text box with a name ‘EmployeeName’.
Click Add to expression. The result is that the field appears in the Expression box.
Click OK to add the expression to the email body text, or click on Close to exit the dialog box without making changes.
To add additional field expressions, click on the Expressions button again, under Add field to expression, click on X beside the field name to clear the expression box and then search for the desired field from a form.
To add a function, click on Reference and copy the function into the body of the email. A list of references are available below.
Expression functions
All JavaScript expressions and functions can be used in the Expression builder to create the impact you want, see Javascript expressions for more details.
In addition to defining your own expressions there is a set list of expressions found under References, see table below for meaning.
Expression
Function
+, -, /, *
Performs one of the basic mathematical operations: add, subtract, divide or multiply.
Sum(arg1, arg2, …)
Returns the sum of the arguments listed between the parentheses.
Date(arg1)
Converts the argument into a date.
DateAdd(dateArg, day, month, year, hour, min)
Adds time to a given date. The date is stored in dateArg and the time to be added is stored in the day, month, year, hour and min arguments.
Status()
Returns the status of the current process.
ProcessID()
Returns the ID of the current process.
FormOwner(formName)
Returns the form owner(s) for the given form.
FormCompleted(formName)
Returns the date completed for the given form.
Pad(value, size, symbol)
Adds left padding to the value with the symbol provided.
QueryString(parameter)
Returns the URL query string for the given parameter (or an empty string if undefined).
IsOnline()
Returns “yes” or “no” depending on the status of the online connection.
ProcessLink()
Returns the HTML link to the current process The link text can be added between the parantheses e.g. ProcessLink(“click here”). This expression is for use in emails and rich text fields.
Digest()
Returns a summary of changes to fields in the current process. A table will be given with the original and new values.
Digest(‘fieldName1’,‘fieldName2’)
Returns a summary of the changes for the given fields. See note below.
GetFieldText(‘fieldName’)
Returns the text in the given field. See note below.
GetFieldValue(‘fieldName’)
Returns the value in the given field. See note below.
Note: In the case of the last three expressions, you should select a field which contains data. If you give the name of a button field for example, then no data will be returned.
What’s next
To find out more about rule implementation, go to the main Rules page and then click on the links to the different rule categories.
To see how expressions are used in controls such as Number fields, go to Number control.
To learn more about how to use JavaScript expressions in expression builder go to Javascript expressions for more details.
4 - Success/Error Mapping
Introduction
Success and Error mapping is used to denote the success or failure of certain rules being executed where data is being transferred or a rule is connected to a data connector. As a user with an administrator or designer role, you can use Kianda Designer to populate fields within the Kianda form, using the Edit rule dialog box to set parameters for success and error mapping.
When to use
Success and Error mapping should be with rule execution, displaying values that you want for rule execution success or failure.
You can use mapping with the following rules:
Data rules > Find items
Data rules > Create item
Data rules > Update item
Data rules > Delete item
All SharePoint rules, except Get attachments and Create anonymous link
How to use
Select the field that will have the rule attached, for example a button at the end of a form, or a field within a form.
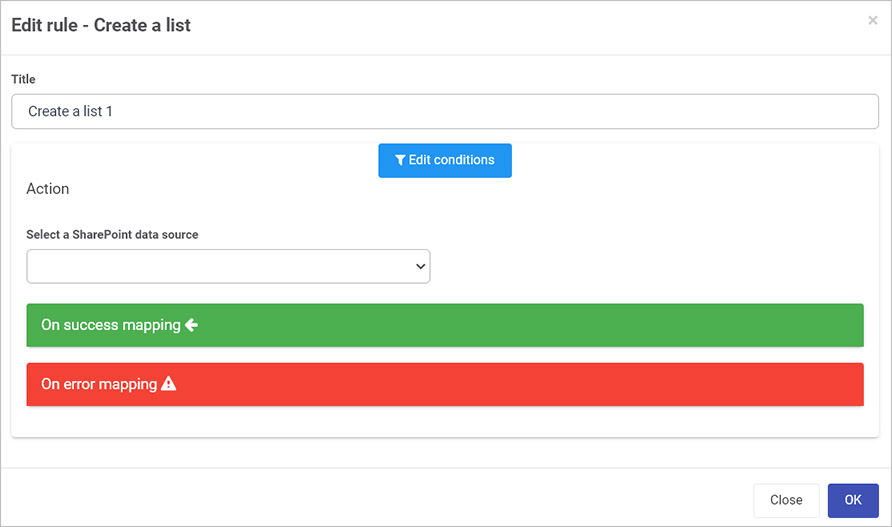
Click on Add a rule in the left-hand pane and select one of the rules that uses mapping as shown in the When to use list above, for example the SharePoint rule called Create list, used to create a list in SharePoint dynamically using Kianda form data.
In the Edit rule dialog box, give the rule a Title.
If you want to add conditions for the rule, click on the Edit conditions button to create conditions for the rule, see Conditions for more details.
Under Action, click on the field Select a SharePoint data source from the drop-down list.
Fill out any additional fields as necessary, for example to create a list the following fields must be completed:
List template - choose from a list of SharePoint list types
List name field - choose a form field that will be used the create a name for the list in SharePoint
List url field - choose a form field that will be used in the creation of a URL within SharePoint
List description field - choose a form field that describes what the list is about
Quick Launch menu - options are Yes or No. Choosing Yes allows the created list to be displayed in the Quick Launch menu, containing a link to the list.
To add success mapping, click on On success mapping and click on the Add mapping button. See On Success Mapping for more details.
For On error mapping and click on the Add mapping button. See On Error Mapping for more details.
you simply need to select the field within the form which will store the error message
When you are finished editing the dialog box, click on OK or click on Close at any time to exit the dialog box.
On Success Mapping
Success mapping is a concept of populating your form fields with data that is retrieved from a datasource using a data connector, to learn more about data connectors go to Data connectors. This retrieved data from the datasource is known as a response. Using this response data, you can populate a field within your form, for example you can retrieve a file which is stored in your SharePoint or Dropbox datasource and populate the retrieved file into a File field. This will give you the ability to access the retrieved file in your process.
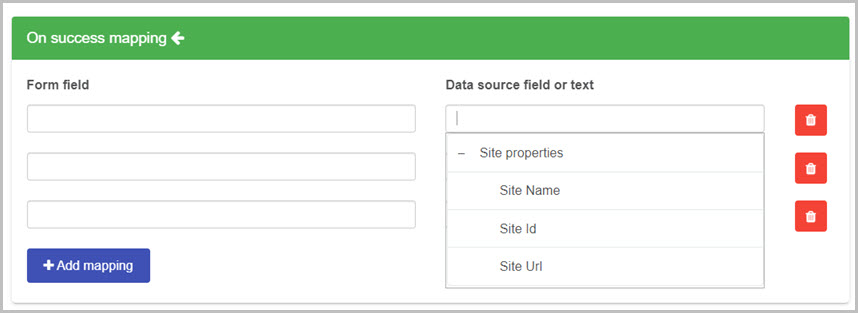
All data connectors within Kianda may have different response data that can be used to populate fields in a form. You can use the Success mapping in the rules mentioned in the When to use section. Take one of the SharePoint rules Create a site as an example. When all information is filled out in the rule, in the On success mapping section you can assess the data object (response) called Site properties. From the Site properties data object you can access three different pieces of data; Site Name, Site Id and Site URL. You can map (populate) those piece of data into fields in your form by selecting a field in the Form field section:
Form field - this field allows you to select a field in your form to store the value from the datasource.
Data source field or text - this field allows you to select which piece of data your want to retrieve from the datasource, and store it in a form field.
Add mapping - Click on the Add mapping to add more fields for mapping results from the datasource to form fields.
Bin/Trash - Click on the Bin/Trash button to delete a mapping.
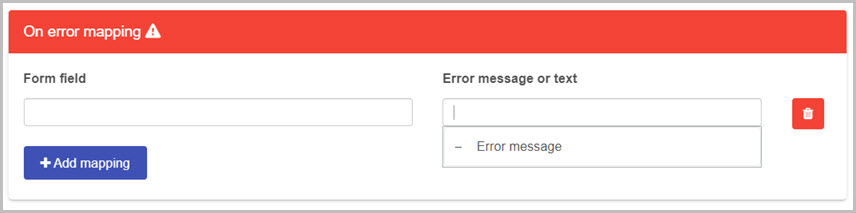
On Error Mapping
Error mapping is a concept of populating a form field in your Kianda process when using the rules from the When to use section. When using those rules, you get presented with the ability to map an error when there is an issue as the rule is executing, for example incorrectly filling out a parameter. It is useful to know the details of the error message that comes from the datasource your are connecting with. To see the error message, you need to create a separate Text box field in your form and map the error to that field. Open the On error mapping section and add a mapping by clicking on Add mapping button:
In the Form field, select a form field which will store the error message in your Kianda form.
In the Error message or text field, enter an error message that you want to appear in the event of errors or click on the text box and select the Error message option to use a system generated error indicating what has gone wrong when the rule executed.
Click on the Add mapping button to add further mappings.
Click on the Bin/Trash button to delete a mapping.
What’s next
To find out more about rule implementation, go to the main Rules page and then click on the links to the different rule categories.

 used to add expressions to rules so that dynamic values can be returned based on calculations or form IDs, see Expressions for more details.
 button next to the rule name.
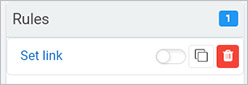


 is found within all rules as well as
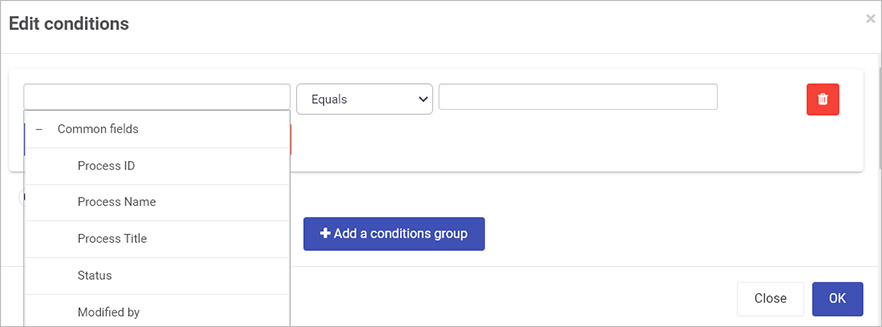


 found in Edit rule dialog boxes and other menu items, such as enabling quick actions for processes and number fields.
 to create conditions for the rule, see
 - Click on the Bin/Trash button