This is the multi-page printable view of this section.
Click here to print.
Return to the regular view of this page.
SharePoint rules
SharePoint rules is a category of rules within Kianda that are associated with SharePoint specific functionality. These rules are using SharePoint Application Programming Interface (API) to perform Create, Read, Update and Delete (CRUD) operations within your SharePoint connector. The SharePoint rules are designed to manage your SharePoint connector instead of populating it with data. With these rules you can create a site, a list or a group on your SharePoint connector along with adding users to groups, removing them from groups or changing user or group permissions.
Take an example of a Find a user rule. Implementing this rule will result in acquiring a Username or User Id of a particular user which is part of your SharePoint users group. When using SharePoint rules that are managing users, the Find a user rule is very useful as rules such as Add user to a group or remove user from a group require a User Id that can be retrieved from the Find a user rule.
Before getting started
In advance of using the SharePoint rules you must have created a SharePoint data connector and establish a connection with your SharePoint site. The data connector is used as part of the SharePoint rules to perform CRUD operations on a site you established a connection with. To learn more about the SharePoint data connector go to SharePoint connector.
Getting started with SharePoint rules
If you go to Administration > Designer and click on a process or create a new process, then click on Add a rule, the SharePoint rules are found in the left-hand pane when you click on SharePoint.

There are 10 SharePoint rules as follows:
- Create a list - creates a new list in a SharePoint site.
- Create a site - creates a new site on SharePoint, enabling the use of a site template.
- Create a group - creates a new group on SharePoint
- Find a user - finds or searches for a user within SharePoint
- Add a user to a group - adds a SharePoint user to a SharePoint group. It is important to note the difference between SharePoint users and Kianda users. SharePoint users are users of the SharePoint system. Kianda users are users of the Kianda system.
- Remove a user from a group - removes a SharePoint user from a SharePoint group
- Reset an item permissions - changes the SharePoint permissions for a given list, document or folder.
- Check in / out an item - checks in or out a file in SharePoint
- Get attachments - reads the attachments from a SharePoint list
- Create anonymous link - creates anonymous links for a SharePoint held file
What’s next 
We have briefly introduced each of the ten types of SharePoint rules. Click on the links below to find out more about each rule in detail.
1 - Add a user to a group
This rule allows you to add a user into a SharePoint group using Kianda.
When to use
This rule should be used when a user within Kianda should be added to SharePoint Group, for example, a new hire being added to a team group during their onboarding phase.
You can add this rule:
Before you get started
In advance of using the Add a user to a group rule, you need to have created one or more forms. In the forms you must have created two separate fields which are needed for:
- Field which represents the title of the group you are adding the user to. This field can for example be a Text box field. To learn more about how to create a text box field go to Text box control.
- Field which represents the Username or User Id of the user you want to add to the group, this can also be a text box field.
How to use
To apply this rule, first choose an item to attach the rule to and have a SharePoint data source ready where you want the user to be located. This data source should be a predefined data connector created with Data sources under Administration.
-
Select the field or other item to attach the rule to.
-
Click on Add a rule > SharePoint > Add a user to a group.
-
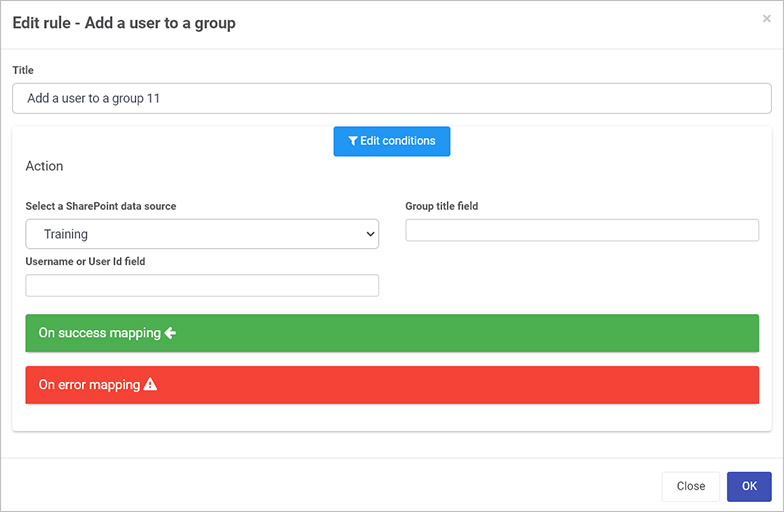
In the Edit rule - Add a user to a group dialog box, give the rule a Title. Then select a SharePoint data source from the drop-down list.
-
Two new fields will appear:
For Group title field, select the field where the group title is stored for example, a list field.
For Username or User Id, select the field where the Username or User id is stored.
-
Once these fields are set you can also set conditions for the rule, see Conditions for more information.
-
The final two sections are optional: On success mapping and Error mapping. See Success and Error Mapping for more information.
-
Click on OK when complete.
User tips 
To use this rule, you must have a user predefined in Kianda and in SharePoint. The group must also be predefined in SharePoint. This rule gives the advantage of allowing multiple users to move to SharePoint groups which could be useful for example during restructuring in an organisation, where existing users need to move to other departments/groups.
If you have multiple rules attached to the field or other item, you may wish to reorder the rules to change the order of rule execution. Go to Multiple rules to find out more.
What’s next
Now that you’ve learned about Add a user to a group, return to the SharePoint rules page to find out about other SharePoint rules.
2 - Check in or out an item
This rule allows you to check in or check out an item within SharePoint using Kianda.
When to use
This rule should be used when a user within Kianda wanted to check in or check out an item from SharePoint
You can add this rule:
Before you get started
In advance of using the Check in or out an item rule, you need to have created one or more forms within your process. When using the check in or out function of the rule, you are required to have a field within your process that specifies an Id of an item you want to check in or out. For example the Item Id field can be a Text box field. When using the Check in functionality of the rule, you are required to create a field which is used to store a comment for the check in, the field type of the comment can also be a text box.
How to use
To apply this rule, first choose an item to attach the rule to and have a SharePoint data source ready where you want to check in or out an item. This data source should be a predefined data connector created with Data sources under Administration.
-
Select the field or other item to attach the rule to.
-
Click on Add a rule > SharePoint > Check in/out an item.
-
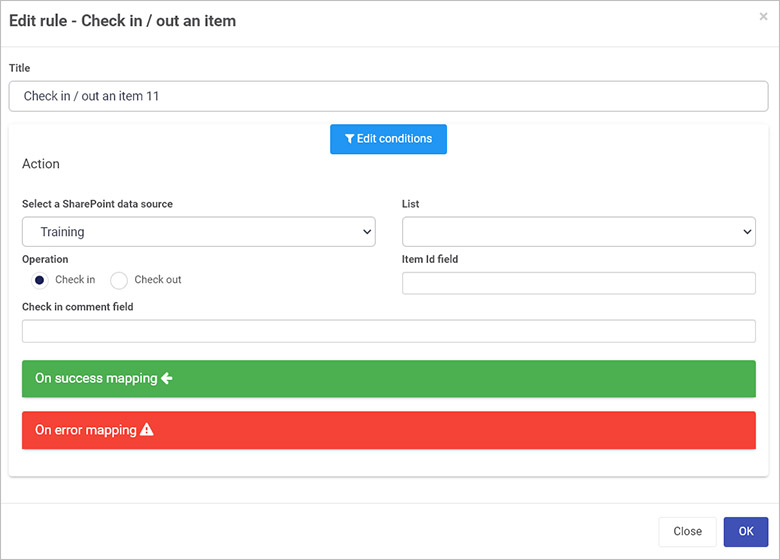
In the Edit rule - Check in/out an item dialog box, give the rule a Title. Then select a SharePoint data source from the drop-down list.
-
Three options are presented:
- List - select the list where the item is present which is needed to be checked in/out.
- Operation - choose from Check in or Check out. If you choose Check in, then select also a field from a Kianda form which will serve as a Check in comment field.
- Item Id field - this will be used to determine which item is being checked in/out. Select the appropriate field from a Kianda form.
-
Once these fields are set you can also set conditions for the rule, see Conditions for more information.
-
The final two sections are optional: On success mapping and Error mapping. See Success and Error Mapping for more information.
-
Click on OK when complete.
User tip
If you have multiple rules attached to the field or other item, you may wish to reorder the rules to change the order of rule execution. Go to Multiple rules to find out more.
What’s next
Now that you’ve learned about Check in/out an item, return to the SharePoint rules page to find out about other SharePoint rules.
3 - Create a group
This rule allows you to create a SharePoint group from within Kianda.
When to use
This rule should be used when you want to create a new SharePoint group from within your Kianda process for example as part of a new project you want to create a group in SharePoint to provide permissions to specific users.
You can add this rule:
Before you get started
In advance of using the Create a group rule, you need to have created one or more forms. In the forms you must have created two separate fields which are needed for:
- Field which will represent the title of the group, for example a Text box field. To learn more about how to create a text box field go to Text box control.
- Field which will represent the description of the group, this can also be a text box field.
How to use
To apply this rule, first choose an item to attach the rule to and have a SharePoint data source ready where you want the group to be located. This data source should be a predefined data connector created with Data sources under Administration.
-
Select the field or other item to attach the rule to.
-
Click on Add a rule > SharePoint > Create a group.
-
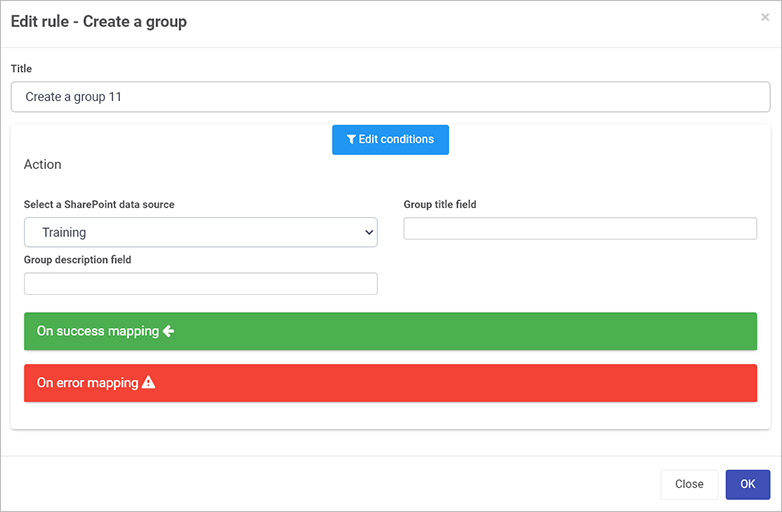
In the Edit rule - Create a group dialog box, give the rule a Title. Then select a SharePoint data source from the drop-down list.
-
Two new fields will appear to allow you to confirm group details:
For Group title field, select the field where the group title is stored for example, a list field.
For Group Description field, create a description for the group.
-
Once these fields are set you can also set conditions for the rule, see Conditions for more information.
-
The final two sections are optional: On success mapping and Error mapping. See Success and Error Mapping for more information.
-
Click on OK when complete.
User tip
If you have multiple rules attached to the field or other item, you may wish to reorder the rules to change the order of rule execution. Go to Multiple rules to find out more.
What’s next
Now that you’ve learned about Create a group, return to the SharePoint rules page to find out about other SharePoint rules.
4 - Create a list
This rule allows you to create a SharePoint List from within Kianda.
When to use
This rule should be used when within your Kianda process you wish to create a new SharePoint list, for example as part of a new project you want to create a list in SharePoint to store information pertaining to that project such as invoice numbers.
You can add this rule:
Before you get started
In advance of using the Create a list rule, you need to have created one or more forms within your process and within the process you need to create three separate fields which will be used when setting up the rule:
-
A field which will represent the Name of the list, for example a text box field. To learn more about a text box field, go to Text box control.
-
A field which will represent the Description of the newly created list. This field can also be a text box field.
-
A field which will be used when creating the URL for the list. You can also use a text box field.
How to use
To apply this rule, first choose an item to attach the rule to and have a SharePoint data source ready where you want the list to be located. This data source should be a predefined data connector created with Data sources under Administration.
-
Select a field or other item to attach the rule to.
-
Click on Add a rule > SharePoint > Create a list.
-
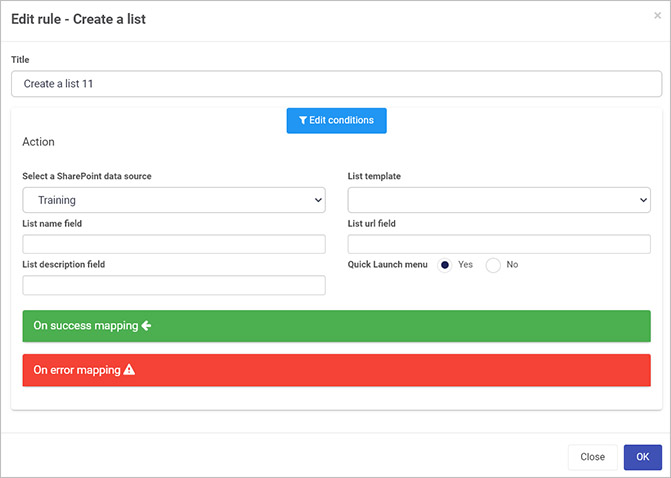
In the Edit rule - Create a list dialog box, give the rule a Title. Then select a SharePoint data source from the drop-down list.
-
You will be presented with five options within the dialog box:
- List template allows you to select an existing SharePoint list within the SharePoint data source to emulate the formatting and design of the list.
- List name field allows you to create a name for the list. This field, List url field and List description field are all populated from a Kianda form. Choose a field from a Kianda form.
- List url field will be used in the creation of the URL within SharePoint. Choose a field from a Kianda form.
- List description field will be used for the SharePoint list description. Choose a field from a Kianda form.
- Quick Launch menu - options are Yes or No.
-
Once these fields are set you can also set conditions for the rule, see Conditions for more information.
-
The final two sections are optional: On success mapping and Error mapping. See Success and Error Mapping for more information.
-
Click on OK when complete.
User tip
If you have multiple rules attached to the field or other item, you may wish to reorder the rules to change the order of rule execution. Go to Multiple rules to find out more.
What’s next
Now that you’ve learned about Create a list, return to the SharePoint rules page to find out about other SharePoint rules.
5 - Create a site
This rule allows you to create a SharePoint site from within Kianda.
When to use
This rule should be used when within your Kianda process you wish to create a new SharePoint site, for example, as part of a new project you want to create a site in SharePoint to store information pertaining to that project, to include all lists and other documentation that you need.
You can add this rule:
Before you get stared
In advance of using the Create a site rule, you need to have created one or more forms within your process and within the process you need to create three separate fields. Those fields that you create will be used when filling out the rule details:
-
A field which will represent the Name of the site, for example a text box field. To learn more about a text box field, go to Text box control.
-
A field which will represent the Description of the newly created site, for example a text box field.
-
A field which will be used when creating the URL for the site, for example a text box field.
How to use
To apply this rule, first choose an item to attach the rule to and have a SharePoint data source ready where you want the site to be located. This data source should be a predefined data connector created with Data sources under Administration.
-
Select a field or other item to attach the rule to.
-
Click on Add a rule > SharePoint > Create a site.
-
In the Edit rule - Create a site dialog box, give the rule a Title. Then select a SharePoint data source from the drop-down list.

-
You will be presented with five options within the dialog box:
- Site template allows you to select an existing SharePoint site within the SharePoint data source to emulate the formatting and design of the site.
- Site title field will be used to create the name of the site. Site title field, site URL, and site description field are all derived from the Kianda form. Choose a field from a Kianda form.
- Site url field will be used in the creation of the URL within SharePoint. Choose a field from a Kianda form.
- Site description field will be used for the SharePoint site description. Choose a field from a Kianda form.
- Inherit parent permissions - options are: Yes and No. If you choose ‘Yes’ it will allow your new site to inherit parent permissions for that SharePoint location.
-
Once these fields are set you can also set conditions for the rule, see Conditions for more information.
-
The final two sections are optional: On success mapping and Error mapping. See Success and Error Mapping for more information.
-
Click on OK when complete.
User tip
If you have multiple rules attached to the field or other item, you may wish to reorder the rules to change the order of rule execution. Go to Multiple rules to find out more.
What’s next
Now that you’ve learned about Create a site, return to the SharePoint rules page to find out about other SharePoint rules.
6 - Create an anonymous link
This rule allows you to create an anonymous link for a file within SharePoint from a Kianda form. This can be useful for example to share with contractors who don’t need to be set up as SharePoint users, but may need access to a file in SharePoint.
When to use
This rule should be used when a file within SharePoint should be shared with an individual via an anonymous link.
You can add this rule:
Before you get started
In advance of using the Create anonymous link, in your process you need to have created at least one or more forms. The create anonymous link rule also requires two control fields. A file control in order to store a file which you want to share and a text box control for storing the generated link. You can also create another text box or a number field to store the link duration, this field is optional but can be a good idea if you want to customise the duration of the link dynamically.
- File field - used to store the file which you want to create a link to. To learn how to create a file field go to File upload control.
- Text box field - used to store the generated anonymous link which can be shared with other users. To learn how to create a text box field go to Text box control.
- Text box or Number field (optional) - allows you to determine the duration of the link in hours. To learn how to create a number field go to Number control.
How to use
To apply this rule, first choose an item to attach the rule to, for example a file field within a form in Kianda.
-
Select a file field.
-
Click on Add a rule > SharePoint > Create anonymous link.
-
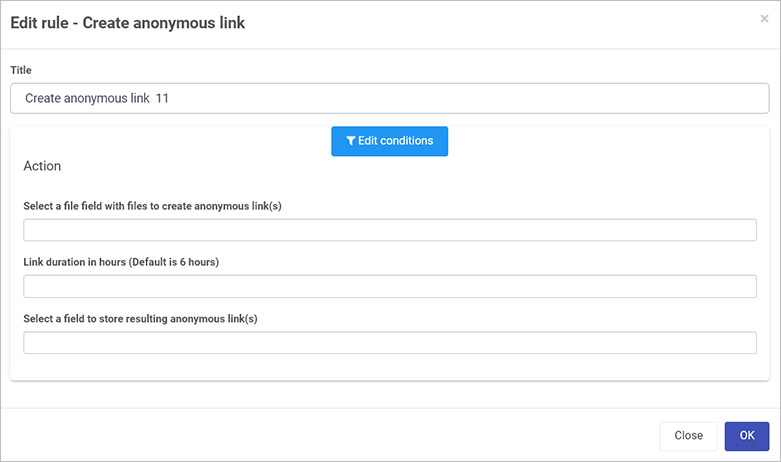
In the Edit rule - Create anonymous link dialog box, give the rule a Title.
-
Under Select a file field with files to create anonymous link(s) select the file field to link to the desired SharePoint file(s).
-
Under Link duration in hours type in a number value. By default the link duration is 6 hours, but this can be increased or decreased as needed.
-
Under Select a field to store resulting anonymous link(s) choose a field within Kianda to store this anonymous link, which can then be used to access the file. For example you could create a utility panel with a textbox for the anonymous link, where the panel and the textbox are not visible to users. This textbox is simply used to hold the system generated link.
-
Once these fields are set you can also set conditions for the rule, see Conditions for more information.
-
The final two sections are optional: On success mapping and Error mapping. See Success and Error Mapping for more information.
-
Click on OK when complete.
User tip
If you have multiple rules attached to the field or other item, you may wish to reorder the rules to change the order of rule execution. Go to Multiple rules to find out more.
What’s next
Now that you’ve learned about Create anonymous link, return to the SharePoint rules page to find out about other SharePoint rules.
7 - Find a user
This rule allows you to find a user from a data source using a Kianda process.
When to use
Use this rule to pull user data into a Kianda form for example when someone wants to add employee information to a form using SharePoint details.
You can add this rule:
Before you get started
In advance of using the Find a user rule, you need to have created at least one or more forms within your process. The find a user rule also requires you to create a field which is used as the search term for the user. You can retrieve two pieces of data from a user that you are looking for, a Username and a User Id. You can store the retrieved data in a field within your form, for example in a Text box field.
How to use
To apply this rule, first choose an item to attach the rule to and have a SharePoint data source ready where you have your user located. This data source should be a predefined data connector created with Data sources under Administration.
-
Select a field or other item to attach the rule to.
-
Click on Add a rule > SharePoint > Find a user.
-
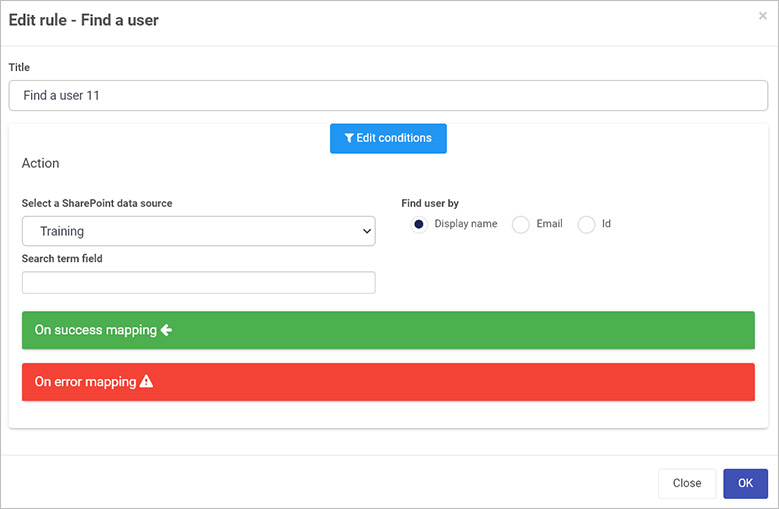
In the Edit rule - Find a user dialog box, give the rule a Title. Then select a SharePoint data source from the drop-down list.
-
You will be presented with two options within the dialog box:
-
Find user by provides the search criteria to find the user that is, display name, email, or ID. These are all SharePoint parameters.
-
Search term field is used to select the Kianda form field which will be used to lookup the user details from the data source.
-
Once these fields are set you can also set conditions for the rule, see Conditions for more information.
-
On success mapping is used to retrieve data from the user we are searching for. The two pieces of data you can retrieve is a Username and User Id. Go to On success mapping to learn how to retrieve data and populate it in a form field.
-
The final section is optional: Error mapping. See On error Mapping for more information.
-
Click on OK when complete.
User tip
If you have multiple rules attached to the field or other item, you may wish to reorder the rules to change the order of rule execution. Go to Multiple rules to find out more.
What’s next
Now that you’ve learned about Find a user, return to the SharePoint rules page to find out about other SharePoint rules.
8 - Get List item attachments
This rule allows you to retrieve an attachment from a SharePoint list for use in a Kianda process.
When to use
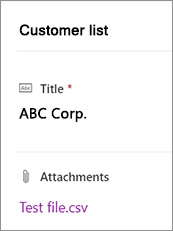
This rule should be used when an attachment needs to be extracted from SharePoint and displayed within a Kianda process, for example a SharePoint list with attachment as seen in the image below.
You can add this rule:
Before you get stared
In advance of using the Get attachments rule, in your process you need to have created at least one or more forms. The get attachments rule also requires one file field which is used to store the attachment that you want to retrieve from your SharePoint. To learn more about file field in Kianda, go to File upload control.
How to use
To apply this rule, first choose an item to attach the rule to and have a SharePoint data source ready where you have your attachments from a list located. This data source should be a predefined data connector created with Data sources under Administration.
- Select the field or other item to attach the rule to.
- Click on Add a rule > SharePoint > Get attachments.
- In the Edit rule - Get attachments dialog box, give the rule a Title.

- If you want to add conditions for the rule, click on the Edit conditions button
 . You create a condition for a rule if you want it to be triggered when a condition is true or false, see Conditions for more details.
 - Under the Action section fill out the following:
- Select data source - this button when pressed is used to select a SharePoint datasource that you want to use when retrieving an attachment.
- Data source filter - this is used to filter data within your datasource. It works on condition bases which allows you to pull wanted and unwanted data back into the process. To learn more about conditions go to Conditions.
- Select a destination file input - this drop-down field is used to select a file field from your process. The selected file field will store the attachment retrieved from the datasource.
- When you are finished editing the dialog box, click on OK or click on Close at any time to exit the dialog box.
This rule can then be run for example on a button which is manually triggered by a user, or automatically on load of the process. From here the file can be utilised to populate data fields, tables and so on. Go to the Rules page to navigate to other rules.
User tip
If you have multiple rules attached to the field or other item, you may wish to reorder the rules to change the order of rule execution. Go to Multiple rules to find out more.
What’s next
Now that you’ve learned about Get attachments, return to the SharePoint rules page to find out about other SharePoint rules.
9 - Remove a user from a group
This rule allows you to remove a user from a SharePoint group using Kianda.
When to use
This rule should be used when a user within Kianda should be removed from a SharePoint Group, for example, an employee leaving a company and to ensure they are removed from team groups.
You can add this rule:
Before you get started
In advance of using the Remove a user from a group rule, you need to have created one or more forms in your process. In the forms you must have created two separate fields which are needed for:
- Field which will represent the title of the group you want to remove a user from, for example a Text box field. To learn more about how to create a text box field go to Text box control.
- Field which will represent the description of the group, this can also be a text box field.
How to use
To apply this rule, first choose an item to attach the rule to and have a SharePoint data source ready where you want the user to be removed from a group. This data source should be a predefined data connector created with Data sources under Administration.
-
Select the field or other item to attach the rule to.
-
Click on Add a rule > SharePoint > Remove a user from a group.
-
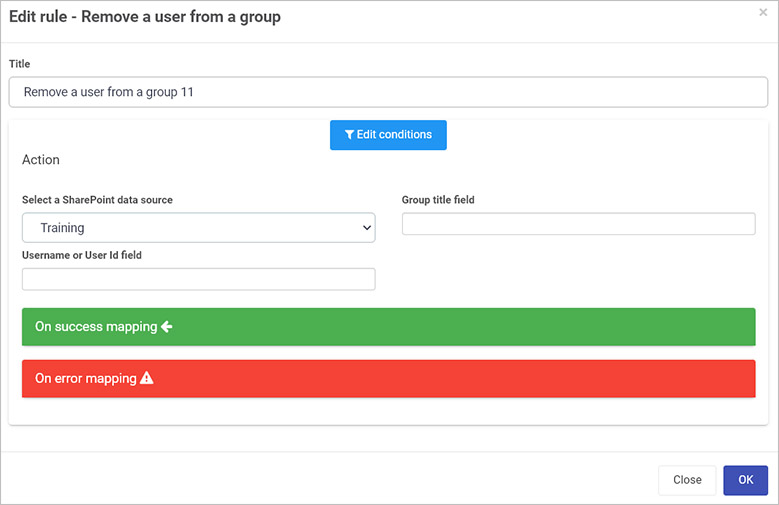
In the Edit rule - Remove a user from a group dialog box, give the rule a Title. Then select a SharePoint data source from the drop-down list.
-
Two new fields will appear: Username and Group name. These are used to confirm the user which is to be removed and the group they are to be removed from.
For Group title field, select the field where the group title is stored for example, a list field.
For Username or User Id, select the field where the Username or User id is stored.
-
Once these fields are set you can also set conditions for the rule, see Conditions for more information.
-
The final two sections are optional: On success mapping and Error mapping. See Success and Error Mapping for more information.
-
Click on OK when complete.
User tip
If you have multiple rules attached to the field or other item, you may wish to reorder the rules to change the order of rule execution. Go to Multiple rules to find out more.
What’s next
Now that you’ve learned about Remove a user from a group, return to the SharePoint rules page to find out about other SharePoint rules.
10 - Reset permissions
This rule allows you to reset permissions for a user/group within a SharePoint site/list/item using Kianda.
When to use
This rule should be used when you wish to alter permissions within Kianda to reflect within SharePoint.
You can add this rule:
How to use
To apply this rule, first choose an item to attach the rule to and have a SharePoint data source ready where you want the user/group permissions to be reset. This data source should be a predefined data connector created with Data sources under Administration.
-
Select the field to attach the rule to.
-
Click on Add a rule > SharePoint > Reset an item permissions.
-
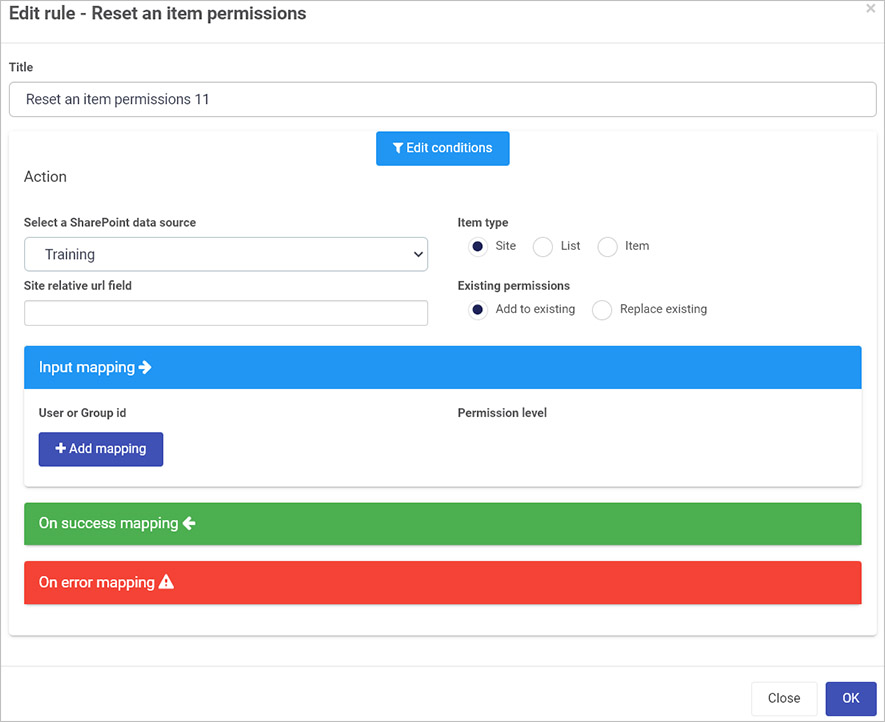
In the Edit rule - Reset an item permissions dialog box, give the rule a Title. Then select a SharePoint data source from the drop-down list.
-
You will be presented with three options:
- Item type is used to confirm what level the permissions are to be set, be it at a site level, list level or item level. Choose from the options:
- Site - When selecting the site option, a Site relative url field drop-down is presented which is used to select a field from your process. The field should contain the full URL path to the site that you want to reset permissions for.
- List - When selecting the list option, a List relative url field drop-down is presented which is used to select a field from your process. The field should contain the full URL path to the list that you want to reset permissions for.
- Item - When selecting the item option, an Item id field drop-down and List title field drop-down are presented. The item id field is used to specify which Kianda field contains the Id identifier for the item you want to change permissions for. The List title field is used to specify which Kianda field contains the title of the list that stores the item.
- Existing permissions allows you to either append or override the permissions of the user/group within SharePoint. Choose from the options: Add to existing or Replace existing. If it is set to Add to existing it will append the permissions and if it is set to Replace existing it will override the current permissions and only reflect the new permissions assigned via this rule.
-
Under Input mapping section, click on Add mapping. This setting is used to determine what level of permissions the user/group will be assigned.
For User or Group id, select the field where the user is stored. This could be either a User Picker field or a text field.
Select the Permission level from the drop-down list.
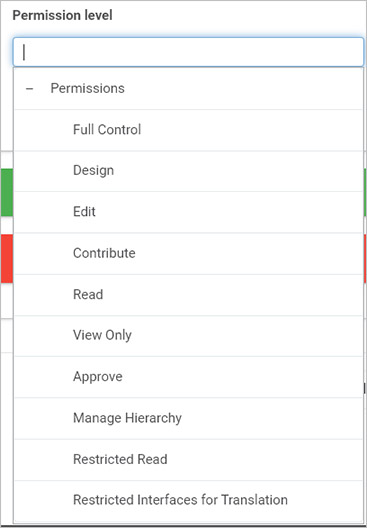
There are 10 permissions:
-
Full control - enables users to have full control of the website
-
Design - enables users to view, add, update, delete, approve, and customize items or pages in the website.
-
Edit - enables users to manage lists.
-
Contribute - enables users to manage personal views, edit items and user information, delete versions in existing lists and document libraries, and add, remove, and update personal Web Parts.
-
Read - enables users to view pages and list items, and to download documents.
-
View Only - enables users to view application pages. The View Only permission level is used for the Excel Services Viewers group.
-
Approve - enables users to edit and approve pages, list items, and documents. For publishing sites only.
-
Manage Hierarchy - enables users to create sites; edit pages, list items, and documents, and change site permissions. For Publishing sites only.
-
Restricted Read - enables users to view pages and documents. For publishing sites only.
-
Restricted Interfaces for Translation - enables users to view lists/libraries properties by remote interface (like REST API, Web Services).
For more on SharePoint permissions go to https://docs.microsoft.com/en-us/sharepoint/sites/user-permissions-and-permission-levels.
-
Once these fields are set you can also set conditions for the rule, see Conditions for more information.
-
The final two sections are optional: On success mapping and Error mapping. See Success and Error Mapping for more information.
-
Click on OK when complete.
User tip
If you have multiple rules attached to the field or other item, you may wish to reorder the rules to change the order of rule execution. Go to Multiple rules to find out more.
What’s next
Now that you’ve learned about Reset permissions, return to the SharePoint rules page to find out about other SharePoint rules.