Create a list
This rule allows you to create a SharePoint List from within Kianda.
When to use
This rule should be used when within your Kianda process you wish to create a new SharePoint list, for example as part of a new project you want to create a list in SharePoint to store information pertaining to that project such as invoice numbers.
You can add this rule:
- to a field
- to a form
- to a process (the rule will run on load)
Before you get started
In advance of using the Create a list rule, you need to have created one or more forms within your process and within the process you need to create three separate fields which will be used when setting up the rule:
-
A field which will represent the Name of the list, for example a text box field. To learn more about a text box field, go to Text box control.
-
A field which will represent the Description of the newly created list. This field can also be a text box field.
-
A field which will be used when creating the URL for the list. You can also use a text box field.
How to use
To apply this rule, first choose an item to attach the rule to and have a SharePoint data source ready where you want the list to be located. This data source should be a predefined data connector created with Data sources under Administration.
-
Select a field or other item to attach the rule to.
-
Click on Add a rule > SharePoint > Create a list.
-
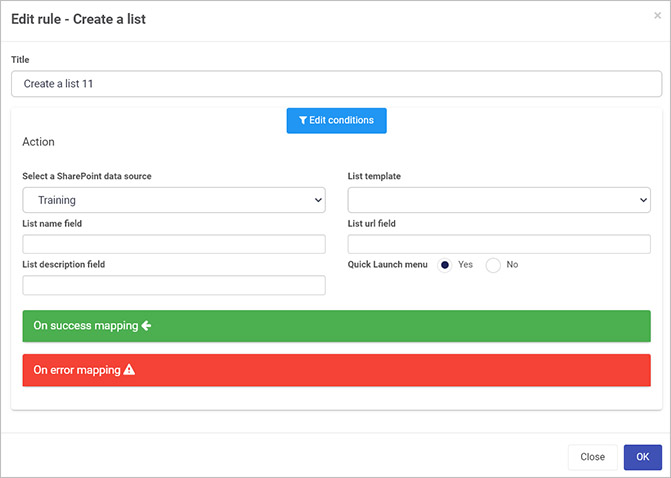
In the Edit rule - Create a list dialog box, give the rule a Title. Then select a SharePoint data source from the drop-down list.
-
You will be presented with five options within the dialog box:
- List template allows you to select an existing SharePoint list within the SharePoint data source to emulate the formatting and design of the list.
- List name field allows you to create a name for the list. This field, List url field and List description field are all populated from a Kianda form. Choose a field from a Kianda form.
- List url field will be used in the creation of the URL within SharePoint. Choose a field from a Kianda form.
- List description field will be used for the SharePoint list description. Choose a field from a Kianda form.
- Quick Launch menu - options are Yes or No.
-
Once these fields are set you can also set conditions for the rule, see Conditions for more information.
-
The final two sections are optional: On success mapping and Error mapping. See Success and Error Mapping for more information.
-
Click on OK when complete.
User tip 
If you have multiple rules attached to the field or other item, you may wish to reorder the rules to change the order of rule execution. Go to Multiple rules to find out more.
What’s next 
Now that you’ve learned about Create a list, return to the SharePoint rules page to find out about other SharePoint rules.
Feedback
Was this page helpful?
Glad to hear it! Please tell us how we can improve.
Sorry to hear that. Please tell us how we can improve.