Reset permissions
This rule allows you to reset permissions for a user/group within a SharePoint site/list/item using Kianda.
When to use
This rule should be used when you wish to alter permissions within Kianda to reflect within SharePoint.
You can add this rule:
-
to a field
-
to a form
-
to a process (the rule will run on load)
How to use
To apply this rule, first choose an item to attach the rule to and have a SharePoint data source ready where you want the user/group permissions to be reset. This data source should be a predefined data connector created with Data sources under Administration.
-
Select the field to attach the rule to.
-
Click on Add a rule > SharePoint > Reset an item permissions.
-
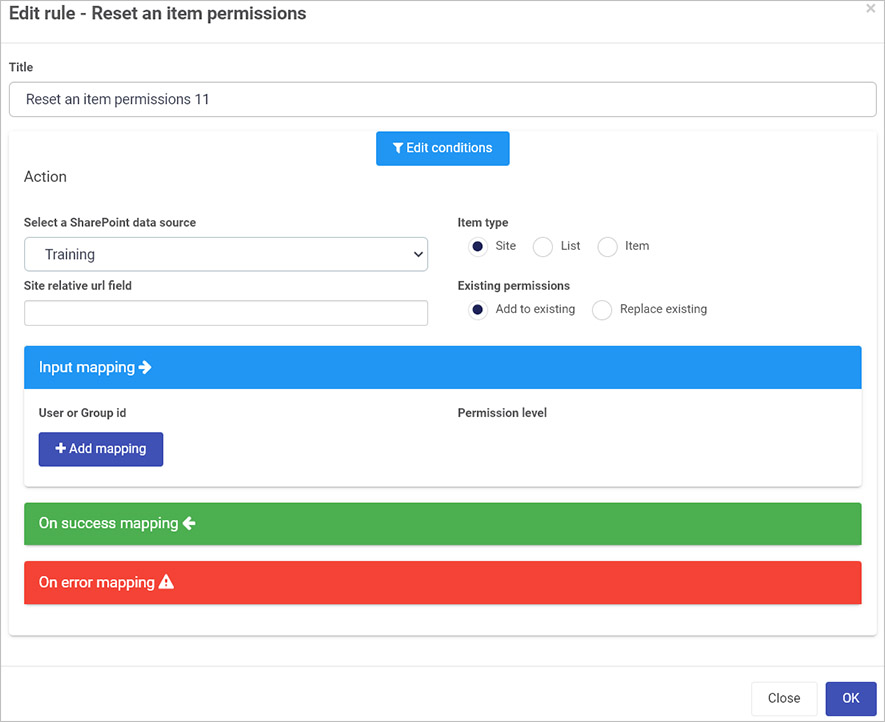
In the Edit rule - Reset an item permissions dialog box, give the rule a Title. Then select a SharePoint data source from the drop-down list.
-
You will be presented with three options:
- Item type is used to confirm what level the permissions are to be set, be it at a site level, list level or item level. Choose from the options:
- Site - When selecting the site option, a Site relative url field drop-down is presented which is used to select a field from your process. The field should contain the full URL path to the site that you want to reset permissions for.
- List - When selecting the list option, a List relative url field drop-down is presented which is used to select a field from your process. The field should contain the full URL path to the list that you want to reset permissions for.
- Item - When selecting the item option, an Item id field drop-down and List title field drop-down are presented. The item id field is used to specify which Kianda field contains the Id identifier for the item you want to change permissions for. The List title field is used to specify which Kianda field contains the title of the list that stores the item.
- Existing permissions allows you to either append or override the permissions of the user/group within SharePoint. Choose from the options: Add to existing or Replace existing. If it is set to Add to existing it will append the permissions and if it is set to Replace existing it will override the current permissions and only reflect the new permissions assigned via this rule.
- Item type is used to confirm what level the permissions are to be set, be it at a site level, list level or item level. Choose from the options:
-
Under Input mapping section, click on Add mapping. This setting is used to determine what level of permissions the user/group will be assigned. For User or Group id, select the field where the user is stored. This could be either a User Picker field or a text field. Select the Permission level from the drop-down list.
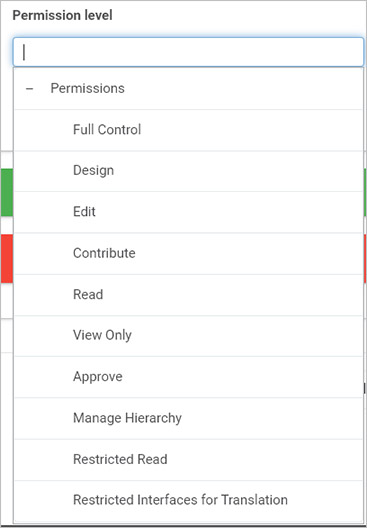
There are 10 permissions:
-
Full control - enables users to have full control of the website
-
Design - enables users to view, add, update, delete, approve, and customize items or pages in the website.
-
Edit - enables users to manage lists.
-
Contribute - enables users to manage personal views, edit items and user information, delete versions in existing lists and document libraries, and add, remove, and update personal Web Parts.
-
Read - enables users to view pages and list items, and to download documents.
-
View Only - enables users to view application pages. The View Only permission level is used for the Excel Services Viewers group.
-
Approve - enables users to edit and approve pages, list items, and documents. For publishing sites only.
-
Manage Hierarchy - enables users to create sites; edit pages, list items, and documents, and change site permissions. For Publishing sites only.
-
Restricted Read - enables users to view pages and documents. For publishing sites only.
-
Restricted Interfaces for Translation - enables users to view lists/libraries properties by remote interface (like REST API, Web Services).
For more on SharePoint permissions go to https://docs.microsoft.com/en-us/sharepoint/sites/user-permissions-and-permission-levels.
-
-
Once these fields are set you can also set conditions for the rule, see Conditions for more information.
-
The final two sections are optional: On success mapping and Error mapping. See Success and Error Mapping for more information.
-
Click on OK when complete.
User tip 
If you have multiple rules attached to the field or other item, you may wish to reorder the rules to change the order of rule execution. Go to Multiple rules to find out more.
What’s next 
Now that you’ve learned about Reset permissions, return to the SharePoint rules page to find out about other SharePoint rules.
Feedback
Was this page helpful?
Glad to hear it! Please tell us how we can improve.
Sorry to hear that. Please tell us how we can improve.