Import CSV or Excel into Table
Introduction
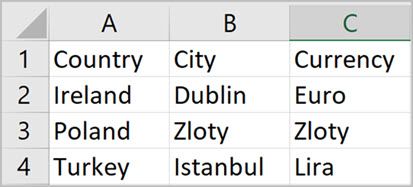
The Import CSV rule allows you import a Comma-Separated Values (CSV) file and populate a specified table within your process. Using this rule automates and speeds up the process of populating a table when a lot of data is present. CSV files may look different depending on what program you will open it with, here is an example of a CSV file opened with Excel:
Here is the same file opened using Notepad:
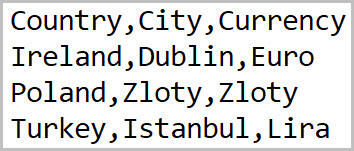
As shown in the two images above, the format changes depending on what program you open the file with. Using the Notepad, each column is separated with a comma and each new line is a row. Excel formats commas and new lines automatically and creates numbers for rows and letters for columns. The CSV file can be separated using different separators other than comma. For example you can use ; as a separator, keep in mind that Excel does not format non-comma separated values correctly and the file will look as follows when opened using Excel:
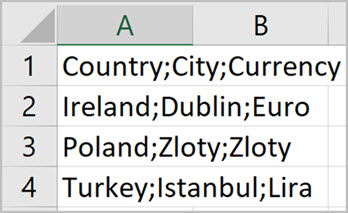
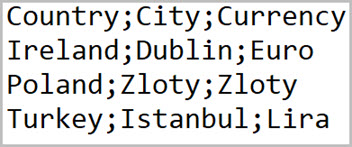
Here is the same file opened using Notepad:
When to use
You can use this rule to populate a table when there is a lot of data present in a CSV file. Apply this rule to a process so that your table is populated automatically when a process has been loaded.
You can add this rule:
- to a field
- to a form
- to a process (the rule will run on load)
Before you get started
For this rule to work there are a couple of prerequisites needed inside of your process:
- Table - needed to let the rule know which table will be populated using the csv file, for more detail on how to add a table go to Table control.
- File - needed as a container to hold your csv file. Using a file control, you can upload a csv file and use that csv file to populate a table. For more detail on how to add a file go to File upload control.
Keep in mind that in order to populate a table within your process correctly, you need to have the same amount of columns in the table as inside of the CSV file. For example a table looking as follows:

This indicates that the CSV file that we want to import should have three columns:
How to get started
-
Click on an existing process by going to Administration > Designer and decide which form, or field you will apply the rule to, by clicking on that item so that it is in edit mode so you can see the Edit/pen button, Pen button
 .
. -
Click on Add a rule > Table > Import CSV.
-
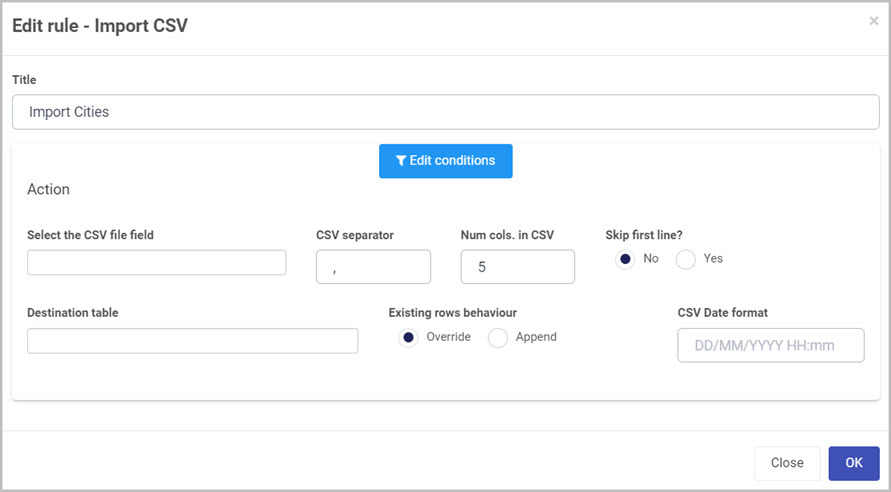
In the Edit rule - Import CSV dialog box, give the rule a title in the Title field.
-
If you want to add conditions for the rule, click on the Edit conditions button
 see Conditions for more details.
 -
Under the Action section fill out the following:
-
Select the CSV file field - select a file field containing a csv file. This file field needs to be pre-created as it is a required field when using this rule. the csv file attached to this field will be used to populate the table.
-
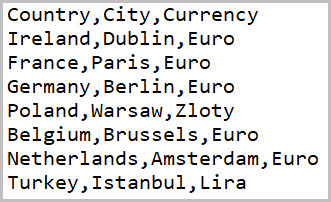
CSV separator - the default separator is a comma ( , ) but you can set it to any character, number or symbol you want. Keep in mind that the separator fields separates each column of a row. For example you can have a file that looks as follows:
This image represents how a table looks like applying the Import CSV rule with a sample file and when the CSV separator is set to a comma ( , ) see below:

-
Num cols. in CSV - this field represents the number of columns in your CSV file. From the example and image above, this field is set to three.
-
Skip first line - radio button asking whether to skip the first line or add the first line of the CSV file. If the first line of your CSV file represents the title of the column, you can select Yes and the line will not be included in your table.
-
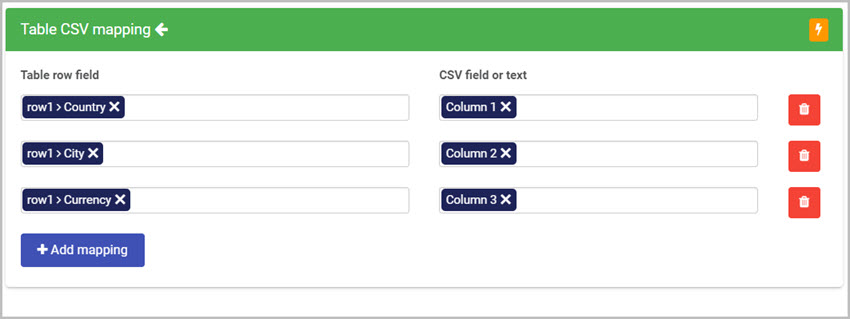
Destination table - field that allows you to select the table you want to target when populating data from the CSV file. New mapping options are presented when selecting a table.

-
Table row field - select the row you want to target when setting a value.
-
CSV field or text - you can select a field/column within your CSV file or type in text manually to represent the value you want your field to contain.
-
Add mapping - you can choose to assign values to multiple fields in your row by clicking on Add mapping button. You can also remove fields by clicking on the Bin/Trash icon
 .
.Going back to the CSV separator example image, to achieve the correct mapping, we need to add three fields as shown below:
-
-
Existing rows behavior - you have two options when populating data into your selected table:
- Override - will override all existing rows of your table with the new data from your CSV file.
- Append - will ignore the existing rows inside of your table and simply append all the new rows from your CSV file to the end of the table.
-
CSV Date format - type in manually the data format that you have set in your CSV file. This applies to a column when it is of type Date. The formatting of the date specified in tis field must be the same as in your CSV file. For example when your date format in the CSV file is DD/MM/YYYY and CSV Date format option is set to YYYY/DD/MM, you can encounter date bugs in your table.
-
-
When you are finished editing the dialog box, click on OK or click on Close at any time to exit the dialog box.
Editing, deleting or duplicating rules
When you have clicked on an existing rule, and the rule is visible in the right-hand pane under Rules, there are a number of options available to you.
- To disable a rule click the slider across beside the rule name.
- To copy a rule, click on the Duplicate button
 beside the rule name.
 - To delete a rule, click on the Bin/Trash button .
- To view a rule, click on the rule name to open the Edit rule dialog box.
What’s next 
To find out more about other Table rules go to Table rules.
To find out more about other rules go to Rules.
Feedback
Was this page helpful?
Glad to hear it! Please tell us how we can improve.
Sorry to hear that. Please tell us how we can improve.