Loop table
Introduction
The Loop table rule allows you to loop through table rows within a table of choice from within your process. When selected the rule allows you to trigger fields or rules to perform a particular action within the specified table. For example if a button is added to the table with an associated action, you can then trigger that action while looping through the table.
For example in the table below, there is a Calculate total button in a Calculate total column. This button has a rule that will set a value in the field in the Total column. Using the Loop table rule every row is looped through and this Calculate total button rule is triggered, completing the fields for each row in the Total column.
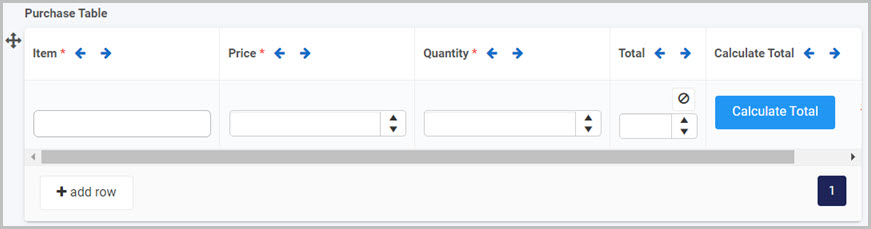
If the Loop table rule isn’t used, the user has to manually click on the Calculate Total button for each row, to populate the field in the Total column.
When to use
This rule is often used when the same action must be performed for multiple rows within a table.
You can add this rule:
- to a field
- to a form
- to a process (the rule will run on load)
Before you get started
To demonstrate this rule, we will loop through a simple Purchase table described in the introduction above, in which we will calculate the total price spent on each item bought. To learn more on how to add a table into your form go to In the table we will have the following columns:
-
Item - text box field representing the name of the item bought. To learn how to add a text box field go to Text box control.
-
Price - number field representing the price of the item. To learn how to add a number field go to Number control.
-
Quantity - number field representing the quantity of the item.
-
Total - number field representing the total quantity spent on the item.
-
Calculate total - a button with a Set form field rule attached. To learn more on how to add and how to use the Set form field go to Set form field rule.
The goal in this example is to loop though the table and trigger the Calculate total button so that for each item purchased, the total can be calculated depending on its quantity.
How to get started
-
Click on an existing process by going to Administration > Designer and decide which form, or field you will apply the rule to, by clicking on that item so that it is in edit mode so you can see the Edit/pen button, Pen button
 .
. -
Click on Add a rule > Table > Loop table.
-
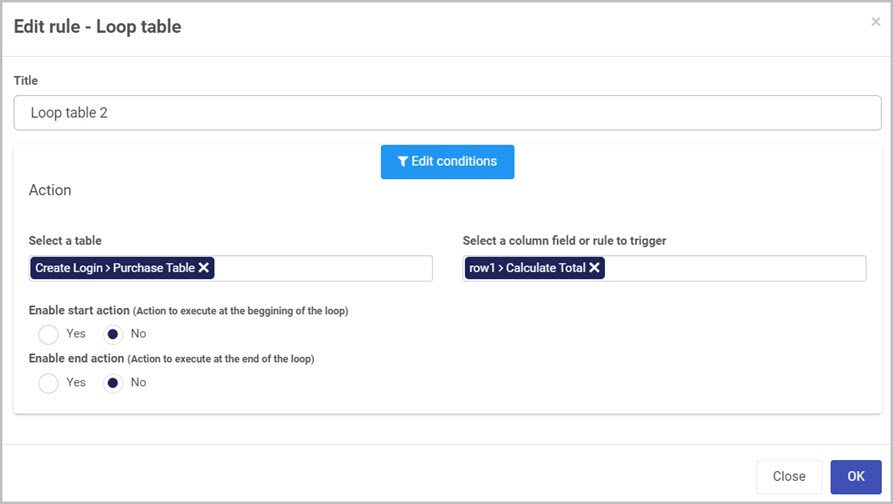
In the Edit rule - Loop table dialog box, give the rule a title in the Title field.
-
In the Select a table option, select the table you want to loop through.
-
In the Select a column field or rule to trigger option, select a field or rule you want to trigger when looping through the table. In this example, we will select the Calculate total button from the table column.
-
Enable start action gives you two options:
- Yes - allows you to select a field that will execute before the loop starts.
- No - means no changes are made, the loop will execute straight away.
-
Enable end action gives you two options:
- Yes - allows you to select a field that will execute after the loop finishes.
- No - means no changes are made, the loop will end without any action.
Editing, deleting or duplicating rules
When you have clicked on an existing rule, and the rule is visible in the right-hand pane under Rules, there are a number of options available to you.
- To disable a rule click the slider across beside the rule name.
- To copy a rule, click on the Duplicate button
 beside the rule name.
 - To delete a rule, click on the Bin/Trash button
 .
. - To view a rule, click on the rule name to open the Edit rule dialog box.
What’s next 
To find out more about other Table rules go to Table rules.
To find out more about other rules go to Rules.
Feedback
Was this page helpful?
Glad to hear it! Please tell us how we can improve.
Sorry to hear that. Please tell us how we can improve.