This is the multi-page printable view of this section.
Click here to print.
Return to the regular view of this page.
User rules
Introduction
User rules is one of the category of rules available in Kianda, that enables user-based operations associated with user properties, for example updating a user property, retrieving a user property and finding a user based on a property. The user rules also allow you to invite partners and share a particular process with them. These rules are very useful when you want to do any property actions on a user like find a user or update a property of a specific user.
Take an example of a Look up user by property rule. Implementing this rule will allow you to store a user in a User picker field by providing a property of a user, for example user role or email address. See image below when a location is being chosen, a trainer is found that is assigned to the location:

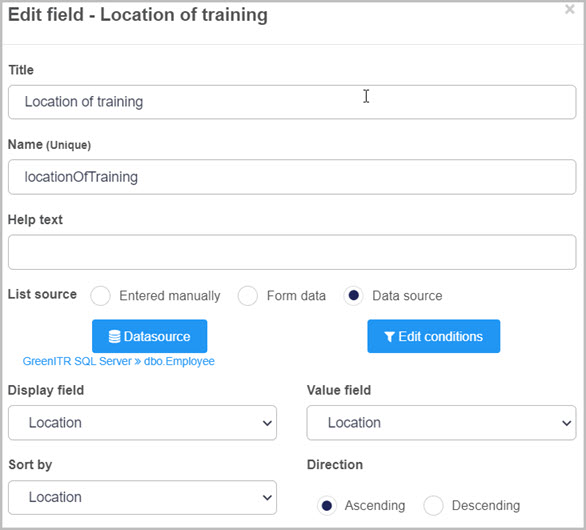
In this example the Location of training is a List control is connected to a SQL Server connector. The Display field, Value field and Sort by of the List control is set to Location. With the list control set up that way, we are provided with a list based on our Location column in the database. For more information on how to create a List control and set its datasource go to List control. See image below to see how the Location of training field is set up:
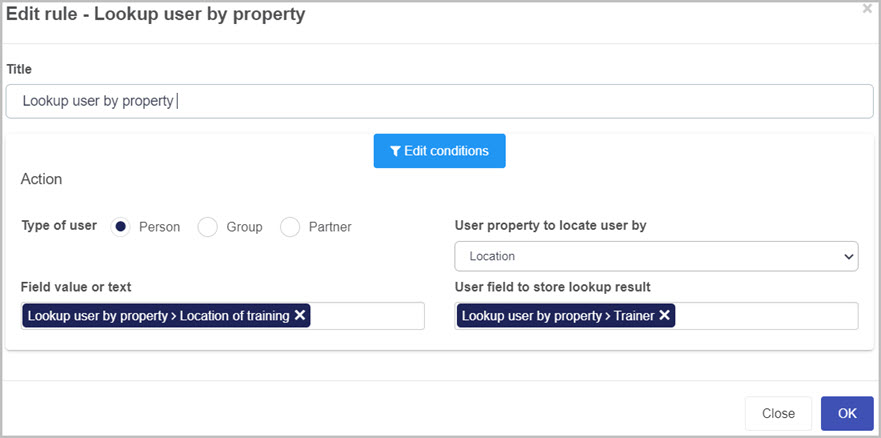
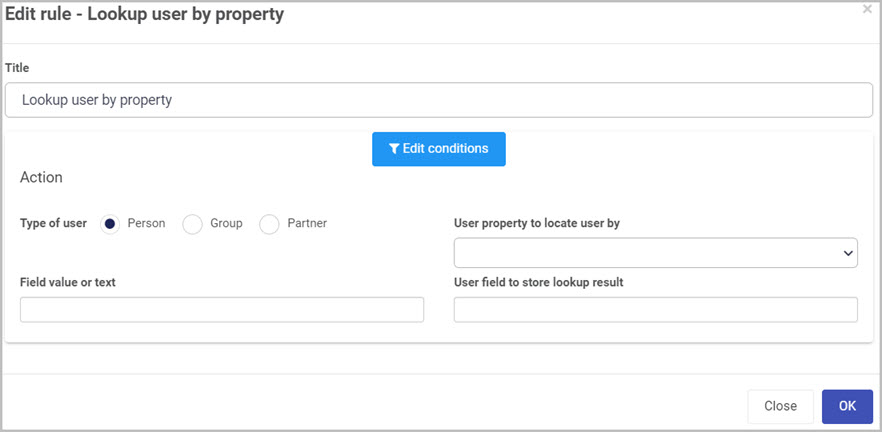
With all of our users, we have set up a Location property and each user is assigned a different locations based on where they operate and provide training. The lookup user by property is set to Location which we provide to the rule by selecting our Location of training field. The outcome of this combination will set our Trainer field with the user that the Location property matches the value specified in the Location of training field. To learn more about how to create your own user properties and attributes go to Modifying profile attributes. See image below of the Lookup user by property rule:
For example when a user selects Galway from the Location of training, the lookup rule will search for a user that has the location property set to Galway and the result is Mark Lycette. See image below to see the SQL database and that Mark Lycette matches with the Galway location.

Getting started with User rules
If you go to Administration > Designer and click on a process or create a new process, then click on Add a rule the User rules are found in the left-hand pane when you click on Users.
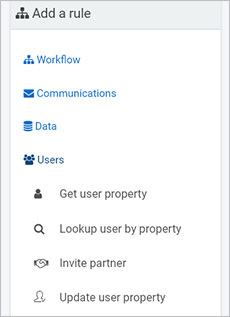
There are four types of User rules as follows:
-
Get user property - this rule allows you to retrieve user profile properties like email, department and so on for a current user, or a user defined via a user picker field, and map these properties for use in form logic.
-
Lookup user by property - this rule allows you to find users, groups or partner accounts based on input filters.
-
Invite partner - this rule sends an invitation to a contact in a partner organization for them to access a shared process.
-
Update user property - this rule allows you to update user profile properties, for example if a user moves department, where the update happens in a dynamic way.
What’s next 
To read more about each of the rule types go to the links below:
1 - Get user profile property
Introduction
The Get user property rule allows you to retrieve a property of a user that has been selected. You can select a user by defining one in a user picker field or selecting the current user, meaning that the user currently filling out the form will be selected when retrieving a profile property of a profile attribute. For example you can retrieve properties such as First Name, Last Name, Email or Phone number of a current user, those property values can be used fill in fields associated with a user.
When to use
Use this rule when you need to retrieve a profile property or a profile attribute from a current user or a user defined in a user picker field.
You can add this rule:
Before getting started
In advance of using the Get user property rule, in your process you need to have created at least one or more forms. The rule also requires you to select a user profile source, the source can be the current user of the form or a user chosen within a User picker field. When selecting the current user option, you will target the property of the user that is currently using the form. When you pick the user picker field, you need to create a User picker field which is used to select a user to target when retrieving a property. The rule also requires a text box field which is used as a container to store the retrieved value of the property.
- User picker (required) - field used to select a user for which you want to update a property. To learn more about user picker field go to User picker control.
- Text box (required) - field used as a container to store the value of the property. To learn more about text box field go to Text box control.
How to get started
-
Click on an existing process by going to Administration > Designer and decide which form, or field you will apply the rule to, by clicking on that item so that it is in edit mode so you can see the Edit/pen button, Pen button  .
.
-
Click on Add a rule > Users > Update user property.
-
In the Edit rule - Update user property dialog box, give the rule a title in the Title field.

-
If you want to add conditions for the rule, click on the Edit conditions button  see Conditions for more details.
-
Under the Action section fill out the following:
-
User profile source - select which type of source you want to use as the user to update the property for, choose from:
-
Current user - selecting this option will result in targeting the user that is currently using the form.
-
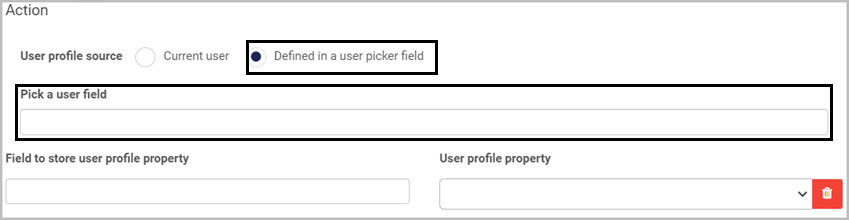
Defined in a user picker field - selecting this option will result in a Pick a user field option to appear allowing you to select a user picker field from your process. This will then specify which user you are targeting when wanting to retrieve a property, see image below:
-
Field to store user profile property - you can select a field within your process to store the value of the retrieved property.
-
User profile property - list of profile properties and profile attributes that you can retrieve. Note that you can create your own profile attributes which also appear in the list, to learn more about profile attributes go to Profile attributes.
-
You can choose to retrieve more than one property of a user, to do so click on the  button. This will result in adding more Field to store user profile property and User profile property fields. You can also delete unwanted fields by clicking on the red Bin/trash icon.

-
When you are finished editing the dialog box, click on OK or click on Close at any time to exit the dialog box.
Editing, deleting or duplicating rules
When you have clicked on an existing rule, and the rule is visible in the right-hand pane under Rules, there are a number of options available to you.
- To disable a rule click the slider across beside the rule name.
- To copy a rule, click on the Duplicate button
 beside the rule name.
 - To delete a rule, click on the Bin/Trash button
 .
. - To view a rule, click on the rule name to open the Edit rule dialog box.
User tip 
- Use this rule to automate processes when a form requires information from a users profile. For example when a form contains field such as name, phone number or email address, you can use this rule to automatically set those fields by retrieving the users name, phone number and email address properties.
What’s next
To find out more about other User rules go to User rules.
To find out more about other rules go to Rules.
2 - Lookup user by property
Introduction
The Lookup user by property rule allows you to look up a user from your subscription using one of the properties in their profile for example first name, last name, email or department. Using this rule you can also look up groups or partners by specifying one of the properties available. When looking up a user, group or a partner you can use the following properties:
- First Name
- Last name
- Display name
- Email
- Phone number
- Partner company name
- Partner main contact email
- Partner language
- Partner region
- UserId
- Custom profile attributes, to learn more about profile attributes go to Profile attributes.
When to use
Use this rule when your process requires to filter a user using a profile property, for example, when a user fills out his email address, a user picker field is assigned with the user that matches the entered email address. This rule is used to automate a user picker field when property input is provided.
You can add this rule:
Before getting started
In advance of using the Lookup user by property rule, in your process you need to have created at least one or more forms. The lookup user by property rule also requires a User picker field which is used to store the user that matches the property you have entered. For best practice, you can also create a text box field which holds the value of the property that you want to look by, for example the email address of a user.
- User picker (required) - field to store the user when the look up is performed. To learn more about user picker field, go to User picker control.
- Text box (optional) - value of the property you want to look by. To learn more about text box field, go to Text box control.
How to get started
-
Click on an existing process by going to Administration > Designer and decide which form, or field you will apply the rule to, by clicking on that item so that it is in edit mode so you can see the Edit/pen button, Pen button .
-
Click on Add a rule > Users > Lookup user by property.
-
In the Edit rule - Lookup user by property dialog box, give the rule a title in the Title field.
-
If you want to add conditions for the rule, click on the Edit conditions button see Conditions for more details.
-
Under the Action section fill out the following:
- Type of user - select the type of user you want to look for, the choices are:
- Person - individual user from your subscription.
- Group - user group that you have created in your subscription.
- Partner - user that is part of your subscription with partner rights.
- User property to locate user by - list of profile properties and profile attributes that you want the user to be looked up by. Note that you can create your own profile attributes which also appear in the list, to learn more about profile attributes go to Profile attributes.
- Field value or text - you can select a field within your form or type in text manually to represent the value of the property you want to look up by.
- User field to store lookup result - field to store the user that the property you searched by matches.
-
When you are finished editing the dialog box, click on OK or click on Close at any time to exit the dialog box.
Editing, deleting or duplicating rules
When you have clicked on an existing rule, and the rule is visible in the right-hand pane under Rules, there are a number of options available to you.
- To disable a rule click the slider across beside the rule name.
- To copy a rule, click on the Duplicate button beside the rule name.
- To delete a rule, click on the Bin/Trash button .
- To view a rule, click on the rule name to open the Edit rule dialog box.
User tip
Create a datasource with all users and their properties, you can create a list field and set the field to the created datasource. You can set the display of the list field to the property value of the data source. With that you will have a selection of user properties which you can use as a search mechanism for users. For example search users that are based in a specific location. To learn more about list field go to List control.
What’s next
To find out more about other User rules go to User rules.
To find out more about other rules go to Rules.
3 - Invite partner
Introduction
The Invite partner rule allows you to dynamically send out an email to a partner organisation with an invitation to share a process from your subscription. This rule creates a profile for the partner as well as shares a process specified in the rule. You can choose to generate an invite link and store the link in a text box field if needed instead of sending out an automatic email.
When to use
Use this rule when inviting a third-party organisation from within a process instance, for example when your company must hire a third-party organisation to complete a specific task from your process, you can share this process with the third-party organisation to complete the task. Take a maintenance company for example, a process is created to perform a maintenance check. The maintenance company performs a check but some broken parts need to be re-manufactured, therefore the maintenance company sends out a Partner invitation to the manufacturing company in order to manufacture missing or broken parts as the maintenance company makes checks and fixes but not manufacture parts.
You can add this rule:
Before getting started
Before you get started with this rule, you need to create a shared process instance of the process you intend to share with the partner. To learn more how to create a shared process instance, go to Shared processes.
In advance of using the Invite partner rule, in your process you need to have created at least one or more forms. The Invite partner rule also requires you to create a list of fields that are used to hold information about the partner and which process you want to share. See below for the list of fields required in your process before using the invite partner rule:
- Partner organisation - text box field representing the name of the organisation that the partner is part of.
- Shared process name - text box field representing the name of the process you want to share.
- Contact first name - text box field representing the first name of the partner you want to share a process with.
- Contact last name - text box field representing the last name of the partner you want to share a process with.
- Contact email - text box field representing the email address of the partner you want to share a process with.
- Partner country - text box field representing the country that your partner is situated in.
- Partner city - text box field representing the city that your partner is in.
How to get started
-
Click on an existing process by going to Administration > Designer and decide which form, or field you will apply the rule to, by clicking on that item so that it is in edit mode so you can see the Edit/pen button, Pen button .
-
Click on Add a rule > Users > Invite partner.
-
In the Edit rule - Invite partner dialog box, give the rule a title in the Title field.

-
If you want to add conditions for the rule, click on the Edit conditions button see Conditions for more details.
-
Under the Action section fill out the following:
-
Partner organisation - field representing the name of the organisation that the partner is part of.
-
Shared process name - field representing the name of the process you want to share. Note that this name needs to match the name of the Shared process instance and not the name of a process. For example if your subscription has a process called Maintenance check, you need to create a shared process instance and give it an appropriate shared process name, for example Maintenance check - Plumbing Partner. In this field you need to use the Maintenance check - Plumbing Partner as the name.
-
Contact first name - field representing the first name of the partner you want to share a process with.
-
Contact last name - field representing the last name of the partner you want to share a process with.
-
Contact email - field representing the email address of the partner you want to share a process with.
-
Partner country - field representing the country that your partner is situated in.
-
Partner city - field representing the city that your partner is in.
-
Partner logo - text box field representing the URL of the partners logo or a file field with the uploaded logo.
-
Send invite email - radio list representing whether to send an email to the partner. If No is selected an extra field appears:
-
Partner account - a user picker field used to specify the account of the partner. You can pre-create an account for your partner and set this field with his user. This will prevent the invited partner to create an account when accepting the invite link.
-
When you are finished editing the dialog box, click on OK or click on Close at any time to exit the dialog box.
Editing, deleting or duplicating rules
When you have clicked on an existing rule, and the rule is visible in the right-hand pane under Rules, there are a number of options available to you.
- To disable a rule click the slider across beside the rule name.
- To copy a rule, click on the Duplicate button beside the rule name.
- To delete a rule, click on the Bin/Trash button .
- To view a rule, click on the rule name to open the Edit rule dialog box.
User tip
Prior to inviting a partner, create a shared process instance of a process that you intend your partner to use. Give it a unique name for example use the original process name followed by the partners name. If you have a process called Inspection Checklist and your partners name is Windmill Inspections, call your shared process instance Inspection Checklist - Windmill Inspections. This will help you differentiate between your original process and the shared process.
What’s next
To find out more about other User rules go to User rules.
To find out more about other rules go to Rules.
4 - Update user property
Introduction
The Update user property rule allows you to change/update a profile property of a user within your subscription. When updating a property of a user, you can choose to select between the current user of the form or a user that can be selected from a user picker field. To learn more about a user picker field go to User picker control. You can update the following properties of a user:
- Phone number
- Partner language
- Partner region
- Custom profile attributes, to learn more about profile attributes go to Profile attributes.
When to use
Use this rule when you need to update a profile property or a profile attribute of a user. Select the current user option to update a property of the user that is currently filling out a form, or create a user picker field to have more flexibility with user selection.
You can add this rule:
Before getting started
In advance of using the Update user property rule, in your process you need to have created at least one or more forms. The update user property rule also requires you to select a user profile source, the source can be the Current user or a User picker field. When selecting the current user option, you will target the property of the user that is currently using the form. When you pick the user picker field, you need to create a User picker field which is used to specify a user when updating a property. For best practices you can create a text box field which will represent the new value of the property you want to update.
- User picker (required) - field used to select a user for which you want to update a property. To learn more about user picker field go to User picker control.
- Text box (optional) - field representing the new value of the property you want to update. To learn more about text box field go to Text box control.
How to get started
-
Click on an existing process by going to Administration > Designer and decide which form, or field you will apply the rule to, by clicking on that item so that it is in edit mode so you can see the Edit/pen button, Pen button .
-
Click on Add a rule > Users > Update user property.
-
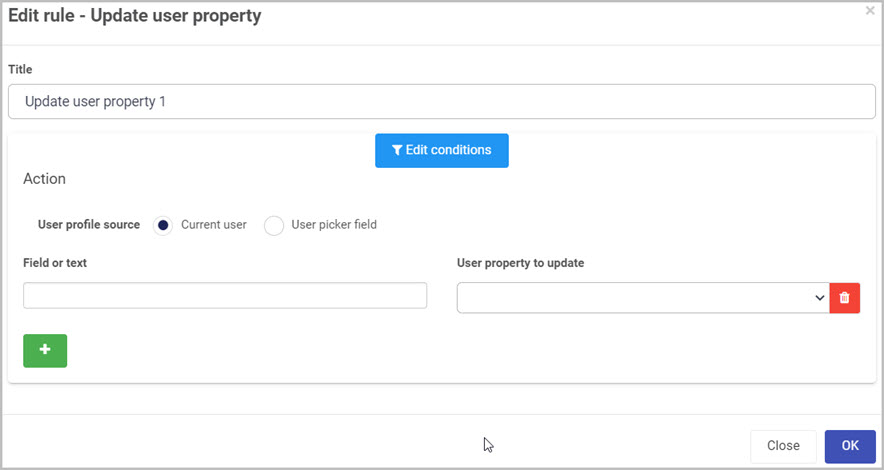
In the Edit rule - Update user property dialog box, give the rule a title in the Title field.
-
If you want to add conditions for the rule, click on the Edit conditions button see Conditions for more details.
-
Under the Action section fill out the following:
-
User profile source - select which type of source you want to use as the user to update the property for, choose from:
-
Current user - selecting this option will result in targeting the user that is currently using the form.
-
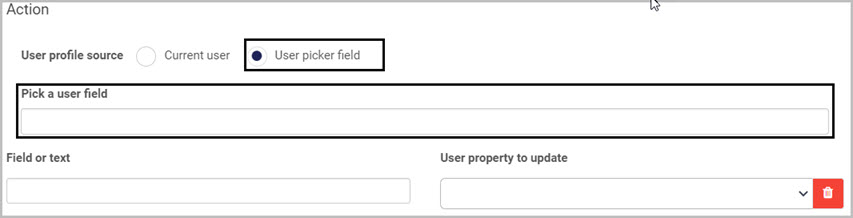
User picker field - selecting this option will result in a Pick a user field option appearing allowing you to select a user picker field from your process. This will then specify which user you are targeting when wanting to update a property. See image below:
-
Field or text - you can select a field within your form or type in text manually to represent the value of the property you want to update.
-
User property to update - list of profile properties and profile attributes that you want the update. Note that you can create your own profile attributes which also appear in the list, to learn more about profile attributes go to Profile attributes.
-
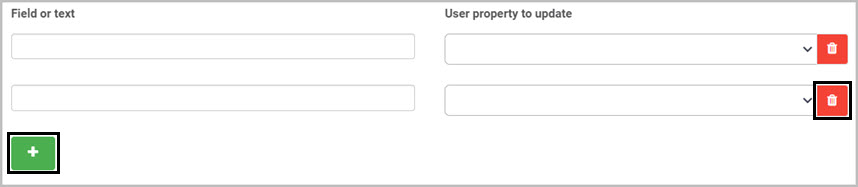
You can choose to update more than one property of a user, to do so click on the This will result in adding more Field or text and User property to update fields. You can also delete unwanted property selectors by clicking on the red Bin/Trash icon.
-
When you are finished editing the dialog box, click on OK or click on Close at any time to exit the dialog box.
Editing, deleting or duplicating rules
When you have clicked on an existing rule, and the rule is visible in the right-hand pane under Rules, there are a number of options available to you.
- To disable a rule click the slider across beside the rule name.
- To copy a rule, click on the Duplicate button beside the rule name.
- To delete a rule, click on the Bin/Trash button .
- To view a rule, click on the rule name to open the Edit rule dialog box.
User tip
When updating multiple properties at once, create a text box field for each property you want to update. This way you have more control of the value you want to assign to each property. To learn more about text box field go to Text box control.
What’s next
To find out more about other User rules go to User rules.
To find out more about other rules go to Rules.
