This is the multi-page printable view of this section.
Click here to print.
Return to the regular view of this page.
Workflow rules
Workflow rules is one category of rules that relates to user interactions with form components. Using Workflow rules will allow you to change the flow of information within a process. For example in a simple Training Process that is made up of three forms by default, the first form in a process is the current form.
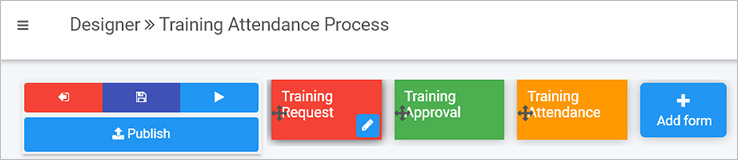
In the example above, the workflow for this process would be completion of the forms in this order: Training Request > Training Approval > Training Attendance, however using Workflow rules, you could use Go to form to force the Training Attendance form to be the current form after the Training Request form has been completed.
You could also use the Assign form rule to assign editing rights to particular users so they can edit forms. See more about Go to form and Assign form below.
Using rules in this way changes the flow of the process, and additional levels of security and user interaction can be added using Process security and Hide or disable see below.
Getting started with Workflow rules
If you have the role Administrator or Design business process, go to Administration in the left-hand side menu and then Designer and click on an existing process or create a new process. Then decide on a form or field to add the rule to by clicking on that item and click on Add a rule.
The Workflow rules are found in the left-hand pane when you click on Workflow.
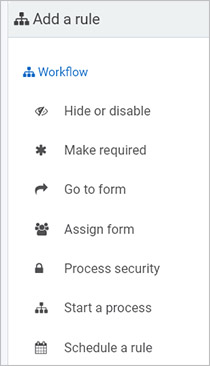
There are seven types of Workflow rules as follows:
-
Hide or disable
This rule is used to hide, disable, show or enable one or more fields, one or more sections or entire forms. This rule has special meaning in terms of workflow allowing the application to direct user action and flow by hiding or showing entire sections of the application.
-
Make required
Use this rule to make individual fields required or entire forms. Unlike the field property ‘Required’, this rule will dynamically allocate a mandatory status on chosen forms or fields, that users must complete and submit.
-
Go to form rule navigates the user from the current form to the destination form. This rule could also set the destination form’s display mode.
-
This rule enables dynamic form ownership and form security assignment of a form owner by assigning a user or a group to a form. You could also choose to override or append the form owner. By default only form owners can see the form in edit
-
Process security
This rule defines the security of the entire process instance (record). Using this rule, you could add any user or group with the right permissions to view/update any instances.
-
Start a (sub) process
Start a process rule helps you create a new instance of the same process or a different process. You could also map the inputs from the current instance to a new instance.
-
Schedule a rule
This rule helps you schedule a rule/rules to be triggered one time, with a recurring schedule or immediately. For example, this rule could be used to schedule a daily reminder email to a user if the task is not complete.
What’s next 
We have briefly introduced each of the six types of Workflow rules. Now let’s look at each of these types of rules in more detail:
1 - Show, hide or disable
Introduction
Use the Hide or Disable rule to hide, disable, show or enable a field or a component in a Kianda form. This rule is very useful if you want different parts of a form, a complete form or multiple forms, to appear or hide based on how the form user completes the form.
There are seven possible actions within this rule that can be applied to fields or forms:
- Hide from the user (not visible)
- Show to the user (visible)
- Disable for the user (not enabled)
- Enable for the user (enabled)
- Toggle visible: toggle between visible and not visible
- Toggle enable: toggle between enabled and not enabled
- Hide and clear: hide from the user (not visible) and clear the contents
When to use
You can add this rule:
How to get started
The following steps illustrate a scenario to hide and show fields. The same steps can be applied to enable, disable, toggle enable and so on. To dynamically hide a field:
-
If you have the role Administrator or Design business process, go to Administration > Designer, open an existing process or create a new process and decide which form or field you will apply the rule to, by clicking on that item so that it is in edit mode so you can see the Edit/pen button, Pen button  .
.
-
Click on Add a rule > Workflow > Hide or Disable.
-
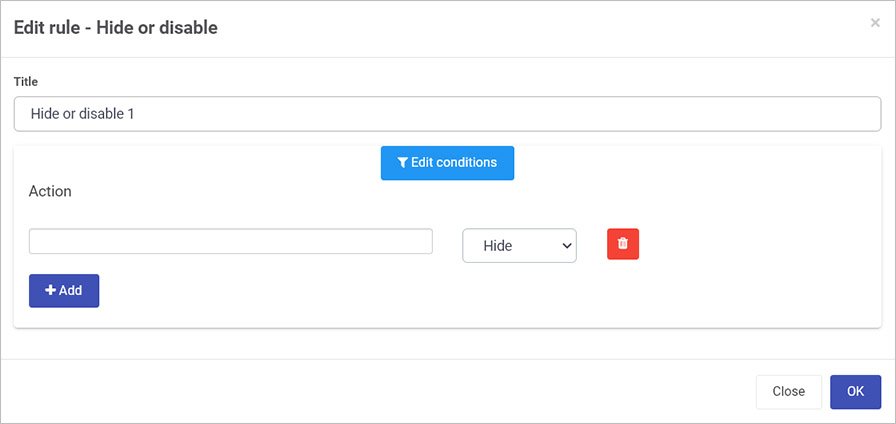
In the Edit rule - Hide or Disable dialog box, give the rule a title in the Title field.
-
If you want to add conditions for the rule, click on the Edit conditions button  to create conditions for the rule, see Conditions for more details.
-
Under Action create one or more actions for the rule by clicking on the empty field to add a form or form field, and then choose an option from the action drop-down list, choosing from Hide, Show, Disable, Enable, Toggle visible, Toggle enable, or Hide and clear, see Introduction for an explanation of each action.
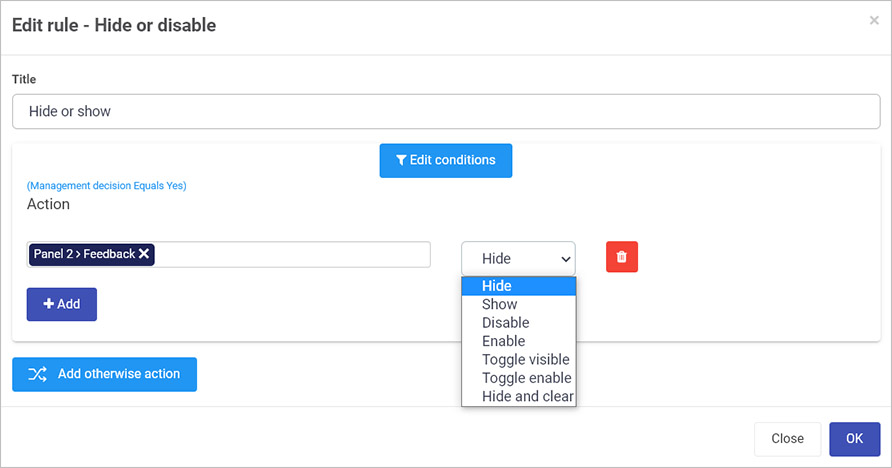
For example in the image above, a Feedback field will be hidden, using Hide, based on a condition, when a field Management decision equals a value ‘Yes’.
-
To add more actions, click on Add. At any time remove an action by clicking on the Bin/Trash icon  beside the name of the action.
-
Just like an ‘if..else’ statement, you can add alternative/elsewise actions, based on different conditions by clicking on Add otherwise action.
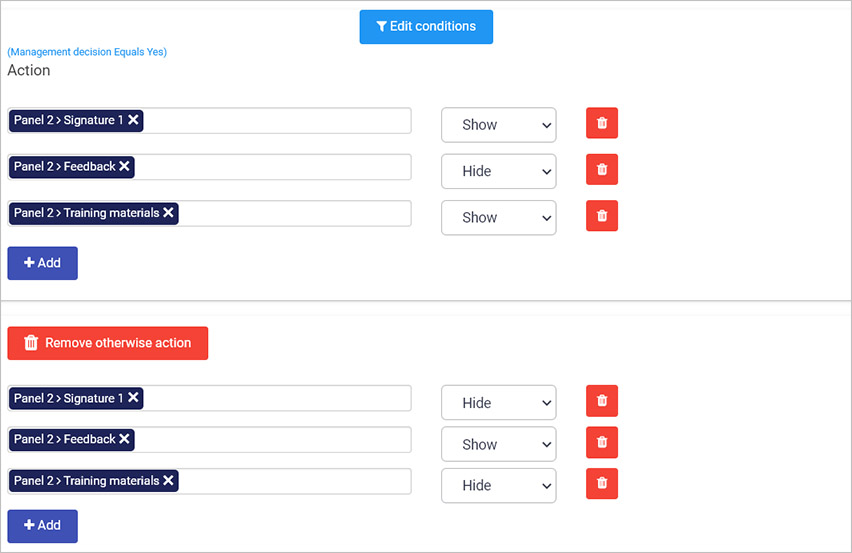
In the example above, Signature and Training materials field will show and a Feedback field will hide, while a Management decision field has a value of Yes, otherwise the shown fields will hide, while the Feedback field shows No. The result is a dynamic form that will reveal particular fields based on user input for the Management decision field.
-
To remove the otherwise action(s), click on the Remove otherwise action fields.
-
When you are finished editing the dialog box, click on OK or click on Close at any time to exit the dialog box.
-
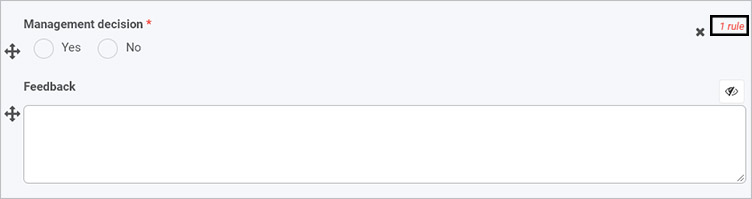
If the rule is attached to a field within a form, a rule notification will appear within the form design, for example a rule is applied to the field Management decision as shown in the image below.
-
When you click on the field or form that has the rule attached, the rule will appear in the right-hand pane under Rules.
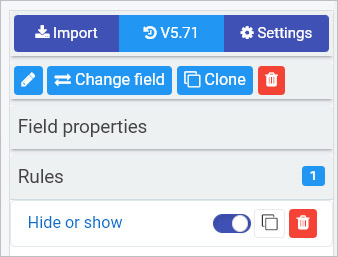
The next section will cover how to use the buttons visible in the right-hand pane to manipulate the rule.
Editing, deleting or duplicating rules
When you have clicked on an existing rule, and the rule is visible in the right-hand pane under Rules, there are a number of options available to you.
-
To disable a rule, click the slider across beside the rule name.

-
To copy a rule, click on the Duplicate button  beside the rule name.
-
To delete a rule, click on the Bin/Trash button .
-
To view a rule, click on the rule name to open the Edit rule dialog box.
User tip 
Note, it is not necessary to add a condition to the rule. In this case the rule will be triggered automatically:
- if the rule is applied to a field, then the rule will be triggered when the user enters a value in that field.
- if the rule is applied to a button, then the rule will be triggered when the user clicks the button.
- if the rule is applied to a form, then the rule will be triggered when the form is submitted.
- if the rule is applied to a process, then the rule will be triggered on load, that is when the process is initiated.
If a rule causes a mandatory field to be hidden or disabled, this will not stop the form from being submitted.
What’s next
To find out more about other workflow rules go to Workflow.
To find out more about other rules go to Rules.
2 - Make required
Introduction
The Make required rule is used to dynamically make form elements required or mandatory for users to fill in, or not required or to toggle between both states.
It is possible to make fields statically mandatory for users to fill in by checking the Required property for the field. However using this rule gives a greater degree of flexibility to cause an action based on user input using a Condition.
Take the example of a feedback form, where there is an option for a customer to fill in their name or not. If they do fill in their name however, then a Customer Account Number field becomes mandatory.
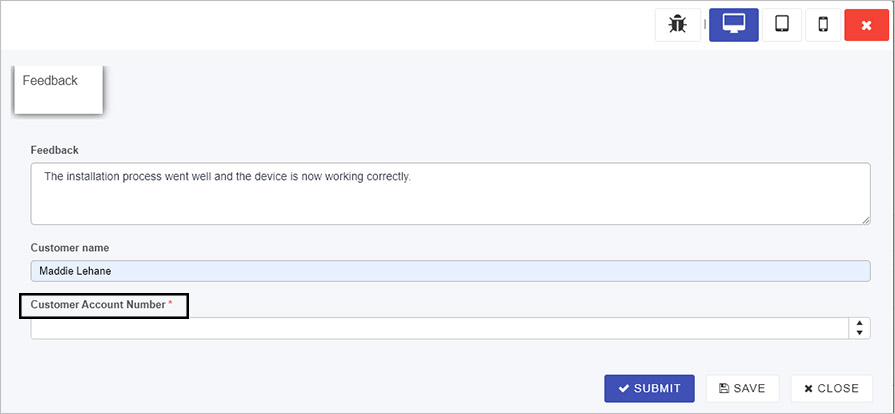
As soon as Maddie fills out her name in the example above, then and only then the Customer Account Number becomes required, indicated by an asterix. This rule could be combined with Hide or Disable rule to make fields appear/hidden based on user input.
When to use
You can add this rule:
The rule can be added at other levels (process, form), but it is most commonly used in the method outlined in the Introduction.
How to get started
To dynamically make a field required:
-
Click on an existing process by going to Administration > Designer and decide which form, or field you will apply the rule to, by clicking on that item so that it is in edit mode so you can see the Edit/pen button, Pen button .
-
Click on Add a rule > Workflow > Make required.
-
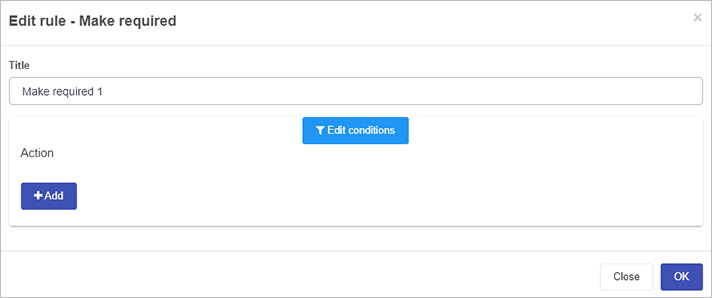
In the Edit rule - Make required dialog box, give the rule a title in the Title field.
-
To add conditions for the rule, click on the Edit conditions button to create conditions for the rule, see Conditions for more details.
For example to make one field required based on another field being completed, the condition would look like this:
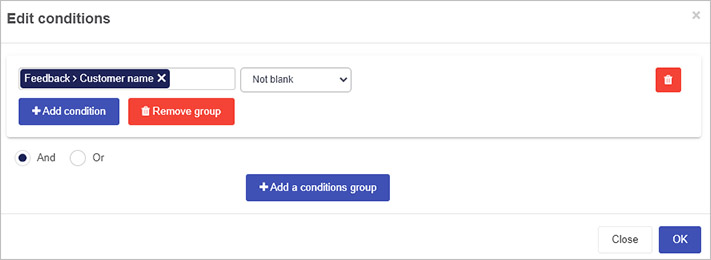
As shown on the Conditions page there are a multitude of options to choose from where Not blank is just one option shown above.
-
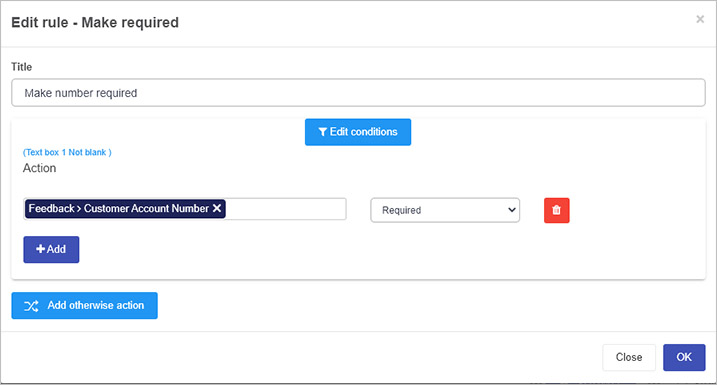
Under Action create one or more actions for the rule by clicking on the empty field to add a form or form field, and then choose an option from the action drop-down list, choosing from Required, Not required or Toggle required.
Using the example from the Introduction, where a condition is used that if one field is not blank, then another becomes required would look like this:
-
To add more actions, click on Add. At any time remove an action by clicking on the Bin/Trash icon beside the name of the action.
-
When you are finished editing the dialog box, click on OK or click on Close at any time to exit the dialog box.
-
If the rule is attached to a field within a form, a notification will appear within the form design, for example the field Customer name as shown in the image below.

-
When you click on the field or form that has the rule attached, the rule will appear in the right-hand pane under Rules.
The next section will cover how to use the buttons visible in the right-hand pane to manipulate the rule.
Editing, deleting or duplicating rules
When you have clicked on an existing rule, and the rule is visible in the right-hand pane under Rules, there are a number of options available to you.
-
To disable a rule click the slider across beside the rule name.
-
To copy a rule, click on the Duplicate button beside the rule name.
-
To delete a rule, click on the Bin/Trash button .
-
To view a rule, click on the rule name to open the Edit rule dialog box.
What’s next
To find out more about other workflow rules go to Workflow.
To find out more about other rules go to Rules.
3 - Go to form
The Go to form rule is used to control how a user moves between forms. As mentioned in Form basics, by default the first form in a process is the current form. Once submitted, control passes to the next form and the user is not allowed to go back to the previous form. The Go to form rule allows you to redirect the user to any form. The user can then navigate back and forth between those forms.
When to use
This rule can only be added to a button.
Warning!
The Close form and Go to form rules cannot be applied to the same button as both rules control which form comes next.
The Save form rule must be used and must appear before the Go to form rule in the list of rules.
How to get started
To dynamically redirect a user to a form:
-
Click on an existing process by going to Administration > Designer and decide which form, or field you will apply the rule to, by clicking on that item so that it is in edit mode so you can see the Edit/pen button, Pen button .
-
Click on Add a rule > Workflow > Go to form.
-
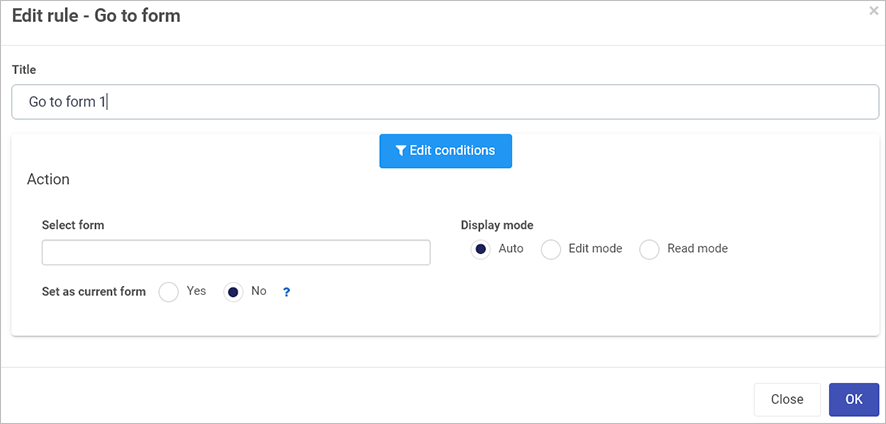
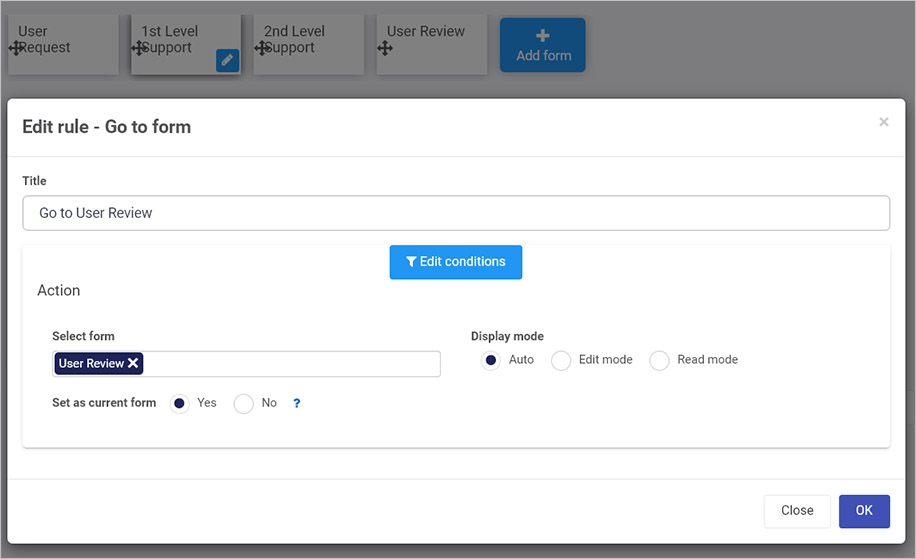
In the Edit rule - Go to form dialog box, give the rule a title in the Title field.
-
If you want to add conditions for the rule, click on the Edit conditions button to create conditions for the rule, see Conditions for more details.
-
Under Action, create one or more actions for the rule by filling out the following:
-
Select form - click on the field and select a form from the process.
-
Display mode - choose from:
-
Auto - the display mode will be either edit or read as determined by the system. If the destination form is the next form in the process workflow, and if the user is an owner of the form, and the form is not completed, then the form will be displayed in edit mode. Otherwise the form will appear in read mode.
-
Edit mode - the user will be able to edit the destination form.
-
Read mode - the user will be able to read, but not edit, the destination form.
-
Set as current form - choose from the radio buttons Yes or No. If you choose Yes this will change the process flow, forcing the selected form to become the current, active form.
For example in the image above of an IT Support process, there are a number of forms, one of which is User Review. In Kianda Designer, the Go to form rule is assigned to a Resolved button in the 1st Level Support form, meaning that the User Review form becomes the next active form, not the 2nd Level Support form although it is the next form in the process workflow.
-
When you are finished editing the dialog box, click on OK or click on Close at any time to exit the dialog box.
-
Remember this rule can only be attached to a button. When you click on the button, the rule will appear in the right-hand pane under Rules.
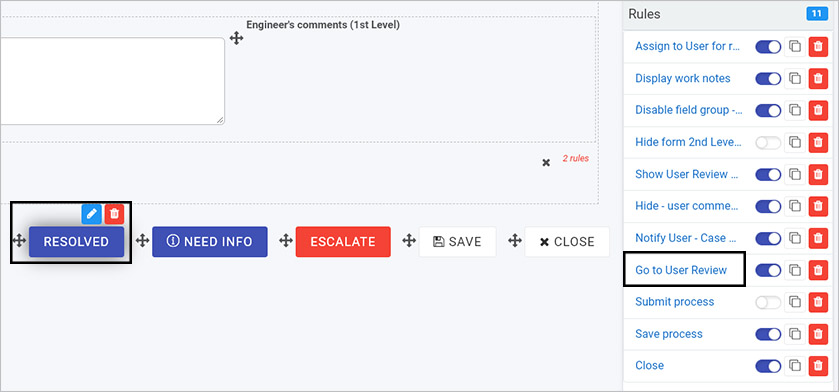
See example above, for a Go to form rule, called ‘Go to User Review’ for a resolved button. Note there are 11 rules attached to that button so the order of execution is important, go to Multiple rules to learn more about how to change rule order.
The next section will cover how to use the buttons visible in the right-hand pane to manipulate the rule.
Editing, deleting or duplicating rules
When you have clicked on an existing rule, and the rule is visible in the right-hand pane under Rules, there are a number of options available to you.
-
To disable a rule, click the slider across beside the rule name.
-
To copy a rule, click on the Duplicate button beside the rule name.
-
To delete a rule, click on the Bin/Trash button .
-
To view a rule, click on the rule name to open the Edit rule dialog box.
What’s next
To find out more about other workflow rules go to Workflow.
To find out more about other rules go to Rules.
4 - Assign form
Introduction
The Assign form rule is used to assign a form to a user or to a group of users, making them the form owners. This means that when a process instance is created, a form owner can edit the form in the process instance, for example a manager who needs to add comments on an appraisal form that has been submitted by an employee.
You can use this rule to override the existing form owners, or to add users or groups to the list of existing form owners. When assigning forms you can choose from:
-
Any user - choose from any user, groups or partners defined in the system
-
Current user - make the current form user, the form owner
-
Defined in a user field - use a selected user/group/partner chosen in a user picker field
-
Form owner(s) - existing form owners as defined in the form configuration
When to use
You can add this rule:
How to get started
To dynamically assign a form to a user:
-
Click on an existing process by going to Administration > Designer and decide which form, or field you will apply the rule to, by clicking on that item so that it is in edit mode so you can see the Edit/pen button, Pen button .
-
Click on Add a rule > Workflow > Assign form.
-
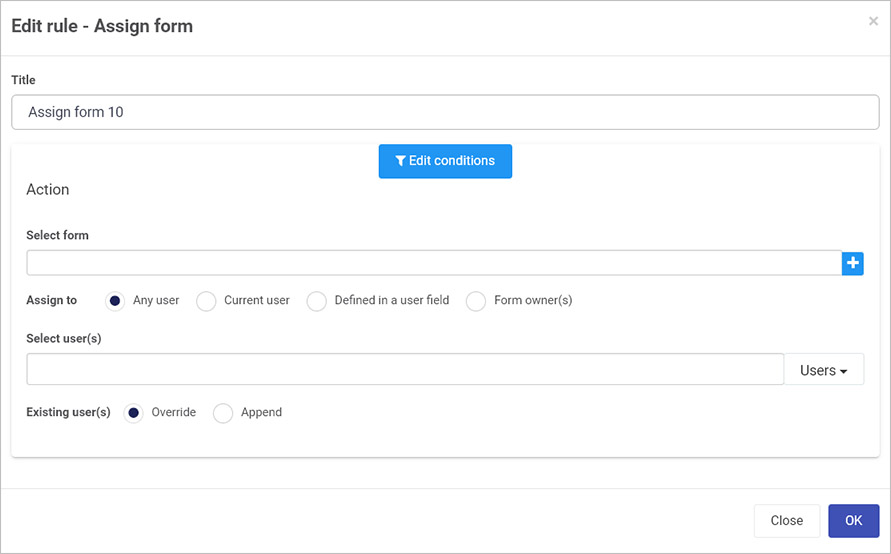
In the Edit rule - Assign form dialog box, give the rule a title in the Title field.
-
If you want to add conditions for the rule, click on the Edit conditions button to create conditions for the rule, see Conditions for more details.
-
Under Action, create one or more actions for the rule by filling out the following:
-
Select form - click on the field and select a form from the process. Click on the Plus/Add button  to add more forms to assign. If you change your mind and want to delete a form, click on the Bin/Trash button .
-
Assign to - choose from the radio buttons:
- Any user - choose from Users, Groups and/or Partners in the drop-down list. All users and groups must be predefined in the system, see Users and Groups for more details. Partners must also be predefined within the Invite partners section under Administration.
- Current user - make the current user of the form, whoever is submitting or saving information, as the person that the form(s) is/are assigned to.
- Defined in a user field - choose a user picker field from the process, where the selected users, groups or partners will have the forms assigned to them.
- Form owner(s) - selecting this option means that the form owner(s) defined during form creation/editing will have the form(s) assigned to them, see Form owners for more details on what form ownership is and how to create form owners.
-
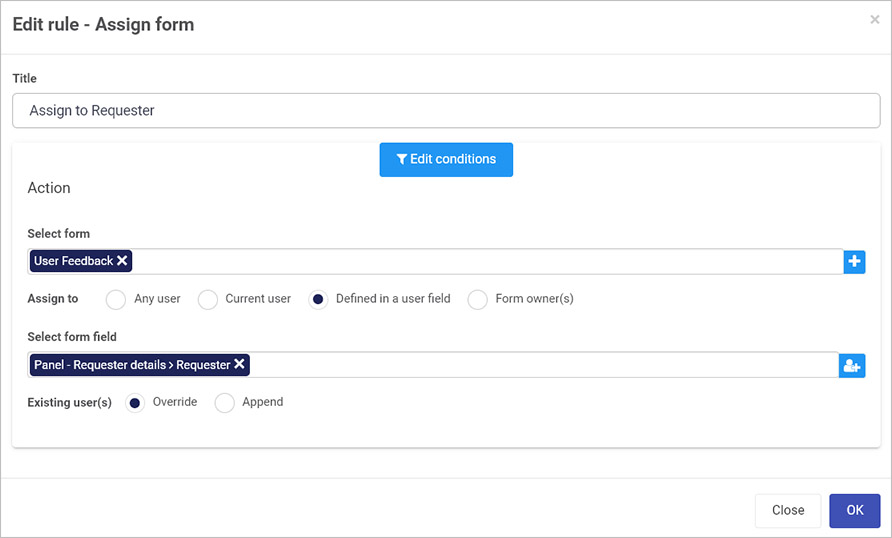
Depending on the option chosen for Assign to, different fields will display. For example if Any user is chosen, then a Select user(s) field appears as shown in the image above. If Defined in a user field or Form owner(s) is chosen then a Select form field appears prompting you to select a user picker field for the former, and a form with form owners for the latter. For example, in the image below a user from a field called Requester will become the form owner of a form called User Feedback.
-
Existing user(s) - choose from:
- Override - this means that this rule will override form ownership, making those referenced in the Edit rule dialog box, the form owners.
- Append - this means that for a current list of form owners, for example those defined during form creation, that list will be appended with any users referenced in the Edit rule dialog box.
-
When you are finished editing the dialog box, click on OK or click on Close at any time to exit the dialog box.
-
If the rule is attached to field within a form, a notification will appear within the form design, for example the field Management decision as shown in the image below.
-
When you click on the field or form that has the rule attached, the rule will appear in the right-hand pane under Rules.
The next section will cover how to use the buttons visible in the right-hand pane to manipulate the rule.
Editing, deleting or duplicating rules
When you have clicked on an existing rule, and the rule is visible in the right-hand pane under Rules, there are a number of options available to you.
-
To disable a rule, click the slider across beside the rule name.
-
To copy a rule, click on the Duplicate button beside the rule name.
-
To delete a rule, click on the Bin/Trash button .
-
To view a rule, click on the rule name to open the Edit rule dialog box.
User tip
This rule can be used multiple times in sequence. A typical use case is that the first rule overrides the existing users and the following rule(s) appends users.
To view the default owners for the form, click on the form itself within the process in Designer and in the Edit form dialog box, see named owners in the Default owner(s) field. See Form owners for more details.
Note: a form displays in edit mode if:
- The user is the owner of the form, and
- The selected form is the current form, and
- The form is not submitted or in a completed state, that is being worked on. The Go to form rule can reset the submitted state of a form, see Go to form for details.
What’s next
To find out more about other workflow rules go to Workflow.
To find out more about other rules go to Rules.
5 - Process security
Introduction
The Process security rule dynamically changes the security settings of a process instance.
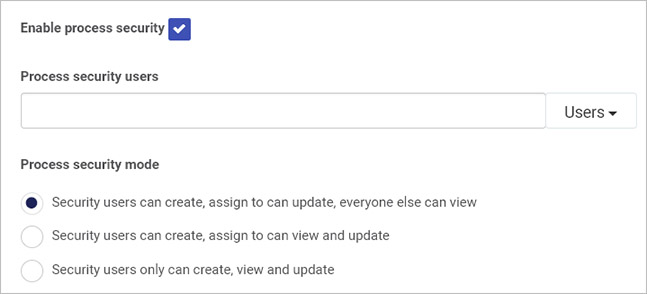
Security settings for a process can be set statically by going to Settings for the process in Kianda Designer. If you check the checkbox for Enable process security, you can then select users, groups, and/or partners and set their access level, see Process settings for more details.
This setting is static and applies to every instance of the process. However the Process security rule is dynamic and changes the security settings for a particular instance. For example if there is a Finance process with a Payroll request form containing personal data like employee salary, this request form should only be visible to an assigned person. An Assign form rule could be used to give form ownership to an assigned person, allowing them to edit the form in a process instance, and if the rule is combined with the Process security rule then only the assigned person can view the request form for the process instance.
If there are multiple process instances listed in a dashboard, then process security will allow only those who have the designated access, to view those process instances.
When to use
You can add this rule:
How to get started
To dynamically set security for process instances:
-
Click on an existing process by going to Administration > Designer and decide which form, or field you will apply the rule to, by clicking on that item so that it is in edit mode so you can see the Edit/pen button, Pen button .
-
Click on Add a rule > Workflow > Process security.
-
In the Edit rule - Process security dialog box, give the rule a title in the Title field.

-
If you want to add conditions for the rule, click on the Edit conditions button to create conditions for the rule, see Conditions for more details.
-
Under Action, create one or more actions for the rule by filling out the following:
-
Add to process security users - choose from the radio buttons:
- Any user - choose from Users, Groups and/or Partners in the drop-down list. All users and groups must be predefined in the system, see Users and Groups for more details. Partners must also be predefined within the Invite partners section under Administration.
- Current user - make the current user of the form, whoever is submitting or saving information, as the person that is added to the form process security.
- Defined in a user field - choose a user picker field from the process, where the selected users, groups or partners will be added to the form process security.
- Form owner(s) - selecting this option means that the form owner(s) defined during form creation/editing will be added to the form process security, see Form owners for more details on what form ownership is and how to create form owners.
-
Depending on the option chosen for Add to process security users, different fields will display:
-
For example if Any user is chosen, then a Select user(s) field appears as shown in the image above. Choose from Users, Groups and/or Partners.
-
If Defined in a user field or Form owner(s) is chosen then a Select form field appears prompting you to select a user picker field for the former, and a form with form owners for the latter.
-
Existing user(s) - choose from:
- Override - this means that this rule will override form ownership, making those referenced in the Edit rule dialog box the form owners.
- Append - this means that for a current list of form owners, for example those defined during form creation, that list will be appended with any users referenced in the Edit rule dialog box.
-
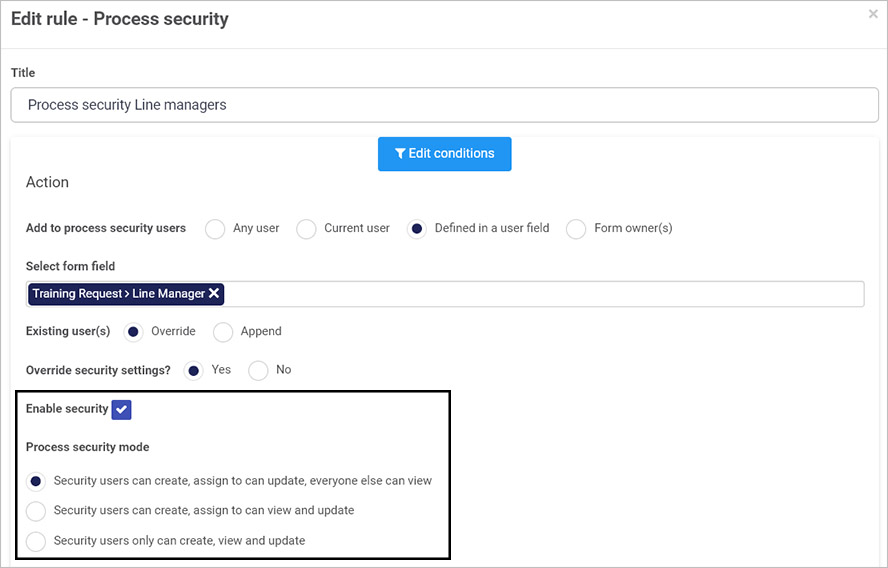
Override security settings - choose from Yes or No.
-
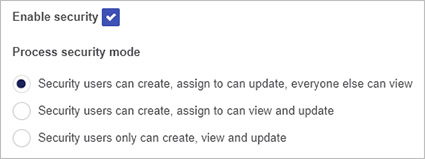
If you choose Yes then a checkbox appears allowing you to Enable security.
-
If you check the checkbox, then you can choose the Process security mode which lists the following options:
- Security users can create, assign to, can update, everyone else can view - this is the lowest level of security, allowing the assigned user(s) the ability to view, edit and assign process instances, while others can view the process instances.
- Security users can create, assign to, can view and update - this allows the assigned user(s) the ability to view, edit and assign process instances.
- Security users only can create, view and update - this is the highest level of security where only the named users, that is those defined as Line Manager in a user picker field, will be able to view and edit process instances. No other users will have access to the process instances.
-
When you are finished editing the dialog box, click on OK or click on Close at any time to exit the dialog box.
-
When you click on the field or form that has the rule attached, the rule will appear in the right-hand pane under Rules.
The next section will cover how to use the buttons visible in the right-hand pane to manipulate the rule.
Editing, deleting or duplicating rules
When you have clicked on an existing rule, and the rule is visible in the right-hand pane under Rules, there are a number of options available to you.
-
To disable a rule, click the slider across beside the rule name.
-
To copy a rule, click on the Duplicate button beside the rule name.
-
To delete a rule, click on the Bin/Trash button .
-
To view a rule, click on the rule name to open the Edit rule dialog box.
User tip
This rule can be used multiple times in sequence. You can use the first rule to override the existing users and the following rule(s) to append users.
You can override the process security settings by setting Override security settings to Yes. Tick Enable security to see the options for setting the security level. These options are identical to those in the static Process settings as mentioned in the Introduction.
Warning!
Setting Override security settings to Yes with Enable security not ticked will disable all security settings.
What’s next
To find out more about other workflow rules go to Workflow.
To find out more about other rules go to Rules.
6 - Start a process
Introduction
The Start a process rule allows you to dynamically start a new instance of a different process, or a new instance of the same process, or updates an existing process instance from a chosen process.
For example if we have an ‘Onboarding’ process, our primary process that involves many different tasks like generating documentation, and sending out emails to managers, HR and new trainers, we could have a secondary process called ‘Send email process’ which sends out these automated emails for a new user once the ‘Onboarding process’ starts. You can transfer field data from the Onboarding process to the new process instance for ‘Send email process’. You can also update the secondary process instance, once you have the ID for the process instance, see step 5 below in [How to get started].
When to use
You can add this rule:
Before getting started
In advance of using the this rule, in your process you need to have created at least one or more forms as well as creating:
-
Two processes, one process that acts as your primary process, that then triggers a secondary process also called your target process.
-
A text box field which can be hidden, to hold your target process ID if you wish to update an existing process. To learn more about text box field go to Text box control.
-
Predefined partners must be set up in the Invite partners section of Kianda if you wish to execute rules related to partner processes. Process security must be enabled in the target process to allow your process to interact with it. Go to Process security to see where this checkbox is.
How to get started
To dynamically start a new process:
-
Click on an existing process by going to Administration > Designer and decide which form, or field you will apply the rule to, by clicking on that item for example the Submit button so that it is in edit mode so you can see the Edit/pen button, Pen button .
-
Click on Add a rule > Workflow > Start a process.
-
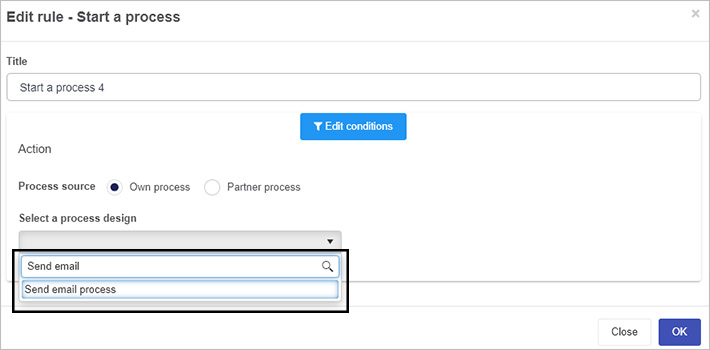
In the Edit rule - Start process dialog box, give the rule a title in the Title field.
-
If you want to add conditions for the rule, click on the Edit conditions button to create conditions for the rule, see Conditions for more details.
-
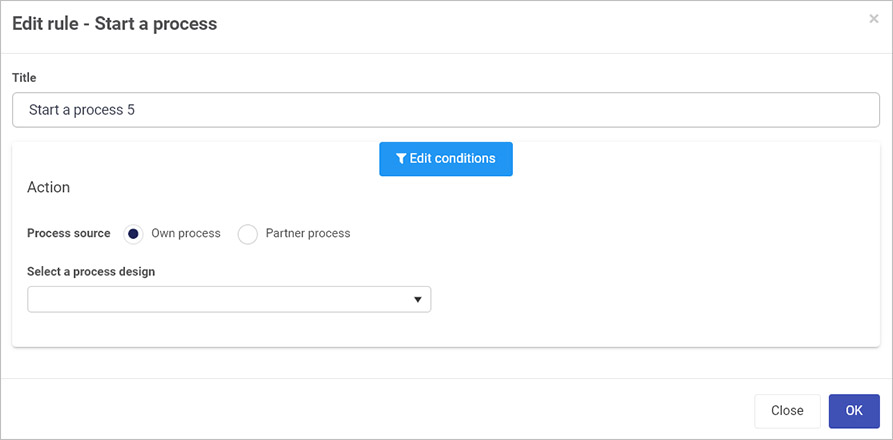
Under Action create one or more actions for the rule starting with choosing the Process source for the secondary/target process. Choose from Own process or Partner process.
-
If you choose Own process then choose from a list of processes already created in the system under Select a process design using the drop-down list, or start to type in the name of a process and the list will autofill as shown below.
-
If you choose Partner process then choose from a list of predefined partners under Select a process design. Click on the drop-down list to add Partners. To read more about how to define partners in Kianda go to Invite partners section of Kianda. Note, the partner organisation must have enabled process security to allow your process to interact with the target process, go to Process security to see where this checkbox is.

-
When the design is chosen, other options will appear in the Edit rule dialog box, the Lookup existing process option appears, where you can choose Yes or No.
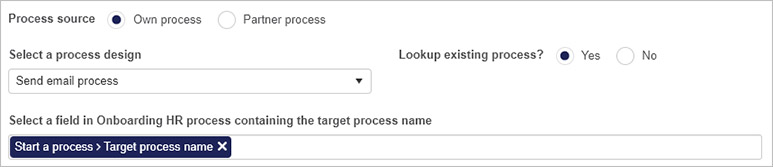
- If you choose No then that means you are creating a new process instance from that process design.
- If you choose Yes then that means you are updating an existing process instance and you must provide a field containing the target process name. You will also need to provide for the existing process instance. This can be done using the On success mapping section, see below.
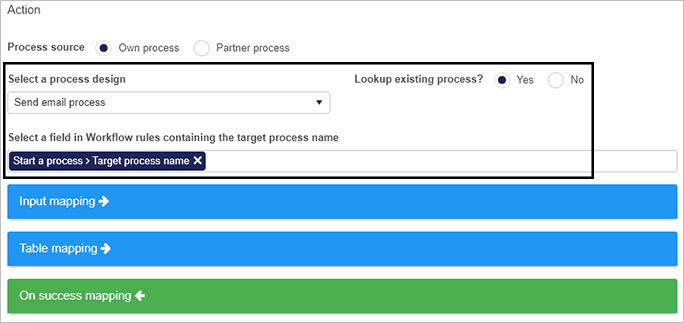
-
An Input mapping section allows you to map values for fields from the primary process to the secondary/target process fields, read more below.
-
A Table mapping section allows you to map values from a table(s) in the primary process to the secondary/target process table(s), see below.
-
Use On success mapping to retrieve values from the secondary process, showing success in process execution. Click on the link to read more.
-
The remaining options in the Edit rule dialog box are explained below.
-
Click OK when you are finished editing the dialog box, or Close at any time to exit the dialog box.
For Input mapping you can map field values from one process to another. For example in an ‘Onboarding HR process’, if a user fills out their name in a Name field, then that name/value will be mapped to a field in a form in the secondary/target process ‘Send email process’ called New request Name as shown in the example below. Your forms must already have precreated fields to capture the values from process or user input.
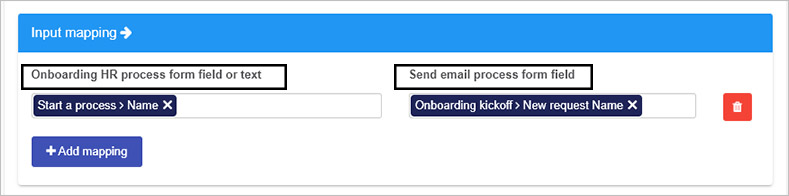
To use Input mapping, click on the blue bar for Input mapping:
-
The process names will automatically appear in the left and right columns once a process design is selected from the drop-down list, see step 5 in How to get started above. Within each field, choose a form and then a field that you would like to map the values from one process to another. Alternatively, you can type in text to pass from the primary process to a field in the secondary process.
-
Click on the Bin/Trash button  to delete a mapping.
-
Click on the Add mapping button  to add further mappings from the secondary/target process to the primary process. Ensure that form fields are already precreated to hold these values.
Table mapping
If you use a table in your process you can map fields from a table in one process to another in a similar way to the fields in Input mapping, but this section includes additional parameters to give you a range of options.
To use table mapping, you must already have tables created in your primary and secondary processes. Then click on the blue bar for Table mapping:
-
The process names will automatically appear in the left and right columns once a process design is selected from the drop-down list, see step 5 in How to get started above.

-
Click on Add table mapping to and add input and output tables for each process. Click on a form and then a table of choice.
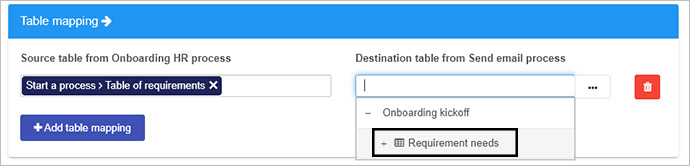
-
Click on the ellipsis button  to open the Table mappings dialog box.
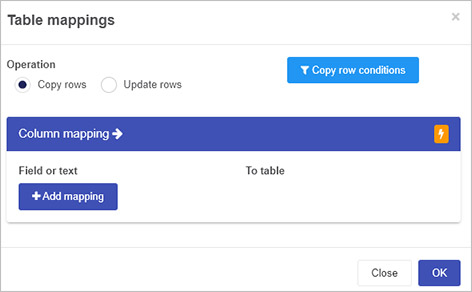
Options within this dialog box are:
-
Operation - choose from:
-
Copy rows which allows you to copy row data from one process to another. You can also add conditions to the copying process by clicking on Copy row conditions to allow you to have conditions on which rows are copied over to the target process. We can add fields or text to the conditions. Click on Conditions to read more about conditions in Kianda.
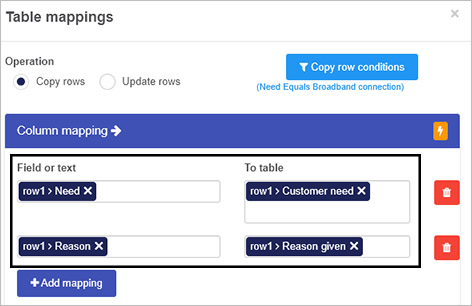
If you click on the Action button  then column titles from the primary and secondary processes are automatically listed under Column mapping as shown below, where Need and Reason are column headings in the table in the primary process and Customer need and Reason given are column headings in the table in the secondary/target process. In the example below, a condition has been set so that if Need equals the text ‘Broadband connection’ then the values input into the columns listed will be copied over.
-
Update rows - if you choose Update rows then contents of the target process table will be updated. Similar to copy rows, an Update row conditions button appears allowing you to set conditions for what content is updated. As with Copy row conditions you can set conditions to control how values are mapped from one process to another.
An Action button is available beside Column mapping to allow you to autofill field names from processes under Field or text and To table fields.
-
Click on the Bin/Trash button to delete a mapping.
-
Click on the Add table mapping button to add more tables.
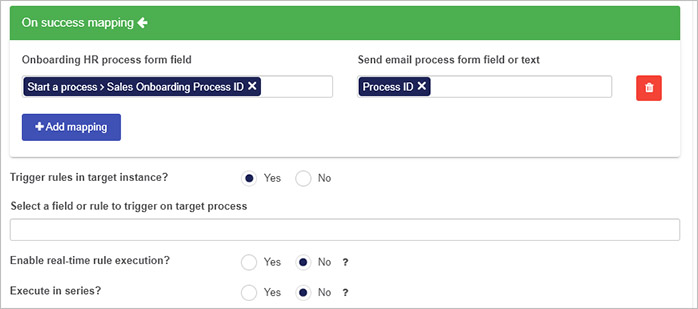
On success mapping
If you wish to update an existing process instance you can use mapping within the On success mapping section to retrieve the Process ID of that process instance, and then trigger rules in the target process instance. A text box field within the form can be created to hold the Process ID value, see Before getting started. The ID for the existing process instance, is one of the Common fields that can be pulled from the system.
To use On success mapping:
-
Click on the green bar of On success mapping to reveal primary and secondary/target process form fields. For example in the image below, the primary process is called Onboarding HR and the secondary process is called Send email process. Both of these appear automatically below when the green bar is clicked on.
- From here you can choose to add in form fields, for example a text box field called Sales Onboarding Process ID that will hold a common field Process ID from the target process.
- Click on the Bin/Trash button to delete a mapping.
- Click on the Add mapping button to add further mappings from the secondary/target process to the primary process. Ensure that form fields are already precreated to hold these values.
-
Further options exist under this section, starting with Trigger rules in target instance allowing you to kick off business rules enabling actions in the target process. Options are:
-
No where triggering rules is disabled, and no further options appear.
-
Yes where triggering rules is enabled, and further options appear:
-
Select a field or rule to trigger on target process - clicking on this field allows you to choose a form from the target process and from there you can drill down to a field to trigger all the rules attached to that field, or drill down to a particular rule so that only that rule will be triggered as shown in the example below.

If you want to save values passed under Input mapping then trigger the Save button (that contains the Save process and Close rules) found by default in all Kianda forms.
-
Enable real-time rule execution? - options are Yes or No. If you choose Yes, rules in the secondary/target process instance will trigger without any delay in the server. If you choose No then a second option becomes available to allow you to choose to Execute in series?

- Execute in series? - options are Yes or No. If you choose No then the server side execution of rules will happen in series or in sequence, instead of in parallel. In series or in sequence refers to synchronous execution, where a rule will only execute when the previous rule has completed. In parallel refers to asynchronous execution whereby rules execute without waiting for the previous rule to finish. This type of execution is useful when rules are not dependent on each other, for example the output of one rule is not used as input for another.
-
When you are finished editing the dialog box click on OK or click on Close at any time to exit the dialog box.
For more details on using On success mapping with other rules click on On success mapping.
Editing, deleting or duplicating rules
When you have clicked on an existing rule, and the rule is visible in the right-hand pane under Rules, there are a number of options available to you.
-
To disable a rule, click the slider across beside the rule name.
-
To copy a rule, click on the Duplicate button beside the rule name.
-
To delete a rule, click on the Bin/Trash button .
-
To view a rule, click on the rule name to open the Edit rule dialog box.
User tip
- Remember the target process can be a Partner process and in this case, the partner organisation must have enabled process security (in the Process settings for the target process) to allow your process to interact with the target process.
- Use the Lookup existing process flag to find a particular instance of the target process at runtime. If you select Yes, then you can select a field in the current process which contains the id of the target instance.
- Use Trigger rules in target instance to select a field or rule to trigger in the target process. Set Execute in series to Yes to ensure server side execution is performed in series instead of in parallel.
- Another feature of this rule is that you can read data from another process instance. In this case it is advisable to give the title of the rule a title such as ‘Read data from Process X’. Click on the green bar of On success mapping and use this area to copy data from the target process to the current process.
What’s next
To find out more about other workflow rules go to Workflow.
To find out more about other rules go to Rules.
7 - Schedule a rule
Introduction
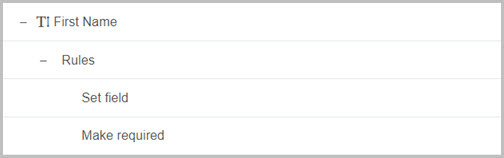
Schedule a rule allows you to schedule a rule or a field to be triggered immediately, at some point in the future or recurring. If a form field has multiple rules attached to it, that include the Schedule a rule rule, rules can execute sequentially and you can change the order of the rule execution, see Multiple rules for details. You can also select a specific rule to execute. For example in the image below, the text box field First Name is expanded to show two rules. You can select all or just one rule to be triggered. You can select all rules by selecting the First Name text box itself or to select just one rule you can expand the field and selecting the desired rule you want to schedule:
When to use
You can add this rule:
How to get started
The following step illustrates a scenario to schedule a reminder email using the Send email rule when a form is submitted:
-
Click on an existing process by going to Administration > Designer and decide which form, or field you will apply the rule to, by clicking on that item so that it is in edit mode so you can see the Edit/pen button, Pen button .
-
Click on Add a rule > Workflow > Schedule a rule.
-
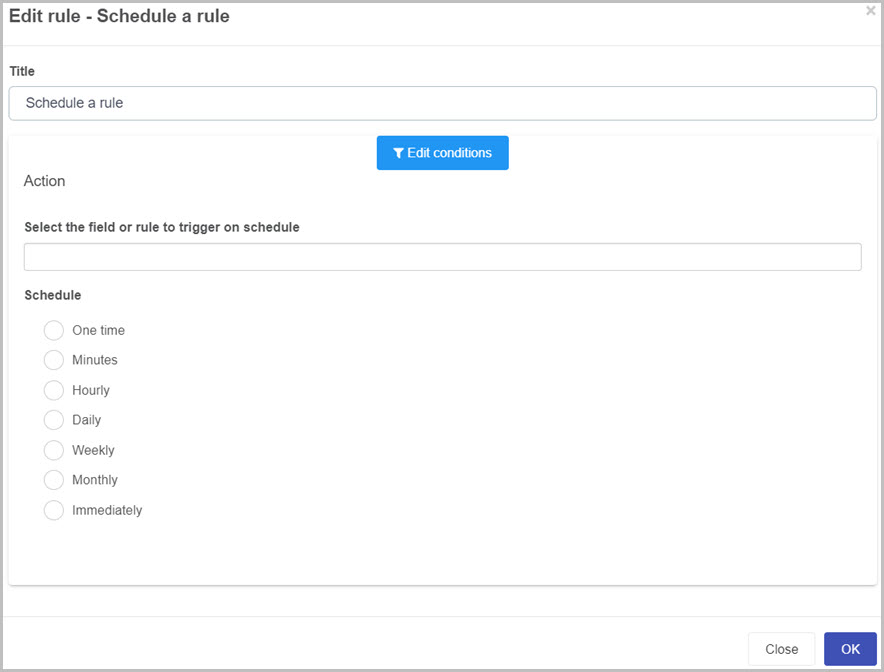
In the Edit rule - Schedule a rule dialog box, give the rule a title in the Title field.
-
If you want to add conditions for the rule, click on the Edit conditions button to create conditions for the rule, see Conditions for more details.
-
Under Action fill out the following:
-
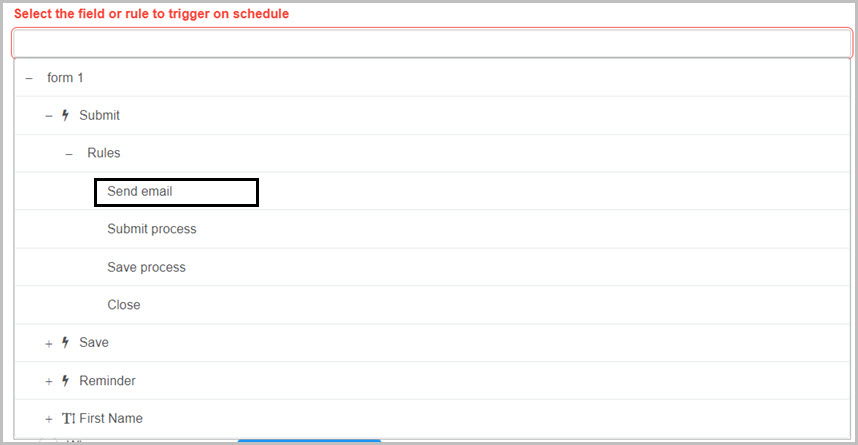
Select the field or rule to trigger on schedule - allows you to select a field or rule you want to trigger. If a field has multiple rules, they will be triggered sequentially and you can change the order of the rule execution, see Multiple rules for details. You can also select a specific rule from a field with multiple rules by drilling down and selecting the desired rule. In this example we want to select a rule called Send email which is attached to the Submit button.
-
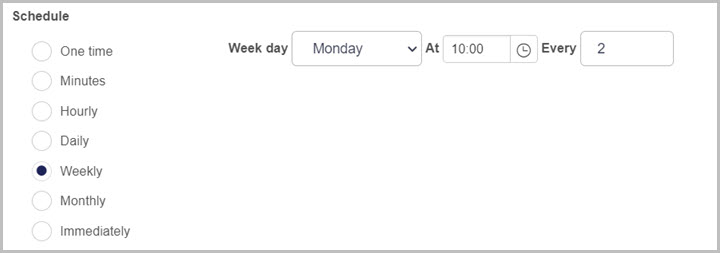
Schedule - allows you to choose a time of schedule. For this example we will select to send the email Weekly at 10 am every 2 weeks.
You can select a different type of schedule that is suited to your rule, here are the options:
- One time - Select Time mode as Absolute or Relative from now. If Absolute, you can select the time using the clock icon and the date using the calendar icon or you can select a form field (where the date is stored) by clicking on the icon with black discs
 . If Relative from now, enter the days, hours and minutes directly.
 - Minutes - select the number of minutes you want the scheduled rule to reoccur.
- Hourly - select the number of minutes and hours you want the scheduled rule to reoccur.
- Daily - select the time of day and the number of days you want the scheduled rule to reoccur. You can select that the rule will trigger only on week days by enabling the Week days only checkbox.
- Weekly - select a day of the week, time of the day and the number of weeks that you want the scheduled rule to reoccur.
- Monthly - select the date of the month or First, Second, Third, Fourth, Last weekday of the month. You can also select a specific time that you want the scheduled rule to reoccur.
- Immediately - the rule will trigger immediately.
-
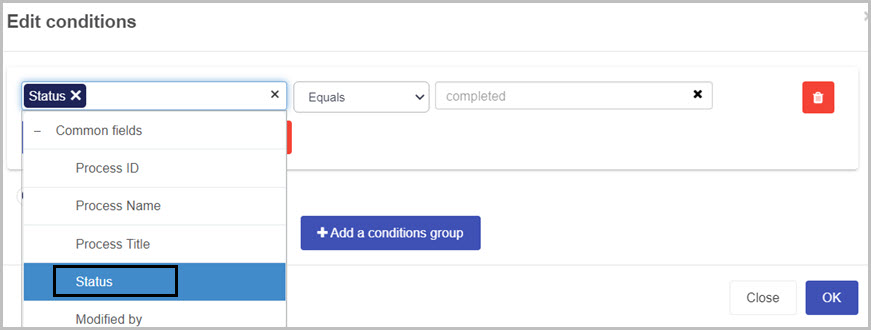
Expire - It is possible to set the schedule rule to expire by enabling Expire checkbox. For this example we will use the When option and apply a condition. The goal of the reminder is to send it every two weeks until the status of the process is completed. In the condition of the When option, select Status from the Common fields and make it equals to completed as shown in the image below:
There are three options when to expire the scheduled rule:
- By - the rule will expire by the date and time given. Either select the time using the clock icon and the date using the calendar icon OR select a form field (where the date is stored) by clicking on the icon with black discs.
- After - the rule will expire after a set number of occurrences. Select the number of occurrences in the blank field or click on the icon with black discs to choose a field where the number of occurrences is stored.
- When - add a condition which will cause the rule to expire when it is true.
You are also presented with two more options when selecting any of the Schedule options except Immediately, the options are:

-
Make task unique - enable this option to prevent a second identical task being created for this instance of the process
-
Execute in series - select Yes if you want the server-side execution to be in series rather than in parallel.
-
When you are finished editing the dialog box, click on OK or click on Close at any time to exit the dialog box.
Editing, deleting or duplicating rules
When you have clicked on an existing rule, and the rule is visible in the right-hand pane under Rules, there are a number of options available to you.
-
To disable a rule, click the slider across beside the rule name.
-
To copy a rule, click on the Duplicate button beside the rule name.
-
To delete a rule, click on the Bin/Trash button .
-
To view a rule, click on the rule name to open the Edit rule dialog box.
What’s next
To find out more about other workflow rules go to Workflow.
To find out more about other rules go to Rules.