Start a process
Introduction
The Start a process rule allows you to dynamically start a new instance of a different process, or a new instance of the same process, or updates an existing process instance from a chosen process.
For example if we have an ‘Onboarding’ process, our primary process that involves many different tasks like generating documentation, and sending out emails to managers, HR and new trainers, we could have a secondary process called ‘Send email process’ which sends out these automated emails for a new user once the ‘Onboarding process’ starts. You can transfer field data from the Onboarding process to the new process instance for ‘Send email process’. You can also update the secondary process instance, once you have the ID for the process instance, see step 5 below in [How to get started].
When to use
You can add this rule:
- to a field
- to a form
- to a process (the rule will run on load)
Before getting started
In advance of using the this rule, in your process you need to have created at least one or more forms as well as creating:
-
Two processes, one process that acts as your primary process, that then triggers a secondary process also called your target process.
-
A text box field which can be hidden, to hold your target process ID if you wish to update an existing process. To learn more about text box field go to Text box control.
-
Predefined partners must be set up in the Invite partners section of Kianda if you wish to execute rules related to partner processes. Process security must be enabled in the target process to allow your process to interact with it. Go to Process security to see where this checkbox is.
How to get started
To dynamically start a new process:
-
Click on an existing process by going to Administration > Designer and decide which form, or field you will apply the rule to, by clicking on that item for example the Submit button so that it is in edit mode so you can see the Edit/pen button, Pen button
 .
. -
Click on Add a rule > Workflow > Start a process.
-
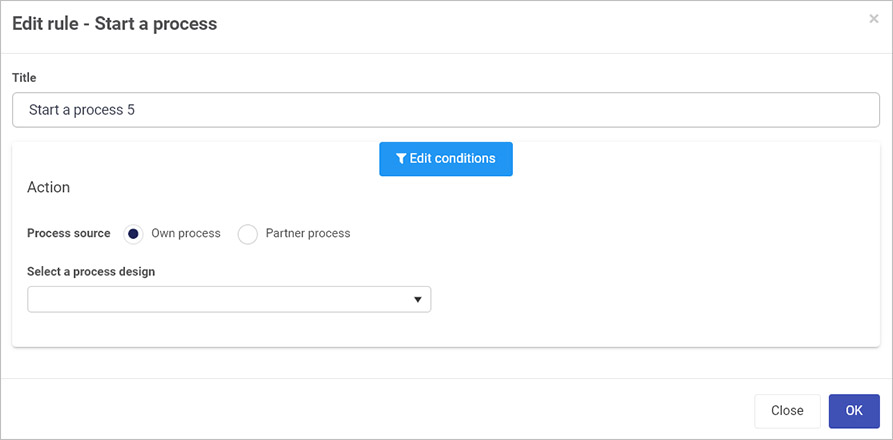
In the Edit rule - Start process dialog box, give the rule a title in the Title field.
-
If you want to add conditions for the rule, click on the Edit conditions button
 to create conditions for the rule, see Conditions for more details.
 -
Under Action create one or more actions for the rule starting with choosing the Process source for the secondary/target process. Choose from Own process or Partner process.
-
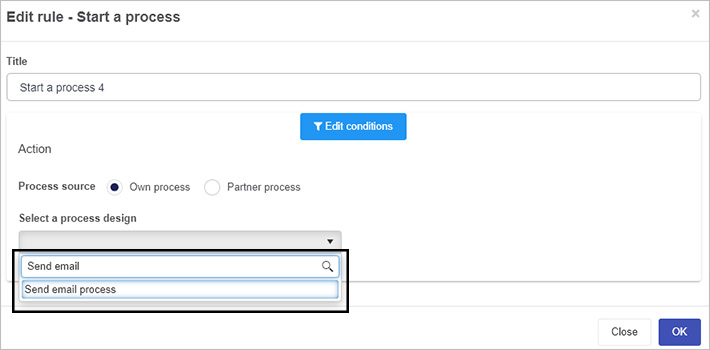
If you choose Own process then choose from a list of processes already created in the system under Select a process design using the drop-down list, or start to type in the name of a process and the list will autofill as shown below.
-
If you choose Partner process then choose from a list of predefined partners under Select a process design. Click on the drop-down list to add Partners. To read more about how to define partners in Kianda go to Invite partners section of Kianda. Note, the partner organisation must have enabled process security to allow your process to interact with the target process, go to Process security to see where this checkbox is.

-
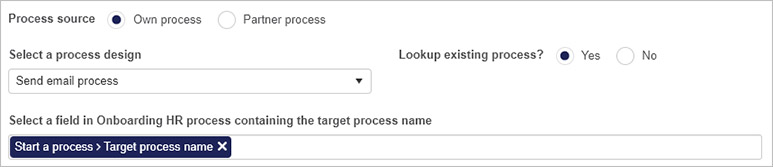
When the design is chosen, other options will appear in the Edit rule dialog box, the Lookup existing process option appears, where you can choose Yes or No.
- If you choose No then that means you are creating a new process instance from that process design.
- If you choose Yes then that means you are updating an existing process instance and you must provide a field containing the target process name. You will also need to provide for the existing process instance. This can be done using the On success mapping section, see below.
-
-
-
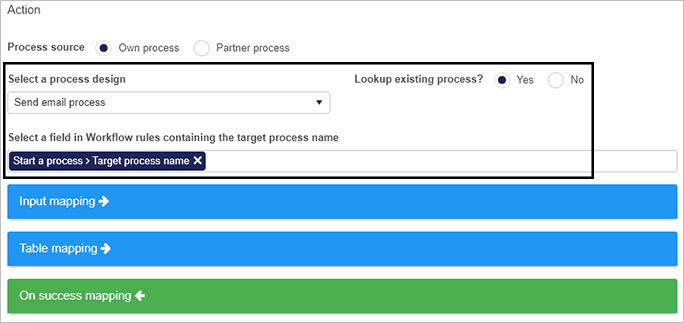
An Input mapping section allows you to map values for fields from the primary process to the secondary/target process fields, read more below.
-
A Table mapping section allows you to map values from a table(s) in the primary process to the secondary/target process table(s), see below.
-
Use On success mapping to retrieve values from the secondary process, showing success in process execution. Click on the link to read more.
-
The remaining options in the Edit rule dialog box are explained below.
-
Click OK when you are finished editing the dialog box, or Close at any time to exit the dialog box.
Input mapping
For Input mapping you can map field values from one process to another. For example in an ‘Onboarding HR process’, if a user fills out their name in a Name field, then that name/value will be mapped to a field in a form in the secondary/target process ‘Send email process’ called New request Name as shown in the example below. Your forms must already have precreated fields to capture the values from process or user input.
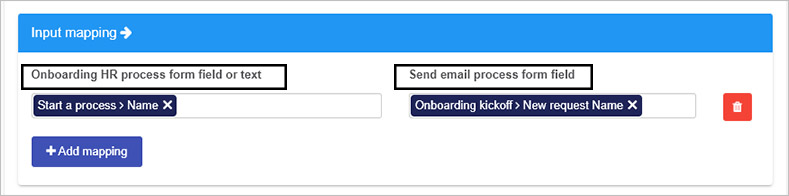
To use Input mapping, click on the blue bar for Input mapping:
-
The process names will automatically appear in the left and right columns once a process design is selected from the drop-down list, see step 5 in How to get started above. Within each field, choose a form and then a field that you would like to map the values from one process to another. Alternatively, you can type in text to pass from the primary process to a field in the secondary process.
-
Click on the Bin/Trash button
 to delete a mapping.
 -
Click on the Add mapping button
 to add further mappings from the secondary/target process to the primary process. Ensure that form fields are already precreated to hold these values.
Table mapping
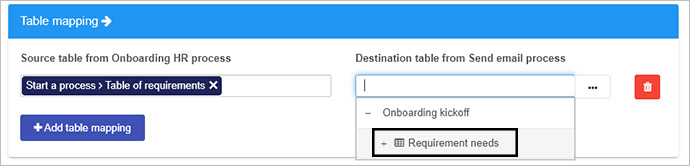
If you use a table in your process you can map fields from a table in one process to another in a similar way to the fields in Input mapping, but this section includes additional parameters to give you a range of options.
To use table mapping, you must already have tables created in your primary and secondary processes. Then click on the blue bar for Table mapping:
-
The process names will automatically appear in the left and right columns once a process design is selected from the drop-down list, see step 5 in How to get started above.

-
Click on Add table mapping to and add input and output tables for each process. Click on a form and then a table of choice.
-
Click on the ellipsis button
 to open the Table mappings dialog box.
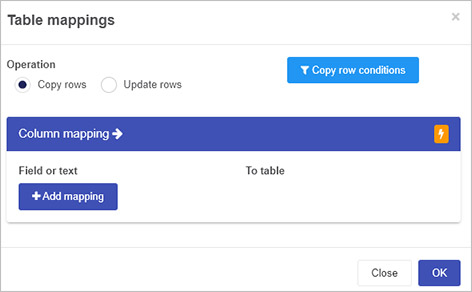
Options within this dialog box are:
-
Operation - choose from:
-
Copy rows which allows you to copy row data from one process to another. You can also add conditions to the copying process by clicking on Copy row conditions to allow you to have conditions on which rows are copied over to the target process. We can add fields or text to the conditions. Click on Conditions to read more about conditions in Kianda.
If you click on the Action button
 then column titles from the primary and secondary processes are automatically listed under Column mapping as shown below, where Need and Reason are column headings in the table in the primary process and Customer need and Reason given are column headings in the table in the secondary/target process. In the example below, a condition has been set so that if Need equals the text ‘Broadband connection’ then the values input into the columns listed will be copied over.
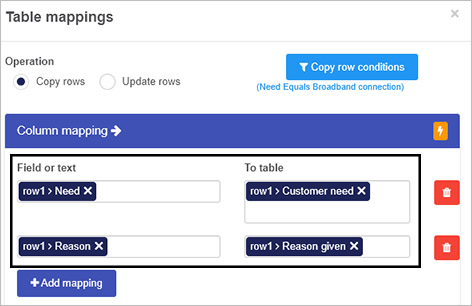
-
Update rows - if you choose Update rows then contents of the target process table will be updated. Similar to copy rows, an Update row conditions button appears allowing you to set conditions for what content is updated. As with Copy row conditions you can set conditions to control how values are mapped from one process to another.
An Action button
is available beside Column mapping to allow you to autofill field names from processes under Field or text and To table fields.
-
-
-
Click on the Bin/Trash button
to delete a mapping. -
Click on the Add table mapping button to add more tables.
On success mapping
If you wish to update an existing process instance you can use mapping within the On success mapping section to retrieve the Process ID of that process instance, and then trigger rules in the target process instance. A text box field within the form can be created to hold the Process ID value, see Before getting started. The ID for the existing process instance, is one of the Common fields that can be pulled from the system.
To use On success mapping:
-
Click on the green bar of On success mapping to reveal primary and secondary/target process form fields. For example in the image below, the primary process is called Onboarding HR and the secondary process is called Send email process. Both of these appear automatically below when the green bar is clicked on.
- From here you can choose to add in form fields, for example a text box field called Sales Onboarding Process ID that will hold a common field Process ID from the target process.
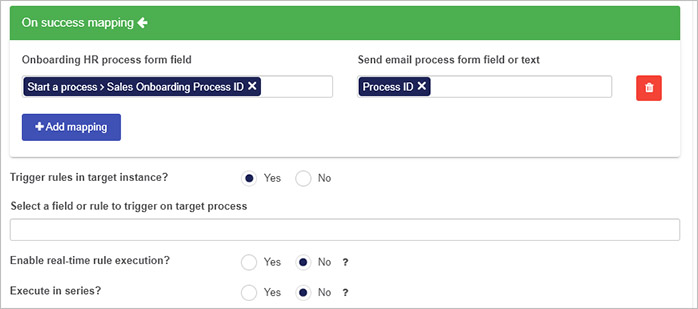
- Click on the Bin/Trash button to delete a mapping.
- Click on the Add mapping button to add further mappings from the secondary/target process to the primary process. Ensure that form fields are already precreated to hold these values.
-
Further options exist under this section, starting with Trigger rules in target instance allowing you to kick off business rules enabling actions in the target process. Options are:
-
No where triggering rules is disabled, and no further options appear.
-
Yes where triggering rules is enabled, and further options appear:
-
Select a field or rule to trigger on target process - clicking on this field allows you to choose a form from the target process and from there you can drill down to a field to trigger all the rules attached to that field, or drill down to a particular rule so that only that rule will be triggered as shown in the example below.

If you want to save values passed under Input mapping then trigger the Save button (that contains the Save process and Close rules) found by default in all Kianda forms.
-
Enable real-time rule execution? - options are Yes or No. If you choose Yes, rules in the secondary/target process instance will trigger without any delay in the server. If you choose No then a second option becomes available to allow you to choose to Execute in series?

- Execute in series? - options are Yes or No. If you choose No then the server side execution of rules will happen in series or in sequence, instead of in parallel. In series or in sequence refers to synchronous execution, where a rule will only execute when the previous rule has completed. In parallel refers to asynchronous execution whereby rules execute without waiting for the previous rule to finish. This type of execution is useful when rules are not dependent on each other, for example the output of one rule is not used as input for another.
-
-
-
When you are finished editing the dialog box click on OK or click on Close at any time to exit the dialog box.
For more details on using On success mapping with other rules click on On success mapping.
Editing, deleting or duplicating rules
When you have clicked on an existing rule, and the rule is visible in the right-hand pane under Rules, there are a number of options available to you.
-
To disable a rule, click the slider across beside the rule name.
-
To copy a rule, click on the Duplicate button
 beside the rule name.
 -
To delete a rule, click on the Bin/Trash button
 .
. -
To view a rule, click on the rule name to open the Edit rule dialog box.
User tip 
- Remember the target process can be a Partner process and in this case, the partner organisation must have enabled process security (in the Process settings for the target process) to allow your process to interact with the target process.
- Use the Lookup existing process flag to find a particular instance of the target process at runtime. If you select Yes, then you can select a field in the current process which contains the id of the target instance.
- Use Trigger rules in target instance to select a field or rule to trigger in the target process. Set Execute in series to Yes to ensure server side execution is performed in series instead of in parallel.
- Another feature of this rule is that you can read data from another process instance. In this case it is advisable to give the title of the rule a title such as ‘Read data from Process X’. Click on the green bar of On success mapping and use this area to copy data from the target process to the current process.
What’s next 
To find out more about other workflow rules go to Workflow.
To find out more about other rules go to Rules.
Feedback
Was this page helpful?
Glad to hear it! Please tell us how we can improve.
Sorry to hear that. Please tell us how we can improve.