A File system data connector allows you to use your local file system as a data source for your Kianda forms or dashboards. This means that as your processes are running, they will use the information from the local file system or depending on the process, update or delete information at the local file system location. Kianda has the ability to extract files, navigate subfolders and write new files into the directory, this includes local file and internet file systems.
Using this type of datasource is useful when you want Kianda to have access to your directory, to extract and read files as well as writing files to the directory.
How to get started
-
From the Kianda home page, click on Administration > Data sources.
-
Click on + Add new button
 and choose File system from the list of data sources provided.
 -
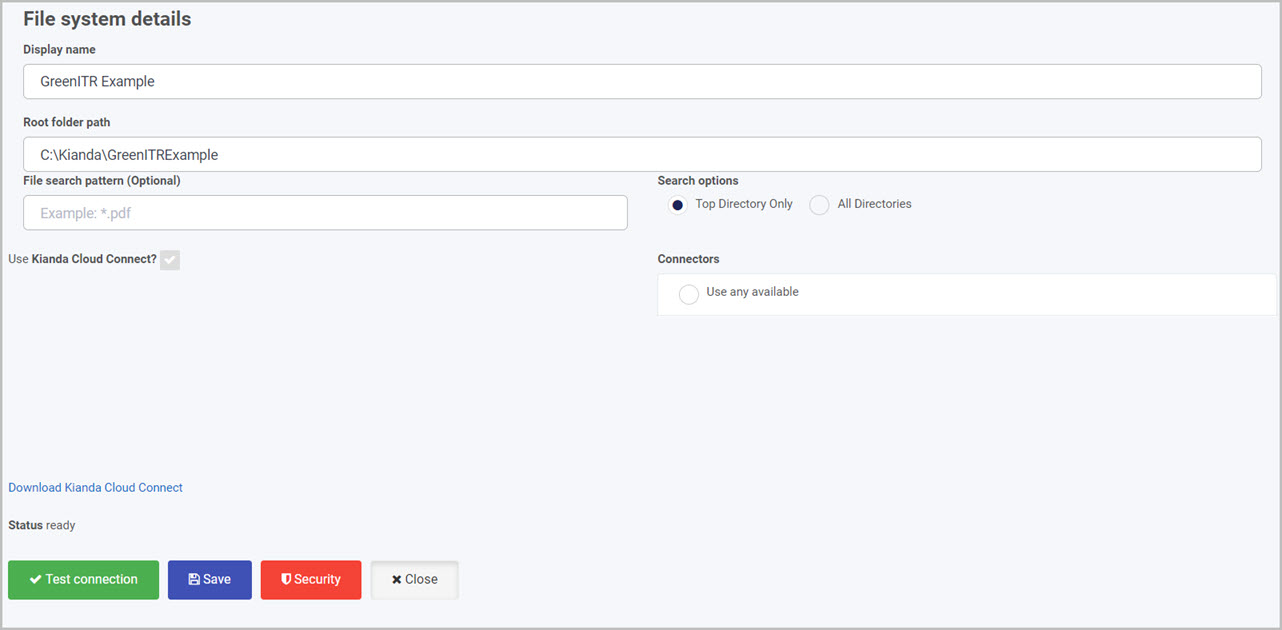
You will be automatically brought to the File system details page, where you can start setting up the connection.

Choose from the edit options:
- Display name - type in the name for your file system connector. This is used to distinguish between different data connectors on your platform.
- Root folder path - type in manually the file path to the folder of your connector, for example C:\Documents\GreenITR. The connector will be able to access data only in this folder and folders within.
- File search pattern - this options can be used to limit the type of files for interaction, by using file extensions. For example typing in
*.txtwill only output the .txt files within the folder path, it will ignore all other path endings and will not display them. To set pattern you need to type in*followed by.extenstionfor example*.txt,*.docxor*.pdf - Search options - this only allows you to search the files of the top directory that is set in the Root folder path or all other files of other directories within.
- For example selecting if Top Directory Only is selected, you will be able to see only the files that are in Root folder path while ignoring folders, meaning that no subdirectories can be navigated.
- If All Directories is selected, you will be able to see files that are in Root folder path and all files from within each folder, or subfolders.
- Use Kianda Cloud Connect - by default this option is enabled and cannot be changed, the cloud connect is needed to create a connection between the local file system and Kianda itself. This lightweight app will sit on the PC or server where the files reside. To learn more about Kianda Cloud Connect and how to create a connection between Kianda and your PC, go to Kianda Cloud Connect.
- Connectors - displays all available connector PC’s that have a connection established with your Kianda website. You must choose the correct PC connection which contains the folder specified in the Root folder path, otherwise the connection will fail.
-
When you have added File system details, you are ready to test your connection and add security. At the bottom of the File system details page, click on Test connection button
 and if the service has been correctly configured, then you should receive a notification saying Connection test succeeded.
 -
Click on Save
 to save the connection and you will receive a notification saying Details saved successfully.
 -
Add Security settings by clicking on the Security button, go to Setting security for data sources for more details.
-
Click on Close to close the details page and return to the data source management main view.
File system parameters
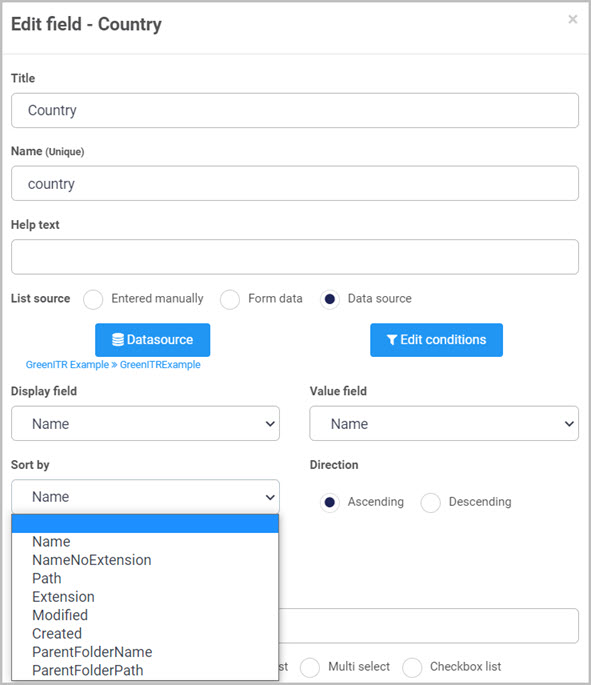
When you use a File system datasource, there are default parameters invoked from the files. For example when you create a list in a Kianda form using a File system datasource, these File system parameters will appear in Display field, Value field and Sort by field in the Edit field dialog box, see Name for example in the image below.

The File system parameters that appear in those three dropdown fields are:
- Name - name of the file including the extension.
- NameNoExtension - name of the file without the extension.
- Path - displays the full path to the file.
- Extension - displays just the extension of the file.
- Modified - displays the date and time when the file was last modified.
- Created - displays the date and time when the file was created.
- ParentFolderName - name of the folder that contains the file.
- ParentFolderPath - path of the folder that contains the file.
What’s next 
Your File system service is now set up and ready to be used in your processes. To find out more about how to design processes go to Designer.