Kianda SQL Server Connector — Developer Documentation
Overview
The SQL Server connector enables reliable interaction with SQL Server databases within Kianda. It supports full CRUD (Create, Read, Update, Delete) operations on tables using Kianda’s Data Rules, making it possible to integrate SQL Server-driven data flows into Kianda-powered forms, dashboards, and processes. Note: table-level operations are supported; however, creating or deleting tables is not permitted.
When to Use
Ideal for applications requiring dynamic access, modification, or display of data residing in SQL Server tables. You can bind table data directly to input components such as list controls.
Prerequisites
- Ensure there’s at least one existing database on the SQL Server you can connect to.
- Use a login that has the appropriate permissions to establish a functioning connection to the target database.
Configuration Steps
1. Access the Connector Setup
- Navigate to Administration → Data sources in Kianda.
- Click Add new, then select SQL Server.
2. Fill in Connection Details
Provide the following information on the configuration screen:
- Display name: A friendly identifier for the connector (e.g.,
EmployeeDB Connector). - Server: Hostname or IP of the SQL Server (e.g.,
localhost,192.168.1.5). - Database: Name of the target database (e.g.,
HR_Records).
Optional Authentication Settings
- Trusted connection: Use Windows authentication. When enabled, Kianda Cloud Connect is automatically used.
- User / Password: SQL authentication if Trusted Connection is not used (requires SQL authenticatication).
Using Local SQL Server with Kianda Cloud Connect
If your SQL Server is running locally:
- Enable Use Kianda Cloud Connect to bridge your local PC and Kianda.
- Choose your machine from the Connectors list to complete the setup.
3. Validate and Save
- Click Test connection. A successful response should display “Connection test succeeded.”
- Click Save to commit your configuration (notification: “Details saved successfully”).
4. Secure Connection Access
- Click Security and define Admins and Users who can manage or interact with this data source.
5. Exit Setup
Click Close to return to the Data Sources management view.
Local Server Connection Walkthrough
(Optional: Use when working with SQL Server on your development machine)
- Follow the connector setup steps above.
- Enter
localhostas the Server and the target Database name (e.g.,GreenITR). - Enable Trusted connection and Use Kianda Cloud Connect.
- Select the local PC as the connector target.
- Test and save the connection.
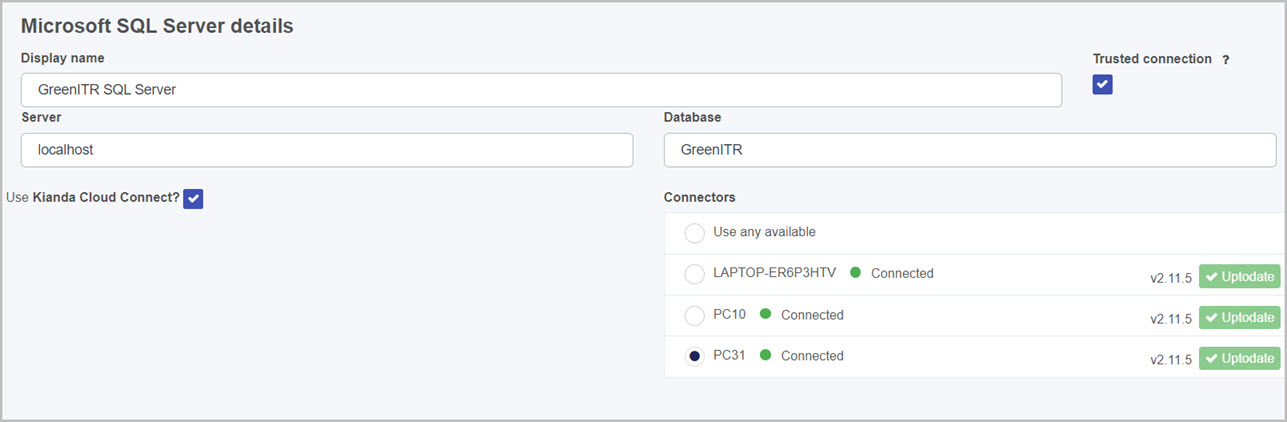
Table-Level Parameters
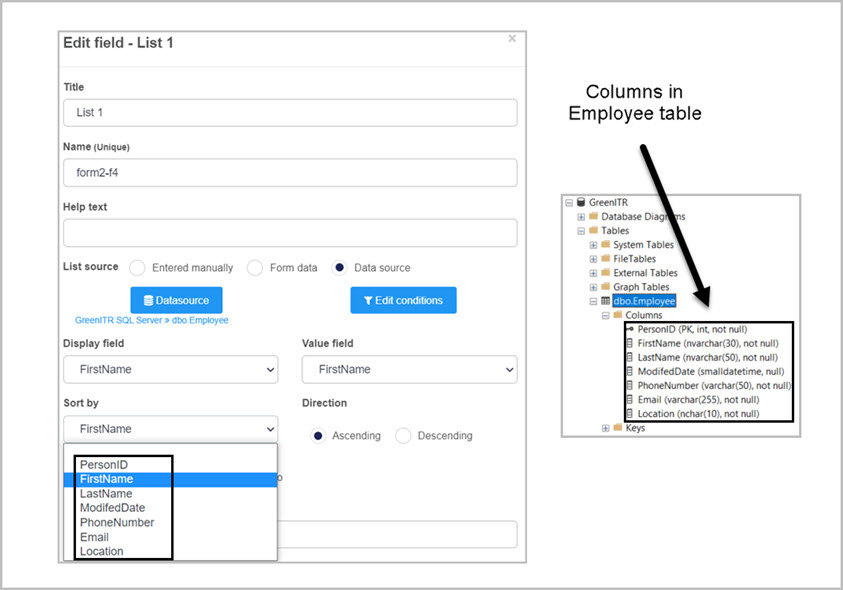
Unlike other connectors, SQL Server connections don’t expose built-in parameters. Instead, when you bind a table—say, Employee—its columns populate dynamically into Kianda form controls such as:
- Display field
- Value field
- Sort by
These options adapt to whatever columns exist in the chosen table.
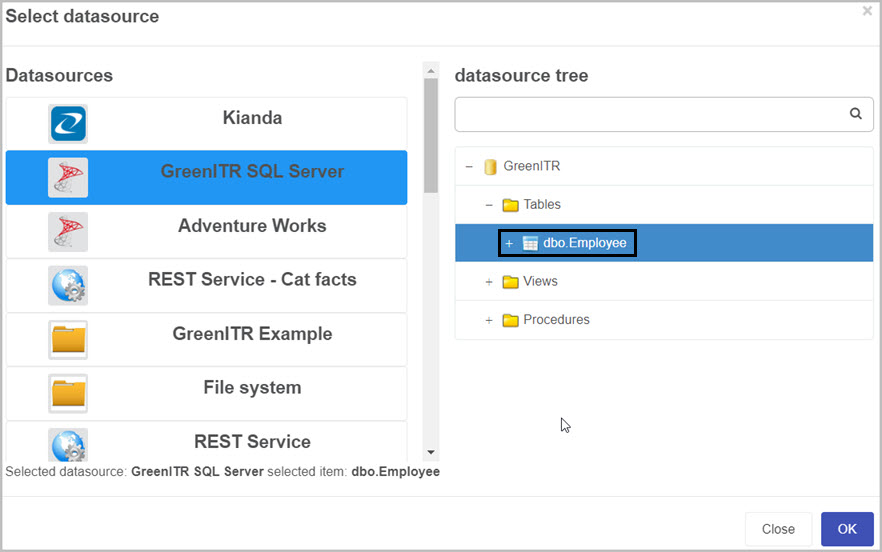
The list of parameters displayed in the the Display field, Value field and Sort by field will match the columns that we have in the Employee table, see image below:
Post-Setup: Next Steps
With your SQL Server connector configured and secured, you can now:
- Use Kianda’s List control to bind SQL table data to form dropdowns, lists, or tables.
- Leverage Data Rules like Find item, Create item, Update item, and Delete item to integrate CRUD operations into your form-driven logic. You can map form fields as query parameters directly to form fields.
Best Practices for Developers
- Naming strategy: Use descriptive display names to easily distinguish between multiple connectors.
- Auth clarity: Understand the differences between Trusted Connection and SQL authentication—choose based on your deployment model.
- Leverage Cloud Connect for local development access without exposing servers directly.
- Secure access appropriately: Use role-based restrictions to uphold data integrity.
- Use dynamic binding: Rely on automatic column binding to reduce manual configuration.
- Test thoroughly: Especially when switching between local and remote SQL Servers or between authentication methods.