Processes in Kianda are made up of forms. Forms contain all the buttons, fields, and rule triggers needed to execute your process.
Using your Administrator or Design business process role, you will use Kianda Designer to design forms for end users who will use the platform to submit, save and review information, either as named users in the platform, users who receive a link to an anonymous form, or partners who can access shared processes. These end users will create new process instances or records in the system, or access existing process instances which shows information that has either been saved or submitted in a form.
When discussing forms we’ll talk about form design that is creating and updating forms within a process using Kianda Designer as well form use which refers to end users who will edit or read forms in a process instance/record in the system, built using the Designer.
Form design principles
As you work with Kianda Designer you are designing the ‘user interface’ for users to interact with a particular process. Keeping the end user in mind, there are three design principles:
Reading modes: Form users can either use/access forms in edit mode or read mode. Edit mode means that users can submit information, while read mode means that users can only view forms. The latter may be useful for example for certain staff to review customer feedback in a form, but not be able to change/edit the feedback form.
Current form: Typically there are several forms in a process, and by default the first form in a process is the current form.
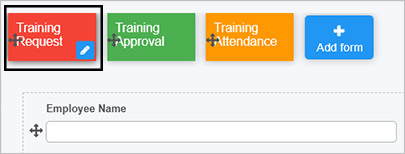
For example in the Training Attendance Process above, the process flow is as follows:
Training Request - an employee initiates a process instance by filling out this form
Training Approval - the manager approves the request using this form
Training Attendance - when training approval occurs, a trainer invites the employee to attend training and once complete, the trainer completes a this form to evaluate the employee’s participation.
Therefore when a process instance is initiated upon submission of the Training Request form, then the next form in the process becomes the current form, in this case the Training Approval form.
Only the form that has the status ‘current form’is editable by a form owner (see point 3 below). In a complex multi-step process, several forms can be configured to activate with the current form, meaning they are also editable at the same time, creating a form group, see section 2 of New form creation. Rules can also be used to change the workflow and make other forms the ‘current form’.
Also note that all first forms in a process flow add the current user as a ‘form owner’ therefore allowing all users to edit the first form, as clicking on ‘submit’ or ‘save’ in the first form results in a new process instance.
Form owner: The default owner is the person or group that the form is assigned to, this means they can edit the current form(s) in a process instance. Default owners are typically set when a form is created, see section 1 of New form creation below. By default, only this person or group can edit the current form in a process instance. All other users can only view forms in read mode. The default owner however can reassign forms to other individuals and/or groups. Form ownership can also be assigned dynamically using the Assign form rule.
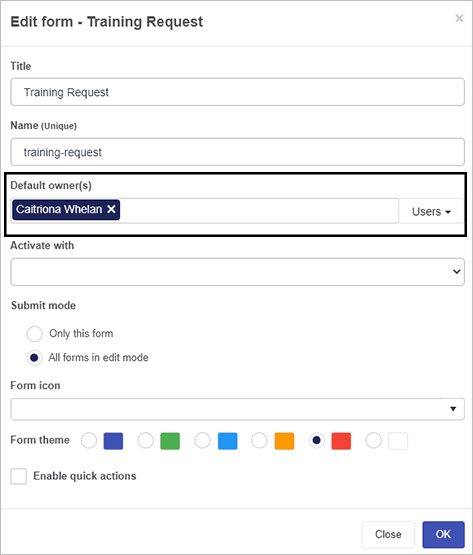
These three considerations are established when the form is created, as seen in the dialog box below, and these parameters can be updated at any time by editing the form design. These properties can also change dynamically as a result of implementing rules, for example the Go to form rule can change the workflow in a process.
New form creation
As mentioned in the Introduction there are certain considerations to keep in mind when working with forms. The image below shows a New form dialog box that is created when the Add form button is clicked in Kianda Designer. At any time if you click on a form and then the Edit/pen button an Edit form dialog box appears which has the same parameters as the one shown in the image below.
New form dialog box
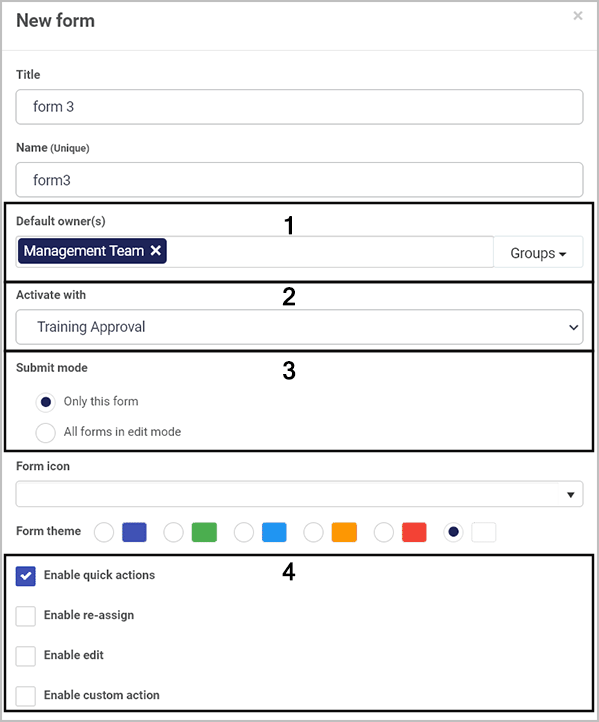
New form considerations
The Default owner(s) field is where you can set individuals and groups as the default form owners who can edit the form.
Activate with means that the form can be activated with other forms within the process, so they can be edited at the same time. This means several forms become the current form in a form group.
Submit mode means that when a process instance is running you can choose only this form to be submitted, or you can choose all forms in edit mode meaning that several forms could have their details submitted or saved.
Enable quick actions allows you to statically enable a) reassignment, b) edit, and c) custom actions on any form. For a) and b) you can choose individuals and/or groups who can reassign or edit forms. In the case of b) edit there are options to hide form footer buttons when editing, and to trigger rules on save against a set field when saving edits. For c) custom actions, you can set your own custom action and create an action label against a particular form field. This means that the user(s) assigning the custom action will see the labelled action designated for them. As a designer you can choose the action display mode as read-only, edit or both, so you can decide what type of access the user(s) will have.
What’s next
We have briefly introduced the principles of working with forms. To read more about working with forms, click on the links below:
1 - Form owners
Introduction
When creating forms, it is important to consider form access during the design phase, that is who can access and edit forms in a process instance. For example if an employee submits a performance review form, a line manager may wish to access that submitted process instance/record and edit the form, adding in comments and performance grades.
There are two key principles to keep in mind in terms of form access:
Forms are assignable - this means that forms can be assigned to individuals and/or groups, and then only they can edit the form, when it is the current form, in a process instance. The ‘assignee’ can be a combination of users and groups. There are various ways a form can be assigned to a user:
a) Using Rules, in particular the Workflow rule Assign form, see Assign form for details
c) Creating form owners when creating or updating a process design, see Creating form owners for details
Only form owners can edit a given form when it is a current form in a process flow by default. Any other user with access to view the form will see it in read-only mode.
So what is form owner? A form owner is assigned when a form is created in Kianda Designer. Form owners can also be added to a form design at a later stage by editing the form. Only the form owner will be able to edit current forms in process instances (records), see below.
Getting started with Form owners
Creating form owners
Click on a process by going to Administration > Designer and click on an existing process or create a new process by clicking on Add new and complete the Add new process dialog box.
Then within Kianda Designer click on a form of interest and then click on the Edit/(Pen) button for that form.
In the New form/Edit form dialog box you can add form owners in the Default owner(s) field.
Using the dropdown list choose from:
Users - Users must already be in the system, see Users & Groups
Groups - Groups must be defined in advance, see Users & Groups
Partners - Partners must be already in the system and active, see B2B portals
If you make a mistake, or form owners need to be changed in an existing process, click on the x beside the name of the Users, Groups or Partners to remove them and choose from the dropdown list again.
Add to or edit the remaining parameters in the dialog box as desired, see Editing forms and click on OK when complete, or Close to exit the dialog box at any time.
Changing form access
The default owner is the person or group that the form is assigned to using the default owner field in the new form dialog box as shown above. By default, only this person or group can edit the current form in a process instance. All other users can only view forms in read mode. The next section details how to Change default owners.
It is also possible to allow other users to have edit access to forms using the Assign rule and Quick actions.
Changing default owners
Using your Administration or Design business process role, go to Administration > Designer > select a process > select a form in the process.
Click on the form so the Edit/Pen button appears in the form name.
Then click on the Edit/Pen button itself to edit the form.
An Edit form dialog box opens which has the same layout as the New form dialog box seen in Creating form owners above.
Here you can change the default owner choosing from Users, Groups and Partners as before.
To find out how forms work within processes go to Process.
2 - Form display modes
Introduction
Remember there are three principles to consider when working with forms:
Reading modes: Form users can either use forms in edit mode or read mode. Edit mode means that users can submit information, while read mode means that users can only view forms. The latter may be useful for example for certain staff to review feedback in a form, but not be able to edit/update it.
Form owner: The default owner is the person or group that the form is assigned to when the the form is created. By default, only this person or group can edit the current form. All other users can only view forms in read mode. The default owner however can reassign forms to other individuals and/or groups.
Current form: Typically there are several forms in a process, and only the form that has the status ‘current form’ is editable. However, in a complex multi-step process, other forms can be configured to activate with the current form, meaning they can also become editable at the same time, creating a form group.
These three considerations are established when the form is created, as seen in the dialog box below.
New form dialog box
These properties can also change dynamically as a result of rules being applied, see Rules.
Setting display modes statically
Remember forms in process instances are either in edit mode meaning they can be edited/changed or read mode where the details are visible to form users but cannot be changed. The actions below refer to making forms editable so if the actions below are not used, then the forms are in read mode. The actions below refer to static or fixed use, set when the form is first created or updated at a later time.
Forms in process instances will be editable for Default owner(s), that is the form owners defined when the form is created, or a form is edited. Form owners are defined in the New form/Edit form dialog box, shown in part 1 of the image above. When a process instance runs, the form owner can then edit the form in that instance.
By default the first form in a process becomes the current form, so only this form will be editable. However if several forms are activated with the current form when the form is created or edited in the New form/Edit form dialog box shown above, then all forms in that group will be editable by the form owner in a process instance.
By default the Submit mode for forms is Only this form meaning that when a process instance is running you can choose only that particular form can have details submitted or saved. Alternatively you can choose all forms in edit mode, meaning that several forms can have their details submitted or saved. For example if several forms are activated together and all are in edit mode then the details of all these forms can be submitted together in the database.
Forms can be statically set to allow Quick actions including allowing editing. When a form is created or edited using the New form/Edit form dialog box, clicking on Enable quick actions allows you to statically enable:
a) reassignment of forms
b) editing of forms
c) custom actions on any form
For a) and b) you can choose individuals and/or groups who can reassign or edit forms. In the case of b) edit there are options to hide form footer buttons when editing, and to trigger rules on save against a set field when saving edits.
For c) custom actions, you can set your own custom action and create an action label against a particular form field. This means that the user(s) assigning the custom action will see the labelled action designated for them. As a designer you can choose the action display mode as read-only, edit or both, so you can decide what type of access the user(s) will have.
Changing form display dynamically with rules
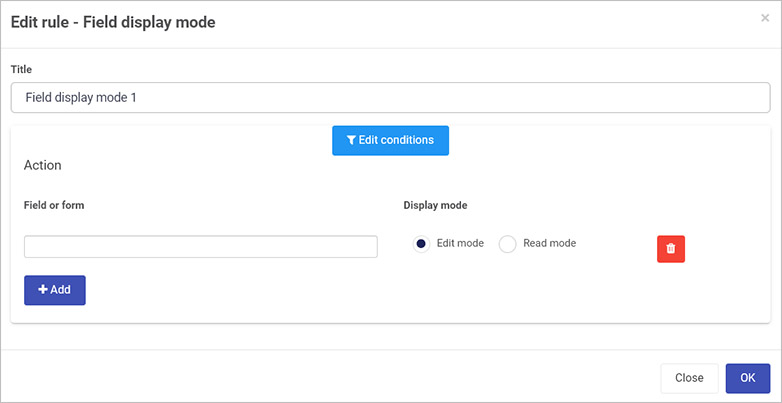
If you use the Form action rule called Field display mode, you can change how a field or form displays dynamically. For example you have a condition set that the display will change based on the condition being present or not.
When you add this rule, under Action you can choose a field or form and choose from Edit mode or Read mode.
Other rules can be used in other ways to change process workflow and therefore how forms behave. For example using the Assign form rule you can assign a form to a particular user, making them the form owner, and therefore giving them edit access to the form.
Kianda low-code development platform - process designer
Kianda process Designer empowers you to easily start building forms and workflows for any business use case. Forms are an important component of any process. They might be used as a stage of a process and can be made active individually or at the same time (parallel forms).
There are 3 key principles to consider when working with forms:
Form design - what a form looks like, what elements it contains, for example controls and rules, see Designer layout.
Form interaction- how users can use forms depending on certain sequences happening, see Rules.
Form management - who can edit and access forms is set when creating a new form, see New forms.
Designer layout
To access processes, go to the left-hand pane and Administration > Designer and click on a process that you have created or imported, see Design and build your process.
From the main process view, click on any process to add forms, for example Training process as seen below.
Main process view
The designer window opens and is made up of 3 main parts.
Kianda Designer
The key components of the designer are:
Left-hand pane is used to add form elements like controls and rules. This pane also houses the Exit Designer SavePreview and Publish buttons.
Central form canvas displays the current form you are working on.
Right-hand pane is used to view and edit process, form and field properties.
Note the name of the process you are working on is shown in the top menu bar, for example Training Process.
The video below demonstrates how to get started using Kianda Designer, and go to How to get started to follow through on different ways to import forms or start from scratch.
Introduction to Kianda Designer
How to get started
How you get started with forms depends on:
if you have created a process using the App Store, see Predefined forms
if you have created a process from scratch or want to create a form from scratch, see New forms
if you import forms that have already been created, see Import forms
Once your form is created, you are ready to start adding elements to your form, see Add controls and rules.
If you have created a process using the App Store, then a number of forms will already be part of the process. For example the process Security Incident Management has 5 forms attached: Incident detail, Data breach, Malware outbreak, Root cause remedy and Caller review.
To edit form details, simply click on a form and click on the Pen button to edit the form. You can also click on the Add form button to add a new form. Edit options are shown under New forms.
New forms
If you have created a process from scratch, an empty form is added to your process by default, called “form 1”. This is the first form. Click on this form and the Pen button to customise it. You can also click on the Add form button to add a new form.
Adding a form
There are a number of edit options below.
Editing a form
Note: as you change any of the options in the dialog box, the impact will be shown in real-time on the form in the background, for example a title, or colour form theme.
Title - the form title, for example Employee Request Form
Name - this is a unique name for the form
Default owner(s) - by default the form creator is an owner. You can remove this owner by clicking on and add other owners by clicking on the arrow and choose from Users, Groups or Partners.
Users - allows you to choose individual owners
Groups - allows you to choose from defined groups for example HR Team or Management Team
Partners - allows you to choose predefined partner organisations that you want to share with or provide permissions
Activate with - will decide when the form will be active. If you have several forms attached to a process, then select from a dropdown list the form you want to activate with the current form. If you leave the field blank, the new form will be activated sequentially after the first form is submitted.
Submit mode - options are a) Only this form (the current form) or b) All forms in edit mode
Form icon - click on the arrow to choose from hundreds of icons to attach to your form.
Form theme - choose from Navy, Green, Blue, Amber, Red or White Colours for your form.
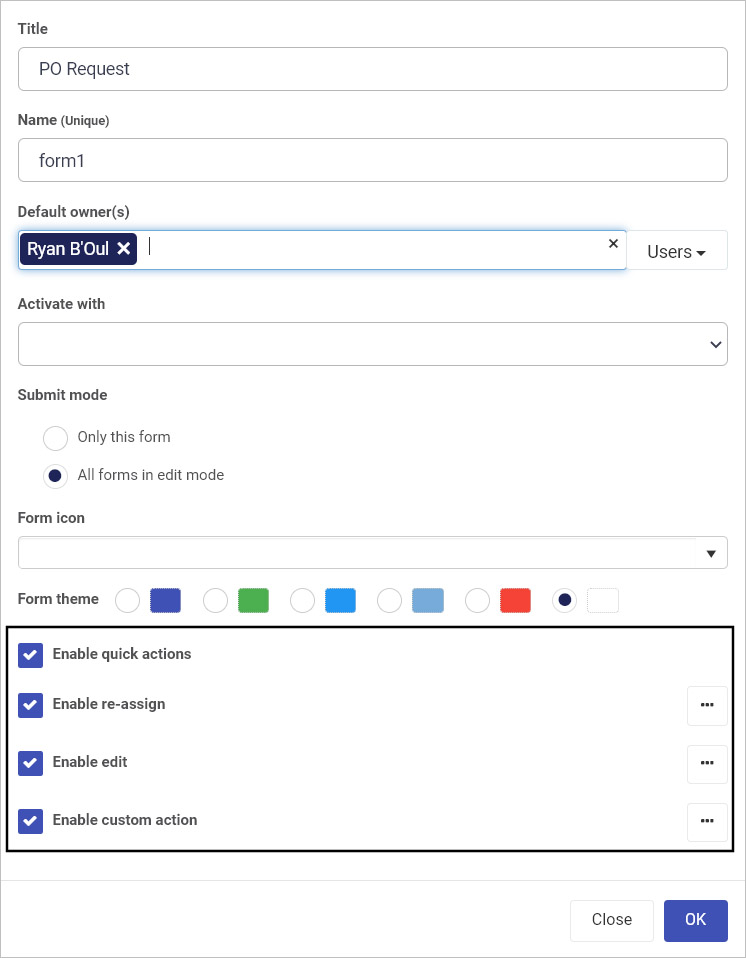
Enable quick actions - if you tick the checkbox, you can select from the options a) Enable re-assign b) Enable edit and c) Enable custom action. Click on Ellipsis button to further modify the action settings.
If you click on Enable re-assign, you can reassign action settings to particular Users, Groups or Partners. Click on Allow form owners if you want form owners to be able to reassign actions.
If you click on Enable edit, you can allow certain Users, Groups or Partners to edit the form, along with form owners by clicking on Allow form owners.
Other options include a checkbox for When editing auto hide form footer buttons and Trigger rules on save.
If you check Trigger rules on save then click into the Save action field to choose from an action trigger as to when the form is saved, for example Submit, Save or Close. These can be other actions depending on what you have defined.
Edit action settings
If you click on Enable custom action, you can allow certain Users, Groups or Partners to edit the form, along with form owners by clicking on Allow form owners.
Other options include Action label, Target action field and Action display mode, for example Read-only mode, Edit mode or Both.
Custom action settings
As a form designer you can set up actions dependent on certain conditions, for example an Action label that targets a certain button appearing for example Close button, only when a certain display mode is chosen, for example Read-only mode. If Edit mode is chosen, then the button will only appear when the form is being edited. In this way you can create dynamic forms that suit user interactions.
Click on the OK button when you are finished editing to save your changes or click on Close to exit the dialog box without saving.
To save your changes to the form, click on the Save button .
You can import a previously designed form by clicking on the Import button .
Click on the arrow to select from the drop down list to Select a process design.
Click on a process of interest and then click on the forms to import. Forms are indicated by a + symbol and can be expanded to show elements within a form for example a panel containing different fields such as lists and text boxes. This means you can import a whole form, or just elements of a form. In this way you can very quickly reuse some or all parts of an existing form.
Importing from another process
Click on the OK button when you are finished editing to save your changes or click on Close to exit the dialog box without saving.
Adding form elements
If you have added a new form during the form creation process, then a blank canvas with 3 default buttons are available to you: Submit, Save and Close.
Edit form information by selecting a form and clicking on the Pen button .
Change a field to another field by clicking on Change field.
Create a duplicate form by selecting a form, clicking on the Clone button and then click on Ok. A version called ‘Form Name Copy’ is created and available to edit on the canvas. The Clone button can also be used to clone form elements like controls or buttons.
Delete a form by selecting a form, clicking on the Bin/Trash button and then click on Ok after you have reviewed the form title and you are sure this is what you want to delete. Click on Cancel if you wish to cancel the deletion.
You can edit process settings by clicking on the Settings button in the right-hand pane.
Choose from the settings:
Process id settings - choose from a) Default or b) Custom and use a combination of [ProcessName]-[UniqueNumber]-[FieldName]
Enable process security - if you tick the checkbox, can allow certain Users, Groups or Partners to have certain privileges related to the radio button options to create, assign and view as shown below.
Enable process security
The default setting is Security users can create, assign to can update, everyone else can view.
On load rules execution mode - options are a) Always b) When in edit mode or c) When open new. The default setting is Always.
Hide form tabs - gives you the ability to hide form tabs, options are a) Yes or b) No
Hide left nav - gives you the ability to hide navigation elements, options are a) Yes or b) No
Enable anonymous sharing of forms - gives you the ability to share forms with people outside your organisation for example a feedback form or GDPR subject access request. Options are a) Yes or b) No. If you click on Yes there are various options that you can add:
Message to display after anonymous submission - to add a display message
Enabling anonymous sharing
Hide form topbar - checkbox to hide the form topbar.
Force log out - options are a) Yes or b) No to force user logout once the form is submitted
Click on New link to generate a new anonymous form link to share with users and click on Edit to change the link.
Enable mobile bottom navigation - options are a) Yes or b) No
Instance delete settings - options are a) Any user can delete b) Creator can delete c) “Current form owner” can delete d) “Security users” can delete e) “Admins only” can delete. The default setting is Creator can delete.
Enable form assignment notification - options are a) Yes or b) No
Prevent closing instance with unsaved data - options are a) Yes or b) No
Selected tab theme - choose from Navy, Green, Blue, Amber, Red or White as a colour when a form is selected.
Completed tab theme - choose from Navy, Green, Blue, Amber, Red or White as a colour when a form is completed.
Click on the OK button when you are finished editing to save your changes or click on Close to exit the dialog box without saving.
Click on the Exit button to go back to the process list, the Save button to save your work, the Preview button to preview what you have created and the Publish button to publish your work.
What’s next
To learn more about rules and controls that can be applied to forms go to Controls and Rules.
The Form quick action menu will appear to designated users as a quick action menu option in the top right-hand corner of a form.
Depending on what type of quick actions are enabled and if you are assigned quick actions as a form user,, then you will see options when you click on the quick action button , for example to reassign a form to someone else, or to perform a custom action like signing off on a purchase order.
How to get started
To enable quick actions, click on a process with Kianda Designer and then a form of choice so that the Edit (Pen) icon is visible.
Click on the to edit a form.
In the Edit form dialog box, check the checkbox beside Enable quick actions.
When you select Enable quick actions then you have three options to select:
Enable re-assign - allows a form in a process instance to be reassigned to a by a designated person/group
Enable edit - allows a form in a process instance to be edited by a designated person/group
Enable custom action - allows a form in a process instance to have customised actions associated with it, and these actions are assigned to a designated person/group
Check the checkbox beside the desired action as necessary. Each option is further explored below.
Enable reassignment
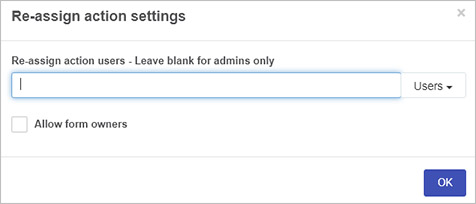
When you check a checkbox for example Enable re-assign then you can click on the Ellipsis button then you can select Users, Groups and Partners who can be chosen to reassign the form to. There is also a checkbox to allow form owners to reassign forms to other users.
Enable edit
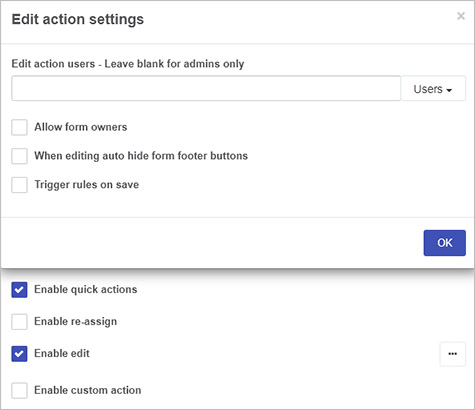
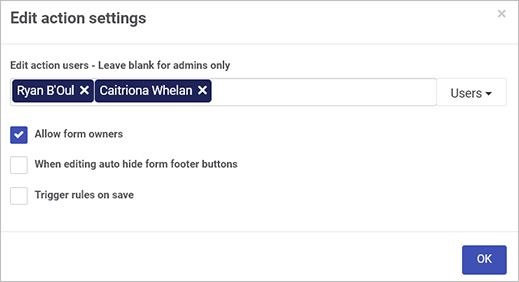
This opens the Action settings dialog box, such as the Edit action settings box shown in the image below.
Choose from the options in the action settings dialog box:
Edit action users - select the Users, Groups or Partners who will use the action
Allow form owners - allows form owners to use the action
When editing auto hide form footer buttons - hides form footer buttons when users are editing forms in a process instance
Trigger rules on save - allows rules to be triggered when a form is saved/submitted. In this case, select the button name used as the trigger in the Save action field
Click on OK when complete or Close to exit the dialog box.
Enable custom action
If you check Enable custom action users who have been selected using the Users, Groups and Partners option, will be able to perform a customised action on a form, defined using the dialog box within this section.
What’s next
To read more about how to create processes and forms go to Application Designer.
Responsive layout refers to the fact that all forms will display equally well on laptop screens, tablets and mobile phone screens. As a form designer you can set the appearance of form fields using the layout function.
How to get started
Within Kianda Designer, click on a process, then a form of choice so that the Edit (Pen) icon is visible.
Click on a field of choice within the form so the Edit (Pen) icon is visible for the field.
Click on the Edit (Pen) icon button for the field.
Click on Layout under Field properties in the right-hand pane.
Click on the Expand button within Layout to see desktop layout see Layout bar and Mobile Layout for the field.
Click on the blue bars to extend the size of the field, for example in the image above, the desktop layout is 50% of the maximum width available, so the field ‘Department Manager’ would only take up half the width of the form. The mobile layout however is set to 100% and the field would take up the maximum width available. There are 12 possible width options that can be used within these bars.
Click on the Collapse button to minimise the Layout property.
What’s next
To read more about how to create processes and forms go to Application Designer.