This is the multi-page printable view of this section.
Click here to print.
Return to the regular view of this page.
Data rules
Data rules is the category of rules that enables the flow of data between data connectors and form elements, for example reading or writing data from a database table or performing data manipulation.
Take an example of one of the rules in the Data rules category, the Find items rule. This rule can be used to extract data from a data source and use this information in a Kianda form. Take an example of an Employee Onboarding or New hire process, where a user chooses a country for a ‘Country’ field from a drop-down list.
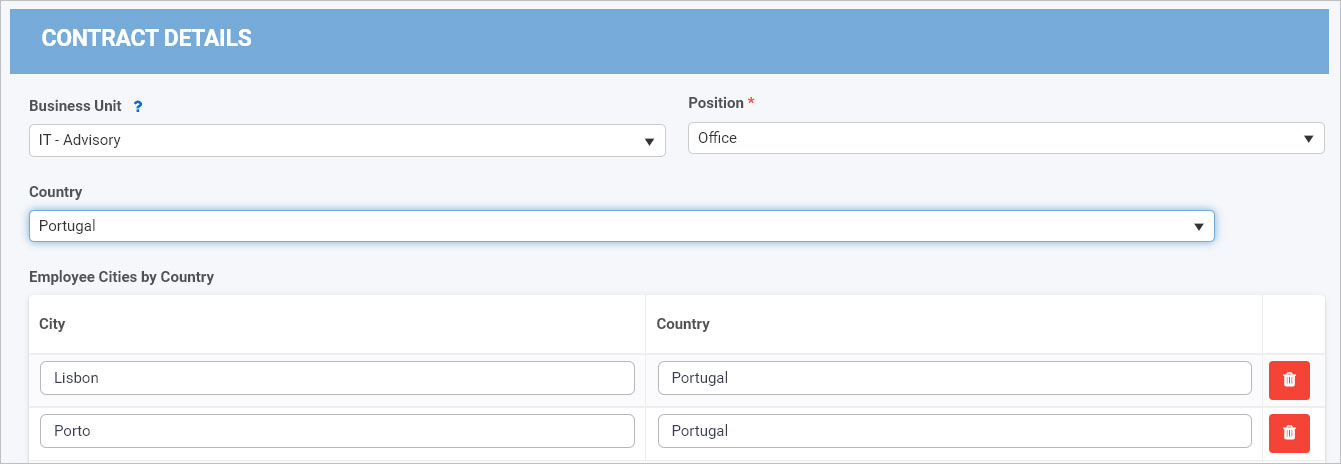
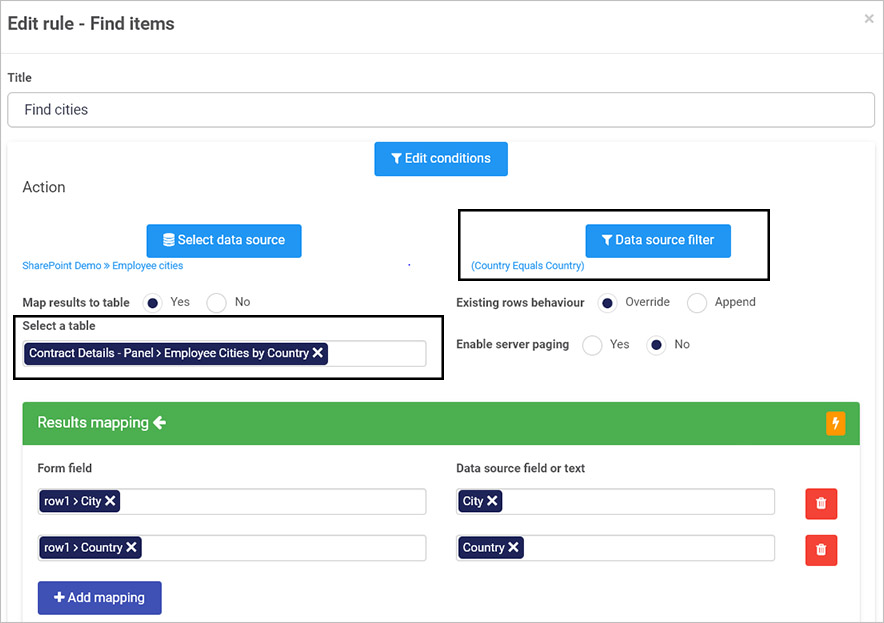
The drop-down list is populated using a SharePoint list in this example, and the ‘Country’ field in turn uses a Find item rule to populate the table below it in the form.
The section below introduces each of the Data rules.
Getting started with Data rules
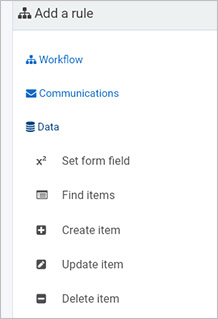
If you go to Administration > Designer and click on a process or create a new process, then click on Add a rule the Data rules are found in the left-hand pane when you click on Data.
There are five types of Data rules as follows:
-
Create item - The create item rule is used to create an item on your data connection. This is a straightforward rule which allows you to connect to your data source and map inputs. You can also map a data source field or text back to Kianda on success or store an error message on failure.
-
Delete item - To delete an item from your data connection, you could use a data source filter and map data source field or text from a data connection to Kianda form field.
-
Update item - This rule works in the same way as the Delete item rule. At any point, if you would like to update any item on your data connection, use this rule. To find an item to update, you could use a data source filter and map the input fields or text.
-
Find items - Use this rule together with a datasource to perform a query and return data for use with the form. To find an item, you could use a data source filter which acts as a conditional bridge between Kianda and data-connections. If the condition is true, you could map the data source field or text to the Kianda form field.
-
Set form field - This rule is used to update the value of fields in a form. The field value could be simple text or based on a custom expression with the ability to define JavaScript expressions. Use this rule to copy content between fields or to apply a custom expression to set the value of a given field.
What’s next 
We have briefly introduced each of the five types of Data rules. Click on the links below to find out more about each rule in detail.
1 - Set form field rule
Introduction
Using the Set form field rule you have the ability to select a field within your process and assign it a value using manually typed text or an expression. With the Set form field rule you can set multiple fields at once by adding more fields to the value mapping within the rule.
This rule is useful when automating processes with previously provided information from other forms. You can apply this rule to a form which will activate the rule when the form is loaded. You can pass query strings and apply the Set form field rule assign values to fields when opening form for the first time. To learn more about query strings go to Query strings.
When to use
You can add this rule:
How to get started
-
Click on an existing process by going to Administration > Designer and decide which form, or field you will apply the rule to, by clicking on that item so that it is in edit mode so you can see the Edit/pen button, Pen button  .
.
-
Click on Add a rule > Data > Set form field.
-
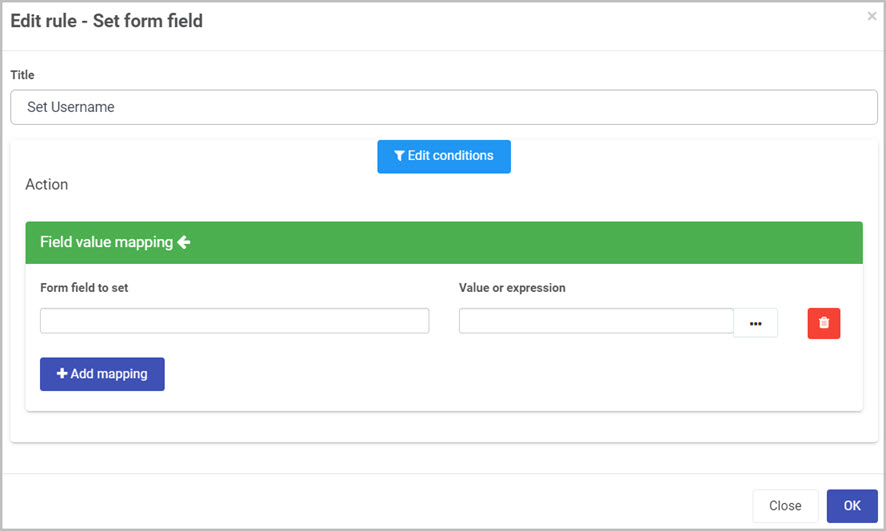
In the Edit rule - Set form field dialog box, give the rule a title in the Title field.
-
If you want to add conditions for the rule, click on the Edit conditions button  see Conditions for more details.
-
In the Field value mapping section, you can select which fields to set and what values to give them. You can do that with the following fields:
- Form field to set - this dropdown list is used to select a field from within your process that you want to set.
- Value or expression - in this field you are able to type in text manually to set the value for a desired field. To make this rule dynamic and use other fields as values, you can use expressions. To learn more about expressions go to Expression builder.
- Add mapping - you can choose to set multiple fields in your process by clicking on Add mapping button. You can also remove fields by clicking on the Bin/Trash icon
 .
.
Editing, deleting or duplicating rules
When you have clicked on an existing rule, and the rule is visible in the right-hand pane under Rules, there are a number of options available to you.
- To disable a rule click the slider across beside the rule name.
- To copy a rule, click on the Duplicate button
 beside the rule name.
 - To delete a rule, click on the Bin/Trash button
 .
. - To view a rule, click on the rule name to open the Edit rule dialog box.
What’s next 
To find out more about other Data rules go to Data rules.
To find out more about other rules go to Rules.
2 - Find items data rule
Introduction
This rule implements the Read function which is one of the four CRUD (Create, Read, Update and Database) functions. The rule will read one or more items of data from a chosen data source, for example SharePoint, SAP or Oracle databases, see Data connectors for more details.
This rule is used to find an item from your data connections. To find an item, you could use a data source filter which acts as a conditional bridge between Kianda and data connections. If the condition is true, you could map the data source field or text to the Kianda form field.
This rule is used to perform a query and return data for use in the form. The data may be stored locally or in one of the data sources
The Data source filter is useful when you want to query data from a specific user using a unique identifier like an Id, name or email.
When to use
You can add this rule:
How to get started
-
Click on an existing process by going to Administration > Designer and decide which form, or field you will apply the rule to, by clicking on that item so that it is in edit mode so you can see the Edit/pen button, Pen button  .
.
-
Click on Add a rule > Data > Find items.
-
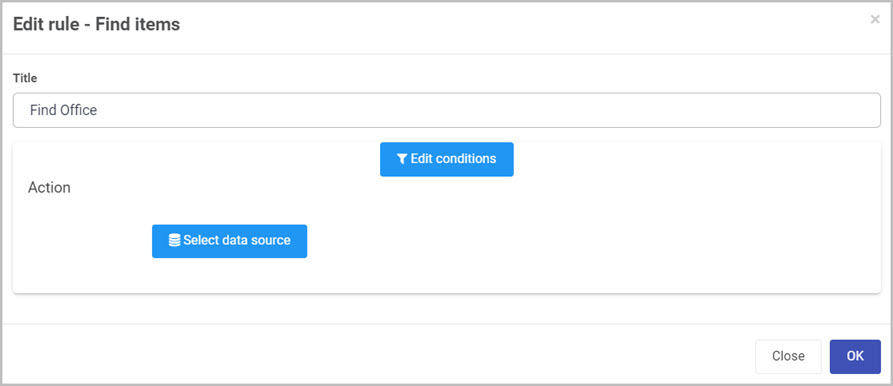
In the Edit rule - Find items dialog box, give the rule a title in the Title field.
-
If you want to add conditions for the rule, click on the Edit conditions button  to create conditions for the rule, see Conditions for more details.
-
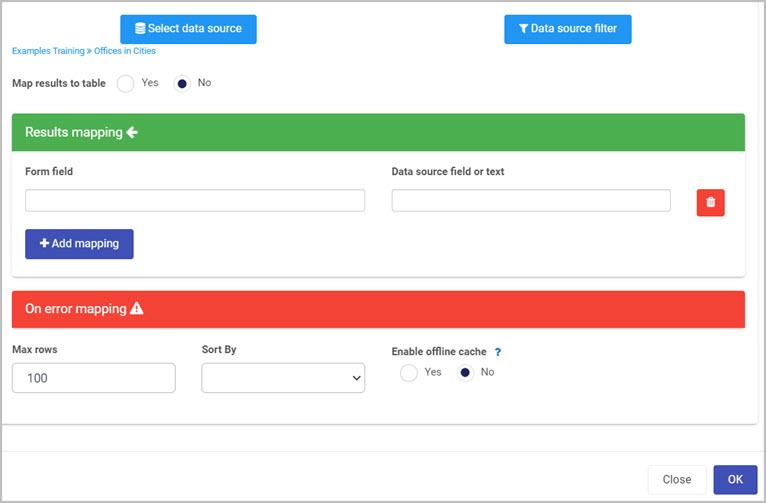
Click on Select data source button  to select the desired data source. When you select your data source, new mappings options are presented.
-
Data source filter - this is used to filter data within your datasource. It works on condition bases which allows you to pull wanted and unwanted data back into the process. To learn more about conditions go to Conditions.
-
Map results to table:
-
Results mapping - is used to set fields within your form from the datasource itself. To learn more about results mapping go to On Success Mapping.
-
On error mapping - you can expand this option by clicking on it, then add fields where you can display any error message that may have occurred during the mapping process. To learn more about error mapping go to On Error Mapping.
-
Max rows - will allow you to set a number of fields to be displayed within a table.
-
Sort By - allows you to sort the results of your datasource within the mapped rows of the table.
Editing, deleting or duplicating rules
When you have clicked on an existing rule, and the rule is visible in the right-hand pane under Rules, there are a number of options available to you.
- To disable a rule click the slider across beside the rule name.
- To copy a rule, click on the Duplicate button
 beside the rule name.
 - To delete a rule, click on the Bin/Trash button
 .
. - To view a rule, click on the rule name to open the Edit rule dialog box.
What’s next 
To find out more about other Data rules go to Data rules.
To find out more about other rules go to Rules.
3 - Create data item rule
Introduction
This rule implements the Create function which is one of the four CRUD (Create, Read, Update and Database) functions. The rule will create one or more items of data from a chosen data source, for example SharePoint, SAP or Oracle databases, see Data connectors for more details.
The Create item rule allows you to create an item of any type in the specified data connector. When applying this rule, you must select a data source in which you want to create the item. When the data source is connecter, you can map inputs from your form fields into your source. Also, you could map a data source field or text back to Kianda on success or store an error message on failure.
When to use
You can add this rule:
How to get started
-
Click on an existing process by going to Administration > Designer and decide which form, or field you will apply the rule to, by clicking on that item so that it is in edit mode so you can see the Edit/pen button, Pen button  .
.
-
Click on Add a rule > Data > Create item.
-
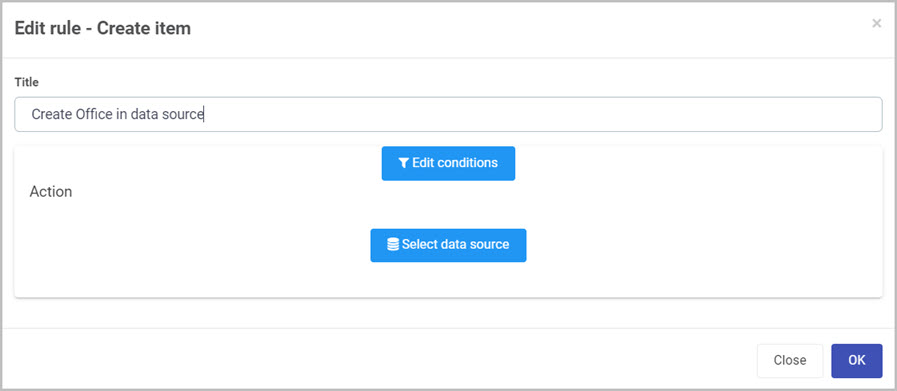
In the Edit rule - Create item dialog box, give the rule a title in the Title field.
-
If you want to add conditions for the rule, click on the Edit conditions button  , see Conditions for more details.
-
Click on Select data source button  to select the data source you want to create a new item in. When you select your data source, new mapping options are presented.
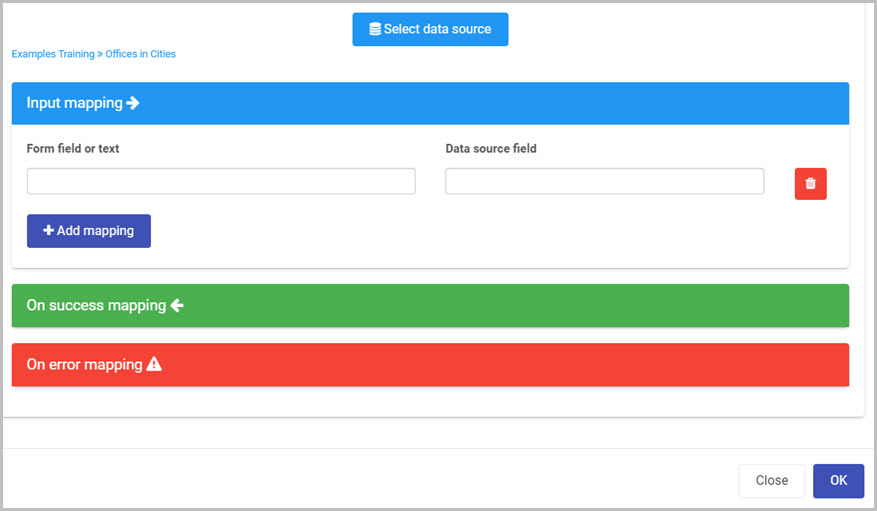
- Input mapping - used to create an item inside of the data source that you selected.
- Form field or text - you can select a field within your form or type in text manually to represent the value you want to your new item to contain.
- Data source field - select a field in your data source to hold the new value.
- Add mapping - you can choose to create multiple items in your data source by clicking on Add mapping button. You can also remove fields by clicking on the Bin/Trash icon
 .
.
- On success mapping - select the field(s) in the form which will store information and populate the data source field or text field with the respective data source value. To learn more about success mapping go to On Success Mapping.
- On error mapping - select the field(s) in the form which will store error messages. Then type in a value or use Error message, to create a system generated error message if an error occurs during rule execution. To learn more about error mapping go to On Error Mapping.
Editing, deleting or duplicating rules
When you have clicked on an existing rule, and the rule is visible in the right-hand pane under Rules, there are a number of options available to you.
- To disable a rule click the slider across beside the rule name.
- To copy a rule, click on the Duplicate button
 beside the rule name.
 - To delete a rule, click on the Bin/Trash button
 .
. - To view a rule, click on the rule name to open the Edit rule dialog box.
What’s next 
To find out more about other Data rules go to Data rules.
To find out more about other rules go to Rules.
4 - Update data item rule
Introduction
This rule implements the Update function which is one of the four CRUD (Create, Read, Update and Database) functions. The rule will read one or more items of data from a chosen data source, for example SharePoint, SAP or Oracle databases, see Data connectors for more details.
The Data source filter in this rule is used for targeting specific data item in your data connection. The item you want to update within your data source is targeted by filtering it out using a field within your form. It is a good idea to connect a dummy field to your data source first and then use that field to filter for the item you want to update. The actual value used to update the item in your data source can also use a field or text filled out in your mapping section (see below for more detail). To make your Update item rule extremely dynamic, it is recommended to create field for filtering an item and a separate field for the new value you want your item to hold.
When to use
The Update item rule should be used whenever you want to update an existing item within a data source of your choice.
You can add this rule:
How to get started
-
Click on an existing process by going to Administration > Designer and decide which form, or field you will apply the rule to, by clicking on that item so that it is in edit mode so you can see the Edit/pen button  .
.
-
Click on Add a rule > Data > Update item.
-
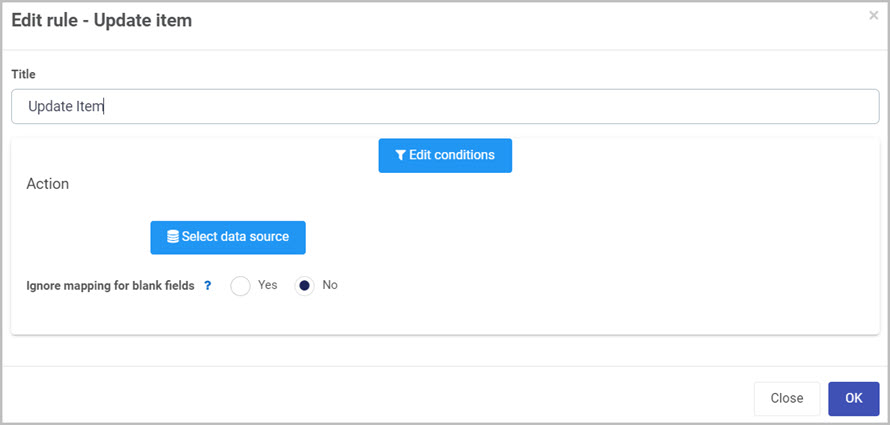
In the Edit rule - Update item dialog box, give the rule a title in the Title field.
-
If you want to add conditions for the rule, click on the Edit conditions button  , see Conditions for more details.
-
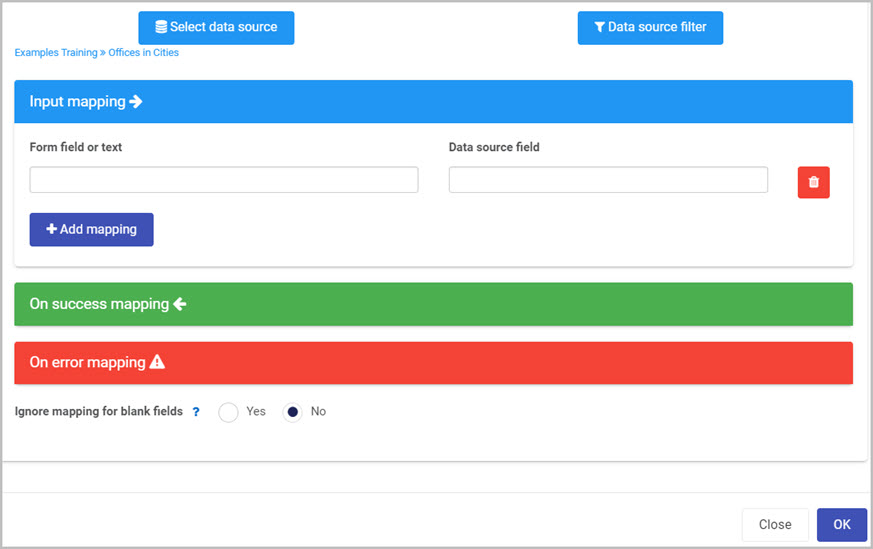
Click on Select data source button  to select the data source you want to update an item in. When you select your data source, new mapping options are presented.
-
Data source filter - works on condition bases where by you can filter the specific item that you want to update within your data source. The condition uses a field from within your form and therefore it is good practice to create a field and connect it to your data source to have the ability of selecting an item that you want to update. To learn more about conditions go to Conditions.
-
Input mapping - used to update an item inside of the datasource that you selected. Within this section the following fields are visible:
- Form field or text - you can select a field within your form or type in text manually to represent the value you want your updated item to contain.
- Data source field - select a field in your data source to hold the new value.
- Add mapping - you can choose to create multiple items in your data source by clicking on Add mapping button. You can also remove fields by clicking on the Bin/Trash icon
 .
.
-
On success mapping - select the field(s) in the form which will store information and populate the data source field or text field with the respective data source value. To learn more about success mapping go to On Success Mapping.
-
On error mapping - select the field(s) in the form which will store error messages. Then type in a value or use Error message, to create a system generated error message if an error occurs during rule execution. To learn more about error mapping go to On Error Mapping.
-
Ignore mapping for blank fields - used to check if there are any blank field that need to be updated on the datasource. For example, if there are two fields to be updated and the user wants to update only one, and leaves the other blank, then the filled out field is updated and the other field is left unchanged.
Editing, deleting or duplicating rules
When you have clicked on an existing rule, and the rule is visible in the right-hand pane under Rules, there are a number of options available to you.
- To disable a rule click the slider across beside the rule name.
- To copy a rule, click on the Duplicate button
 beside the rule name.
 - To delete a rule, click on the Bin/Trash button
 .
. - To view a rule, click on the rule name to open the Edit rule dialog box.
What’s next 
To find out more about other Data rules go to Data rules.
To find out more about other rules go to Rules.
5 - Delete data item rule
Introduction
This rule implements the Delete function which is one of the CRUD (Create, Read, Update and Database) functions. The rule will delete an item data from a chosen data source, for example SharePoint, SAP or Oracle databases, see Data connectors for more details.
The Data source filter in this rule is used for targeting specific data item in your data connection. The item you want to delete within your data source is targeted by filtering it out using a field within your form. It is a good idea to connect a dummy field to your data source first and then use that field to filter for the item you want to delete.
When to use
The Delete item rule should be used whenever you want to delete an existing item within a data source of your choice.
You can add this rule:
How to get started
-
Click on an existing process by going to Administration > Designer and decide which form, or field you will apply the rule to, by clicking on that item so that it is in edit mode so you can see the Edit/pen button, Pen button  .
.
-
Click on Add a rule > Data > Delete item.
-
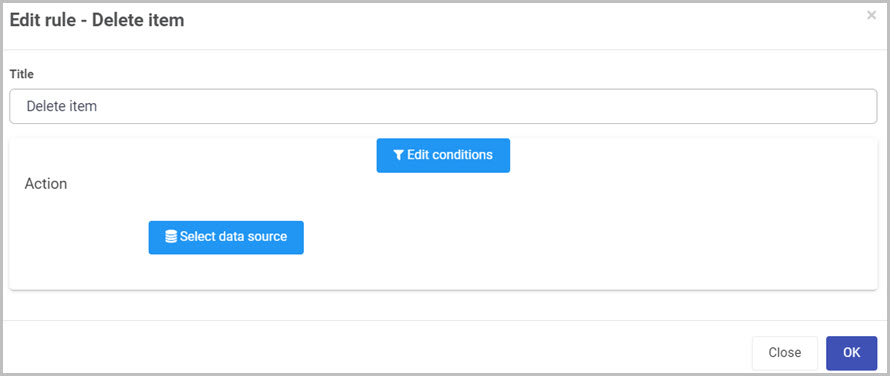
In the Edit rule - Delete item dialog box, give the rule a title in the Title field.
-
If you want to add conditions for the rule, click on the Edit conditions button  see Conditions for more details.
-
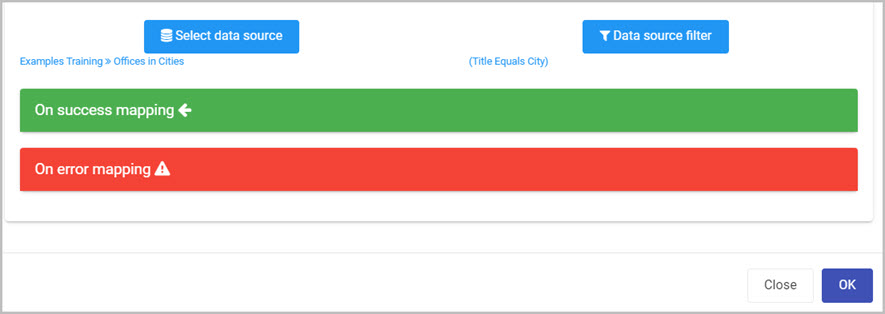
Click on Select data source button  to select the data source you want to update an item in. When you select your data source, new mapping options are presented.
-
Data source filter - works on condition bases where by you can filter the specific item that you want to delete from your data source. The condition uses a field from within your form and therefore it is good practice to create a field and connect it to your data source to have the ability of selecting an item that you want to delete. To learn more about conditions go to Conditions.
-
On success mapping - select the field(s) in the form which will store information and populate the data source field or text field with the respective data source value. To learn more about success mapping go to On Success Mapping.
-
On error mapping - select the field(s) in the form which will store error messages. Then type in a value or use Error message, to create a system generated error message if an error occurs during rule execution. To learn more about error mapping go to On Error Mapping.
Editing, deleting or duplicating rules
When you have clicked on an existing rule, and the rule is visible in the right-hand pane under Rules, there are a number of options available to you.
- To disable a rule click the slider across beside the rule name.
- To copy a rule, click on the Duplicate button
 beside the rule name.
 - To delete a rule, click on the Bin/Trash button
 .
. - To view a rule, click on the rule name to open the Edit rule dialog box.
What’s next 
To find out more about other Data rules go to Data rules.
To find out more about other rules go to Rules.


 see
see  .
. beside the rule name.
 to select the desired data source. When you select your data source, new mappings options are presented.


