Welcome to the Kianda Quick Start Guide! This guide is designed to help you quickly learn how to build, connect, automate, and publish process apps using the Kianda platform. Kianda is a modern form-based low-code development platform that enables you to create beautiful web-based business process applications.
Prerequisites
Admin access to Kianda
Basic knowledge of web development
Process specific knowledge
How to Use This Guide
Follow the sections below to quickly get up to speed with Kianda. Each section provides detailed instructions and examples to help you master each aspect of the platform.
Quick Start Guide Sections
Forms and Controls
Learn how to create forms, add controls, and make them responsive.
Read More
Connect to Data Sources
Discover how to integrate data sources with your forms and processes.
Read More
Build Process Logic with Rules
Understand how to use rules to create dynamic and automated processes.
Read More
Publish Your Process with Pages
Learn how to publish your processes and create interactive pages.
Read More
We encourage you to start building and exploring the capabilities of Kianda. Your feedback is valuable to us, so please let us know how we can improve this guide.
1 - Forms and controls
Learn how to build form and process apps layouts with the form designer
This guide aims to provide you with a clear understanding of how to use Kianda’s forms and controls features to build the process layout for user input capture and to automate tasks.
1. Introduction
Using Kianda’s form builder, you can quickly design dynamic forms and controls to streamline various business processes.
In this section, we will cover the basics of Kianda forms and controls. You will learn how to navigate the platform, access the form builder, and create new process designs.
We will also discuss the different types of controls available, such as input controls, layout controls, actions, and custom controls, and how they can be used to build interactive and responsive forms. By the end of this section, you will be ready to start creating forms that meet your specific business requirements.
Before we begin, ensure you have the necessary admin rights within your Kianda workspace and a basic understanding of HTML, CSS, and JavaScript, especially for creating custom controls. This guide will provide step-by-step instructions and visual aids to help you get started quickly. Whether you are building a simple form or a multi-step process application, Kianda’s form builder and versatile controls will help you achieve your goals with minimal coding effort.
To access the form builder in Kianda, ensure you have admin rights within your workspace. Once logged in, navigate to the top right corner of the screen and click the cog icon to open the admin menu.
From there, select the “Designer” menu to open the designer page where all process designs are listed. You can either click on an existing design or create a new one by filling out the necessary details in the dialog box.
Watch the video below for a visual guide on accessing the designer and selecting a process form design to start building your forms.
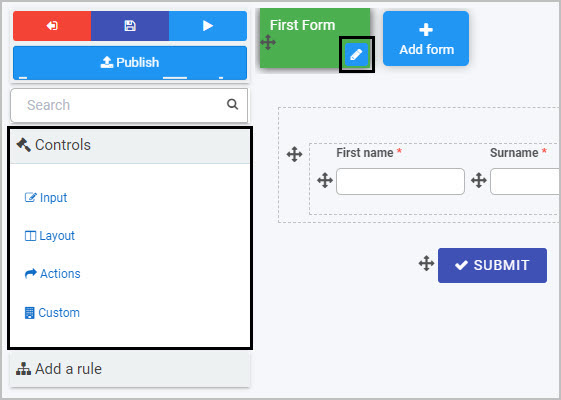
3. Understanding Controls
In Kianda, controls are the building blocks of your forms. They allow you to capture user inputs, organize the layout, perform actions, and even create custom functionality.
Controls are grouped into four main categories: Input, Layout, Actions, and Custom. Each category serves a distinct purpose, helping you create interactive and responsive forms tailored to your business needs. The table below lists the controls available under each category.
Input Controls
Layout Controls
Action Controls
Custom Controls
Text Box
Panel
Button
Custom controls created using HTML, Handlebars, and JavaScript
List (Dropdown, Radio Button, Multi-select, Checkbox)
Dialog Box
Link
Number
Rich Text
Date
Field Group
File
Table
User Picker
Toggle
Signature Pad
4. Adding Controls to a Form
Adding controls to a form in Kianda is a straightforward process. Once you have accessed the form builder, you can drag and drop the desired controls from the control panel onto your form canvas.
Each control can be customized through its properties, which are displayed on the right side of the screen. You can configure settings such as visibility, required fields, responsiveness, and more. This intuitive interface allows you to quickly build and modify forms to suit your specific needs, ensuring an efficient and user-friendly experience for end-users.
5. Making Forms Mobile Responsive
Ensuring that your forms are mobile responsive is essential for providing a seamless user experience across different devices. Kianda’s form builder allows you to design forms that automatically adjust to various screen sizes, from desktops to tablets and smartphones. Using the responsive layout options available in the form builder, you can define how each control should behave on different devices. This ensures that your forms remain accessible and user-friendly, regardless of the screen size.
To make a form mobile responsive, start by configuring the layout settings of each control. In the properties panel, you can specify the number of columns a control should span on different screen sizes, following the Bootstrap grid system.
For example, you might set a text box to take up half the width of the screen on a desktop (6 columns) but adjust it to full width (12 columns) on a mobile device. This flexibility allows you to optimize the layout for better readability and ease of use on smaller screens.
Additionally, you can group controls using layout elements like panels and field groups to maintain a clean and organized structure. These grouping elements can also be configured for responsiveness, ensuring that related controls stay together and display cohesively on all devices. By leveraging Kianda’s responsive design features, you can create forms that provide a consistent and efficient user experience, enhancing usability and satisfaction for both desktop and mobile users.
6. Advanced Control Configuration
Advanced Control Configuration in the form builder allows you to tailor each control to meet specific requirements. Each control type has a unique set of advanced options that can be configured to optimize functionality and user experience. Here are the detailed configurations for some of the common control types:
Textbox Control
Mode: Single line of text, Multiple lines of text, Rich text - Sets the type of text input allowed.
Text style: Normal, Capitalize, Uppercase, Lowercase - Adjusts the text appearance.
Control type: Text, Password - Determines the kind of data the control will handle.
Auto fill: Default, Off - Enables or disables automatic suggestions.
Placeholder: Text displayed inside the textbox as a hint.
Expression: An expression in JavaScript that can add references to other fields - Allows dynamic value calculation.
Number Control
Display format: Default, Integer, Currency, Percentage - Specifies how the number is formatted.
Show number up-down arrow: Yes / No - Displays arrows for incrementing/decrementing the number.
Enable native number input on mobile: Yes / No - Allows native mobile number input.
Decimal places: Sets the number of decimal places allowed.
Placeholder: Text displayed as a hint inside the number input.
Expression: Same as the textbox - Allows dynamic value calculation.
List Control
The list control is a versatile control that can bind directly to data sources such as databases or other process data.
List source: Entered manually, Form data, Data source - Determines where the list data comes from.
Display format: Dropdown list, Radio list, Multi select, Checkbox list - Sets how the list items are displayed.
Filter mode: Starts with, Contains - Controls the filtering behavior of the list.
Enable native selector on mobile: Yes / No - Allows native mobile list selection.
Date Control
Display format: Date, Date and time - Sets the type of date input allowed.
Allow manual entry of date format?: Yes / No - Allows manual date input in a specified format.
Adjust to user timezone?: Checkbox - Adjusts the date/time according to the user’s timezone.
Set default date onload?: Yes / No - Sets a default date when the form loads.
Enable native picker on mobile: Yes / No - Allows native mobile date selection.
File Control
Save location: Selector of the data source where files are uploaded to - Specifies where the files are stored.
Open file behavior: Download, Open in browser - Determines how the file is accessed after upload.
Folder structure: None, Process(ID), Process/Form, Custom - Organizes files within specific folders.
Allow file override: Yes / No - Permits or restricts file overwriting.
Allow remove file: Yes / No - Allows files to be deleted.
File name options: Original file name, Auto generated, From form field - Sets the naming convention for uploaded files.
File extension: Specifies allowed file types.
Enable media capture: Yes / No - Enables capturing media directly through the form.
Button text: Customizes the upload button text.
Button icon: Sets an icon for the upload button.
Enable background upload: Allows files to be uploaded in the background.
Enable chunked upload: Allows large files to be uploaded in chunks.
User picker Control
Selection mode: Single, multiple - Specifies if multiple users can be selected.
Member of group: Limits the selection of users from single group.
Selection options: Users, Groups, Partners (External users) - Defines what type of principals can be selected.
Default to current user: Yes / No - Auto select the current user in the picker control.
Toggle Control
Toggle control allows the capture of Boolean type of content using (Yes / No by default)
Value when enabled: Specifies specifies the value when the toggle or checkbox is selected.
Value when disabled: Specifies specifies the value when the toggle or checkbox is un-selected.
Display mode: Toggle, Checkbox - Defines what type of control will be used (Checkbox or a toggle control).
Table Control
Allows the capture of tabular or repeating data. Table control can include panel as the single column that in itself can contain other controls. This makes the table controls a flexible control for both tabular format data as well as for repeating data structures.
Add row text: The button text for the add new row button of the table - Customizes the text for the add row button.
Page size: Table paging size - Sets the number of rows per page.
Enable adding rows: Yes / No - Allows users to add rows.
Enable removing rows: Yes / No - Allows users to remove rows.
Show row count: Yes / No - Displays the number of rows.
Enable sorting: Allows table columns to be sorted.
Enable search: Enables search functionality within the table.
Add first row on load: Automatically adds the first row when the form loads.
Enable export to CSV: Allows exporting table data to a CSV file.
Panel Control
Enable panel security: Enables settings to apply dynamic security to a panel - Secures panel content based on conditions.
Color scheme: Options to choose color for the panel - Customizes the panel color.
Dialog Control
Dialog size: Default, Large - Defines the size of the modal dialog.
Hide Ok, Hide Close: Options to choose hide the default modal dialog buttons.
Button Control
Enable button security: Same as panel security - Secures button actions based on conditions.
Button size: XL, L, M, S, XS, Default - Sets the size of the button.
Block button: Yes / No - Makes the button span the full width of its container.
Align button: Left, Center, Right, Default - Aligns the button within its container.
Color scheme: Various color options - Customizes the button color.
Icon: Sets an icon for the button.
Show in form body: Yes / No - Controls whether the button is displayed within the form.
These configurations ensure that each form control can be finely tuned to provide the best user experience and functionality, making your forms not only more powerful but also more adaptable to specific needs.
7. Testing Your Form
The Previewer allows true iterative development, by providing a testing mechanism to give insights that lead to further developments. Each process version can be saved as a draft, with options to restore to earlier versions if needed.
Testing Form Functionality
While in preview mode the user can test in detail and using multiple screen sizes the form they are working on. Rules and other form level configuration will behave just like it would for end users.
Debugging Common Issues
To debug and step through the form the user might click the debug button
Connecting to data sources is a crucial aspect of building robust and dynamic process applications in Kianda. By integrating external data, you can enhance the functionality and relevance of your forms, automate data-driven tasks, and ensure seamless communication between different systems within your organization.
This section will guide you through the basics of managing data sources in Kianda, enabling you to create more powerful and efficient applications.
You will learn how to access and configure data sources using Kianda’s administration menu. We will cover the process of registering new data sources, integrating them into your process apps, and utilizing them effectively to meet your business needs.
Additionally, you will gain insights into best practices for maintaining and optimizing data source connections, ensuring your applications run smoothly and securely.
Before you begin, ensure you have admin privileges within your Kianda workspace, as managing data sources requires access to administrative functions. A basic understanding of the types of data sources you will be working with (such as databases, web services, or file systems) will also be beneficial.
With these prerequisites in place, you are ready to start leveraging the full potential of Kianda’s data source integration capabilities.
2. Accessing and Registering Data Sources
To manage and integrate data sources within Kianda, you need to access the Data Sources administration menu.
This section will guide you through the steps to navigate the admin menu, understand the data sources landing page, and register a new data source in your workspace.
Navigating to the Data Sources Admin Menu
Access the Admin Menu
Click on the cog icon located at the top right corner of the screen to open the admin menu.
Select Data Sources
From the admin menu, select the “Data Sources” option to access the Data Sources management page.
The Data sources management page displays a list of all registered data sources in your workspace that can be managed centrally.
Registering a New Data Source
Click on the “Add new” button located at the top of the Data Sources management page.
Select a Data Source Type. Choose from a variety of supported data sources such as:
Office 365, SharePoint, SQL Server, Salesforce, DocuSign, MySQL, Oracle, SAP, Active Directory, SOAP Service, REST Service, File System, Email, FTP, Dropbox, PowerShell, Global Payments, Google Drive, Stripe, Autodesk, Procore.
Configuring a New Data Source
After selecting the type of data source, you will be prompted to enter the necessary configuration details.
Example: Configuring a MySQL Data Source
Display Name: Enter a descriptive name for the data source.
Server: Enter the server address (e.g., serverA.company.com).
Database: Enter the database name (e.g., products).
User: Enter the username for accessing the database.
Password: Enter the corresponding password.
Test Connection: Click to verify that the connection details are correct.
By following these steps, you can efficiently access and manage data sources in Kianda. This foundational step is crucial for integrating external data into your process applications, enabling you to build more dynamic and data-driven solutions.
Once your data sources are registered and configured, you can start integrating them into your process apps using list controls and CRUD rules, which will be covered in the next section.
3. Integrating Data Sources with Process Apps
Integrating data sources with your process apps in Kianda allows you to dynamically read and display data from external databases directly within your forms.
There are two primary methods to achieve this: using the List control for direct binding to data sources and utilizing the Find Items rule. These tools enable you to create forms that interact seamlessly with your data sources, providing real-time access to essential data.
The List control in Kianda can be directly bound to a data source, making it a powerful tool for displaying data within your forms. When configuring the List control, you can select the desired data source using the data source picker.
Once selected, additional fields are provided to fine-tune the data binding. The Display field specifies the column from the data source that will be shown to users as the display value, while the Value field determines the column that will hold the actual value.
This setup is particularly useful for dropdown lists, radio buttons, multi-select options, and checkbox lists, allowing you to populate these controls with data directly from your databases without requiring additional coding.
By leveraging the List control and the Find Items rule, you can effectively integrate data sources with your Kianda process apps, providing a dynamic and interactive experience for users.
These tools enable you to seamlessly read data from external databases, enhancing the functionality and usability of your forms. In the next section, we will explore how to configure and utilize these controls and rules in detail, ensuring you can implement these integrations smoothly and efficiently.
3.1. List Control Data Binding
3.2. Find Items Rule (Data Query)
Another robust method for reading data into your forms is the Find Items rule. This rule is used to execute a data retrieval (Select) operation from any configured data source and map the results into various controls within your form.
The Find Items rule allows you to set conditions for filtering data and specify how the retrieved data should be mapped to form fields or table controls. When mapping to a non-table control, only the first result of the query is mapped.
Additionally, the Find Items rule includes a sort order and max rows setting to limit the number of results returned. This feature is particularly useful for displaying query results in a table control, providing a dynamic way to present and manage data within your forms.
3.3. Saving Form Inputs to Data Sources
Writing data to data sources in Kianda is a crucial functionality that allows users to take input from forms and persist it into various external systems.
This can be achieved using the Create Item rule, Update Item rule, and Delete Item rule, which together with the Find Items rule, provide full CRUD (Create, Read, Update, Delete) operations.
These rules are not limited to databases but can also be applied to non-database data sources such as REST APIs or third-party services, making them extremely versatile for various integration needs.
The Create Item rule is used to insert new records into a data source based on user input from a form. This rule supports the creation of one item at a time and, when working with databases, it translates into an INSERT statement.
The rule employs a visual transactional logic represented by three panels: Input Mapping, Success Mapping, and Error Mapping. These panels allow you to define what data should be sent to the data source, how to handle successful transactions, and how to manage errors.
This conditional logic enables complex workflows where subsequent actions can be triggered based on the success or failure of the initial data write operation.
Similarly, the Update Item rule is used to modify existing records in a data source. It can update multiple items in a single operation, which corresponds to an UPDATE statement in database terms.
This rule includes a flag to automatically ignore blank values, ensuring that only specified fields are updated. Like the Create Item rule, the Update Item rule uses the same transactional logic with Input Mapping, Success Mapping, and Error Mapping panels.
This allows developers to conditionally execute additional logic based on the outcome of the update operation.
The Delete Item rule completes the set of CRUD operations by allowing the removal of records from a data source. Together, these rules provide a robust framework for interacting with external data sources, enabling dynamic and responsive process applications.
By combining these data rules with the Find Items rule, Kianda users can create comprehensive data management workflows within their forms. For example, a process could begin with a Find Items rule to retrieve existing records, followed by an Update Item rule to modify those records, or a Create Item rule to add new records based on user input.
This seamless integration of reading and writing data ensures that Kianda forms can handle complex business scenarios, making your process applications both powerful and flexible.
4. Best Practices
Implementing best practices when integrating and managing data sources in Kianda ensures that your process applications are secure, efficient, and maintainable. Here are some key recommendations to follow:
Performance Optimization
Optimizing the performance of your data interactions is crucial for maintaining responsive and efficient applications. When designing forms, use server-side filtering and pagination to manage large datasets effectively, avoiding the need to load extensive data sets into the client-side.
For frequent data interactions, enable caching where appropriate to reduce the load on your data sources and improve response times.
Additionally, optimize your queries and rules to retrieve only the necessary data, and use indexed columns in your databases to speed up search operations.
Kianda automatically performs server side paging and filtering under the hood to ensure that the application is fast and responsive to users.
Security Considerations
Securing your data connections is paramount. Restrict access to data sources based on the principle of least privilege, ensuring that only authorized users and services can read or write data.
Utilize Kianda’s security features, such as data source security, enabling security settings for panels and buttons, to further control access and actions within your forms.
Managing Data Source Changes
Change management is an essential aspect of maintaining data source integrations. Document your data source configurations and changes meticulously.
Before making changes to live data sources, test them thoroughly in a development or staging environment to ensure they do not disrupt existing processes. Implement fallback mechanisms and error handling in your forms to manage unexpected issues gracefully.
Regularly review and audit your data source configurations to ensure they remain aligned with your organizational policies and performance standards.
5. Data source connectors in Kianda
Data Source
Description
Office 365
Microsoft’s cloud-based suite for office applications, including email and collaboration tools.
SharePoint
Microsoft’s platform for document management and collaboration.
Enterprise resource planning (ERP) software to manage business operations and customer relations.
Active Directory
Microsoft’s directory service for Windows domain networks.
SOAP Service
Protocol for exchanging structured information in the implementation of web services.
REST Service
Architectural style for designing networked applications.
File System
System that controls how data is stored and retrieved on a computer.
Email
Email protocol support for sending and receiving messages.
FTP
Protocol for transferring files between systems over a network.
Dropbox
Cloud storage service for file sharing and collaboration.
PowerShell
Task automation framework from Microsoft, consisting of a command-line shell and scripting language.
GlobalPayments
Payment technology services for processing transactions.
Google Drive
Cloud storage service from Google for file storage and synchronization.
Stripe
Online payment processing for internet businesses.
Autodesk
Software applications for 3D design, engineering, and entertainment.
Procore
Construction management software for project management, scheduling, and collaboration.
Custom
Developers can develop their own data connectors using micro-services and common schema.
This table provides a brief description of each data source, helping you understand the various integration options available in Kianda.
6. Summary
In this guide, we covered the essential steps to connect and integrate data sources with your Kianda process applications. From accessing and registering data sources to reading and writing data, these functionalities enable you to create dynamic, data-driven forms.
By following the best practices outlined, you can ensure your applications are secure, efficient, and maintainable. With these skills, you are well-equipped to leverage Kianda’s powerful data integration capabilities to build comprehensive business solutions.
In Kianda, rules form the backbone of dynamic and robust process applications. They enable you to define logic that responds to user inputs, automates tasks, and integrates with various data sources and external systems.
By leveraging more than 60 built-in rules, along with the ability to create custom rules using JavaScript, Handlebars, and HTML, you can design process apps that are both flexible and powerful.
This guide will introduce you to the concept of process logic within Kianda, emphasizing the critical role rules play in creating responsive and efficient workflows. You’ll learn how to use rules to control the behavior of forms and fields, automate communications, manage data, and integrate with user and file management systems.
Whether you are hiding a field based on user input, sending automated emails, or updating a database, rules provide the necessary logic to make these actions possible.
Before diving into the specifics, ensure that you have a basic understanding of Kianda’s interface and permissions, as well as familiarity with the types of data sources and systems you plan to integrate.
This foundation will help you navigate the various rule configurations and make the most of Kianda’s process automation capabilities.
By the end of this guide, you will be well-equipped to implement dynamic process logic that meets your business needs efficiently and effectively.
2. Understanding Rules in Kianda
Rules in Kianda are essential components that drive the behavior and logic of process applications. They provide the dynamic capabilities needed to respond to user actions, automate processes, and interact with external systems and data sources.
Understanding the different types of rules and how they can be utilized is crucial for building effective and robust process applications.
Types of Rules
Kianda offers a wide range of built-in rules that cater to various needs, grouped into categories such as Workflow, Communications, Data, Users, File Management, Tables, Dates, Actions, and SharePoint Integration. Each category encompasses rules designed for specific functionalities. For example:
Workflow Rules: Manage the flow of your process by showing or hiding fields, making fields required, navigating between forms, and starting or scheduling processes.
Communications Rules: Automate sending emails, meeting requests, and user alerts and push notifications.
Data Rules: Handle CRUD operations (Create, Read, Update, Delete) on data sources, enabling dynamic data management within your forms.
User Management Rules: Manage user properties, look up users, and invite partners to processes.
File Management Rules: Perform operations on files, such as copying, converting to PDF, generating documents, and creating anonymous links.
Table Management Rules: Manipulate table data by adding, removing, sorting, and aggregating rows.
Date Rules: Manage date-related operations, such as adding time, calculating intervals, and comparing dates.
Action Rules: Perform actions such as validating input, submitting forms, and saving or closing forms.
SharePoint Integration Rules: Integrate with SharePoint to manage lists, sites, groups, and permissions.
Custom Rules
In addition to the default rules, Kianda allows developers to create custom rules using JavaScript, Handlebars, and HTML. This feature provides the flexibility to implement bespoke logic and functionalities tailored to your specific business requirements.
Custom rules can be used to extend the capabilities of your process applications, offering advanced control over how your processes operate.
Rule Categories and Their Uses
Each rule category in Kianda serves a specific purpose and is designed to address particular aspects of process automation:
Workflow Rules: Ensure that the right actions are taken at the right time within your process, maintaining control over the flow and state of forms and fields.
Communications Rules: Facilitate automated communication with users, keeping them informed and engaged throughout the process.
Data Rules: Enable seamless interaction with data sources, ensuring that your forms are always up-to-date and can perform complex data operations.
User Management Rules: Allow for dynamic user interactions, making it easy to manage user-related information and permissions.
File Management Rules: Provide robust file handling capabilities, essential for processes that involve document management.
Table Management Rules: Offer powerful tools for managing tabular data, which is often crucial for business applications.
Date Rules: Simplify date manipulations, making it easier to work with time-sensitive data.
Action Rules: Automate common actions, improving the efficiency and responsiveness of your forms.
SharePoint Integration Rules: Seamlessly connect with SharePoint, leveraging its capabilities for document and user management.
By understanding these categories and the specific rules within them, you can effectively plan and implement dynamic process logic in Kianda. This foundational knowledge will enable you to create process applications that are not only functional but also highly adaptable to your business needs.
3. Creating and Managing Rules
Creating and managing rules in Kianda is a straightforward process that allows you to implement complex logic and dynamic behaviors in your process applications. This section will guide you through the steps of adding rules to controls, managing form submission rules, and configuring process load rules.
Adding Rules to Controls
Adding rules to controls is a fundamental aspect of creating dynamic forms in Kianda. Controls, such as text boxes, dropdown lists, and buttons, can have rules attached to them to define their behavior based on user interactions. Here’s how you can add rules to controls:
Select the Control: Navigate to the form designer and select the control you want to add a rule to.
Add the rule: In the left panel, find the and click on “Add a rule” to expand the section.
Choose the Rule Type: Select the type of rule you want to add from the list of available rules. For example, you might choose a “Hide or Disable” rule to conditionally hide a control based on user input.
Define Rule Conditions: Set the conditions that trigger the rule. Conditions can be based on field values, user properties, dates, and more. You can add multiple conditions and condition groups to create complex logic.
Configure the Rule Action: Specify the action that should occur when the conditions are met. For example, if the rule is to hide a control, you will specify which control to hide.
Save the Rule: Once you’ve configured the rule, click ok to apply the logic to the control.
Form Submission Rules
Form submission rules are executed when a form is submitted and marked as completed using the “Submit Form” rule. These rules are crucial for performing final validations, calculations, or data operations before the form is finalized. To add submission rules:
Access Form Rules: In the form designer, click on the form tab on the top to reveal the “Form submit rules” section under the properties panel.
Add a Form Submission Rule: On the left panel click on “Add a rule” to expand the rules section. Rules added here should be executed upon form submission. For example, you might add a “Send Email” rule to notify a supervisor that the form has been completed.
Define Rule Conditions: Similar to control rules, define any conditions that need to be met for these rules to execute. This ensures that the rules are only triggered under the appropriate circumstances.
Save and Test: Save the rules and test the form submission to ensure that all logic is executed as expected.
The “Submit Form Rule” rules can be added to a submit button to initiate the submit form event.
Process OnLoad Rules
Process load rules are executed when a process is loaded. These rules are useful for pre-loading data, initializing form fields, or performing any setup operations required when the users opens the process. Here’s how to configure process load rules:
Open On Load Rules: In the process designer, click the title of the process on the top bar above the save button". This will reveal the “On load rules” on the properties panel on the right.
Add Onload Rules: Select “Add a rule” under left panel to expand the rules section. Choose the type of rule you want to execute when the process loads, such as “Find Items” to pre-load data into the form.
Define Conditions and Actions: Set the conditions that trigger the rule and specify the actions to be performed. For example, you might set a condition to check if certain data is available before populating the form fields.
Test the Process Load: Save the rules and load the process to verify that the onload rules execute correctly and the form is initialized as intended.
By mastering the creation and management of rules in Kianda, you can build highly dynamic and responsive process applications. These rules allow you to automate tasks, enforce business logic, and create user-friendly forms that adapt to various inputs and conditions, ultimately enhancing the efficiency and effectiveness of your workflows.
4. Rule Conditions
Rule conditions in Kianda provide the logical framework that determines when a rule will execute. These conditions are essential for implementing dynamic behaviors in your process applications, ensuring that actions are only taken when specific criteria are met. Understanding how to configure and use rule conditions is crucial for building robust and responsive process apps.
Overview of Rule Conditions
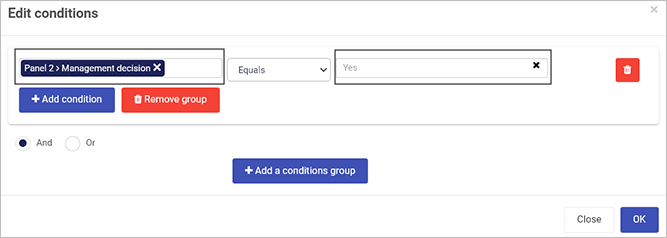
Rule conditions are the building blocks of logic within Kianda rules. They define the “if-then” scenarios that control the execution of actions in your process apps. Each rule can have an unlimited number of conditions, allowing you to create complex and nuanced logic. Conditions can be based on various factors, such as field values, dates, user properties, and more.
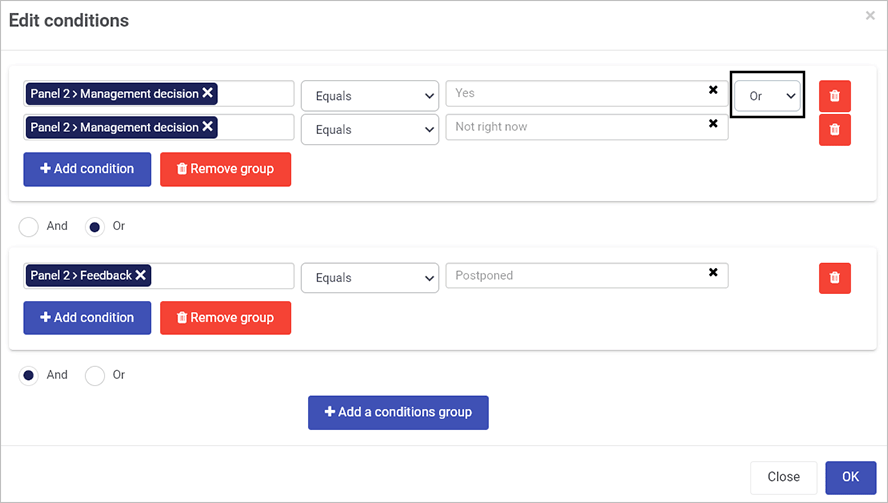
Condition Groups and Conditions
Rule conditions are composed of condition groups and individual conditions:
Condition Groups: These act like parentheses in logical expressions, grouping multiple conditions together. You can define whether all conditions within a group must be met (AND logic) or if meeting any one condition is sufficient (OR logic).
Individual Conditions: Each condition represents a specific logical test, such as checking if a field equals a certain value or if a date falls within a specified range. These conditions form the criteria that must be evaluated to determine whether a rule should execute.
The conditions visual editor provides a visual editor in the process designer that enables developers easily author conditions for use in many logical scenarios.
Here is an example JSON representation of rule conditions:
The above is only for illustration, developers use the visual conditions editor above to achieve the desired conditional logic.
Example of Rule Conditions
Consider a rule designed to hide a specific form field based on user input. The rule might include conditions that check if a text box contains a certain value. If the condition is met, the field will be hidden. This is an example of a hide/show rule with conditions:
Available Condition Operators
Kianda provides a wide range of condition operators to support various logical tests. These operators can be used to compare values, evaluate dates, check for patterns, and more. Here are some of the available condition operators:
Date Operators:
Is Today
Is Before Today
Is After Today
Is This Week
Is Previous Week
Is Next Week
Is This Month
Is Previous Month
Is Next Month
Is This Year
Is Previous Year
Is Next Year
Is Between Dates
General Operators:
Equals (eq)
Not Equals (neq)
Contains (contains)
Greater Than (gt)
Greater or Equal (gte)
Less Than (lt)
Less or Equal (lte)
Is Blank (isblank)
Not Blank (notblank)
Matches Pattern (match)
Does Not Match Pattern (nomatch)
Is Visible (isvisible)
Is Enabled (isenabled)
Is Current User or Member (IsUserOrMember)
Configuring Rule Conditions
To configure rule conditions in Kianda:
Select the Rule: Navigate to the rule you want to configure within the form or process designer.
Edit Conditions: Click on “Edit conditions” to open the conditions editor.
Add Condition Groups: Define your condition groups and specify whether they should use AND or OR logic.
Add Conditions: Within each group, add individual conditions using the available operators. Specify the field, value, or property to be tested.
Save and Test: Save your conditions and test the rule to ensure it behaves as expected under the defined criteria.
By leveraging rule conditions, you can create highly dynamic and responsive process applications in Kianda. These conditions allow you to implement precise control over when and how rules are executed, ensuring that your business logic is applied correctly and efficiently.
5. Workflow Rules
Workflow rules in Kianda are designed to manage the flow and state of forms and fields within your process applications. These rules help control visibility, required status, navigation between forms, assignment of forms, and more. Understanding and utilizing these rules effectively can significantly enhance the functionality and user experience of your process apps.
Hide or Disable
The “Hide or Disable” rule is used to control the visibility and interactivity of forms and fields based on specific conditions. This rule can hide, show or disable, enable elements dynamically, ensuring that users only see and interact with relevant parts of the form.
Use Case: Hide a section of the form unless a checkbox is checked.
Make Required
The “Make Required” rule forces a field to be mandatory based on certain conditions. This ensures that users provide necessary information before proceeding.
Use Case: Make an email field required if a “Contact Me” checkbox is checked.
Go to Form
The “Go to Form” rule sets a specific form as the current form within a multi-form process. This rule helps navigate users through different steps or stages of a process.
Use Case: Direct users to a summary form after they complete the initial input form.
Assign Form
The “Assign Form” rule assigns a form to one or more users, enabling dynamic assignment based on certain criteria. This is useful for workflows that require different users to complete different parts of the process.
Use Case: Assign a review form to a manager if the total expense exceeds a certain amount.
Process Security
The “Process Security” rule allows you to enable or disable process security dynamically. This rule helps in managing access and permissions based on specific conditions.
Use Case: Enable additional security for sensitive forms.
Start a Process
The “Start a Process” rule initiates a new process based on certain conditions. This rule can automate the initiation of related processes, ensuring seamless workflow integration.
Use Case: Start an approval process when a new request is submitted.
Schedule a Rule
The “Schedule a Rule” allows you to automate actions at specific times or intervals. This rule is useful for recurring tasks or timed actions within your process.
Use Case: Send a reminder email every Monday morning.
By effectively utilizing workflow rules in Kianda, you can create dynamic and responsive processes that adapt to user inputs and automate essential tasks. These rules ensure that your forms and processes are intuitive, efficient, and aligned with your business requirements.
6. Communication Rules
Communications rules in Kianda are essential for automating interactions and keeping stakeholders informed throughout your process applications. These rules enable you to send emails, meeting requests, alerts, and create anonymous form links, ensuring seamless communication and collaboration. Understanding how to configure and use these rules will enhance the responsiveness and efficiency of your processes.
Send Email
The “Send Email” rule allows you to automatically send emails based on specific triggers or conditions. This rule is useful for notifying users about important events, updates, or actions required.
Use Case: Send a confirmation email to a user after they submit a form.
Meeting Request
The “Meeting Request” rule automates the creation and sending of meeting invitations. This is particularly useful for scheduling meetings directly from a process without manual intervention.
Use Case: Schedule a project kickoff meeting when a new project is approved.
Anonymous Form Link
The “Anonymous Form Link” rule generates a link to a form that can be accessed without requiring user authentication. This is useful for collecting information from external users or stakeholders who do not have access to the Kianda platform.
Use Case: Create an anonymous feedback form link for external partners.
User Alert
The “User Alert” rule sends an alert or “push notification” to a specific user or group of users. This rule is useful for urgent notifications or reminders that require immediate attention.
Use Case: Send an alert to a manager when a critical issue is reported.
By leveraging communications rules in Kianda, you can automate critical interactions and ensure that all relevant parties are kept informed and engaged. These rules help maintain clear and timely communication, which is essential for the smooth operation of your processes and the overall success of your projects.
7. Data Rules
Data rules in Kianda are crucial for managing and manipulating data within your process applications. These rules enable you to perform CRUD operations (Create, Read, Update, Delete) on various data sources, ensuring your forms are dynamic and data-driven. Understanding how to configure and use these rules will allow you to build powerful, data-centric process apps.
Set Form Field
The “Set Form Field” rule allows you to dynamically set the value of a form field based on specific conditions or calculations. This rule is useful for auto-populating fields, performing calculations, or dynamically updating form content.
Use Case: Auto-fill the current date in a date field when the form is loaded.
Find Items
The “Find Items” rule queries a data source to retrieve and display data in your form. This rule is essential for populating tables, and other controls with external data based on specific criteria.
Use Case: Retrieve and display a list of active projects in a table field.
Create Item
The “Create Item” rule inserts a new record into a data source based on user input from the form. This rule is transformed into an INSERT statement when working with databases, allowing you to add new data entries dynamically.
Use Case: Add a new customer record to the CRM database when a form is submitted.
Update Item
The “Update Item” rule modifies existing records in a data source. This rule can update multiple items in one operation and includes a flag to ignore blank values, ensuring that only specified fields are updated.
Use Case: Update the status of a project in the database when a form field is changed.
Delete Item
The “Delete Item” rule removes records from a data source based on specific conditions. This rule is equivalent to a DELETE statement in database terms, allowing you to dynamically manage data cleanup.
Use Case: Delete a user record from the database if the user is marked as inactive.
By effectively utilizing data rules in Kianda, you can create process applications that are highly interactive and data-driven. These rules allow you to automate data management tasks, ensuring your forms are always up-to-date and reflecting the latest information from your data sources.
8. File Management Rules
File management rules in Kianda enable you to handle files and documents within your process applications. These rules allow you to perform various file operations such as copying, converting, generating documents, and creating anonymous links. Understanding how to configure and use these rules will help you build process apps that effectively manage and automate file-related tasks.
Copy File
The “Copy File” rule allows you to copy files from one field to another within a form or process. This rule is useful for duplicating files, maintaining backups, or distributing files across different parts of a process.
Use Case: Copy an uploaded document to a review section when a form is submitted.
Convert to PDF
The “Convert to PDF” rule converts documents to PDF format. This rule is useful for standardizing document formats, ensuring compatibility, and preparing files for distribution or archiving.
Use Case: Convert an uploaded Word document to PDF when a form is approved.
Generate Word Document
The “Generate Word Document” rule creates a Word document from process data. This rule is useful for generating reports, letters, and other documents dynamically based on form inputs.
Use Case: Generate a contract document from form data when a form is submitted.
Generate Excel Workbook
The “Generate Excel Workbook” rule creates an Excel workbook from process data. This rule is useful for generating spreadsheets, reports, and data analysis files dynamically based on form inputs.
Use Case: Generate a financial report in Excel format from form data when a form is submitted.
Set Existing File
The “Set Existing File” rule allows you to set an existing file into a file field within a form. This rule is useful for pre-populating file fields with documents that are already available in the system.
Use Case: Attach a template document to a form when it is loaded.
Merge PDF
The “Merge PDF” rule combines two or more PDF or image files into a single document. This rule is useful for consolidating related documents into a single file for easier management and distribution.
Use Case: Merge multiple PDF reports into a single document when a form is submitted.
Create File Anonymous Link
The “Create File Anonymous Link” rule generates a link to a file that can be accessed without requiring user authentication. This is useful for sharing files with external users or stakeholders who do not have access to the Kianda platform.
Use Case: Create an anonymous download link for a report when it is generated.
By leveraging file management rules in Kianda, you can automate and streamline various file-related tasks within your process applications. These rules ensure that your files are handled efficiently and securely, enhancing the overall functionality and user experience of your forms.
9. Table Management Rules
Table management rules in Kianda enable you to manipulate and manage tabular data within your process applications. These rules allow you to perform operations such as adding, removing, and sorting table rows, importing and exporting data, and aggregating values. Understanding how to configure and use these rules will help you build process apps that effectively manage and automate tasks involving tabular data.
Loop Table
The “Loop Table” rule iterates through each row in a table, allowing you to perform actions on each row individually. This rule is useful for processing data row by row, such as performing calculations or updating records.
Use Case: Calculate the total cost for each item in an order form.
Add Table Row
The “Add Table Row” rule adds a new row to a table dynamically based on specific conditions. This rule is useful for expanding tables as new data is entered or specific criteria are met.
Use Case: Add a new row to the tasks table when a new task is created.
Remove Table Row
The “Remove Table Row” rule removes a specific row from a table based on certain conditions. This rule is useful for cleaning up data and ensuring that only relevant rows are displayed.
Use Case: Remove a row from the expense report table if the expense is marked as invalid.
Import CSV
The “Import CSV” rule allows you to import data from a CSV file into a table. This rule is useful for bulk data entry, where data from external sources can be imported directly into the process application.
Use Case: Import employee details from a CSV file into an employee records table.
Export CSV
The “Export CSV” rule exports the data from a table into a CSV file. This rule is useful for generating reports and exporting data for use in other applications.
Use Case: Export a list of registered participants from an event registration table.
Copy Table Rows
The “Copy Table Rows” rule copies rows from one table to another within the same form or process. This rule is useful for duplicating data or transferring information between tables.
Use Case: Copy selected rows from a draft table to a final approval table.
Clear Table Rows
The “Clear Table Rows” rule removes rows from a table based on specific criteria. This rule is useful for clearing outdated or irrelevant data from tables.
Use Case: Clear all rows from a temporary data table after processing.
Lookup Value from Table
The “Lookup Value from Table” rule searches for a value in a table based on specified criteria and returns the matching row. This rule is useful for finding and displaying specific data within a table.
Use Case: Lookup and display the details of an order based on the order ID.
Update Table Values
The “Update Table Values” rule updates the values of specific columns in a table based on certain conditions. This rule is useful for modifying table data dynamically as form inputs change.
Use Case: Update the status of all tasks in a project tasks table when the project status changes.
Sort Table
The “Sort Table” rule sorts the rows of a table based on one or more columns. This rule is useful for organizing data in a specific order to improve readability and usability.
Use Case: Sort the items in an inventory table by item name and quantity.
Aggregate Table
The “Aggregate Table” rule performs calculations on table data, such as summing up values or calculating averages. This rule is useful for generating summary statistics and insights from tabular data.
Use Case: Calculate the total cost of items in a purchase order table.
Hide / Show Column
The “Hide / Show Column” rule allows you to dynamically control the visibility of table columns based on specific conditions. This rule is useful for customizing the display of table data.
Use Case: Hide the cost column in a budget table for non-admin users.
By utilizing table management rules in Kianda, you can efficiently handle and automate tasks involving tabular data. These rules provide powerful tools to manipulate table data, ensuring your process applications are dynamic, interactive, and data-driven.
10. Action Rules
Action rules in Kianda are designed to automate various tasks and interactions within your process applications. These rules enable you to perform actions such as validating inputs, submitting forms, saving changes, and closing forms. Understanding how to configure and use these action rules will help you build responsive and efficient process apps that enhance user experience and ensure data integrity.
Validate Input
The “Validate Input” rule ensures that form inputs meet specified criteria before allowing the user to proceed. This rule is crucial for maintaining data quality and preventing errors.
Use Case: Ensure that an email field contains a valid email address format before submission.
Field Display Mode
The “Field Display Mode” rule temporarily changes the display mode of a field or form. This rule is useful for customizing the user interface based on specific conditions or actions.
Use Case: Change a text field to read-only mode after it is filled out.
Submit Form
The “Submit Form” rule marks a form as completed and triggers any associated submission logic. This rule is essential for finalizing forms and moving to the next step in a process. Additionally, it allows defining the process status upon submission.
Use Case: Submit a leave request form after all required fields are filled.
Save Form
The “Save Form” rule saves or commits the current state of the form without marking it as completed. This rule is useful for allowing users to save their progress and return to the form later.
Use Case: Save the progress of a long survey form so users can complete it later.
Close Form
The “Close Form” rule allows the user to exit the form and navigate to another location. This rule is useful for managing form navigation and user flow. There are several options for configuring the navigation behavior:
Auto: Attempts to navigate the user to the previous page or screen before entering the form.
Return to a Dashboard: Returns the user to a specific dashboard page, useful for allowing the user to return to the process landing page.
Return to a URL: Redirects the user to another URL within or outside of the same workspace.
Go to a Process: Redirects the user to another process record or new form, useful for scenarios where you want to navigate to related records or processes.
Use Case: Close a feedback form and return the user to the main dashboard.
Delete Form
The “Delete Form” rule deletes the current form or process. This rule is useful for removing forms that are no longer needed or for cleanup operations.
Use Case: Delete a temporary form used for data collection after processing the data.
By utilizing action rules in Kianda, you can automate a wide range of tasks within your process applications, ensuring that your forms are responsive and efficient. These rules help streamline workflows, maintain data integrity, and enhance the overall user experience, making your process apps more robust and effective.
11. Best Practices for Using Rules
Implementing rules effectively in Kianda is crucial for creating dynamic, efficient, and robust process applications. Following best practices ensures that your rules are not only functional but also maintainable and scalable. Here are some key recommendations to follow when working with rules in Kianda:
Planning Process Logic
Before you start adding rules to your forms and processes, it’s essential to plan your logic carefully. Understand the business requirements and define the desired outcomes. Mapping out the process flow and identifying where and when each rule should be applied will save you time and prevent potential issues.
Define Objectives: Clearly outline what each rule is supposed to achieve. For example, ensure that a required field is always filled or that a particular action is triggered under specific conditions.
Visualize the Flow: Create flowcharts or diagrams to visualize the process logic. This helps in understanding the sequence of actions and identifying any potential gaps or conflicts.
Prioritize Rules: Determine which rules are critical and should be implemented first. Focus on core functionalities before adding more complex or conditional rules.
Combining Rules for Robust Processes
Combining multiple rules can create powerful and flexible process applications. However, it’s essential to ensure that these rules work together seamlessly and do not conflict with each other.
Layer Rules Strategically: Start with basic validation and action rules, then layer more complex conditions and actions. This approach helps in building a solid foundation and ensures that simpler rules are not overshadowed by more complex ones.
Use Condition Groups: Utilize condition groups to manage complex logic effectively. Grouping conditions allows you to apply AND/OR logic, making it easier to handle multiple criteria.
Test Incrementally: After adding or modifying a rule, test the form or process to ensure that it behaves as expected. Incremental testing helps in identifying issues early and prevents cascading errors.
Testing and Debugging Rules
Thorough testing and debugging are crucial to ensure that your rules perform correctly under various scenarios. This step helps in maintaining the reliability and integrity of your process applications.
Simulate Different Scenarios: Test your rules with various inputs and conditions to ensure they handle all possible cases. Consider edge cases and unlikely scenarios to ensure robustness.
Use Debugging Tools: Kianda provides tools for debugging and monitoring rules. Utilize these tools to trace rule execution, identify issues, and understand the flow of actions.
Review Logs and Reports: Regularly review logs and reports generated by Kianda to identify any errors or unexpected behaviors. Logs provide valuable insights into rule execution and help in pinpointing issues.
Involve Stakeholders: Include end-users and stakeholders in the testing process. Their feedback can provide valuable insights into how the rules perform in real-world scenarios and help identify any usability issues.
Documentation and Maintenance
Maintaining clear documentation and regular updates is essential for managing rules over time. Well-documented rules make it easier for team members to understand and modify process logic as needed.
Document Rule Logic: Keep detailed documentation of each rule, including its purpose, conditions, and actions. This documentation serves as a reference for current and future team members.
Version Control: Use version control to track changes to rules and processes. This practice helps in managing updates and allows you to revert to previous versions if needed.
Regular Audits: Periodically review and audit your rules to ensure they are still relevant and performing as expected. Remove or update outdated rules to maintain the efficiency and accuracy of your processes.
By adhering to these best practices, you can ensure that your rules in Kianda are well-designed, maintainable, and effective. These practices help in creating dynamic and responsive process applications that meet your business needs and provide a positive user experience.
In Kianda, pages serve as the essential interface for delivering process applications to end-users. They act as dashboards, landing pages, and reporting tools, allowing users to interact with and manage business processes efficiently. By leveraging pages, you can create intuitive and dynamic interfaces that facilitate user interaction with your process apps.
Pages are constructed using a variety of specialized widgets, which are components designed to display data, charts, lists, links, and more. These widgets follow a responsive layout system based on Bootstrap, ensuring that your pages look great and function well across different devices and screen sizes. This flexibility allows you to build customized dashboards that can handle millions of records and present data in a meaningful way.
Creating and configuring pages in Kianda is straightforward and user-friendly. With just a few clicks, you can add and arrange widgets, set up data connections, and define the layout to match your requirements.
This guide will walk you through the process of creating a new page, adding and configuring widgets, and publishing your pages to make your process apps accessible to users. By the end of this guide, you will have the knowledge needed to design and deploy powerful and interactive pages in Kianda.
2. Creating a New Page
Creating a new page in Kianda is a simple process that enables you to design customized interfaces for your users. These pages can be tailored to serve as dashboards, landing pages, or detailed reporting tools, providing users with a seamless way to interact with your process applications. Follow the steps below to create a new page in Kianda.
3. Understanding Page Widgets
Page widgets are the fundamental building blocks in Kianda that allow you to create dynamic and interactive pages. Each widget serves a specific purpose, enabling you to display data, provide navigation, or offer interactive elements to users. Understanding the different types of widgets and how to configure them is essential for designing effective pages in Kianda. Below, we explore the various widgets available and their functionalities.
Rich Text Widget
The Rich Text widget allows you to insert and format text or HTML content on your page. This widget is useful for adding descriptive content, instructions, or any custom HTML elements you need to include.
Text Content: Enter and format your text or HTML content.
Tile Widget
The Tile widget displays data expressions based on a query. It is typically used to show aggregated data such as counts, sums, or averages. Tiles are great for providing at-a-glance information and key metrics.
Data Expression: Choose between count, sum, or average.
Data Source: Select the process or data source for the query.
Icon: Select an icon to represent the data visually.
Conditional Formatting: Change the color or text of the tile based on specific conditions.
List Widget
The List widget displays tabular data based on a query. It supports data from processes or data sources and allows for various processes to be combined into a single view. The List widget is highly flexible and can include sorting, filtering, and search functionalities.
Data Source: Select the data source or process.
Columns: Define which fields to display as columns.
Sorting and Filtering: Enable or disable sorting and filtering options.
Pagination: Set the number of items per page.
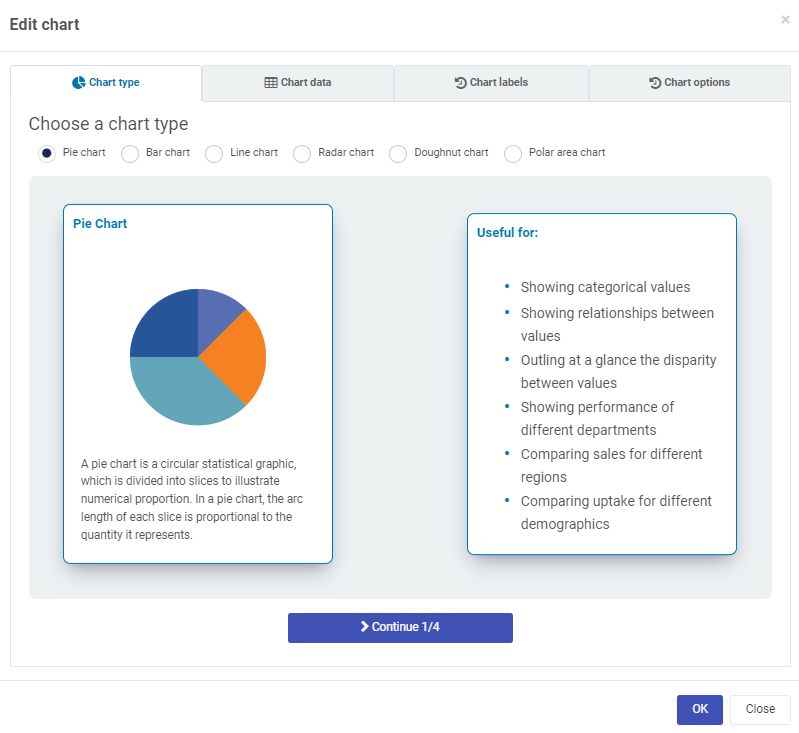
Chart Widget
The Chart widget allows you to visualize data using various chart types, including pie, bar, line, radar, doughnut, and polar area charts. This widget is ideal for presenting data trends, distributions, and comparisons.
Chart Type: Select the type of chart.
Data Source: Choose the data source or process.
Labels and Data: Define the labels and data points for the chart.
Appearance: Customize the colors, legend, and other visual settings.
Filter Widget
The Filter widget enables dynamic filtering of data displayed in other widgets on the page. It can connect to various data sources, including process data, and supports cascading filters by linking multiple filters together.
Filter Type: Choose between dropdown list, radio list, date range, free text, or current user.
Filter Options: Set manual entries or bind to a data source.
Default Value: Define a default filter value.
Widget Connections: Link the filter to other widgets on the page.
Link Widget
The Link widget allows you to create responsive link buttons for navigation. This widget can be used to guide users to different processes, pages, or external URLs.
Links: Define the text, icon, and destination for each link.
Visibility: Set visibility rules based on user roles or conditions.
Styling: Customize the appearance of the links.
Walk-through Widget
The Walk-through widget enables administrators to record and display walkthrough steps, guiding users on how to use processes and features within Kianda. This is especially useful for onboarding new users or introducing new features.
Steps: Define the steps of the walkthrough.
Target Elements: Specify the UI elements to highlight in each step.
Instructions: Provide detailed instructions and tips for each step.
General Page Widget Settings
4. Customizing Layout with Bootstrap Grid System
In addition to the individual widgets, Kianda supports custom layouts using a grid system (Bootstrap). This allows you to create responsive layouts that adapt to different screen sizes and devices.
Creating Layout Containers: Use layout containers to structure your page.
Defining Columns: Specify column spans to control the width of each widget.
Responsive Design: Ensure your layout adjusts appropriately for various devices.
By understanding and utilizing these page widgets, you can design comprehensive and user-friendly pages in Kianda that cater to your specific needs. Each widget provides unique functionalities that, when combined, create powerful and interactive interfaces for end-users.
Example Layouts
Here are some examples of common layouts you can create using the Bootstrap grid system in Kianda:
Dashboard Layout:
Header: A full-width row with a title or navigation bar.
Main Content: Two rows, each containing three columns (4 units each) to display tiles or charts.
Footer: A full-width row with footer information or links.
Landing Page Layout:
Hero Section: A full-width row with a large image or text banner.
Features Section: A row with three columns (4 units each) highlighting key features.
Call-to-Action Section: A full-width row with a call-to-action button or form.
Reporting Page Layout:
Filters Row: A row with multiple columns (e.g., 3 units each) for filter widgets.
Charts Row: A row with two columns (6 units each) for different charts.
Data Table: A full-width row for displaying a list widget with tabular data.
5. Best Practices for Designing Pages
Designing effective and user-friendly pages in Kianda requires a thoughtful approach to layout, content, and functionality. By following best practices, you can ensure that your pages are intuitive, visually appealing, and optimized for performance. Here are some key recommendations to keep in mind when designing pages in Kianda.
User-Centric Design
Designing with the end-user in mind is essential for creating pages that are easy to navigate and use. Consider the needs and expectations of your users at every step of the design process.
Understand Your Audience: Know who your users are and what they need from the page. Tailor the content and layout to meet their specific requirements.
Simplify Navigation: Make it easy for users to find what they are looking for. Use clear headings, logical grouping of content, and intuitive navigation elements.
Consistent Design: Maintain a consistent design throughout your pages to provide a cohesive user experience. Use consistent colors, fonts, and styles.
Performance Optimization
Optimizing page performance ensures that your pages load quickly and run smoothly, providing a better experience for your users.
Efficient Data Queries: Optimize data queries to minimize load times. Use pagination in list widgets to handle large datasets efficiently.
Minimalist Design: Avoid cluttering your page with too many elements. Focus on essential content and functionality to reduce load times and improve user focus.
Responsive Design: Ensure your pages are responsive and adapt well to different screen sizes. Use the Bootstrap grid system to create flexible layouts.
Effective Use of Widgets
Widgets are the building blocks of your pages. Using them effectively can enhance the functionality and interactivity of your pages.
Choose the Right Widgets: Select widgets that best meet your needs. For example, use chart widgets for visual data representation and list widgets for tabular data.
Widget Configuration: Configure widgets properly to display the correct data and provide the desired functionality. Customize widget settings to align with your design goals.
Dynamic Filters: Implement filter widgets to allow users to refine data displayed on the page. Cascading filters can provide a more interactive and personalized experience.
Consistent Styling
Applying consistent styling across your pages helps create a professional and cohesive look, enhancing the overall user experience.
Use Themes and Templates: Utilize Kianda’s theming and templating features to apply consistent styles across all your pages. This saves time and ensures uniformity.
Custom CSS: If needed, apply custom CSS to fine-tune the appearance of your widgets and layouts. This allows for greater control over the visual design.
Visual Hierarchy: Establish a clear visual hierarchy using font sizes, colors, and spacing to guide users’ attention to the most important elements on the page.
Accessibility Considerations
Making your pages accessible ensures that all users, including those with disabilities, can use your applications effectively.
Text Alternatives: Provide text alternatives for non-text content, such as images and icons, to ensure screen readers can interpret them.
Keyboard Navigation: Ensure that all interactive elements can be accessed and used with a keyboard.
Colour Contrast: Use sufficient color contrast to make text and other elements easily readable for users with visual impairments.
Regular Maintenance and Updates
Keeping your pages up-to-date and well-maintained is crucial for long-term success. Regularly review and update your pages to ensure they remain relevant and functional.
Monitor Performance: Regularly check page performance and make necessary optimizations. Use analytics to understand user behavior and identify areas for improvement.
User Feedback: Collect and analyze user feedback to identify pain points and areas for enhancement. Continuous improvement based on user feedback ensures your pages meet user needs.
Documentation: Maintain clear and detailed documentation of your pages, including design decisions, configurations, and updates. This helps in managing changes and onboarding new team members.
By following these best practices, you can design pages in Kianda that are user-friendly, performant, and visually appealing. These practices help ensure that your pages provide a positive experience for your users and effectively support your business processes.