Workspace security
There are a number of different ways of setting security within your Kianda workspace. Security refers to both access to processes as a Designer, and access to process instances.
Security privileges by role
The Kianda platform allows for different security privileges to be set for different types of users, making administration of users and their access rights easy to manage. The following are the different roles users can be assigned on Kianda – each has certain default permissions:
- User – can only access what is assigned to them. For example, forms and dashboards.
- Administrator – can access (view and edit) all published processes. Can only edit draft processes that they have created themselves or for which they have been made Process Administrators.
- Manage partners/customers – can only access the essentials to manage customer portals; that is, they can use the Invite partners function under the Administration menu.
- Design business process – can only design business forms and workflows using Kianda Designer
- Manage data sources – can only manage data sources and connections, namely the Data sources function
- Developer – can design new widgets within the platform using the Developer function
In addition to default permissions, you can also create user groups and assign ownership and/or access to processes or dashboards as needed. Security settings can be applied to dashboards or particular widgets within a dashboard so that they are only visible to certain users or groups of users; and data source connections can be configured in the same way to ensure the highest access control levels. We will now look at different ways of assigning access and controlling security.
Process administrators
When an Administrator creates a new process in Kianda, they can set who they want the Process Administrators of that process to be (anyone chosen to be a Process Administrator needs to be someone who has an Administrator role, so that they have access to the Designer function to be able to edit the process). The Process Administrators can be individual users, groups or a combination of the two.
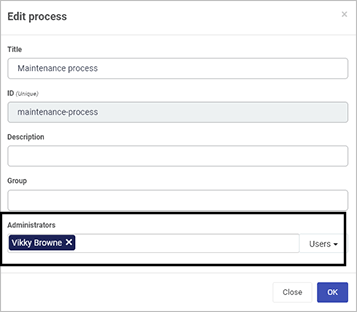
If you are an Administrator, you can edit a process you have created and set the Administrator role for that process by clicking on the Edit process button (Pen icon) in the main process view. Choose the user(s) and/or groups you want to be the Process Administrator(s) in the Edit process dialog box.
Setting process administrators in the Edit process dialog box

In the example above, Vikky was already a Workspace Administrator who had access to the Designer function in Kianda – now that she has been assigned to be the Process Administrator for the Maintenance Process, this means that she can edit the draft process design.
Form ownership
When you create a process in Kianda, you can then set a default owner for each form you create within that process. Only Form Owners can edit individual process records. For example, if a ‘Maintenance Request Process’ is initiated from a dashboard, then the default Form Owner, regardless of their role (that is, regardless of whether their ‘role’ on Kianda is ‘administrator’ or ‘user’ etc), will be able to edit information submitted in new process records from that form.
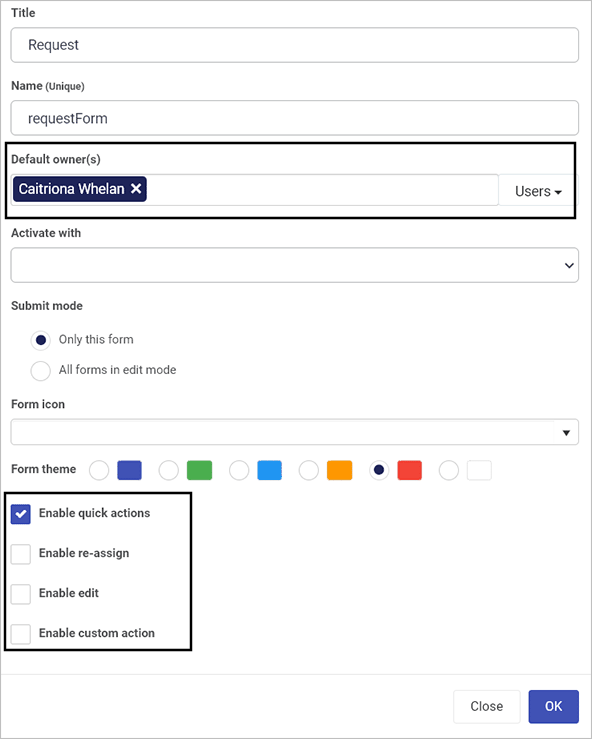
If you are a Workspace Administrator and you’ve created a new process that contains a form, you can set the default owner for that form by opening the process in Kianda Designer, selecting the form and clicking the Edit form button (Pen icon). This opens the Edit form dialog box within which you can choose from individual users, groups or a combination of both under Default owner(s).
Quick actions within forms
Within the Edit form dialog box, you can select the Enable quick actions checkbox so that options to Enable re-assign, Enable edit and Enable custom action appear. From here, a Process Administrator or form designer can give individuals, groups or a combination of both, the ability to have process instances assigned to them, to enable them to edit in process records and custom actions of their choice.
Edit form dialog box

Select the Enable quick actions checkbox, then select one or more of the checkboxes for the three options that appear below it (as shown in the image). For each of the options you select, click on the ellipsis button  and select from Users, Groups and Partners, and/or check the box to Allow form owners the particular action – for example, re-assignment means the chosen users can click on the quick action button
  in the form and reassign the form to someone else.
What’s next 
Now that you’ve learned about Workspace security, find out more about other security access levels: